Home > Article catalog > Materials and technologies > Water heated floor - advantages and features
Water heated floor in the apartment
A water-heated floor is understood as a special design placed under the floor covering and providing the floor with high-quality heating at any time of the year. This design is a closed pipe placed under the floor covering.
Peculiarities
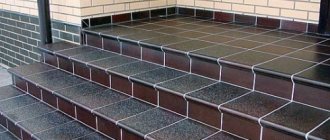
As a rule, heated floors under ceramic tiles are installed in rooms with high humidity, for example, in the kitchen, bathroom, saunas, and swimming pools. Thanks to heating, the floor covering in these rooms becomes comfortable and warm, even if you walk on it barefoot.
Floor tiles themselves are a material that is resistant to moisture and mechanical abrasion. Combined with heating, it becomes even more functional and in demand.
An electric floor heating system is one of the types of heated floors. There are also water heated floors, which are heated by water. This system is only suitable for private houses, since when used in an apartment building, there is a high probability of flooding of neighbors below, as well as interruptions in heating of neighboring apartments.
Where can I use it?
Due to the sufficient thickness and mass of the entire system, its use is limited to private housing construction. It is extremely irrational to install water-heated floors in apartments.
The main reason is difficulties with connecting the power. You can connect to the central heating system only after permission from the regulatory authorities. And it is almost impossible to get it. Even if it exists, the main leitmotif – autonomy – will disappear. We know of options for installing electric and even gas boilers in an apartment, but these are isolated cases that only confirm the rule: water heated floors are used only in private homes.
Kinds
Electric floors are based on heating cables, which can be of 2 types:
- Resistive , that is, releasing heat evenly. There are single- and double-core cables, all of them are characterized by constant resistance;
- Self-regulating , which can only be multi-core, which almost completely eliminates the risk of overheating at certain points of the cable.
Depending on the systems used and installation method, electric flooring is divided into the following types.
Cable
The floor is based on a resistive (single- or two-core) or self-regulating cable. The first system usually has a thermostat, while the second system self-regulates the temperature depending on the room conditions. For example, windows and doors heat up more intensely than areas under furniture.
However, natural uneven heating can be achieved even when using resistive cables, since during installation you can adjust the pitch of the heat cable. In areas where more heat is required, the cable is laid more tightly.
The cable sheath in such a system can withstand temperatures up to 70C. The advantage of cable underfloor heating is its good compatibility with tiles, as well as the efficiency of heating when turned on.
The disadvantages include the fact that it is not recommended for use in apartment buildings. This is due to the installation features of the cable floor.
It is laid in a concrete screed, the height of which should be about 4 cm. Thus, after installing the heating system and flooring, the height of the floor in the room rises by 5-6 cm. In addition, the load on the floors increases. Among the disadvantages of cable flooring, one can note the high energy consumption and the complexity of self-installation.
Heating mats
The mats are a reinforced mesh into which heat cables are mounted. Due to the small (no more than 3 mm) thickness of the material and their low weight, they are suitable for installation in any premises, including apartment buildings.
Depending on the type of cables used, mats with two-core cables and single-core cables are distinguished. The former have a higher cost and increased elasticity. The last indicator is important when laying cable heated floors.
If we talk about heating mats, where the cables are already laid in a mesh, there is no need to spend money on material with a more expensive two-core cable. In other words, it makes no difference whether the mat has a two-core or single-core cable.
The heating mat cables can withstand high temperatures, and the system has a thermostat. For the most effective and safe combination with tiles, when installing mats, a layer of thermal insulation is laid as the first layer.
The advantages of heating mats are ease of installation with your own hands, fast heating and the ability to regulate temperature.
However, such a system is not suitable as the only heating source. In addition, its operation will be more expensive compared to using cable electric flooring.
Film
The film floor is a thin infrared film into which carbon plates are mounted. Due to the peculiarities of its structure and functioning, such an electrical system is considered the most efficient and heat-saving.
The low weight and thickness of the film determines its versatility in use.
A special feature of the film system is the creation of a comfortable microclimate in the room - objects and people are heated, and the heated objects, in turn, give off heat to the air. The latter heats up evenly without drying out.
Another advantage of an infrared floor is that if one section of the coating fails, the system continues to work. This is possible thanks to the parallel connection of elements.
The use of film requires the installation of fiberglass mesh as the electrical system is not compatible with tile adhesive. It is worth noting that the cost of an infrared floor is higher, compared to the prices of the systems discussed above.
Rod
Rod flooring is an improved type of film flooring. The principle of its operation is also based on infrared radiation. Thanks to the use of carbon rods embedded in a polymer-based film, it was possible to achieve higher mechanical strength of the floor. This allows you to lay it even under massive interior items.
Laying the rod system does not require additional substrates; the material is well compatible with floor tiles.
Like the infrared floor, the rod version continues heating even if individual sections fail. Determining the location of dysfunction is quite simple - the floor in this place remains cold.
Naturally, having such significant advantages compared to other systems, the rod floor has the highest cost.
Water heated floor
It is a pipe system through which heated coolant circulates. The pipeline is located between the base of the floor and the top covering. Water is used as a coolant. It can be taken from the heating system, or special equipment can be used for heating. As the water passes through the pipes, it gradually cools, so in such systems it is not recommended to use pipes that are too long.
During installation, metal or polymer pipes are usually used. When choosing them, reliability and durability play an important role, because in the event of a leak, complex and expensive repairs will have to be performed.
The operation of such floors is relatively economical. Their use makes it possible to reduce energy consumption. This value in different cases can be 20-60% depending on the specific situation. The coolant temperature during operation does not exceed 50-60 degrees.
The installation is quite complicated and requires the participation of specialists.
The water heated floor is a multi-layer structure. When installing them, it is necessary to ensure high-quality thermal insulation so that the heat does not escape outside the home.
If a heated floor is installed in a residential building that was left for several days during frost, then there is a danger that the liquid in the pipes may freeze. To prevent this from happening, the system is left turned on for this time at a reduced coolant temperature or liquid is pumped out of the pipes during absence.
Electric water
In recent years, another type of underfloor heating has gained popularity, in which both electric heating and coolant circulating through pipes are used to generate heat. This type of heating uses pipes that are made of structured polyethylene. Their diameter is two centimeters. Antifreeze is used as a coolant in the pipes. A chromium-nickel electrical cable is laid parallel to them, which is in a sheath made of Teflon. Pipes and cables are covered with concrete screed.
If a leak occurs, a clearly visible stain will appear on the floor surface, which will allow you to accurately determine the location of the breakdown and take action.
The cable warms up the antifreeze, which circulates through the pipes. As a result of the heat, the liquid quickly boils, which leads to rapid heating of the floor.
An important feature of this type of heated floors is that electrical energy during their operation is consumed efficiently and at the same time economically. This system has good resistance to overheating, which allows it to be installed in the right places, including under massive furniture.
Infrared carbon floors
Infrared floors consist of heating elements filled with a carbon mixture and fixed to a polypropylene base. When exposed to current, carbon emits heat waves with a length of 8–14 microns; the waves pass through the floor covering and warm up the objects in the room (the air only slightly). A room heated by an infrared carbon floor is always very comfortable - there is no dry air, which is why we suffer so much in winter.
RavaFORUMHOUSE Member
It heats up objects: tables, stairs, walls, that’s the whole point. You open the windows wide, ventilate, and when you close everything, it’s warm again. Because not only the air is warm, but everything around it.
Infrared floors are not afraid of frost: you can come to a cold country house in winter for the weekend after a week of hellish minuses, turn on the system and it will work normally, and a comfortable temperature will be established very quickly (the system enters operating mode in 5-7 minutes, but it also cools down such a floor immediately).
Film and rod floors have their own characteristics.
| Film floor | Rod floor |
| Installed without wet processes, on a dry, flat surface under the finishing coat. Installation is quick, with the ability to dismantle the system and use it again. | Laying is carried out in a screed or a layer of tile adhesive (2 cm) with mandatory thermal insulation of the rough base. Foil materials are not allowed for the coating substrate. |
| It is not recommended under carpet, carpet tiles, linoleum on felt - these coatings reduce the heating efficiency several times. Parquet and solid boards are possible if the operating temperature of the system is not higher than 28 degrees. | Self-regulating system: if the floor temperature rises in the area under the furniture, the power consumption of the heating elements decreases. And vice versa. |
| It can be cut into pieces and placed arbitrarily - this allows you to heat only some local areas of the room: passages, places where children play, etc. | A core floor can be installed in any room; large furniture and equipment can be placed on top. |
| If any section breaks, the floor will work as before - you won’t even notice it. | Thanks to the parallel connection scheme, the system will operate stably even if several heating elements fail. |
Heating coatings of this type are used to heat stairs and porches in private homes, to prevent the formation of ice.
Calculation and installation
Work on installing a heated floor with your own hands should begin with a detailed calculation of the power of the device and drawing up a step-by-step plan for laying its elements.
It is important to keep the following aspects in mind:
- If the system is functionally a basic heating option, then its power should be 150 W/sq. m. For lower floors it can be a little more - 180 W/kV. m. The area of its installation should occupy at least 70% of the area of the entire room. If you plan to use the system as an additional one, then its sufficient power will be 110-130 W/sq.m. m. In places where furniture is permanently placed, heating elements are not installed due to possible overheating of the cable;
- The gaps between the walls and the nearest turns of the cable must be at least 50 mm, and the gap between the central heating pipes and the cable must be at least 100 mm. The interturn cable pitch depends on the power of the device, the length of the conductor and the heated area.
Н = S*100/L, where
- H – interturn distance (cm);
- S – heating area;
- L – conductor length.
The length of the conductor is calculated using the formula:
L = S*Рs/Pk, where
- S – heating area;
- Рs – required specific power per 1 sq. meter of area;
- Pk is the specific power of the conductor according to the passport per 1 linear meter.
When laying the conductor, you immediately take into account the place where it is connected to the junction box and the temperature control device. Crossing cables is not permitted.
It is very important to provide in advance in the arrangement the location of the temperature sensor, which should be placed exactly in the center of the loop at a distance of about 40-50 cm from its edge.
The procedure and features of laying a heated floor may differ depending on the type of device, but the sequence of its implementation is almost the same:
Advantages of hidden heating
One side of the attractiveness of underfloor heating systems is the concealment of utilities. Neither radiators, nor heating pipelines, nor shut-off and control valves will disturb the harmony of the interior. However, this is not the only advantage of the secrecy of the heating system.
If in living rooms the pipes do not pass through the wall ceilings and along them, this will greatly facilitate the finishing work. For leveling and applying decorative materials, the entire plane of the walls is available; in addition, there are no difficulties with cutting the floor covering; there is no need to hide the passage of pipes when installing suspended ceilings. The absence of visible communications is especially beneficial when changing layouts.
In addition to aesthetic advantages, there are also technical ones: uniform heating of the floor creates an optimal distribution pattern for warm air. Since the main emphasis is not on convection heat transfer, but on its direct radiation, there is no need to warm up the upper uninhabited zone.
This ensures a reduction in heating costs of about 10–15%. What’s most interesting is that savings here do not come at the expense of comfort: the temperature in the leg area is about 20–22 ºС, in the head area it is 3–4 ºС lower.
Design and principle of operation =»ltr»>
The design of the system does not differ in the abundance of components, which greatly facilitates the installation of a water heated floor even with your own hands. Its mandatory elements are:
- pump,
- water heater,
- pipeline,
- collector-distribution unit.
Speaking about the principles of operation of this system, a heating method is noted when air moves in the “bottom-up” direction, while the main coolant is water. It moves through pipes laid in one of the following ways:
- “Spiral” (or “Snail”), which allows you to evenly heat the entire room;
- “Snake”, which is most convenient in rooms where different temperature conditions are provided;
- a combined option where both installation schemes are used.
In addition, the operation of the system allows you to maintain optimal temperature in the room, since the difference between the upper and lower air layers is three to four degrees, which allows you to create warm feet and a pleasant comfortable atmosphere above.
A water floor will be an excellent option for heating
Types of pipes used =»ltr»>
To install a warm water floor, various types of pipes are used.
| Material | Advantages | Flaws |
| Copper | Long lifespan Resistant to microorganisms, corrosion, and temperature changes | Resistant to microorganisms, corrosion, and temperature changes Not compatible with steel products Reacts to hard water with high acidity content Expensive |
| Polypropylene | Durability Environmental safety Reasonable price | Installation temperature limitation – not lower than 15 degrees Inconvenient for installing a heated floor circuit. |
| Metal-plastic | Long service life Corrosion resistant Environmentally friendly High level of sound insulation | Afraid of open fire Lime deposits can form at the joints of connections, which leads to leaks |
| Cross-linked propylene | Resistant to temperature and pressure changes, mechanical damage Not subject to corrosion Chemical resistant Does not corrode Environmentally friendly Lasting | Does not tolerate prolonged exposure to direct sunlight When oxygen enters the structure, the service life is reduced |
All of them must have mandatory markings indicating the possibility of their use for heating devices.
To install a warm water floor, various types of pipes are used
This is interesting: Swedish stove in the interior: design features (23 photos)
What power heated floor to choose
Let's start with the fact that the floor temperature is regulated by sanitary standards (SNiP 2.04.05*91*, clause 3.16). According to this document, the floor cannot be heated above:
- 26°C - in rooms where people are constantly present (residential);
- 31°C - floor in rooms where people are temporarily (bathroom, toilet, etc.).
At the same time, the maximum heating temperature above the heating element is also limited. It should not be higher than 35°C. In fact, you feel comfortable if it’s about 26-29 degrees under your feet. It is, of course, a personal matter, but a warmer floor feels hotter.
Why do we need floor temperature? But because the required power per square meter depends on it. If you do everything according to the rules, you need to calculate the heat loss of the room, take into account the heat capacity of the materials, the presence and quality of insulation. Calculating the power of a heated floor is a whole process. But it can be made simpler.
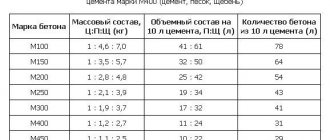
There is an “average temperature in the hospital.” The data collected on the basis of actually working structures is shown in the table.
But this does not take into account the layer of glue and the thickness of the tile. These are really “average” indicators. How can I correct them? If the adhesive layer, tiles or porcelain tiles are thick, add about 20%. This will give the required temperature. In general, it is better to take power with a reserve. There are two reasons.
- Firstly, operating at the limit damages the equipment. It breaks down faster. This also applies to heating elements.
- Secondly, in case of extreme cold or the main heating is turned off, you will have some reserve. True, an increase in the maximum power of the heating elements leads to an increase in the diameter of the wires in the power line and the power of the machines. But in electrics, a power reserve is always better than a lack. More safely.
How to improve the comfort of the bedroom?
To arrange a bedroom in a home, non-passage rooms are most often used, where it will be convenient to relax after a working day. The interior design concept uses soft and muted tones, pleasant-to-touch textures of finishing and decorative materials, and subdued lighting systems.
And, although experts recommend sleeping in a cool room, it is in this room that you want to maintain a certain temperature regime. You can heat the room through the operation of a centralized or individual heating system, but you can use other options.
Installing heating devices can reduce the harmony of the interior and individual devices can take up a lot of free space. An interesting and original solution would be to install a heated floor, a low-temperature system that will help achieve the desired temperature and maintain a cozy atmosphere.
Calculation example
In the table we have standards, but they are for one square meter. To calculate the required power for the entire room, you need to calculate the heated area. We multiply the resulting figure by the selected norm.
Let us show with an example how to calculate the power of a heated floor. We will lay the electric warm mat only in the free area. In the bathroom this is 3.5 square meters.
Based on the table, a bathroom requires 150 W of heated floor power per square meter. But we will be laying thick tiles, so we will take the power with a reserve. Let's count 180 W/m?.
A total of 180 W/m² * 3.5 m² = 630 W is required. That is, you will need to find a cable mat that will produce at least 600 W of heat over 3.5 square meters.
Electricity consumption
Electricity consumption depends on the type of floor. When laying cable systems, the consumption depends on how densely the cable is laid. In mats and film floors, the cable layout is fixed, as is the energy consumption.
For efficient operation of the floor, a certain power per 1 sq. m is required.
For interior tiles, this figure is 110-180 W/sq. m, for street ones - 2-3 times higher.
It is important to take into account the characteristics of the room. The less heat loss, the less powerful the floor heating system can be. For cold buildings, electricity consumption per 1 sq. m can reach up to 300 W. In other words, when organizing a heated floor on a balcony, for example, a more powerful version of the system is required.
The type of flooring is also important. If the power system under a wooden floor can have a power of 110-130 W/sq. m, then the tile requires an option with a power of at least 150-180 W/m. sq.
A special formula allows you to select the optimal power. For example, for a bathroom in a standard apartment (where there is central heating), the floor power is 1 sq. m averages 150 W.
This indicator should be multiplied by the area of the room, having previously excluded from it the area for plumbing and furniture. On average, this is 3 sq. m. So, we multiply 150 W/sq. m by 3 sq. m, we get 450 W.
Taking into account the resulting indicator, you can select the length of the electric floor cable. This is the optimal power value. When it decreases, the efficiency of the heated floor decreases; when it increases, unreasonable expenses on electricity cannot be avoided.
Heating time
The heating time of an electric floor depends on whether the heating system is laid directly under the tiles or built into the screed. In other words, it depends on the type of system.
There are certain forms for estimating heating time, often understandable only to specialists. In this regard, let’s discard the calculations and give the standard heating time for different types of floors:
- A heating mat laid under a 1.5-2 cm thick tile has a heating time of just under an hour (45-50 minutes);
- Cable system in a 5 cm thick screed without thermal insulation in a heated room – 2-2.5 hours;
- A similar system with thermal insulation – 1.5 hours.
Thus, the minimum heating time is demonstrated by a system of mats and films installed immediately under the floor covering. When using powerful models, the time indicator can be reduced to 30 minutes.
Compared to mats under tiles, cables in a screed take 3 times longer to warm up. However, this value can be reduced by 2 times if the screed is provided with a layer of thermal insulation. It is also necessary in cases where there is an unheated room or ground below.
When talking about floor heating time, power indicators, the location of the temperature sensor, and the features of installing thermal insulation should be taken into account.
If the power is calculated incorrectly, the system “does not work”, the floors do not warm up or take a long time to warm up. If the temperature sensor is located too close to the heating element, it reaches the desired temperature faster than the floors in the room and turns off prematurely. If there is no thermal insulation or the thickness of its layer is insufficient, heat loss exceeds the heat generated, so it seems that the floors take longer to heat up, and the desired temperature is not reached.
Control system and circuit testing
The control system for water heated floors includes:
- Pump;
- Boiler;
- Collector;
- Thermostat.
The arrangement of all elements in compliance with technical parameters is a very complex thermal engineering task. A lot of parameters are taken into account, starting from the number of fittings and the length of pipes, and ending with the thickness of the walls and the region of the country. In general terms, you can focus on the following data:
- The pump can only be used as a circulation pump. The “wet” type of pump is more reliable than the “Dry” type and less demanding to maintain.
To calculate performance, use the following formula:
P = 0.172 x W.
Where W is the power of the heating system.
For example, with a system power of 20 kW, the pump capacity should be 20 x 0.172 = 3.44 m
3
/h. Round the result up.
The pressure is calculated using a more complex technique. After all, the pipes are located horizontally, and the pump characteristics show vertical pressure. Use the following formula: H = (L * K) + Z/10. Where L is the total length of the circuits, K is the pressure loss coefficient due to friction (indicated in the pipe passport, converted to MPa), Z is the pressure reduction coefficient in additional elements
Z1 – 1.7 thermostat valve;
Z2 – 1.2 mixer;
Z3 – 1.3 valves and fittings.
Using an example, it looks like this, let’s say there are 3 circuits, 120 m each. In total there are 18 fittings, 3 thermostat valves, 1 mixer. Pipe – corrugated stainless steel ø16 mm, loss coefficient 0.025 MPa.
H = (120*3*0.025) + ((1.7 * 3) + (1.3 * 1) + (1.2 * 18))/10 = 9 + (5.1 + 1.3 + 21 .6)/10 = 11.8 m. The result is rounded up - the pump head is 12 m.
- The boiler power is calculated using the formula W = S * 0.1. Where S is the area of the house. There are also a lot of correction factors, depending on the thickness and material of the walls of the house, the climate of the region, the number of floors, and the presence of adjacent rooms.
Please note that the outlet water temperature should be more than 30 - 35˚C. To withstand this temperature, a mixer is installed in front of the collector. In it, water is mixed to the desired temperature before entering the circuit.
- The collector regulates the water supply in each circuit. Without it, the water will follow the path of least resistance to flow, that is, along the shortest circuit. The adjustment is carried out by servo drives, according to data from the thermostat.
- Thermostats monitor the temperature in controlled rooms by taking readings from temperature sensors.
Before crimping the circuit, it is washed and only then connected to the manifold. Water is supplied at normal pressure, but the temperature is increased by 4˚C per hour, up to 50˚C. In this mode, the system should function for 60-72 hours. IMPORTANT: constant monitoring is required during crimping!
At home, without the use of special equipment, it is impossible to pressurize with high pressure.
If the inspection does not reveal any installation flaws, then you can proceed to further operations.
Installation
Installing a warm electric floor with your own hands will begin with drawing up a cable laying diagram. The following recommendations help to install the floor correctly:
Cables should not be laid under stationary furnishings. Otherwise, this may lead to overheating of the elements, since there is no heat exchange between the floor and the air in the room. In addition, heating is harmful to furniture, it cracks and dries out.
Finally, heating the floor under bulky cabinets and sofas is not practical from an economical point of view.
When installing the cable from walls and stationary furniture, an indent of 0.5 cm is made; from risers and other elements of the heating system - 1 cm.
For the floor heating system to function effectively, the coverage area must be at least 70% of the room area.
You should immediately determine the location of the temperature sensor. It is located at a height of 30-100 cm from the floor and should be easy to access.
It is important to remember that heating wires are always laid in parallel.
After all calculations have been made, installation begins. The technology is the same for all types of systems and includes the following steps:
- Floor preparation - removal of old coating, leveling;
- Installing the thermostat at a height of 0.5-1 m from the floor.
- Laying shrink tape around the perimeter of the room;
- Pouring the first layer of screed;
- After the screed has dried, the mounting tape is laid, and heating cables (mats) are placed on top of it;
- Installation of temperature sensors, connection via cables of the thermostat and the electric floor system, checking them;
- Pouring the final layer of screed.
When mounting mats and films, steps 4 and 7 are omitted. When using an infrared floor, a layer of mounting mesh is laid between it and the tiles.
It is important to ensure that the surface is absolutely flat, since any bending of the cable will lead to overheating and failure. To obtain a smooth surface, leveling compounds are used.
There are 3 types of cable laying schemes using cable ties:
- Screed installation (used for kitchens, balconies under cable systems);
- On top of the screed under the tile;
- Directly onto the screed (film floors).
If the presence of thermal insulation is implied, then it must be placed between the floor and the heating system. When the humidity of the room is high, waterproofing materials are laid on top of the thermal insulation materials.
For heated rooms, foil insulation with a thickness of 2-4 mm is sufficient.
To insulate unheated rooms, it is recommended to create a “pie”: lay thermal insulation material based on polystyrene foam 5-10 cm thick under a layer of foil insulation.
Main pros and cons
The advantages of water heated floors are numerous. Among them are usually called:
- Coziness and comfort. Any heated floor is actually a large heating radiator, on which it is pleasant to walk in the winter cold, on which it is pleasant to lie with a book, and on which you can let even the smallest children out without fear of catching a cold.
- Uniformity of heat distribution horizontally. If a conventional radiator heats only near the window, then a warm water floor heats the entire room evenly, without leaving cold corners.
- Uniform vertical heat distribution. If, when using a conventional battery, warm air accumulates under the ceiling and drafts move across the floor, then a water-heated floor in the house does not allow this to happen.
- Less heat loss through the ceiling. If the ceiling is cold (and in winter it is definitely cold), hot air, rising to it, quickly cools down. But the warm air rising from the water floor has a smaller temperature difference with the ceiling, which means less heat loss.
- Less drafts. Uniform heating eliminates this problem from the room.
- Easy care. It is almost impossible to wash the battery - it is too inconvenient to get to the back of it. The water-heated floor device makes it easy to wipe with a mop or a wet rag.
- No dry air. The floor is warm, not hot, the air next to it does not become drier, which is important for people with sensitive respiratory tracts.
- Aesthetics. A heating battery can hardly be called a very beautiful accessory that can fit into any interior. It is difficult to disguise it; you need imagination and means. There is no need to mask water-heated floors - they will fit perfectly into the interior.
- Saving. Heated floors allow you to save on heating costs - they can be turned off in places where heat is not yet needed.
But besides the advantages, there are also disadvantages, which are no less:
- A room with heated floors will have to be additionally insulated. If heat loss is too high, the floors will simply become useless.
- Difficulties with installation in the apartment. It is not officially permitted to install water-heated floors in apartment buildings. You will have to visit the architectural college and collect a lot of documents.
- The thickness of the screed for water heated floors should be at least 10 cm in rooms located above the first floor, and at least 20 cm on the ground floors. This will significantly reduce the room and provide additional load on the floors.
- Expensive materials. A radiator heating system is noticeably cheaper. Moreover, to install a heated floor, a person who is not confident in his abilities is better off inviting specialists, which will also cost money.
- Possible health hazard. Constantly staying in a room with a hot floor can negatively affect the veins, which can lead to varicose veins and other unpleasant diseases.
There is one more disadvantage - not every material is suitable for making flooring for a water floor. You need to choose wisely.
Required materials and tools
To install a warm tiled floor, you need to buy a set of heating mats, as well as auxiliary materials and assemble (buy, rent from neighbors, friends) a set of tools:
a set of mats with a single or double-core cable, which should contain:
- the mats themselves;
- cold ends;
- corrugated tube;
- temperature sensor with wires;
- thermostat;
- waterproofing mastic;
- foil insulation;
- box for thermostat;
- tile adhesive;
- tile.
If the kit does not contain anything from the above list, then such an element of the system is purchased separately.
In addition, you will need:
- terminals in the form of a sleeve (one for each connection) with heat-shrink insulation;
- heat-shrink tubing;
- silicone glue.
The tools you should have on hand are:
- perforator;
- Bulgarian;
- knife or special device for removing insulation from wires;
- Phillips screwdriver;
- tester;
- construction hair dryer or lighter;
- scissors.
Concrete
Concrete pouring is carried out after laying the heat emitters and securing them securely, but this method is not suitable for apartments.
The screed takes a long time to dry and when using a water system it is almost impossible to detect a leak, which will lead to gradual destruction of the material and a decrease in heating efficiency.
General step-by-step installation technology
To install a heated floor under ceramic tiles, you need to competently perform installation work in 10 stages.
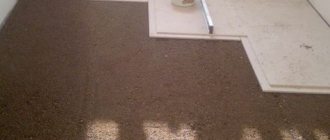
Surface preparation
The area for laying mats or cables must be level and clean. For pronounced unevenness, cracks and protrusions, it is best to use a cement screed that will hide all the flaws. If the flaws are insignificant, it is enough to fill the cracks and sand the protruding areas.
Then the floor is cleared of debris, thoroughly swept and treated with a primer.
The next stage is started only when the primer is completely dry.
Create a schema
Regardless of the type of electric floor, preparation of the thermostat is necessary. It can be powered from an already installed outlet or directly from the network. As a rule, the connection diagram for the thermostat is indicated in the instructions. Also, two channels are grooved in the wall: one for the corrugation of the temperature sensor, the second for the power wires of the heating cable.
Important! The cable and mats should be laid in such a way that there is a distance of about 10 cm from the walls.
- The easiest way to lay a cable is considered to be a snake. The mats are laid either straight or randomly in those areas where more intense heating is required. When laying the cable, both ends are led out to the thermostat, and the coupling is subsequently hidden under the tie.
- Then a temperature sensor is mounted in a special plastic pipe and all the wires powering the heating system are connected.
Water floor installation
Installation of the system is quite complicated. The project must take into account such points as the expansion of the concrete screed when heated, heat transfer and heating power.
- Before installing the system, it is necessary to lay a layer of thermal insulation material on the floor.
- A reinforcing mesh is laid on the heat-insulating layer, to which the pipes will be attached using wire. The fastening step is 1 meter.
- Pipes can be laid in a snake or spiral pattern. The distance between them should be from 10 to 35 cm.
- The distance from the pipe to the wall must be at least 7 cm.
- For high-quality heating, about 50 m of pipe is needed.
Screed
- The pipes are covered with sand-cement screed.
- The floor covering should not interfere with heat transfer.
Material calculation
The number of heating mats and linear meters of cable is calculated according to the diagram given above.
In addition you will need:
- thermal insulation materials;
- damper tape;
- connecting wires;
- tile adhesive;
- tile;
- fasteners;
- thermostat and temperature sensor;
- grounding copper cable;
- RCD protection system.
The amount of tiles and thermal insulation is calculated based on the floor area with allowances for trimming. The amount of tile adhesive will depend on the curvature of the floor.
But you can rely on the instructions from the manufacturer of the product per square meter.
Checking old electrical wiring
The larger the area of the room intended for underfloor heating, the more powerful the wiring should be. Therefore, you must first calculate the cable cross-section in terms of power, current and length so that the core does not heat up and melt the insulation.
- The calculation takes into account the rated power of the cable and electrical appliances that it must power.
- If the core diameter is too small, the wiring will have to be replaced and adjusted to the new system.
- Also, do not forget that the residual current device and the circuit breaker must correspond to the new electrical load.
Surface thermal insulation
The quality of heated floor installation will largely depend on the quality of the base insulation. A properly laid base will not only reduce heat loss, but also increase the efficiency of the electrical system.
Penofol is best suited for thermal insulation purposes. This is a modern multilayer material with a polyethylene base and a self-adhesive base. The outer part of the penofol is made of foil, which prevents heat from escaping from under the floor.
Penofol is glued to the floor, joint to joint, extending 3-5 cm onto the walls. The joints are sealed with foil tape, and damper tape is laid around the perimeter of the room, preventing direct contact with the heating elements.
Advice! For rooms with low ceilings, it is recommended to use polystyrene foam or polypropylene instead of penofol.
Installing a temperature sensor and thermostat
The thermostat is designed to turn the system on/off, as well as adjust the heating temperature. It is mounted on the wall near the outlet.
The temperature sensor is designed for independent operation of the heating system and its optimization without control by the owners. The sensor is mounted directly into the floor in a corrugated pipe laid in a groove.
It should be installed centrally between two turns of the cable. The inner end of the corrugation is insulated with sealant, the outer end is connected to the thermostat.
Control test
The cable or mats are checked before they are laid on the surface - for this purpose their resistance is measured with a multimeter. The resistance should not differ from the specified passport parameters by more than 10%.
If the indicators are within normal limits, you can begin installation.
Attaching the heating element
- The easiest way to install thermomats is to spread them along the floor plane in the selected position and connect to the thermostat.
- The cable is laid in a snail or snake pattern and secured with mounting tape. To make the work easier, you can use plastic clamps to secure the electric floor. It is very important to maintain the same distance between the turns of the cable, otherwise the site will heat up unevenly.
- After laying out the material, it is necessary to check the resistance again - it should coincide with the data of the first measurement.
Filling the screed
The screed serves as the basis for the cladding and promotes better heat distribution across the floor. Traditionally, a cement-sand screed consisting of three parts sand and one part cement is used for pouring. Water is added to them until a viscous consistency is obtained and PVA glue is added to increase the viscosity of the solution.
To save cement, crushed stone is added to the solution - 5 parts to 1 part cement. The recommended pouring thickness is about 3-5 cm.
Important! You cannot add a large amount of water to the solution, otherwise cracks will appear in the screed as it hardens.
If mats are chosen as the heating element, no screed is required - tiles can be laid directly on the film.
Laying tiles
Laying a floor with a cement screed can only be done when the mortar has set. Complete drying may take a month, but you can start covering the surface 2-3 days after pouring the screed.
Ceramic tiles are laid on a heated floor according to the same principle as on any other base.
It is better to place it on glue, which will not “steal” additional centimeters of height. The adhesive must be specially marked “warm floor” or indicate the permissible temperature range. The adhesive composition must be applied to the mat very carefully with a soft spatula so as not to damage the system.
When using a solution, you need to ensure that there are no voids in the layer, which could cause the cable to overheat.
Within a day you will be able to walk on the heated floor. It is recommended to fully start the system and grout the seams when the glue, mortar and cement base are completely dry.
Connection diagram
The final argument against underfloor heating systems is the complexity of organizing the coolant distribution scheme. If the system has more than one floor heating circuit, the installation of hydraulic manifolds with flow regulators is required.
House heating scheme with water-heated floors. A - gas heating boiler; B - combined mixing unit and collector group; B - heated floor contour. 1 - boiler with built-in circulation pump; 2 - security group; 3 - expansion tank; 4 - three-way mixing valve; 5 - circulation pump; 6 - ball valve; 7 - needle valve or valve with a servo drive; 8 — pressure reducer; 9 - flow meter
On the one hand, installation and commissioning of such complex networks are comparable to additional costs. However, all the efforts to organize heating with underfloor heating are more than compensated by the comfort of its use: each room can easily adjust its own thermal regime, while the entire system can be easily and efficiently balanced even if there are several dozen “loops”.
Otherwise, the connection of the heated floor is carried out according to the classical scheme of organizing a closed heating system with excess pressure. The only addition is the water preparation unit at the make-up inlet: since the heat exchanger consists of fairly narrow channels located at the lowest point of the system, it is necessary to remove from the water all mechanical impurities that can settle and eventually completely clog the tubes.
rmnt.ru
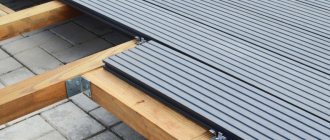
Floor installation methods="ltr">
When installing the system on a floor, which is most often wooden, you need to choose a method for installing it. The installation procedure is as follows:
- inspect the condition of the flooring;
- raise the floorboards;
- check the condition of the joists and, if necessary, replace damaged ones;
- lay thermal insulation;
- laying heated floors along joists;
- pipeline laying.
Tip: you can nail a wooden beam to the joists for additional placement of insulation.
The floor must be laid strictly according to the instructions.