Advantages and disadvantages
The floor screed method, in which expanded clay is the main material, has been used for several decades.
Nowadays, this option is gradually giving way to modern insulation, but does not cease to remain one of the most popular materials.
- good thermal insulation properties;
- high tensile strength;
- ability to withstand moisture for a long time;
- good fire safety indicators;
- absence of toxic components;
- is not a medium for the development of harmful microorganisms;
- high level of sound insulation;
- the ability to retain properties over a long period;
- not subject to destruction as a result of sudden temperature changes;
- easy to process;
- available at any hardware store;
- small price.
Despite the large number of advantages, expanded clay also has several disadvantages. You definitely need to know them so that after completion of the work you do not encounter various difficulties.
- ineffective when the screed thickness is less than 10 cm;
- water ingress will cause mold to form.
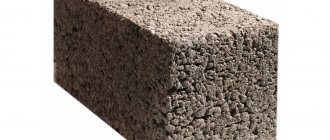
Expanded clay is a lightweight building material produced by foaming, during firing, light clay or shale. Granules measuring 1-20 mm are oval, from 21 to 40 mm - cubic, with rounded edges and corners.
This material has both pros and cons. Positive properties include:
- high strength of both the granules themselves and solutions based on them;
- low thermal conductivity;
- good noise absorption;
- chemical inertness - cannot be destroyed by chemicals, including acid and alkali;
- a light weight;
- frost resistance (unlike brick, it is not destroyed by frost);
- fire resistance;
- environmental cleanliness;
- low cost.
In addition, it has one more property that is so necessary for private construction - mice and rats do not live in it, since their passages collapse.
Expanded clay also has its disadvantages:
- actively absorbs moisture, which takes a very long time to evaporate (dry), which leads to constant dampness with subsequent destruction of the floor;
- floats in solutions, creating a corrugated surface of the screed, which requires additional costs for grinding it or pouring an additional layer of self-leveling mixtures.
Basic properties of expanded clay
Expanded clay is a lightweight porous material that is obtained by firing clay. There are several types of it, but not all of them can be used as a protective layer.
The set of properties of this material depends on many factors, the main one of which is the grain size of the fractions.
- sand - granule size ranges from 20 to 40 mm;
- crushed stone - from 10 to 20 mm;
- gravel - from 20 to 40 mm.
A high-quality waterproofing layer can only be achieved by using expanded clay crushed stone or gravel. Both of these varieties have the necessary characteristics and reliably protect the floor from moisture and cold.
- if necessary, reduce the load on the base;
- when the floor will be regularly exposed to heavy weight loads (for example, in a garage);
- during the installation of a “warm” floor;
- if you need to save sand and cement.
What kind of expanded clay is needed for screed
Depending on the size of the granules, three fractions of expanded clay are distinguished:
- 5-10 mm - expanded clay sand or sand-crushed stone mixture;
- 10-20 mm – expanded clay crushed stone;
- 20-40 mm – expanded clay gravel.
Each type has different physical and operational characteristics and is used in construction. When choosing a material for a screed, proceed from the thickness of the coating that needs to be formed. If the thickness of the screed does not exceed 30 mm, granules with a particle size of 5-20 mm are used. With a thickness of more than 30 mm - fractions with a particle size of up to 40 mm. In addition to the size of the granules, attention is paid to their density. Manufacturers offer ten brands of M 250-800. For example, for grade M 250 there are 250 kilograms of material per cubic meter. This indicator is important in cases where it is necessary to take into account the pressure on the ceiling.
With increasing density, the strength of the granules improves, but their thermal insulation ability decreases.
When dry screeding a floor with expanded clay, several parameters are taken into account: the required degree of thermal insulation, layer thickness, and permissible weight load. When creating a wooden floor on joists, you can use a large fraction up to 40 mm. It will fill the space well and create a light, heat-insulating layer. Experts recommend laying a fine fraction of 5-10 mm under slabs or penoplex. It is suitable for eliminating differences of up to 4 cm, will give the floor the required density, and will cope well with loads.
When is the use of expanded clay effective?
Having many positive properties, expanded clay is still not a universal building material. In many cases, its use is basically impossible. Therefore, it is important to know when the use of expanded clay granules is technologically justified and economically effective.
- In individual construction, expanded clay must be poured onto the ground base to create a cushion under the screed. There are simply no other materials for these purposes. At the same time, the expanded clay layer serves as a good insulator, protecting the room from the cold below.
- For large differences in height of the floor base (more than 4 cm), a thick layer of screed is required to level out the difference. The use of cement-sand mortar in such cases has a number of disadvantages:
- large weight load on the floor;
- significant labor costs;
- very expensive materials.
These disadvantages can be avoided if you use expanded clay for floor screeding in the form of bedding or expanded clay concrete.
- With a wooden floor base or a weak concrete floor, which is often found in old houses, filling the floor with expanded clay, or more precisely, using expanded clay granules for screed, will help reduce the weight load.
- If it is necessary to hide utility networks or install “warm floors,” expanded clay serves as a reliable base for pipes or cables, and also effectively serves as a thermal insulation layer, without which the “warm floor” system is ineffective.
- In the case of carrying out construction or repair work on a budget, it is impossible to do without using the cheapest material - expanded clay.
How to make a floor screed with expanded clay
Expanded clay floor screed is performed using one of 3 options:
semi-dry; expanded clay concrete; dry.
They are selected depending on the characteristics of the base, purpose and location of the room. Semi-dry screed is usually used in cases where careful preparation of the base is not required and the level difference is minimal. The main thing is to remove debris and dust and protect the granules from moisture. Its advantages include ease of installation, reduced drying time, and creation of a smooth surface.
The option with expanded clay concrete is relevant if it is necessary to eliminate large surface differences and insulate the base. The advantages of dry screed include speed of execution. A day after installation, you can begin installing the finishing coating. Regardless of the chosen installation method, it includes such steps as preparation of the base, arrangement of the base layer, and final coating.
Preparing the base
First of all, dismantle the old coating using a jackhammer or hammer drill. Then the cracks are sealed, after the solution has completely dried, construction debris is removed and dust is collected. To protect the expanded clay for floor screed from condensation, which negatively affects the quality of the base, a vapor barrier is laid as the first layer. It can be made of polyethylene with a thickness of 200 microns (for a concrete base), parchment or paper with bitumen impregnation (for a wooden floor), or other special vapor and moisture protective materials.
The vapor barrier is spread on the prepared surface. If the film consists of several parts, make an overlap of at least 15-20 cm. Along the perimeter of the walls, it must be placed on the walls 5-7 cm, secured with tape. The height should be such that it overlaps the finished base. For example, if the thickness of the expanded clay concrete screed is about 10 cm, the overlap is 15 cm. At the junctions of the walls with the base along the perimeter of the film, a damper tape is glued onto 2-sided tape. It will prevent the appearance of unpleasant squeaks during further use of the floor, and will protect the floor from deformation during temperature fluctuations.
Installation of beacons
To level the screed, beacons made of wooden blocks, metal profiles, corners, and pipes are used. They are installed using a laser level, rules, screwdrivers, and self-tapping screws. The first step is to mark the top level of the finished screed on the walls. To secure the beacons, use plaster, cement mortar or self-tapping screws.
First, install the first and last beacons, placing them at a distance of approximately 40 cm from the opposite walls. Then the remaining slats are set so that the distance between them does not exceed the length of the rule (approximately 60 cm). The supports for the beacons are positioned so that their upper edge coincides with the set floor level. In this case, the minimum screed on expanded clay followed by pouring concrete is 5-7 cm (of which 3-5 cm is the height of gravel, 2 cm is the height of mortar). The planks are fixed, aligned. The solution will take a day to set; if the planks are secured with self-tapping screws, you can immediately proceed to the next steps.
Required materials and tools
At each stage of laying floor screed you will need certain materials and tools. When preparing the subfloor you will need:
- for concrete floors - hammer drill, broom, dustpan, vacuum cleaner, concrete primer, cement, mixer, bucket, spatula;
- wooden subfloor - boards, screws, screwdriver or screwdriver, parquet putty, plane;
- soil base - expanded clay, sand, shovel.
READ MORE: DIY manifold for heated floors
Beacons are installed in two stages:
- the screed line is determined;
- Beacon guides are installed.
For the first stage you will need:
- hydraulic (laser) level;
- a simple pencil;
- construction cord or simple fishing line;
- rule;
- roulette.
For mortar beacons you need cement (alabaster, “Rotband”), sand, a spatula (trowel), a bubble level, and metal guides. Beacons on self-tapping screws can be made using a hammer drill, self-tapping screws with dowels, guides, and a level.
Making a screed using the dry method will require the purchase of waterproofing material (polyethylene film, roofing felt, bitumen, etc.), damper tape, expanded clay, plasterboard (GVL), self-tapping screws and PVA glue. You will also need: tape measure, construction knife, pencil, ruler, screwdriver.
Screeding with expanded clay concrete can be done using:
- concrete mixers;
- buckets;
- expanded clay brand M700;
- cement M400;
- river or quarry sand.
When installing a combined type of screed, you will also need a metal mesh for reinforcement.
We make a screed from sand concrete and expanded clay with our own hands
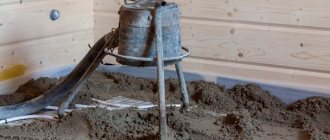
The foundation was verified, prepared, and the beacons were installed. Now you need to take tools for mixing expanded clay with sand concrete or fill the expanded clay dry, depending on the installation method you choose.
The first layer is dry expanded clay
There is nothing complicated here, you just need to pour the expanded clay onto the base and level it, making sure that the layer (the distance from it to the beacons) is at least 3 cm (the minimum thickness of the screed).
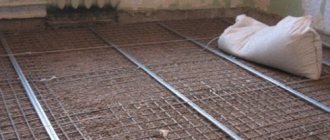
After filling the expanded clay, you need to lay a metal mesh on it. This is done to prevent the screed from cracking.
Screed on dry expanded clay necessarily requires reinforcement
There is nothing complicated, after that we fill the screed as usual.
Preparatory work
The first stage of work on installing the screed will be the implementation of mandatory preparatory measures. They are the same in all cases, so they are suitable for repairing the floor not only in an apartment, but also in a private house.
- Remove the old floor covering.
- All resulting cracks and voids are sealed with putty.
- Mark the floor using a building level.
- The base is covered with waterproofing materials (for example, dense polyethylene) or special mastic.
- A damper tape is glued along the perimeter of the floor, which will help avoid damage in the event of sudden temperature changes.
- Wide masking tape is glued to the top.
- Using a felt-tip pen or marker, mark the level of the future screed.
- Calculate the required amount of expanded clay and mortar.
The technology for laying screed requires careful preparation of the base, its hydro- and sound insulation, installation of beacons and fastening of damper tape along the entire perimeter of the wall.
The initial but most important stage in installing a floor is preparing its base.
Concrete floors are cleaned of old screed and debris, and cracks are sealed.
In the wooden subfloor, rotten and loose boards are replaced, cracks and fallen knots are sealed with parquet putty.
The soil base is leveled. A layer of expanded clay and sand is poured onto it to create a cushion under the screed. The process of preparing the base for a floor screed is discussed in detail in the material “Preparing the base for a floor screed,” which can be viewed here.
Waterproofing
The use of expanded clay in a floor screed requires mandatory work on waterproofing the screed. This is caused by the hydrophobic properties of expanded clay, as a result of which the expanded clay floor screed is destroyed under the influence of moisture.
Insulating layers can be laid under the screed, on the screed, and also, which is gaining popularity recently, on both sides at the same time.
Polyethylene film is widely used as insulating materials.
Other waterproofing materials: roofing felt, bitumen, liquid rubber, special primers, etc. are also used, but much less frequently, due to their higher cost and high labor costs.
The features of waterproofing are described in detail in the work “Waterproofing under screed” (see here).
Thermal insulation
The problem of home insulation is very relevant for individual developers. In private houses, the floor on the ground floor is either on the ground or above the basement. In both cases, it is necessary to carry out thermal insulation work.
Insulating the floor with expanded clay under the screed allows you to retain heat in the house better than modern materials - polystyrene foam and expanded polystyrene. In addition, it is easier to implement and much cheaper.
Soundproofing
Soundproofing of the floor when using expanded clay as one of the components of the screed is not performed. The function of noise absorption is performed by porous expanded clay granules.
Installation of beacons
It is impossible to obtain a flat surface of the screed without using beacons when pouring the solution. Their installation involves two stages of work:
- determining the screed line and applying it to the wall, as well as calculating the number of rows of beacons and determining their location based on the floor (a description of the procedure for performing the work is given here);
- installation of beacons.
The type of beacons is dictated by two factors: the method of waterproofing and the type of screed. Thus, the use of film and roll materials for protection against moisture excludes the installation of beacons on self-tapping screws.
Dry screed involves removing the beacon guides, which can only be done when using U-shaped profiles (the technology for installing beacons is discussed in the material “How to install beacons for a floor screed?”).
Damper tape
When screeding dry, the damper tape is attached against the floor covering so that it does not creak during operation. In other cases - to the entire thickness of the screed layer, to compensate for its expansion under the influence of temperature and humidity.
The tape is attached to the wall with a stapler or double-sided adhesive tape.
What types of floor screed are there?
There are many varieties and types of floor screed. When renovating apartments, residential premises and small offices, mainly three types of floor leveling are used, which we want to mention:
Traditional screed
Traditional cement screed using dry mixes; This is a screed made from cement, sand and fine gravel. The market is overflowing with ready-made dry solutions from different manufacturers. For floor screeding, a mixture of M - 300 is ideal, and M - 200, M - 150 are also used.
Self-leveling screed.
These are mixtures with high self-leveling properties for various purposes.
Dry leveling floors
All three types of floor screeds are distinguishable by the technological process of implementation, cost, time of completion of the work and the tasks performed. The most common method of leveling floors can be considered a cement screed using ready-made dry mixtures, since this is the least expensive method and you can level a surface with large differences.
It would not be appropriate to say that this or that floor screed is better or worse because it is simply wrong. If in your apartment or room the differences reach ten centimeters, then we level the floor with a dry mixture, but even then we cannot do without a self-leveling self-leveling floor, because in large areas and with a large layer thickness, its shrinkage cannot be avoided. This is where you will need a self-leveling floor to level the entire surface. The self-leveling floor is very good, but at the same time it is an expensive material and with such a self-leveling mixture it is good to level out differences of up to 5 centimeters.
Dry leveling floors using German technology cannot be called expensive or cheap. The advantage of such a floor is that it saves time, since after installation it does not require time to dry. This floor does not shrink, which eliminates the additional costs of a self-leveling self-leveling floor. Instead of a mixture, fine expanded clay is used, which is poured using a laser level, compacted and GVL sheets made using special technology are laid on it. Another advantage of such a floor is the solution to the issue of sound insulation.
And also one of the newest technologies (can be considered in the past tense) used in construction and renovation is adjustable floors. Floor installation is quick and not complicated; it is carried out using adjustable joists, and the result is of quite high quality. Adjustable floors perfectly solve the issue of hidden communications. The final stage of the subfloor installation is the laying of chipboard or plywood flooring; it is on this that the flooring is laid.
Calculation of expanded clay needs
A universal formula for calculating the need for expanded clay has not yet been created, since it is impossible to take into account the influence of the specific density of the material and the size of the granules on its volume. Therefore, it is impossible to calculate how much expanded clay is needed for a wet floor screed per 1 m2 without a special table.
Table of the required number of mortar components to obtain expanded clay concrete.
It is easier to calculate the amount of expanded clay with a dry screed. To do this, the volume of the backfill is determined by multiplying the dimensions of the width and length of the room by the height of the backfill (for large differences in floor height, it is averaged).
This volume is divided by the volume of expanded clay in the bag. Manufacturers indicate the volume not in m3, but in liters. Let us recall that 1 m3 = 1000 l, which makes it possible to determine the consumption of expanded clay for screed in bags.
READ MORE: How to make a floor screed: how to properly make a dry, concrete floor screed in an apartment with your own hands, step-by-step instructions and video
When using expanded clay as a component of the mortar, its quantity depends on the brand of cement, the density requirements for the screed, and the size of the granules. For the convenience of users, an average table has been calculated that allows you to determine its quantity.
| Expanded clay grade by bulk density | Expanded clay of the highest category | Expanded clay of the first category | ||
| Strength grade | Tensile strength, MPa, min | Strength grade | Tensile strength, MPa, min | |
| M250 | P35 | 0.8 | P25 | 0.6 |
| M300 | P50 | 1 | P35 | 0.8 |
| M350 | P75 | 1.5 | P50 | 1 |
| M400 | P75 | 1.8 | P50 | 1.2 |
| M450 | P100 | 2.1 | P75 | 1.5 |
| M500 | P125 | 2.5 | P75 | 1.8 |
| M550 | P150 | 3.3 | P100 | 2.1 |
| M600 | P150 | 3.5 | P125 | 2.5 |
| M700 | P200 | 4.5 | P150 | 3.3 |
| M800 | P250 | 5.5 | P200 | 4.5 |
Traditional expanded clay concrete screed
For its construction, a traditional solution made from sand, cement and water is used. The first 2 components are taken in a 3:1 ratio, and enough water is added to form a thick mixture.
If you do not want to measure out the required amount of materials, then you can use a ready-made expanded clay concrete mixture, which can be purchased at any hardware store.
- Expanded clay gravel or crushed stone is added to the prepared solution.
- The components are mixed until the granules are completely covered with the cement-sand mass.
- The finished mixture is evenly distributed over the surface of the base. Lay it down until the pre-marked level is reached.
- Leave the screed to harden for 2 weeks. If necessary, moisten the coating with water so that it does not dry out.
DIY screed device
You can screed a floor with expanded clay and cement yourself using the instructions in a more modern way. It consists of using coarse material, which is used more economically and allows you to reliably protect the floor from moisture and cold.
- A layer of expanded clay no less than 10 cm high is poured onto the base covered with waterproofing material.
- The granules are compacted by compacting with a plaster float.
- After this, prepare a solution consisting of 1 part cement and 3 parts sand. You need to take enough water so that the resulting solution has a consistency similar to sour cream.
- The resulting mixture is poured onto the expanded clay, completely covering it.
- The solution is evenly distributed over the entire surface, trying to achieve maximum evenness.
- The floor is left for 24 hours until the mixture has completely hardened.
- At the next stage of work, the reinforcing mesh is laid.
- Beacons are placed that will act as guides for pouring the screed. These parts are made from galvanized plaster profiles and attached to the base using mortar.
- Leave the structure for another day until the beacons are securely fixed.
- After the specified time, a standard sand-cement mortar is prepared and a special plasticizer is added to it. You can do without it, but this way the screed will be as strong and durable as possible.
- The finished mixture is laid out on the floor surface and leveled using a spatula.
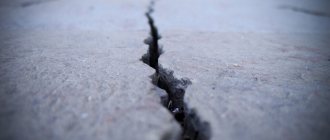
- Punctures are made in several places so that air comes out of the solution and voids do not form. If this is not done, the screed will quickly collapse.
- After 12 hours, the slightly hardened mixture is moistened with water to prevent it from cracking due to drying out.
- The surface is covered with plastic film to retain moisture.
- After about a week, cut off the protruding parts of the damper tape.
- Leave the concrete to harden for another 2 or 3 weeks.
Screed with expanded clay and cement is considered one of the most affordable ways to insulate a floor. Anyone can get involved in its construction and successfully complete the work. To avoid mistakes and large financial costs, it is necessary to study the technology in detail and take into account all its features.
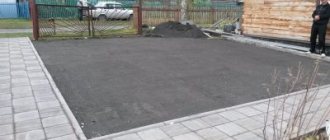
Pouring wet screed
In this case, the flooring cake consists of the following layers:
- rough screed;
- waterproofing;
- damper tape;
- expanded clay;
- guide system;
- finishing cement-sand screed.
General scheme for arranging a screed using expanded clay
Preparatory work
The first step is to carefully inspect the base. If the old coating is in good condition: there are no large cracks, signs of corrosion, peeling, etc., then you can simply remove dust and debris from it. Otherwise, you should remove the screed using a hammer drill and inspect the rough coating again. Areas with oil stains must be sanded down to the base material with a grinding machine, and all cracks must be sealed with a repair compound based on cement and sand. After the solution has dried, you need to treat the surface with a deep penetration primer.
The old concrete base must be carefully prepared
Definition of zero level
The easiest way to carry out this operation is using a laser level. It needs to be placed on the floor and turned on, and the cross-level should be pointed at one of the walls. Then, opposite this wall, screw a self-tapping screw into the floor so that it rises at least 10 cm. You need to install something long and even on the head of the self-tapping screw, for example, a rule or a building level, and put a mark on the tool at the intersection of the beam and the rule. Then the same procedure should be repeated against the other wall. If the mark on the rule is higher or lower than the beam, you need to adjust it by screwing in or unscrewing the screw.
The laser level gives absolutely accurate results, but it is an expensive tool
As a result, 15 screws should be installed near each wall, all of them will be located at different distances from the floor. It is necessary to find the highest and lowest fasteners and calculate the difference in their heights - this will be the blockage of the floor. Beacons should be placed taking into account the exposed fasteners.
On a note! If you don’t have a laser level, you shouldn’t buy one for one-time use; you can buy a hydraulic level. It is a regular tube that is filled with water.
You also need to select the wall from which the beating will be carried out, and measure 1.5 m from the floor; it is easier to work at this height. Make a mark at this level, then lean the tube against it so that the water level is opposite it. If one person is working, the handset should be secured. If there are two, then one holds, and the second brings the opposite end to the other wall to a height of 1.5 m. If the water level is opposite the mark, then the floor is not blocked. Otherwise, you need to raise or lower the tube to get the water to the edge. Where this happened, you need to put an end to it.
So, put 4 points on each wall, find the highest and lowest, calculate the difference and subtract the resulting number from 1.5 m. Then, from the first point, measure down the resulting number of centimeters - this will be the zero level.
The accuracy provided by the hydraulic level is quite sufficient for marking the level of the finished floor
Hydro- and vapor barrier
As already mentioned, expanded clay is highly hygroscopic, so it is important to protect it from moisture. If a floor with expanded clay is being poured in a private house, then it is better to opt for roll waterproofing. It is recommended to lay roofing felt or other similar material using the hot method; the strips should be laid with an overlap of 10 cm.
If the expanded clay concrete screed is poured over a concrete base, then you can limit yourself to polyethylene film or coating waterproofing. At this stage, it is also important to lay out all utility lines, which should be hidden in a plastic corrugated box.
After this, it is necessary to glue the lower part of the walls, stairs and other structural elements with damper tape, which will protect the surfaces from cracking due to linear vibrations of the screed. The tape has an adhesive surface, making it easy to install.
Polyethylene film is considered the cheapest option for waterproofing, but it is not advisable to lay it under a wet screed
First fill option
- Sprinkle expanded clay onto the waterproofing layer. For this purpose, material with a large grain is more suitable, since it produces less dust. The backfill layer is made such that there is a height reserve of approximately 3 cm for subsequent concrete screed. Next you need to compact the layer using a plaster float.
For screeding, it is better to use expanded clay of large and medium fractions
- Prepare a cement-based liquid solution, the so-called milk, and pour it over the expanded clay. This is necessary for the expanded clay gravel to adhere. You can also pre-mix expanded clay with milk in a concrete mixer and then pour it in. The layer dries in about a day.
- At the next stage you need to make a reinforcing mesh. To do this, install low pads made of ceramic tiles, pieces of concrete, and so on on the surface. In addition, you can purchase special plastic products.
There are special supports for installing the reinforcement cage
- After installing the mesh, it is impossible to use metal profiles for pouring, so you need to prepare a cement-sand mortar and apply it over the entire surface of the floor. Beacons should be installed on the resulting slides and aligned with the zero mark and the building level. They are mounted every meter to make it more convenient to work as a rule.
Metal beacons are conveniently installed on plaster pyramids
- After the solution holding the beacons has set, you need to prepare the usual composition of 1 part cement, 3 parts sand and water, and you can add plasticizers. The mixture is applied between the beacons with a reserve, after which it is carried out in a zigzag manner along the guides. The remaining material on the blade should be spread over the untreated areas.
- Remove the beacons from the concrete, and seal the resulting grooves with mortar, using the finished coating as a level.
The beacons are pulled out of the solution a few hours after pouring, when the mixture just begins to set
- After pouring and leveling the entire area to be treated, it is necessary to leave it to dry for a day, then slightly moisten the surface to prevent cracking. This procedure must be repeated every 1–2 days. You can also wet the coating once and cover it with plastic wrap.
- After a week, you are allowed to walk on the screed. After this time, excess damper tape and waterproofing film should be cut off.
Expanded clay concrete screed in section
Second way
In this case, it is necessary to prepare two types of solution. One consists of cement, sand and expanded clay in proportions 1:2:3. First, water is poured into the concrete mixer, then expanded clay is added so that it has time to absorb a sufficient amount of moisture, after which cement and sand are poured. The second solution is a regular cement-sand mixture with water.
First, a composition with expanded clay is laid; its layer should be approximately 1/4 of the total thickness of the pie. After leveling, pour in the usual solution and repeat the sequence again. The result is a coating of 4 layers, the top one being the finishing concrete screed. Expanded clay screed in this case is a little “colder”, but this can save a little time.
The presence of a finishing cement-sand screed provides a perfectly smooth coating
Third method
Here, a screed with expanded clay consists of one type of mortar: a mixture of expanded clay, sand and cement, to which water is added. It is important to remember that expanded clay is much lighter than water, so in a solution it will always tend upward and it will not be possible to perfectly level the coating.
The mechanical strength of wet-mixed expanded clay concrete leaves much to be desired
The composition is simply poured between the beacons, leveled as much as possible and left to dry. This screed requires further processing. The fact is that expanded clay is a rather fragile material, so it will gradually deteriorate and become very dusty. To avoid these troubles, it is recommended to apply a top coat of self-leveling mixture or ceramic tiles.
Recommendations for screeding floors with expanded clay
Builders equally use the following types of screed with expanded clay:
- dry expanded clay screed;
- floor screed with expanded clay concrete;
- semi-dry floor screed with expanded clay, which should more accurately be called combined, since the bottom layer is represented by a dry screed, and the top layer by a wet screed.
READ MORE: Do-it-yourself floor insulation in a private house
Dry screed
The simplest and cheapest type of screed is dry screed. The entire technological process boils down to pouring a layer of expanded clay onto the prepared floor base at the level of the beacons. Sheets of plywood, chipboard or gypsum fiber board are laid on its surface, on which the finishing coating is mounted.
In this case, screeding a floor with expanded clay with your own hands is most accessible to a novice builder. A detailed description of the technological process is presented in the article: “Dry floor screed with expanded clay.”
Expanded clay concrete
Floor screed with expanded clay and cement is a wet type of screed. It is used only when the dry and combined screeding method cannot be used for financial or technological reasons.
The process of preparing and pouring a solution of expanded clay with cement consists of a number of sequential steps.
- Expanded clay granules are soaked.
- Expanded clay, sand and cement are poured into a concrete mixer with water. In this case, the proportions of expanded clay and sand concrete for the screed are as follows: 4 parts expanded clay M700, 3 parts sand, 1 part Portland cement M400. By adding the dry mixture of components little by little, you achieve the required consistency of the solution. To increase fluidity, add liquid soap at the rate of 50-100 ml per bucket of cement (10 l).
- Pour the solution between the rows of beacons and level with the rule.
- After pouring is completed, the surface of the screed is moistened with water so that cracks do not appear on the surface. The procedure is repeated once every 2 days for a week.
- The surface of the screed, due to the expanded clay granules rising to the surface, is either ground or filled with a self-leveling mixture.
The process is described in detail in the material “Do-it-yourself expanded clay concrete screed”.
Expanded clay filling
The last, third type of screed using expanded clay is called differently by builders: semi-dry or combined screed, sometimes - backfill. The essence is in its two different layers.
The bottom layer is always made of expanded clay granules, which are poured with cement “military” (obtained by stirring a standard mixture of cement and sand with water in a ratio of 1:2) to keep the surface motionless.
Often, for these purposes, a reinforcing mesh is laid on it.
The second layer is usually a cement-sand mortar. Rarely, but still, a mixture of expanded clay and sand concrete (expanded clay concrete) is also used for these purposes.
Scheme of a combined screed. 1 – floor base (concrete floor slab, soil, wooden subfloor). 2 – wall of the room. 3 – waterproofing layer. 4 – elastic damper tape. 5 – a layer of expanded clay, at least 50 mm thick, and if insulation of the floor of the first floor or in a private house is required, then the minimum thickness reaches 100 mm. 6 – lines of beacons fixing the screed line – not shown in the diagram, but a reinforcing mesh is most often laid on top of the expanded clay. 7 – screed made of mortar based on sand and cement.
How to make a floor screed with expanded clay in the bottom layer and a wet screed in the top? Step-by-step instruction:
- A layer of expanded clay is poured onto the prepared surface of the floor base. What fraction of expanded clay should I use for screed? A fraction of 5-10 mm will allow for good compaction of the backfill. If it is necessary to improve thermal insulation, add 40-50%, while mixing, of granules measuring 10-20 mm. The backfill is carried out in height to a conventional line, which is 3-4 cm below the level of the screed, after which the layer is compacted. Using a rule and a level, the surface of the expanded clay is carefully leveled;
- The surface of the expanded clay is spilled with cement “milk”. This operation is necessary to form a hard film on the top of the expanded clay layer. This will allow:
Leveling the expanded clay surface.
- prevent the solution from leaking deep into the bottom layer, which will save materials;
- protect the solution from loss of moisture due to the suction properties of expanded clay (if this is allowed, the process of setting the solution will not be completed - the screed will not gain the necessary strength);
- prevent expanded clay granules from rising upward in the solution and creating a corrugated pouring surface.
- Filling with cement laitance is dried within 24 hours;
- If the beacons were not placed on the base of the floor, they are placed on the bottom layer of the screed;
- Fittings are installed (only if large dynamic loads are expected), which is typical for gyms or rooms with washing machines;
- A standard solution is prepared based on cement and sand in a ratio of 1:3;
- The cement screed is poured from the far corner along the rows of beacons;
- The alignment rule is carried out along the entire length of the line of beacons. In places with a subsiding surface, the solution is added; at the end of the line of beacons, the excess is removed;
- The surface of the solution is often pierced with a thin metal rod to remove possible air from the pouring body;
- After finishing the work, the surface is wetted to prevent the appearance of small cracks. The procedure is repeated every 1-2 days for a week;
- Drying time is given 7 days for each centimeter of the thickness of the solution layer. Once the hydration process is complete, the floor can be laid.
Thickness of the layer of concrete screed with expanded clay
Expanded clay can also be used when constructing a wet screed; in this case, 2 technologies are used : laying a mortar mixed with expanded clay and laying a concrete layer on the expanded clay. The thickness of the expanded clay screed is calculated individually depending on the room in which it is laid.
Construction experts recommend sticking to a concrete layer thickness of 20 mm or more when laying the screed; the thicker the concrete layer, the higher the need for additional reinforcement with metal mesh. In rooms where a large load is planned, the concrete screed can reach 70 mm.
The average recommended thickness of a cement-concrete screed is 30-50 mm, and it is important to take into account the number of differences and the depth of the irregularities; the larger they are, the thicker the concrete layer.
In special cases, if the cracks in the base reach a depth of more than 100, then the concrete layer may exceed 70 mm. Expanded clay, as an additional layer in a concrete-cement screed, is necessary to reduce the load on the base.
For your attention, a video on how to make a floor screed with expanded clay with your own hands.
How to set beacons for a screed? You will find out the answer to this question by reading our article. And here is an article comparing which is better: laminate or cork.