Do you need high-quality WPC materials or require installation work?
Call the number
Terrace board is a truly unique material in its characteristics, so it is important to approach the laying scheme and fastening of the boards competently. The boards will last a long time only if the independent installation of larch decking boards is carried out correctly. So, how to attach a deck board? In addition to the step-by-step instructions in this material, for greater understanding, you can watch a video on this topic.
Preparation
Before installation, the used larch decking board must lie in the open air to get used to the local climate. To do this, you need to unpack the packaging and leave it under a canopy for several days. Before you start fastening, you should immediately decide which method you will use - closed or open.
If the choice fell on open installation, then self-tapping screws made of galvanized steel and with an anti-corrosion coating are required. Preliminary markings are made and all holes are pre-drilled. After this, all the screws are screwed to the installed joists.
As for the closed method, all fasteners will be hidden under the flooring. For this purpose, special fasteners are used, also called clips. Preference should be given to metal fasteners with anti-corrosion coating. About 20 clips are usually consumed per 1 m2.
Plus, you need to decide exactly how the board will be laid evenly, diagonally or otherwise.
Advice! You should choose the installation method that will result in the least amount of waste in the form of trimmings.
Preparing the decking board
Before fastening and laying a decking board (decking or multideck), it is necessary to prepare it - it is important to adapt the material to the conditions in which it will be located during the entire period of use. If operating conditions are violated, cracks may appear in the boards.
The preparation consists of keeping the board outdoors for two to three days, and you need to unpack it. The main thing is to protect from precipitation, such as rain. Moreover, during the adaptation period, it is important to place the board approximately in the place where it will be fixed.
Don’t be alarmed if suddenly a board made of wood like larch becomes bent – this is quite normal. But it is important to understand that such a board can no longer be fully used, but there are other options for using it - it can serve as an additional part.
If the board is bent by more than 50%, then you should return it to the store. Because severe curvature is the manufacturer’s fault. This means that he dried the boards unevenly, which is why moisture was distributed throughout them inside.
Before laying the decking, it is necessary to lubricate it with an antiseptic. Thanks to this, moisture will not be able to penetrate into the wood, because the antiseptic substance will fill the pores of the material.
Installation process of polymer boards, instructions
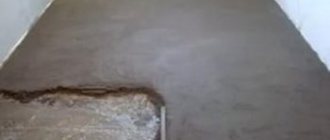
First, a flat surface is prepared; it can be concrete slabs, screed or sand cushion. The base must be sloped or for drainage; supports will need to be placed under the logs. When laying on the ground, use a material that will not allow weeds to germinate.
To lay WPC decking boards, you must use special composite logs. If the length of the surface to be covered is large, then the logs are laid end-to-end, not connected to each other, and a gap of 6-7 mm is left.
A gap is also left between all fixed stops. The distance between the lags should be about 300-350 mm, if the load on the floor is high, then it is reduced to 250 mm, and when laying diagonally, the distance is 200 mm.
The logs are laid on a clean, dry and level base parallel to the drainage of water.
The boards are fastened perpendicular to the joists; starting clips are used to fix the first board. The screws cannot be screwed in very tightly; the first board is attached to the starting clamp. Further installation is carried out using clips that are fixed on the joists.
It is necessary to leave a gap between the longitudinal joints; if the terrace is long, then the boards are laid end to end and a gap of about 6 mm is also left. The last board is cut to size, after which it is fixed to the joist using self-tapping screws, screwing them in at an angle of 45-50 degrees. This fastening will then be closed with a corner or end strip.
The gap between the profile and the fixed stop must be at least 2 cm.
The board can protrude no more than 50 mm beyond the edge of the joist, the end part is covered with a bar or corner, and side plugs can be used.
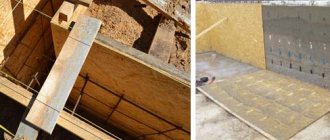
Foundation preparation
The foundation is the basis for the future terrace, so it is important to do everything carefully, following the rules listed below:
- To begin with, a smooth and reliable base must be cleared of weeds and treated with a liquid that prevents plant growth; also for the same purpose, roofing felt or other similar flooring, for example, geotextiles, can be laid on top of the soil.
- The soil must be compacted using a vibrating plate.
- Then you need to pour gravel on the ground - about ten centimeters, and then five centimeters of sand on top. Compact again with a vibrating plate.
- Next, you need to install a reinforcing mesh on top and fill the structure with concrete, so that you end up with a concrete floor.
- Then special control supports are installed, which are secured using dowels.
- It is important that the logs are attached to the supports (necessarily perpendicular to the direction of the decking board).
The decking boards are attached to the top of the support joists, so first you need to figure out how to properly install the fastenings to the joists.
It is important to carry out these works in dry weather, at temperatures from +5 to +30 degrees, air humidity should be from 40 to 60%.
Installation of logs
The logs are the support of the entire future structure, so it is necessary to secure them as securely as possible. And the fasteners must consist of stainless materials, for example, aluminum.
The logs also need to be prepared before installation - this means treating the wood with an antiseptic and on the end sides with a wax solution so that the logs do not begin to crack.
If you plan to lay the decking board in parallel, then you need to place the logs at a distance of fifty centimeters from each other. If you plan to lay the boards at an angle of 45 degrees, then the distance between the logs is reduced to thirty centimeters.
Accordingly, a slope of 30 degrees reduces the distance between the logs to twenty centimeters. The logs need to be secured with dowels or screws, and they can be connected to each other with corners. It is important to remember that the logs should never come into contact with the ground. The optimal distance from the ground should be four centimeters to ensure good ventilation.
How to attach a larch deck board? Technology of laying decking boards
There are many ways to do this, for example:
- Open is the easiest way, but it is better to use stainless screws or nails so that they do not spoil the appearance in the future.
- Hidden - fastening using special spikes that will be located between the boards. Only the price for this type of fastener is much higher and such work takes longer. But sometimes it doesn’t even matter how much such work costs, because with this method the design has the most aesthetic appearance.
- Tenon and groove is the most externally inconspicuous method of fastening. Special screws are used here.
- Hidden way. The fastening is located on the back side of the boards.
Laying deck boards with your own hands
We install decking using special instructions for installing decking boards:
- Installation of boards must begin from the walls, retreating at least 0.8 cm.
- Using a screw, you need to install and attach the first board.
- You need to hammer the anchor of the fastener into the base and hammer the head in so that it stands vertically.
- When the deck board fastener is installed, you need to insert a nail into its hole and drive it into the board
- When you need to lay the second board, you will already need a type “A” spacer, which must be installed together with this board.
- When the board is laid, you need to stand on it. Standing on the board, you need to hammer it into the tenons of the fasteners with a hammer. Such manipulations must be continued with all subsequent boards.
- Do not forget that the last board in the structure must be secured with a self-tapping screw.
- The end part of the board must be closed with special plugs that come with them. For this, a rubber hammer is usually used so as not to spoil the material.
Self-installation of decking boards
Every person would like to have their own cozy house outside the city with an open terrace, where they could meet with relatives every evening, drink tea in nature, talk about pleasant topics, and enjoy the sunset. Or have your own luxurious and unique outdoor pool with wooden sides that look great against the backdrop of blue water.
Bringing this idea to life is not difficult. And in order not to invest a lot of money, you just need to learn how to work with wood or WPC decking boards, which are recognized today as a substitute for wood. This article will discuss the process of self-assembling decking boards.
Preparing and assembling the frame
The article will indicate the features of installing decking boards made of natural and composite materials.
The base of the terrace is considered to be a developed area of a piece of land that is located separately or adjacent to the house. The foundation consists of a foundation, supporting elements, and a drainage system.
There are several ways to pour a foundation for a terrace. When choosing a method, it is necessary to take into account the type of soil, seismic activity, and other factors. The foundation can be strip, columnar, or screw.
A good solution for the rapid production of foundations are screw piles. Therefore, a foundation made using a screw method will be very reliable. And it doesn’t take much effort to build the structure. At the same time, during assembly the surrounding area will remain clean, which is rare when pouring concrete. If you do not have the necessary experience in welding, you will not need to achieve a high-quality result. It is best to entrust this process to real professionals.
Supporting elements are the part of the structure responsible for the stability of the terrace. It can be a frame made of metal, a concrete plane, or a wooden building, which is tied to rack supports. Supporting elements play a big role in the process of covering the terrace with WPC boards. When assembling a wooden surface, logs can be used as supporting elements.
The design of the veranda must have a drain for water, since the room is constantly exposed to precipitation. Accordingly, a gap must be left between the flooring boards.
If it is necessary to lay the terrace board on concrete, the roof piles can be replaced with adjustable supports. With their help, you can completely smooth out the difference in heights on the base, and align the frame from the logs to the horizon.
Installation of logs
First, let's tackle the wood deck frame. To do this, you need a beam with a cross-section of more than 75*75 mm. It will be able to withstand light flooring and will not deform during use. When there is a large distance between the supports, there is a plan to build a closed structure full of furniture, you must definitely take a stronger beam of 100 * 150 mm. Such timber has a safety margin for the pitch of foundation supports up to 240 cm.
For the frame, you can use boards with a section of 50*150 and then lay them on the edge. Their cost is cheaper than timber. This design will have slightly worse strength. But it is well suited for almost any decking. In addition, you can use two lumber at once.
On average, the distance between the logs should be less than 50-60 cm. This parameter is affected by the thickness of the deck board. The greater the thickness, the wider the logs can be installed. In some cases, you can set lags other than the selected step. This will allow you to avoid additional trimming of expensive material.
Special fasteners are used to connect frame elements. There is a wide range of these items. In any hardware store you can always find the necessary fasteners.
The main conditions that apply to the frame are reliability and compliance with the horizontal level. When purchasing wood, you need to carefully check the product offered, do not take crooked boards, beams with cracks or fungus. When installing the foundation, you can set the log level. And to regulate it, you can use special metal supports. In their design, they are similar to plastic options for WPC boards.
Logs for WPC decking boards
Wood-polymer composite timber for veranda boards can be used as lag and timber made of similar materials. In addition to complete WPC logs, you can use wooden materials. However, it is best to use the aluminum version.
The resulting product is similar to a rolled profile, which has grooves for fastening and connections for supporting elements.
Aluminum logs are highly reliable, have a long service life, and low linear expansion. The aluminum joist can be rigidly attached to the base with a self-tapping screw.
When installing aluminum on a metal frame, it is important to take into account one point - the log cannot be laid on the metal itself. As soon as aluminum comes into contact with iron, rust will begin to appear and the metal will begin to deteriorate. In such cases, rubber cushions are used for protection. They need to be placed between the base and the joist.
Let's summarize briefly:
- The logs must be laid parallel to each other. The slope between them should not exceed 2%.
- The largest step distance between the central axes of the joists should be less than 40 cm.
- WPC logs should be laid with the groove up and the grooved side down.
Deck boards
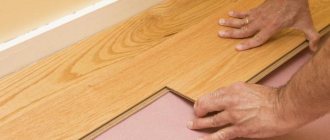
Having assembled the support frame from the logs, you can begin installing the main covering. To do this, the boards must rest for two days and adapt to the current temperature and climate. Most of all, this rule applies to composite boards.
To secure the board, you can use 2 methods: open and hidden.
In the first case, assembly involves making holes in the front side of the board and fixing it using self-tapping screws and nails. Since the screw heads usually spoil the appearance, this method has not gained much popularity. It is mainly used when installing subfloors.
For hidden installation of decking boards, special fasteners are used, located between the boards. This method works best when the gap is properly aligned between the boards to ensure constant water drainage. If it is planned that it will rain for a long time, it is better to use wide brackets.
Let's take a closer look at hidden fasteners for decking boards. To do this, we will use a mount with a special anchor shape. In appearance it looks like a simple door key. To install it you need a hammer, a rubber mallet and a screwdriver.
Installation stages:
- Using self-tapping screws, the first board is attached using open mounting.
- The clamp is driven at an angle of 45° to the base of the first board at the junction of the new element.
- The head of the fastener is bent to the edge of the first board and secured with a self-tapping screw.
- A new board is brought to the side, which is driven with a mallet onto the tenon of the clamper.
To adjust the gap, it is better to use a lining of equal thickness called a “spacer”.
Clamps with two or three holes for mounting in the base, which allow you to fix the element to the joist, with one hole for connecting to the edge of the board. Strong fixation can be achieved by using two spikes in the upper part of the product.
The blades of the staple can be inserted into the cuts on the sides of the board. To do this you need to use a router. To obtain cuts, you need to make markings at the locations of the fasteners.
This type of fastening is intended for installing floor coverings for heavy terraces with furniture. Its advantage is the ability to further dismantle some areas of the floor.
The fastening itself is designed to hide the flooring and create gaps between the joists and boards. It can be made of metal, plastic, or purchased separately. It includes a main plate with mounting holes.
This mount is attached to the back of the board with an outlet. And for this connection two elements are needed. Then, using self-tapping screws, the board is attached to the joists. The resulting structure has high strength and allows you to install the first board using a hidden method.
Installation of WPC flooring
To fix a wood-polymer composite board, no adjustment of the boards is required. This material has an absolutely flat shape. And when working with mounting fasteners, you don't need to use a hammer.
The WPC decking board already has ready-made grooves for connection with plastic or metal fasteners.
Fastenings are available in the color of wood or any other material, which allows them to be made invisible with large gaps between the boards.
Due to the special profile, in individual aluminum joists it is possible to use terminals without fixation with self-tapping screws. They are inserted into the joists and rotated 90°. The terminal has a special shape with compensation antennae that can compensate for the gap between the boards. As the material expands, they begin to shrink and prevent the board from rising. In cold weather, they allow you to set the gaps at the same level.
This fastener helps speed up the installation task and speed up the work process. In stores today you can buy clamps of a similar design.
Laying veranda boards
After installing the first board, it must be fixed in an open manner. Plugs of the same color as the material will help hide the screw heads.
Make extensions of the board 7-10 cm long along its ends. This will help visually hide the extreme lag.
On each joist at the junction of the new rows you need to install fasteners and secure them with a self-tapping screw.
Insert the second board into the clamper from the reverse side, using a rubber mallet if necessary. Using shims, you can achieve full completion of the gaps.
Go over the entire surface according to the described method. Install the last board with the outlet using open mounting.
After the flooring is completed, the ends of the boards are decorated. For this purpose, aluminum or WPC profile is used. At points of identical connection, special decorative strips are used.
The main advantage of a wood-polymer composite is the absence of operating costs. Every year the board does not need to be treated, oiled, or sanded. It is enough to wash its surface twice a year.
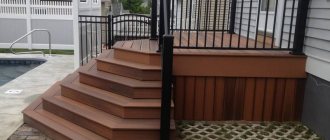
After assembling the terrace board, taking into account the prepared plan, you can install a fence, stairs, and build a roof. Thus, the deck will be finally built.
Tags: veranda board, installation, deck board, terrace board.
Author: admin
Published: April 24, 2018
Share
Fastening deck boards using self-tapping screws
There are a few rules to remember:
- The screws must be coated with an anti-corrosion coating to maintain a presentable appearance.
- There must be a gap between the boards - on average 0.2 cm. Moreover, the wider the board, the wider this gap. It is not necessary to make gaps between the boards only if they are laid in a heated room. Accordingly, in this case the boards can be safely joined.
After installation. Processing of decking boards
After laying the decking, it is very important to treat it with protective compounds. For example, if the wood belongs to types “B” and “C”, then it is worth using paint or grout. And if the tree is of types “A” and “Elite”, then you can cover the boards along the length with protective wax or varnish without color.
Terrace boards in our TerraDream online store:
- Terrace board CM Skandinavia Grand Wenge 190, 25, 4000 mm
- Terrace board CM Skandinavia Vintage Wenge 140, 25, 4000 mm
- Terrace board CM Skandinavia Vintage Ebony 140, 25, 4000 mm
- Terrace board CM Skandinavia Vintage Oak 140, 25, 4000 mm
- Decking board CM Skandinavia Vintage Ebony 140, 25, 4000 mm
- Terrace board CM Skandinavia MIX COLOR MIX 135, 25, 3000 mm
- Terrace board CM Skandinavia SOLID Wenge 140, 22, 3000 mm
- Terrace board CM Skandinavia SOLID Rowan 140, 22, 3000 mm
- Terrace board CM Skandinavia SOLID Oak 140, 22, 3000 mm
- Terrace board CM Skandinavia NATUR Wenge 135, 25, 3000 mm
- Terrace board CM Skandinavia NATUR Rowan 135, 25, 3000 mm
- Terrace board CM Skandinavia NATUR Oak 135, 25, 3000 mm
- Terrace board TWINSON Terrace 140mm 20mm 6m
- Terrace board TWINSON Terrace 140mm 28mm 6m
- Terrace board DM Premium 140mm
- WPC board Holzhof 150mm 3m
- Terrace board WOOZEN from LG Hausys 140mm 2.8m
- Decking board with Holzhof embossing 142mm 4m, 6m
- Seamless terrace board Holzhof 145mm 3m, 4m, 6m
- Terrace board Edececk 165mm 4m, 6m
- Terrace board Deckron 153mm 3m
- Terrace board Darvolex 150mm 4m, 6m
- Terrace board Woodvex 25mm 3m, 4m
- Woodvex decking board 22mm 3m, 4m
- Woodvex decking board 22mm 4m
- Terrace board Woodvex 20mm 3m, 4m
Flooring on an exploited roof
After installing a usable flat roof, you can proceed to the stage of laying the finishing coating. Recently, most often for these purposes, WPC decking boards are used, which feel great outdoors, are strong, reliable, durable and beautiful.
Regardless of what type of covering you choose, a parapet is installed on the roof in use along its entire perimeter , which will simultaneously perform a protective and decorative function.
To lay the decking board, it is necessary to prepare a flat base, which should have a slope towards the edge of the roof. The base can be covered with a screed and leveled with crushed stone, after which support posts are installed and logs are attached to them. Using adjustable posts allows the joists to be aligned with the sloping base, resulting in a smooth finish.
The logs should be laid with the groove up and the corrugated side towards the base; this will help install the self-tapping screw when attaching the clip to the center of the log.
It is impossible to rigidly attach the logs to the base ; it is recommended to use steel or aluminum brackets, which are installed at intervals of 1 m. Using a decking board on an existing roof is very convenient; you practically do not need to take care of it, since all the dirt will be washed off during rain. Experts recommend planning the creation and arrangement of a serviceable roof at the design stage of building a house.