January 23, 2017
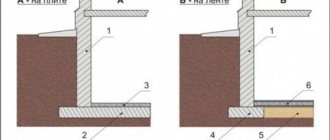
According to the old tradition, the floors in the bathhouse were usually laid with wood. But, as is known from practice, such a floor becomes saturated with dampness and rots over the years. Modern construction of baths requires a concrete base. How to fill the floor in a bathhouse? Having detailed instructions and familiarizing yourself with the nuances of this event, it is quite possible to implement it on your own.
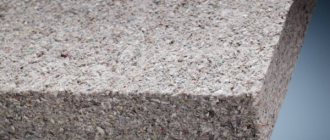
Advantages of concrete floor
- Durability.
- Moisture resistant.
- Fire resistance.
- Easy to maintain.
- Unaffected by microorganisms.
Drainage
Before starting work, care should be taken to ensure drainage. For this, a pipe with a diameter of 200 mm is used. Before starting work, you need to think carefully about the drainage system. Due to improper placement, the water will stagnate, and mold will appear in the bathhouse over time. The outlet can be connected to the central sewer system. If there is none, then a hole is made for drainage about five meters from the bathhouse. The dimensions of the drain are selected based on the estimated water consumption. It is recommended to make the walls of the pit from concrete or tiles and fill the bottom with crushed stone for better water flow. A grill cover is installed on top of the drain. A shutter is placed at the end of the drain pipe to prevent unpleasant odors from entering the bathhouse.
Pouring the floor
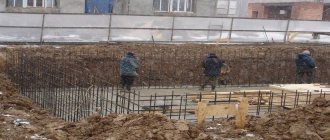
After the tap is carried out, the base of the floor is prepared. The floor soil is compacted and a layer of gravel or crushed material such as broken brick is poured.
In the steam room and shower room of the bathhouse, the first layer of concrete is first poured, which is left for some time to dry completely.
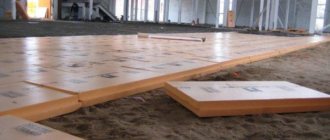
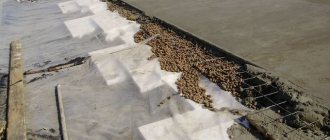
Then a thermal insulation material such as expanded clay is placed. Instead, mineral wool is often used. In addition to good heat-saving properties, it is a non-flammable material. Next, waterproofing material is laid to protect against moisture. Roofing felt is spread on top with an overlapping sheet on sheet. The joints of roofing felt sheets with each other and along the perimeter of the bathhouse are lubricated with bitumen mastic. All that remains is to pour the second layer of concrete, which is pre-reinforced with mesh.
Concrete screed is made from three parts sand and one part M-400 cement, although to make work easier, a ready-made mixture is purchased in specialized stores. Only a mixture is selected that is intended for use in rooms with high humidity and containing perlite. This bulk material retains heat well. The floor is almost ready! It remains to wet the surface twice a day for several days to prevent cracks from appearing on the surface. Now you can think about introducing aesthetics. The ideal option would be tiles.
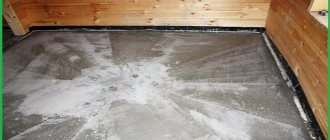
Important! All layers must be laid with a slope towards the drainage pit. This will allow water not to accumulate on the floor, but to flow into one specific place. From here the water goes into the sewer pit. The slope during work can be adjusted using the building level. The photo shows how the floor in a bathhouse with a slope is poured:
Basic requirements for flooring
Before starting work, you should consider the water drainage system. If the drain is done incorrectly, an unpleasant odor, dampness and fungus will soon appear in the bathhouse.
The most convenient way is to connect to a central sewer system. Unfortunately, this possibility is not always available. Therefore, water is usually drained into a pit or septic tank.
The pit should be located at a distance of 3-5 m from the bathhouse.
It is recommended to make the walls of the pit from concrete, fill the bottom with crushed stone or broken brick so that the water drains freely.
To prevent debris from entering the drain, the drain should be covered with a grate.
If there is a septic tank on the site, then the pipe is discharged there, you just need to equip a water seal that prevents odors from penetrating into the steam room. Look at the video for the drainage device in the bathhouse.
Video:
Requirements for pipes:
- Internal water supply is made of cast iron, ceramic, asbestos or PVC pipes;
- The use of steel is unacceptable, as this material deteriorates from constant contact with water;
- The minimum diameter of the drain is 50 mm;
- For external water supply it is recommended to use PVC pipes;
- The drain is installed with a slope towards the drainage pit.
Sometimes an absorption pit is installed directly under the bathhouse.
To prevent such a pit from becoming a source of unpleasant odors, it is advisable to leave ventilation ducts in the base through which air will circulate.
A drain located directly above the pit can only be installed on sandy, light soils. This method of water drainage is not suitable for dense and clayey soils.
To remove blockages, you need to make an inspection well.
How to make a manhole with your own hands:
- At a distance of 3 - 3.5 m from the bathhouse, dig a round or square hole with an area of approximately 1 m;
- The walls of the well should be covered with concrete, brick, wood;
- The lower part must be filled with concrete to create a tray connecting the pipes;
- A lid should be installed at the top and insulated;
- Cover the entire structure with slag, sawdust or earth;
- Pouring the floor over the ground
Pouring floors on the ground is only possible in areas with dense soil, where deformation of the building in the event of subsidence of the foundation is excluded.
In the presence of heaving soils and the danger of freezing, the installation of a concrete floor in the bathhouse is made using a different technology.
Before you start pouring the base on the ground, you should remove the top layer, and then thoroughly compact the soil. Features of the installation of a floor on the ground can be seen in the video.
Video:
Fill the floor over the soil in one layer with your own hands:
- Remove the top layer of soil to a depth of 400-500 mm;
- Compact the area;
- Add 150mm of gravel. At this stage, begin to form a slope to the place where the drain will be located;
- Place a 300-500 mm layer of sand on top of the gravel and compact it well again;
- The next stage is waterproofing. Spread several layers of roofing felt on compacted sand with an overlap of 100 mm. The layers should be perpendicular to each other. Coat the joints with bitumen mastic;
- To prevent the floors in the bathhouse from being cold, you need to make insulation. Depending on the climatic conditions, the base can be insulated with polystyrene foam, penoplex, mineral wool slabs impregnated with tar and construction felt. Lay thermal insulation materials towards the wall;
- If the insulation is carried out with mineral wool, then waterproofing is again done on top of the material, only this time with plastic film, a whole panel or two pieces with a large overlap and fixation with wide tape;
- Next, lay the reinforcing mesh with a 5 mm rod;
- Install the beacon system in such a way as to form a drain. If you make it in the center, it will be difficult to direct the slopes. It is better to arrange a drain in the corner of the room;
- The minimum thickness of concrete screed on the ground is from 30 mm. Filling can be done with a ready-made dry mixture for rooms with high humidity or with a cement-sand mortar (1:3).
When laying the floor in several layers, the order of work changes. The first layer is poured along the beacons directly onto the sand and gravel layer. After hardening, the waterproofing is laid, then the floor needs to be insulated.
It is recommended to do insulation not with polystyrene foam, but with perlite sand. Perlite has high thermal insulating qualities.
Since perlite insulation is associated with the formation of a large amount of dust, it is recommended to lightly bind the material with cement.
Next, the reinforcing mesh is laid, beacons are installed, and concrete is poured.
In case of danger of flooding with groundwater or seasonal floods, high-quality waterproofing and drainage system are needed.
Video:
The order of work when pouring over the ground on heaving and flooded soils:
Install a drainage system to lower the groundwater level 80 cm below where the soil freezes.
Before pouring a concrete floor in a bathhouse, remove the layer of native soil and replace it with a denser one.
Thoroughly compact the base and insulate the base using slab moisture-resistant materials, for example, foamed polyurethane foam.
Next, the reinforcing mesh is laid, beacons are installed, and concrete is poured.
Bathhouse in winter
If the bathhouse is intended for year-round use, then underground ventilation is installed. This method is also used when building baths on unstable, weak soil. It will help keep the floor warm in cold winter weather. Ventilation is done as follows:
- Logs are installed at a height of 20 centimeters on top of the ground.
- Plywood is placed on top. To protect it from moisture, it is advisable to soak it with an antiseptic or drying oil. At this stage, the drain pipe is removed.
- The structure is coated with an antiseptic composition.
- A durable film is covered, acting as waterproofing. The remaining steps are similar to the instructions described above.
Do-it-yourself bathhouse floor - step-by-step guide
Laying floors is the most critical stage in the construction of any building. Properly laid floors reduce the load on the foundation, distributing it evenly, thereby extending the service life of the structure. In addition, properly laid floors mean the convenience and safety of people who live in the building or constantly use it.
DIY bath floor
READ MORE: How to choose school sports floors: necessary conditions
It is especially important to follow the installation technology when building a bathhouse, since a bathhouse is a special object, in the premises of which there is high humidity and high temperature; both hot and cold water is used abundantly.
Below we will talk about what kind of bath floors there are, and we will try to describe their installation in the form of a step-by-step guide.
Types of floors
In the bathhouse, the floors can be made of concrete, wood or brick. The latter type of flooring is used very rarely.
The fact is that while brick has a high heat capacity, it also has low heat transfer. In other words, it heats up so much that you can get severe burns. Therefore, brick is used to construct the base for concrete or wooden floors.
Adviсe
- Fill the screed from the far corner of the bathhouse.
- To keep your feet cool on a tiled floor, lay down polymer mats or wooden structures.
- To increase strength, pour a cement-sand mixture over the concrete. The surface will be leveled and it will be easier to lay tiles on it.
- In a small bathhouse, the floor is poured over the entire area at once, but if the area is large, it should be divided into meter-long sections with metal or wooden guides and poured gradually.
So, you know how to fill the floors in a bathhouse under the drain. This is labor-intensive work. But if you do the work strictly according to the instructions and with high quality, a warm bath will delight you for many years.
Thorough preparation is the key to success
If you have made a difficult decision and decided to make a concrete floor, then you should first carry out thorough preparation, which will help reduce labor costs when pouring it to a minimum.
The main problem associated with installing a concrete floor is the arrangement of drainage.
In wooden floors, this process can be carried out much more simply - through natural cracks in the floorboard. A drainage system must be provided in the floor of the bathhouse or, if the soil allows, a drainage hole must be made. It’s good if you turned out to be a prudent person and did this work while the foundation was being poured.
- To make a drain, you need to punch holes in the foundation and insert a plumbing pipe into it in a sleeve of a larger diameter.
- Afterwards, in the place of the proposed washing compartment or shower room, dig a pit, about 40 cm deep. It is into this pit that the plumbing pipe should go to drain the water.
If the soil on which the bathhouse is built allows you to make a drainage hole, then it is best to make one, since you won’t need to dig into the foundation and construction waste (crushed stone, broken bricks, sand residues) will have somewhere to go.
To do this, dig a hole under the future washing compartment and fill it with drainage material. Dig without fanaticism: a hole 70 cm deep will be enough. To prevent stagnation of water and a “wonderful smell,” you should use vents in the foundation.
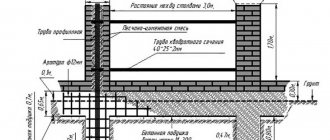
This is a very important stage in arranging the floor, during which crushed stone and sand are used, which should be compacted well. But first you need to make the so-called pie.
The technology for its manufacture is quite simple:
- Prepare the soil for laying the “pie” for the floor. It should be cleared of roots, leveled and compacted.
- Compact a 10-15 cm layer of sand well.
- It is good to compact 15-20 cm of crushed stone or gravel with a slope towards the drainage well.
- Waterproofing. The most popular insulating material today is roofing felt. It should be spread on a compacted gravel bed with an overlap of 5 cm. The waterproofing should also extend onto the wall, at least 15 cm.
- We pour about 5 cm of concrete onto the insulation. At this stage, a slope of 10° is formed into the drainage hole.
- After which such a “pie” needs to be insulated. Any suitable materials can be used as insulation, but the most popular today are polystyrene foam and mineral wool. The main thing is that the insulation is of appropriate thickness and density, then the concrete floor in the bathhouse will always be warm and will not freeze even in severe frosts.
- The next layer of the cake will be the reinforcement of the future concrete floor. To do this, a reinforcing mesh is laid on top of the insulation. An ordinary chain-link mesh, which was the “predecessor” of your fence, is a good choice as a reinforcing material.
The last layer is to pour the concrete floor using cement mortar. For 1 part cement take 3 parts sand. You should remember about the slope.
Tags: bath, soil
« Previous entry