Insulation under the screed: how to make a concrete floor warm
Insulation installed under the screed will help make the floors warm and reduce heating costs.
A well-insulated apartment or private house is not only a guarantee of comfort and coziness, but also a way to save significantly in the future on heating costs for your home.
This is exactly how I reason and, of course, this is what one of my recent clients thinks, who asked me to insulate the floors and floors in his new country cottage (the walls there were already thermally insulated using curtain-ventilated façade technology).
Looking ahead, I will say that there was a huge field for activity there. It was necessary to insulate the floors on the ground, first and second floors (and in some rooms I simultaneously installed a floor heating system), on the balcony and attic.
So I had a unique opportunity not only to earn a lot of money, but also to tell you how to do everything yourself. Moreover, you will learn how to choose insulation for a concrete floor under a screed, and how to lay it correctly.
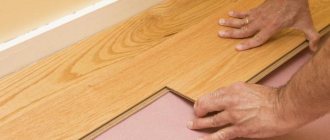
Types of insulation for water heated floors
When selecting a material for a thermal insulator for a warm hydrofloor, you should take into account the characteristics and technical indicators of the room, as well as the base on which the substrate will be installed.
For the most part, the thermal insulation material has the same degree of thermal conductivity. But the thickness of the layer is often required even in the same room.
The most common types of thermal insulation used under water-heated floors include: mineral wool, cork, expanded polystyrene, profile mats. This material has different thermal insulation characteristics and properties, and this should be taken into account when choosing and installing the floor.
Let's take a closer look at each type of material for thermal insulation of a heating structure.
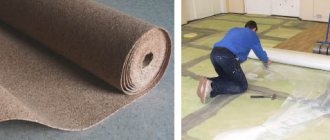
Cork backing
Cork is an expensive product because it is made from oak bark. Available in rolls or sheets, but there are no differences in technical characteristics. The only difference is the size and thickness.
We suggest you read: How much omez should you take for prevention?
Cork backing:
- has low thermal conductivity;
- waterproof;
- environmentally friendly;
- hypoallergenic;
- elastic;
- light-resistant;
- fireproof;
- resistant to sudden temperature changes;
- not susceptible to chemical influences.
https://www.youtube.com/watch?v=Vn_6FL3ZJlw
A product made from cork is an ideal option for a water-heated floor system, and if funds allow, then it is better to choose it. The thickness of this substrate contributes to effective saving of heat resources, which is especially important when installed on the ground.
Cork is not subject to deformation and shrinkage when pouring concrete screeds. It cannot be harmed by insects and rodents, mold and mildew, and is also not terrible.
However, it should be noted that the use of cork as a substrate will affect the height of the ceilings, and additional reflective material will also need to be purchased.
Expanded polystyrene
Expanded polystyrene is the most common type of thermal insulation under water heating floors, and has a fairly affordable price. It provides high-quality protection from water and steam, a high degree of sound insulation, does not deform from exposure to temperature, does not react to chemicals and resists the formation of mold and mildew.
Thermal insulation consists of many bubbles placed in a shell. To add strength to the structure with this substrate, a reinforcing mesh is used. Ease of installation, which even an inexperienced person can handle, also plays an important role in its popularity. In addition, the service life is several decades.
The main disadvantage of polystyrene foam is a fire hazard, so it must be insulated with a foil backing.
Expanded polystyrene comes in several types, which differ in production technology and properties:
- Extruded polystyrene foam is durable and better performs its main function - thermal insulation. It has increased strength, since the particles are tightly bonded to each other. But the vapor permeability indicator is almost zero. Its thickness is at least 3 cm. The slabs are often colored.
- Foamed - also called polystyrene foam. It has a low specific gravity and a high degree of vapor permeability. It is not recommended for foundation insulation, as it is destroyed by moisture. The color is usually white. It is produced in a non-extruded way, that is, the structure has cells with air channels.
- Penoplex - its cost is not high. It has good performance in terms of reflecting heat flows, therefore it is considered one of the best insulation materials. During installation, a waterproofing substrate is not required, and the process itself is not complicated; it is easy to do the installation yourself. Available in slabs of various sizes, the thickness of which ranges from 20 to 100 mm. The package contains from 4 to 20 sheets - it depends on the thickness of the product.
Main advantages:
- high heat and vapor insulation;
- absence of emissions containing harmful substances;
- resistance to the effects of microorganisms;
- does not allow moisture to pass through;
- has high strength.
- Profile mats - they are also based on polystyrene foam. They are stamped using a special technological method and covered with a film for waterproofing. The slabs are high-strength products that can withstand mechanical loads. They are equipped with protrusions; water heated floor pipes are laid in them, which facilitates the process of placing the circuit. They have side locks - this simplifies installation and minimizes the presence of seams. The model is considered the most profitable, in terms of financial investments, when constructing heating.
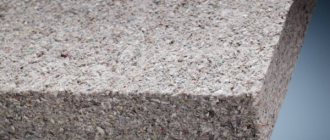
Mineral wool
Mineral wool is fireproof, unlike polystyrene foam insulation, but its price is more expensive. It is manufactured in slabs, making it easy to install.
When installed on an aluminum underfloor heating base, this insulation has high efficiency, even when placed on the ground. In addition, it has good noise and heat insulation, increased rigidity, and is resistant to chemicals.
The main disadvantage of the product is that it contains carcinogenic and toxic substances that are dangerous to human health. In addition, cotton wool is hygroscopic and vapor-permeable, and when laying it in a screed, care must be taken to protect it from moisture and steam emissions.
Foamed polyethylene (penofol) is gaining popularity today. It is sold in rolls and has a thickness from 3 to 10 mm. The product is equipped with a foil surface, it reflects heat and allows you to significantly reduce the thickness of the “pie”, since there is no need to lay additional waterproofing made of lavsan or thermal insulation.
There are the following types:
- A - one side has a layer of foil;
- B - foil on both sides;
- C (self-adhesive) - there is foil on one side, glue is applied on the other;
- “ALP” - one side is foil, the other with a special film.
Each type is suitable for use under heated floors, and almost completely copes with the thermal insulation of the device.
The technical indicators of foamed polyethylene and polystyrene are largely similar, the thermal conductivity coefficient ranges from 0.037 - 0.049 W/m °C.
It is worth mentioning the ability of the material to absorb water, which results in a decrease in its thermal insulation properties.
In addition, under the influence of a wet screed containing chemicals, the aluminum foil layer becomes unusable. To combat this problem, manufacturers began to produce the product in sheets with a film-like coating on top of the foil.
Metallized lavsan film is capable of qualitatively protecting the screed and flooring from the effects of alkali. Insulation with an aluminum layer without a thermally resistant coating is not used. The positive side of the product is its high degree of heat reflection.
Selection of materials
If you are reading this material to find out how to insulate floors yourself, without involving specialists, then you will definitely need to know what to use for this. I will talk about suitable thermal insulators, and then we will decide together which insulation is best to use for the job.
Necessary Requirements
You probably know many different thermal insulation materials. But I want to say right away that when laying under a screed (which is exactly how I insulated the floors in a client’s house), the insulation will be affected by specific external conditions that should be taken into account.
Not all insulation materials are suitable for installation under screed.
I believe that thermal insulation material for laying in concrete should have the following features:
Choosing insulation for concrete screed
The insulation is laid under the floor screed in two cases - on floor slabs or floors on the ground. Depending on the operating conditions (basement, attic or interfloor ceiling), floor covering and the maximum permissible level of rise of the finished floor, the structure pie and the location of individual layers in it will change.
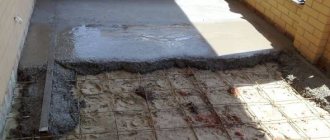
Preparatory work
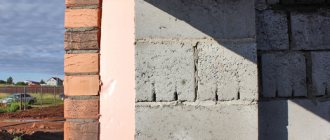
It is necessary to completely remove the old covering and clear the floor of construction debris. If there are large chips or cracks in the concrete, they must be repaired. More thorough preparation of the floor (priming, painting) is usually not performed, and there is no need for it, because the stitching will cover not the concrete coating, but a layer of foam plastic.
If the floor in a cottage or on the ground floor of a building is insulated, it is necessary to provide waterproofing. It is best to use rolled material (for example, roofing felt) or mastic. You can combine these two methods for reliability. Sheets of insulating material must be overlapped with an overlap of 20-30 cm, with an overlap of up to 20 cm on the walls. The mastic must be applied with a brush, and you can begin laying the insulation sheets after the composition has completely dried.
When insulating higher floors, there is no need to carry out waterproofing.
Options for floor pie with screed
Insulation of the floor under the screed is carried out in several cases:
- on the floor slab - reducing heat loss in the basement or attic floor;
Thermal insulation on the floor slab.
Thermal insulation of the floor on the ground.
In addition, insulation is laid under the contours of a heated floor on any floor if a decision is made not to use a massive ceiling as a heat accumulator. Therefore, all options will be considered in detail.
There are three types of screeds, which also affects the choice of insulation. For example, in dry screeds, expanded clay sand is used, which has both heat-insulating and sound-proofing properties. For wet and semi-dry screeds, the same insulation materials and principles of hydro-, sound- and vapor barrier are used.
Floor slab
When laying factory-made slabs or pouring them in place, it is impossible to ensure a vapor barrier for this structure from moist air from below. Therefore, a vapor barrier layer is applied over the ceiling, taking into account the following nuances:
- if the repair budget is insufficient, cheap films are used in two layers to ensure a thickness of 300 microns, which are easily torn when laying wire mesh and walking by workers;
- fused bitumen materials are more reliable, however, the problem of uneven slab surfaces and height differences remains, leading to pinpoint ruptures of the layer;
- heavy EPDM membranes cannot be torn by feet and nets, even with significant unevenness of the floors, but this material is very expensive;
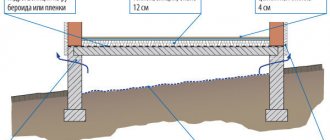
The insulation is laid under the screed taking into account the following diagram of the relative arrangement of layers:
- leveling layer - necessary for making a flat surface on which a vapor barrier can be laid, ensuring its integrity and tightness of the seams, made from a thin screed or bulk material (granules, expanded clay sand);
Leveling the slabs with sand.
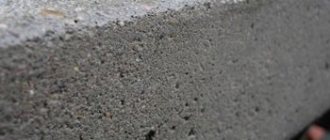
For concrete structures, it is better to use polystyrene foam as thermal insulation.
Reinforcement of the screed on the separating layer with mesh.
Important! Concrete and the acoustic material underneath form a single sound insulation system. The sound wave arriving from below is partially dissipated in the acoustic material, then reflected by massive concrete.
Construction regulations SP 29.13330 recommend a concrete layer thickness of 3 cm. To ensure normal sound insulation, it is recommended to increase this parameter to a minimum of 5 cm.
In the basement level
In this particular case, under the floor slabs there is either a basement or a technical underground. To ensure natural ventilation in the underground, the following products are used:
- the total size of all windows must be at least 1/400 of the underground area;
- the recommended height of windows from the blind area is 0.5 m, so that they are not covered with snow in winter;
- It is forbidden to close vents for the winter.
Screed pie on the basement floor.
These conditions are not always met, so there may be excess moisture in the underground. Therefore, thermal insulation must have minimal moisture saturation and be laid on top of the vapor barrier.
Between floors
Unlike the basement and attic levels, there is no heat loss in the interfloor ceilings. There are heating appliances on all floors. However, to save energy, insulation is still included in the design:
- without this layer, part of the heat will be spent on heating the floor slab, which will reduce the efficiency of the heated floor;
- thermal insulation will reflect the heat flow and completely leave it inside the room.
Therefore, instead of extruded polystyrene foam and foam glass, foamed polyethylene is sufficient here.
Important! The most effective in screeds with heated floor contours on interfloor floor slabs is reflective insulation coated with aluminum foil. The reflective layer should be on top, that is, the polyethylene foam is laid with the foil facing up.
Attic
When installing thermal insulation of the upper floor in a building with an unheated attic, the following factors must be taken into account:
- a dew point appears in this design, as the attic freezes completely;
- the dew point must be moved outward so that condensed moisture can be removed from the surface by natural ventilation;
- To provide ventilation in an unheated attic, dormer windows are used, which must be open all year round, similar to vents in the underground.
Features of the material
The advantage of this insulation is its light weight, therefore, combined with the weight of the screed, it does not exert a significant load on the ceiling and does not weigh down the structure. Heat loss through the floors in a private house, as experts have proven, is at least 10%. This leads to daily overpayments for electricity and heating.
Insulation structure
There are two types of floor bases - concrete in the form of reinforced concrete slabs and primed. Their insulation with Penoplex occurs in different ways. This must be taken into account in order to obtain an effective underfloor heating design.
Preparing the floor for screeding
Experts agreed that laying penoplex in a screed on a concrete base is one of the simplest, proven and reliable methods of floor insulation. The technology is accessible even to those who have minimal experience in construction and repair work.
Pouring screed using the “warm floor” system
Penoplex is not so simple - it is a universal material that combines several important properties:
- The material has high strength when working under bending and contact pressure - you can walk on the surface of the penoplex in shoes without causing significant consequences to the material.
- Working with penplex does not cause discomfort, as, for example, with mineral wool, when it is necessary to use respiratory protection, mucous membranes and skin. The unique properties of extruded polystyrene foam, which is used to make Penoplex, are that the material does not generate dust, gas and volatile substances.
- Another property that makes this type of insulation so attractive is its ability not to absorb moisture, which allows it to be used in a screed on a floor slab above an unheated subfloor. The insulating properties of this material are guaranteed by the manufacturer for 30 years of operation.
Penoplex is stored in sealed tight bags
Before you start insulating the floor with foam plastic under a screed with your own hands, you should familiarize yourself with some useful information that will help you do everything correctly (more details: “Insulating a floor with foam plastic under a screed - installation instructions”).
READ MORE: Damper tape for floor screed: purpose, properties and installation
If you plan to make a screed from cement-sand mortar, then a waterproofing material must be laid on top of the insulation. This is done to protect the material from exposure to moisture from the solution. The waterproofing must be laid overlapping, the joints must be secured with tape.
If a “floating floor” is being made, then even before screeding, it is recommended to lay strips of wooden slabs, which should be equal in height to the thickness of the future screed.
A small gap of approximately 1-3 mm should be left between the screed and the wall. This will help avoid the formation of “sound bridges”.
https://www.youtube.com/watch?v=
After studying all the information about thermal insulation materials for screed, you can choose the most suitable one for yourself. You should also remember about consistency and compliance with the rules when performing floor insulation, otherwise you may get a completely different result than you would like.
I have already said that I agreed with the client to insulate his floors on concrete floors and the floor in the basement on the ground. So I’ll tell you how to insulate a concrete floor with penoplex under a screed in both cases.
I always start my work by stocking up on the necessary tools. In this case I need:
- gravel or crushed stone with a fine fraction;
- river or quarry sand;
- laser level (you can use a water level);
- electric rammer (can be replaced with a manual one);
- mesh for reinforcing the surface of the screed (metal);
- cement;
- metallized adhesive tape;
- material for waterproofing surfaces;
- beacons for leveling the surface of the screed;
- alabaster;
- aluminum rule;
- slabs of extruded polystyrene foam, that is, penoplex.
To make a high-quality screed, I deepened the soil level in the basement by about 50 cm. Moreover, I very efficiently and carefully leveled and compacted the bottom of the pit. If the soil is loose, it will subsequently shrink and the floor in the basement will simply collapse.
Further work is carried out in the following sequence:
- I waited for the soil in the basement to dry completely. Before starting work, its surface must be completely dry. To make this happen as quickly as possible, I opened all the ceiling windows and doors in the basement, ensuring high-quality and intensive ventilation.
The soil in the basement must be leveled and cleared of plants.
- Covered the floor surface with a layer of dry gravel. To avoid shrinkage, I did this in two stages. First, I poured gravel 20 cm thick, and then compacted it with a tamper. Then he poured another similar layer and leveled it too. But in the latter case, I installed a laser level and used it to check the boundary of the fill so that it was without height differences.
The surface is covered with gravel.
- Sand was poured on top. It should be a material with medium grain size. The thickness of the layer is 10 cm. I carefully compacted it with a tamper and checked the filling level again. In some places I had to add a little extra sleep.
Compacted sand in the basement.
- Installed foam boards. I laid them on sand because I was insulating the floor in the basement, which, although people will walk on it, will not be as often as, for example, on the first floor.
Penoplex slabs are laid on sand.
Penoplex has edges treated in a special way, so the plates fit together very tightly, eliminating the formation of cold bridges. I laid the insulation starting from the stairs, so as not to distort the surface of the sand, which I had previously leveled.
After laying out the insulation and carefully aligning all the joints (by the way, I placed them in a checkerboard pattern), I additionally taped all the seams using metallized adhesive tape.
If you are making a floor on soil that will be used intensively, you must first make a rough screed and then insulate it.
- I laid the second row of insulation boards. As I already said, you need a layer of insulation 10 cm thick. But I take 5 cm sheets and lay them in two layers so that the seams do not coincide with each other. Then no cold will definitely seep inside.
The slabs can be laid in one or two layers.
When laying both layers, I always use a laser level and check how evenly and correctly the foam boards are laid out. This then determines how much effort will have to be put into leveling the screed.
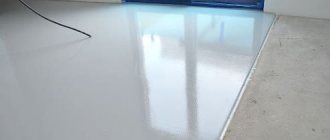
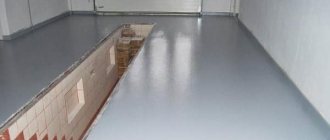
- I laid a waterproofing membrane on top of the insulation boards. By the way, you can replace it with ordinary plastic film.
A waterproofing membrane is laid on the penoplex
In my case, the basement was quite large, so I had to use several sheets of film. I arranged them in such a way that the edges of adjacent sheets overlap each other at a distance of about 10 cm (otherwise the solution will flow inside onto the penoplex).
I also secured the sheets of polymer film with adhesive tape so that they would not move around on the surface, and the waterproofing layer itself would be as airtight as possible.
I wrapped the edges of the film on the walls to form a kind of side about 15 cm high.
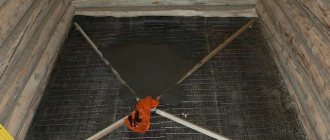
- I placed reinforcing galvanized mesh on the insulation. You can replace it with a composite one.
I placed the mesh on the surface of the insulation so that the reinforcing frame rose slightly (about 2-3 cm). For this I used pieces of plastic. But you can replace them with a special mesh mount. Penoplex is so strong that brackets for a reinforcing frame can be screwed into it.
- I set up beacons for arranging the finishing screed. These are galvanized parts that can be purchased at a hardware store.
Beacons installed on penoplex
I keep the distance from the wall to the outermost beacon at 15 cm, and between adjacent beacons - 1.5 meters, since my rule is a little longer. The beacons must be placed parallel and so that their edge is located strictly at the same level.
I fix the beacons on alabaster mortar. To do this, I place heaps of alabaster mortar on one line along the wall, after which I attach the beacon and set its level. In the same way I place a beacon along the opposite wall. And then I pull a rope between them and use it to orient the intermediate beacons.
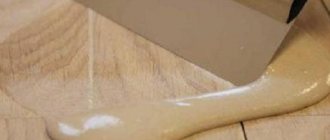
- Mixed the screed mixture. I took one bucket of cement and three buckets of sand, then mixed them together in a concrete mixer and added water until the solution looked like a not very thick paste. If you plan to screed a large floor area, you can increase the number of components, but at the same time maintain their ratio to each other. Or you can also buy a dry building mixture for screed, and then dilute it with water on site.
- Screeded the floor. The thickness of the screed on top of the insulation is approximately 5 cm. But again, remember that I was making the floor in the basement, where people will not walk very often. And on the ground floor, for example, or in the garage, I would advise making a layer 10 cm thick.
READ MORE: Cement floor screed in a private house