The bathhouse has become a very common addition to the ensemble of buildings on the plot of a country house or dacha. This is a comfortable place to relax, as well as a means of maintaining good health. Many people build this facility on their own, so the question of how to fill the floor in a bathhouse is asked quite often. Despite the fact that the process of creating the coating itself is not complicated, there are several preparation rules to make the steam room ultimately convenient to use.
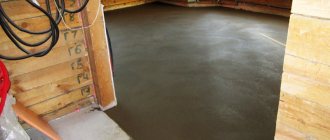
Bath floor
General description of the preparation process
Pouring the floor in a bathhouse is the final part of a long and rather complex process, which includes preparing the base for a screed or other covering. In the steam room and dressing room, as well as the washing room, there is always a large amount of water and moisture. Therefore, floors must be constructed with certain characteristics. They include the following requirements:
- if you decide to make the floor in the bathhouse with your own hands, you should provide a drainage area for water and form a slope towards the liquid drainage point;
- it is necessary to organize ventilation of the space under the floor if the building with a steam room, washing room, dressing room is not located on the ground;
- Before pouring the floor in the bathhouse, it is necessary to lay sewer outlets, arrange a drainage well to collect wastewater, create a drainage hole, or take other measures to drain or accumulate used liquid.
Most of the processes of final design of the coating in the steam room or dressing room can be done in-house. So that solving the problem of how to pour a floor in a bathhouse under tiles does not seem difficult, it is necessary to carefully prepare the base for a clean concrete screed.
Self-leveling flooring in bathhouses is available, but the formation of the coating will force you to follow certain rules. In most cases, pouring is done without a slope, ensuring thorough sealing of the base and ventilation of the room. But mixtures are also available that allow you to make a self-leveling floor in a bathhouse with a slope. They dry quickly and to create a high-quality coating you will need a highly qualified performer.
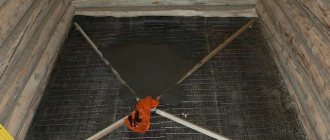
Bathhouse floor with outlet
Calculation of drainage angle
The only effective solution to the problem is to install a drainage system.
Owners of properties located on slopes may think that these concerns are not for them. The water will drain on its own. Dangerous misconception. If the slope horizon is less than 8%, the need for drainage is unconditional. As, indeed, with a steeper location of the land plot. However, in the latter option you can do without inspection wells. The standards allow.
The slope of the drainage pipe is necessary for the spontaneous flow of groundwater outside the site.
In order for the collection and drainage of water from the site to be carried out effectively, it is necessary to conduct preliminary hydraulic studies. Based on their results, an algorithm of actions is built, the necessary materials and structures are selected.
The non-pressure principle of operation of the drainage system is based on the location of drainage pipes at a certain angle to each other. Size matters. Large diameter pipes are not recommended. Water flows through them too quickly; over time, thick layers of silt form on the walls, leading to blockages and the need for a costly procedure for cleaning the pipeline.
Optimal solutions for constructing drainage on a site, calculating its slope, depth and length of trenches are found in the SNiP regulatory documents. To correctly calculate the slope of the drainage pipe, the following mandatory parameters must be taken into account:
- the terrain on which the land plot is located, the degree of elevation changes;
- pipe cross-sectional size – the looser the soil, the larger the diameter;
- type of drains used, for sandy soil - with geotextiles;
- drain depth;
- type of soil layer of the site;
- coordinates of the location of groundwater.
| Pipe diameter in millimeters | Slope in centimeters per meter of length |
| 50 | 3 |
| 110 | 2 |
| 160 | 0,8 |
| 200 | 0,7 |
If the length of the branch branches does not exceed one and a half meters, then differences in their inclinations relative to each other are acceptable.
Storm gutters.
In addition to the slope angle of the drain, it is important to calculate the height and width of the tray. This is done quite simply. As a rule, trays with a width of 20 cm are filled 80% in height with water. Using these proportions, the drainage design is calculated taking into account hydraulic pressure. For example, the height of the tray is 60 cm. It turns out that its width should be at least 80 cm.
What slope of the drainage pipe is considered correct? The slope of the drainage system is usually measured in centimeters per linear meter, and not in degrees. This makes it easier to determine how much one section 1 m long is lower or higher than the neighboring one.
If the pipe slope is insufficient, then the water flows slowly. The weak flow pressure is not able to push through the generated waste, which settles and silts on the walls of the drains. Blockages occur and the system cannot cope with drainage.
We suggest you familiarize yourself with Growing ferns in the garden
On the other hand, too much slope leads to rapid water flow. In this case, fragments of large waste under the pressure of the flow are pressed against the walls of the pipes and get stuck. In addition, there is a huge load on the connecting communication nodes.
The correct slope of the drainage pipe.
Cleaning of drainage pipes is carried out through drainage and inspection wells in two ways:
- mechanical - using a device for passing drains and removing deposits, carried out every 3-4 years;
- hydrodynamic - using pumping equipment and a compressor, clean every 10-15 years.
The drainage system will function properly and efficiently only if the correct pipe angle of 1 meter is observed, according to SNiP. Installation of a drainage system requires a professional, balanced approach.
It is necessary to calculate the depth and level of inclination of the pipes so that they are not subject to blockages and effectively cope with the drainage of wastewater. Experts will help you avoid technical errors in calculations.
5.1.1 When designing sewerage systems in populated areas, the calculated specific average daily (per year) drainage of domestic wastewater from residential buildings should be taken equal to the calculated specific daily average (per year) water consumption in accordance with SP 31.13330 without taking into account water consumption for watering territories and green spaces.
5.1.2 Specific water disposal for determining the estimated wastewater flows from individual residential and public buildings, if it is necessary to take into account concentrated costs, should be taken in accordance with SP 30.13330.
5.1.3 The amount of wastewater from industrial enterprises and the coefficients of unevenness of their inflow should be determined according to technological data with an analysis of the water balance in terms of possible water circulation and reuse of wastewater, in the absence of data - according to aggregated rates of water consumption per unit of product or raw material, or according to data similar enterprises. From the total amount of wastewater from enterprises, the costs incurred in the sewer system of a populated area or other water user should be distinguished.
5.1.4 Specific water disposal in unsewered areas should be 25 l/day per inhabitant.
5.1.5 The estimated average daily consumption of wastewater in a populated area should be determined as the sum of expenses established according to 5.1.1-5.1.4. The amount of wastewater from local industrial enterprises serving the population, as well as unaccounted expenses may be accepted (if justified) additionally in in the amount of 6-12% and 4-8%, respectively, of the total average daily water disposal of a populated area (with appropriate justification).
5.1.6 Estimated daily wastewater flow rates should be taken as the product of the average daily (for the year) flow rate according to 5.1.5 and the daily unevenness coefficients adopted in accordance with SP 31.13330.
5.1.7 The estimated total maximum and minimum wastewater flow rates, taking into account daily, hourly and intra-hourly unevenness, should be determined based on the results of computer modeling of wastewater disposal systems, taking into account the schedules of wastewater inflow from buildings, residential areas, industrial enterprises, the length and configuration of networks, the presence of pumping stations and etc.
We suggest you familiarize yourself with How to increase the immunity of an adult at home
Table 1 - Estimated total maximum and minimum wastewater flow rates, taking into account daily, hourly and intra-hourly unevenness
| General coefficient of unevenness of wastewater inflow | Average wastewater flow, l/s | ||||||||
| 5 | 10 | 20 | 50 | 100 | 300 | 500 | 1000 | 5000 or more | |
| Maximum at 1% security | 3,0 | 2,7 | 2,5 | 2,2 | 2,0 | 1,8 | 1,75 | 1,7 | 1,6 |
| Minimum at 1% security | 0,2 | 0,23 | 0,26 | 0,3 | 0,35 | 0,4 | 0,45 | 0,51 | 0,56 |
| Maximum at 5% security | 2,5 | 2,1 | 1,9 | 1,7 | 1,6 | 1,55 | 1,5 | 1,47 | 1,44 |
| Minimum at 5% security | 0,38 | 0,46 | 0,5 | 0,55 | 0,59 | 0,62 | 0,66 | 0,69 | 0,71 |
| Notes 1 The general wastewater inflow coefficients given in the table can be accepted when the amount of industrial wastewater does not exceed 45% of the total flow. 2 For average wastewater flow rates of less than 5 l/s, the maximum unevenness coefficient is assumed to be 3. 3 5% provision assumes a possible increase (decrease) in consumption on average 1 time during the day. 1% – 1 time for 5-6 days. 4 A 5% probability is accepted to determine costs at the highest degree of filling of pipes in accordance with Table 2. A 1% probability is accepted when the pipes are completely filled, and should also be taken into account when determining the volumes of receiving tanks of pumping stations. | |||||||||
Table 1 (Changed edition, Amendment No. 1).
5.1.8 Estimated costs for networks and structures when supplying wastewater by pumps should be taken equal to the productivity of pumping stations.
5.1.9 When designing drainage communications and wastewater treatment facilities, the technical and economic feasibility and sanitary and hygienic possibility of averaging the estimated wastewater flow rates should be considered.
5.1.10 Sewerage structures must be designed to pass the total calculated maximum flow rate (determined according to 5.1.7) and additional influx of surface and groundwater unorganized into gravity sewer networks through leaks in well hatches and due to groundwater infiltration.
where is the total length of gravity pipelines to the calculated structure (pipeline site), km; – the value of the maximum daily amount of precipitation, mm (according to SP 131.13330). Test calculation of gravity pipelines and channels with a cross section of any shape for the passage of increased flow should be carried out at a filling height of 0.95.
5.2.1 Hydraulic calculations of sewer gravity pipelines (troughs, channels) should be performed for the calculated maximum second wastewater flow rate according to tables, graphs and nomograms. The main requirement when designing gravity collectors is to skip the calculated flow rates at self-cleaning speeds of transported wastewater.
We invite you to familiarize yourself with the Recommendations for the design of industrial roofs with a warm attic for residential buildings in climatic region I
5.2.2 Hydraulic calculation of pressure sewer pipelines should be carried out in accordance with SP 31.13330.
5.2.3 Hydraulic calculations of pressure pipelines transporting raw and digested sludge, as well as activated sludge, should be made taking into account the traffic mode, physical properties and compositional features of the sludge. At a humidity of 99% or more, the sludge obeys the laws of movement of waste liquid.
5.2.4 The hydraulic slope when calculating pressure sludge pipelines with a diameter of 150-400 mm is determined by the formula
where is the sediment moisture content, %; – sediment movement speed, m/s; – pipeline diameter, m; – pipeline diameter, cm; – friction resistance coefficient along the length, determined by the formula
How to drain liquid from premises
The problem of water drainage from the washing room, steam room and dressing room is solved depending on the conditions at a particular work site. May be available:
- a storage pit for wastewater, located at a certain distance from the premises;
- porous, non-freezing soil that can act as an excellent absorbent;
- free space outside the premises where you can arrange a small storage pit;
- space is sharply limited (the construction, for example, is carried out in the basement).
Why do you need a slope?
The slope is necessary for the smooth transportation of water to the drainpipes
An inclined plane causes fluid to move. In the vertical pipes of the east it will move without problems. In order for it to flow down the gutters of the first part of the drainage system, they must be laid at an angle. If this is not done, water will collect in the gutters, stagnate there, and when accumulated, overflow the edges of the gutters, flooding the walls and foundation of the building.
There is also the opposite side of the situation. If the angle of inclination of the drain is large, this will primarily damage the facade of the house. The water drainage system from the roofs will not stand out in the best way.
In this case, water drainage will occur as efficiently as possible. But at the junction of the gutters with vertical pipes, a large volume of water will accumulate, which the pipes may not completely accept, and the same overflow may occur. The problem can be solved by installing larger receiving funnels. But this will also affect the appearance of the facade.
Preparing the base on the ground
The two main problems that you will have to deal with in a structure located on the ground are as follows:
- reverse capillary movement of moisture from the ground to the screed;
- intense loss of heat, which simply goes into the ground.
When pouring the floor in a bathhouse with a slope, if construction is carried out on the ground, several features must be taken into account:
- you will have to make a massive pillow that will stop the rise of moisture;
- the cushion should act as a damper if the soil in the construction area freezes;
- The rough screed is made with increased thermal protection.
The problem of creating a reliable foundation for a floor covering in a building on the ground is solved as follows:
- the depth of the bottom point of the pillow should be 500-600 mm from the ground level;
- A layer of construction waste, stone fragments, large fractions of gravel, and concrete fragments is poured as a damper. Recommended zone thickness – up to 400 mm;
- A two-layer pillow acts as a neutralizer for the reverse movement of condensate. It consists of zones of backfilling fine gravel with a thickness of 100 mm, and 50 mm of sand. Each layer after filling is leveled, wetted, and compacted with a vibrating machine;
- After the layers of sand and gravel have dried, you can lay the rough support screed.
Selection of sewer pipes
To equip the drainage system, standard plastic sewer pipes with a diameter of 50-100 mm are used. Gray polypropylene pipes can be used inside the bathhouse. Channels of 50 mm are usually laid from each water collection point to the outlet.
Two types of pipes for internal and external communications
For external communications, orange PVC pipes will be required; they are used to equip sewer systems laid directly into the ground, without insulation and the use of concrete trays. The outlet pipe is selected with a diameter of at least 100 mm.
The drain for water from the steam room or other compartments in the bathhouse will be connected to the general sewer system, as a result, a 50-100 mm adapter will be required, and in addition, a groove will be made for the pipe space ventilation equipment. If you plan to use the bathhouse in winter, then the communications will, at a minimum, need to be insulated in the area from the wall to the multi-chamber septic tank and equipped with a cable heating system.
In addition to choosing the design of the shutter, it is advisable to select the size of the mesh so that it is convenient to lay the tiles on the floor: it is desirable that the size of the drain be a multiple of the size of the tile (including mosaics). Pay attention to the material of the case. For a shower stall in an apartment or house, plastic is quite suitable. These are the most affordable options. Floor drains made of polypropylene are more expensive, and stainless steel is even more expensive.
There are even corner models
You can make a floor with a drain in the shower with your own hands
It is more convenient to work with a level (laser level) that has a plane builder function. It will make the work much easier.
The first step is to remove a branch from the sewer riser where the water will flow. The sewer pipe is laid with the required slope (2 cm by 1 meter), the socket is placed at the intended location of the drain connection. After the sewer outlet is installed, take a drain and make preliminary markings - you need to mark the height of the screed on the walls of the shower stall:
- We install the level so that it marks the axis of the drained sewer pipe.
- We position the drain so that its axis is approximately 1.5 cm higher than the axis of the sewer pipe (see photo). The axis of the drain should be slightly higher than the axis of the sewer pipe
- After this, we raise the leveling beam to the installation height of the ladder grating (taking into account the fact that another grate will be installed - add its thickness).
- Since normal water flow requires a slope. It is made 1-2 cm per meter long. From the existing ladder grating line upward, set aside the required distance. Mark the line for laying the screed on the walls
- Based on the mark found, we set the leveling beam. This will be the level of screed that must be maintained along the walls. You can draw this line with a pencil or marker.
Now you can measure the height to which you will need to raise the floor in the shower stall. It largely depends on the parameters of the ladder (its height). Based on the obtained figure, it will be necessary to plan the layers of screed and their thickness.
Usually it is assumed that polystyrene foam 5 cm thick is placed in the screed. The minimum thickness of the screed is 3 cm (more is possible, less is not). This is in the center near the drain; towards the edges it becomes thicker (the required slope is created). From the existing screed height line, we put the resulting figure down (add the thickness of the polystyrene foam and the screed). It will be necessary to bring the rough screed to this level.
From the existing height of the screed we set down the thickness of the insulation and DSP
To reduce the load, the rough screed is made of lightweight concrete. It can be foam concrete or expanded clay concrete. Wet work can be minimized. To do this, you can lay foam blocks at the missing height and fasten them with reinforcing mesh. You can pour a 3 cm layer of DSP on top.
When installing such a base, a damper tape is needed along the walls. Since in the presence of polystyrene foam or any other insulation, the floor may sag a little, it must be made incoherent with the walls. This is why you need a damper tape. It is placed around the perimeter of the base. In height it should be 1-2 cm above all layers.
You can use a special damper tape, or thin foam plastic (1 cm thick or less). Even corrugated cardboard will do. The remaining tape is then cut flush with the screed. She did her job - we got a floating slab.
The poured screed must stand for at least a week - the concrete must gain at least 50% strength. After this, you can continue working.
Waterproofing
To prevent the drain floor from leaking, the shower stall needs good waterproofing. It is better to make it multi-layered. One of the layers can be done at this stage.
Coating waterproofing is usually used. This could be bitumen mastic or special waterproofing for swimming pools. It is applied with a brush in several layers, extending onto the walls at least 30 cm. These mastics form an elastic, waterproof film on the surface without seams or joints. This type of waterproofing is highly reliable.
Particular attention should be paid to the processing of corners. They can even be glued with a strip of rolled waterproofing (such as Gidroizol, etc.). Apply the first layer of coating waterproofing to the walls, then glue the joint between the wall and the floor with roll waterproofing (set on the same compound), and apply another layer on top.
Multi-layer waterproofing is more reliable
For those who like to do everything with a margin of safety, the first layer of waterproofing can be laid even under the first corrective screed. All rules remain the same as described above.
Instead of coating waterproofing, you can use roll waterproofing. But you will still have to lay it on bitumen mastic, lubricating it well and pressing the seams. The approach to the walls is approximately the same - about 30 cm. If the width of one roll is not enough, the panels are laid with an overlap of 15 cm, they are well coated with mastic.
To ensure that the tiles on the floor of the shower stall look at least normal, it is better to position the drain grate symmetrically relative to the tiles. Therefore, first, dry, lay out the tiles on the floor (taking into account the seams). When laying out, remember to step back a little from the walls - by the thickness of the tiles and glue.
It is not at all necessary to make the drain in the center - it can easily be moved to any wall. In this case, the far wall from the entrance was chosen to reduce the possibility of water spilling out of the booth
Next, we choose the position of the ladder so that everything looks good and, at the same time, it is necessary to make a minimum of trimmings. Not only do they take up time, they also spoil the view.
The next stage is installing the drain and laying thermal insulation. A drain is placed at the selected location, it is connected by a pipe to the sewer outlet (during installation, do not forget about the slope). After this, insulation boards are laid. It is cut so that the installed ladder can be covered. A damper tape is also required around the perimeter.
Gangway installation
The joints of polystyrene foam are glued with tape (so that moisture does not leak out of the concrete). If there are large gaps, they can be tightly packed with scraps and then sealed.
Filling the screed
A reinforcing metal mesh is placed on the laid insulation. A ready-made mesh of steel wire with a diameter of 3 mm and a pitch of 10 cm is sufficient. It is cut to size and laid on polystyrene foam. Next, they begin to install beacons.
The floor with the drain must be sloping towards the drain. To do this, you need to set up beacon strips. You can use standard beacons (from a hardware store) or wooden planks. They are installed so that their surface sets the required slope.
When the preparatory work is completed, the ladder bowl is oriented along the walls. This can be done using a square. At the same time, you need to align the measurements as you determined during fitting.
Fill the floor with a drain and an installed drain with ordinary cement-sand mortar (for 1 part of cement of a grade not lower than M400), 3-4 parts of coarse sand. To give the coating water-repellent properties, you can add appropriate additives.
The poured solution is left to “ripen”. This usually takes 28 days. In this case, you need to take care of the screed: maintain stable humidity, avoid low temperatures (optimally around 20°C), and avoid direct sunlight. The easiest way is to cover the piece with matting (an old bag) and/or film.
Preparing the foundation in a house with a subfloor
If in a private house or other building where you plan to build a bathhouse, there is a high foundation and there is an underground floor (the distance from the ground to the load-bearing floor joists), you can make an all-season flooring. To do this, you will need to provide ventilation. Pipes are led into the underground space through the plinth; it is advisable that they be located on different sides of the bathhouse.
An all-season bathhouse floor will require careful waterproofing, antifungal and anti-mold treatment of the logs. Therefore, in order to achieve optimal results when solving the problem of how to fill the floor in a bathhouse with a slope, it is recommended to dismantle and reassemble the flooring when such an option is possible. This will allow the lags to be treated and ensure their durability.
How to fill the floor in a bathhouse: with a slope, under the drain, under the tiles?
A person who decides to build a bathhouse on his own asks the question: how to fill the floor in the bathhouse? It would seem that this could be difficult, but it has its own characteristics.
If you neglect them, the result is that instead of the pleasure of visiting the bathhouse, you can get negative emotions in the form of frozen feet, water that does not want to drain due to problems with drainage, and high fuel consumption to maintain a sufficient level of heat.
Let's look at everything in more detail.
Preparation is key
First we build the foundation. Next, we think about the drainage system. Here we pay attention to the soil; further actions depend on this.
An ordinary drainage pit is suitable only if the soil under the future bathhouse is sandy, that is, it will absorb water well.
Fill the hole with crushed stone, sand or gravel; fragments of bricks are best suited, since they can be taken completely free of charge, having agreed on this at the construction site.
It is enough to make the hole depth 50-60 cm.
If the soil under the future bathhouse is made of clay, then more effort will be required. What is necessary?
We make a small pit under the planned drain, from which we will later lay a pipeline.
To do this, we install a sewer pipe; it will, accordingly, pass under the foundation and discharge water into the drainage pit. At the end of the pipeline you need to make a valve.
This trick helps avoid unpleasant odors coming from the ditch. We seal the walls of the pit with clay or concrete with a small layer of 5 cm and cover them with a metal grate.
How to make the base of the future floor?
First we compact the soil. In the place where the drain will be, we make a slight slope. Next, we fill everything with a layer of crushed stone, about 15 cm high, also with a slope towards where the drain will be.
Thus, we make a kind of pillow, the role of which is to absorb moisture formed during condensation due to temperature differences. Once again we compact everything. Pour in two layers.
Video:
The first layer should be no more than 5 cm high. Also, do not forget about the slope for the drain.
We fill the joints between the floor and the walls with bitumen to avoid water seepage. To provide better thermal protection, the solution is made based on perlite.
It has good thermal insulation properties and also allows you to increase the fire safety of the future bathhouse.
This solution is mixed in several stages (it is more convenient to use a concrete mixer):
Half a bucket of cement is poured in, immediately or in parts, without ceasing to stir.
We achieve homogeneity of the mass, then add one bucket of perlite and 2 liters of water.
When the solution becomes free-flowing, then you can stop and leave the mixture to “rest” for 10-15 minutes.
The finished mixture should become plastic, so after a pause it is necessary to continue kneading until the desired result is obtained.
Video:
This solution dries for 5 to 7 days. The concrete solution takes approximately 14 days to dry.
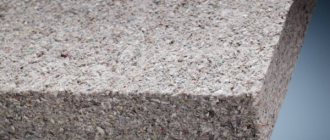
The next step is laying a thermal insulation layer. This can be felt, expanded clay, mineral wool.
The best option would be a layer of felt, which provides additional adhesion for the screed and retains heat well.
We fill the insulated surface with a second layer of concrete, which we then reinforce. This can be done using a chain-link mesh.
After the concrete is compacted, a sand-cement mixture is applied on top.
We level, do not forget about the drainage, with a regular board. Now we wait for the surface to partially dry and moisten it every day to avoid the formation of cracks.
The floor is ready, what's next?
After the floor has been prepared, you need to take care of its beauty and convenience. We are talking about direct coating of the concrete screed.
Most often, ceramic tiles are used in sinks and showers.
Video:
Metlakhskaya is well suited for a bath due to its performance qualities. How is it laid?
Dry cement is applied to our still concrete floor, half a kilogram per square meter, and the tiles are applied directly to it by pressing.
It is better to seal the seams between the tiles after two days.
If you still choose this option, then you can put wooden canopies or polymer mats on the floor.
The latter will need to be dried after each use to avoid the spread of bacteria.
Synthetic materials: linoleum, laminate - it is also better not to use.
How to make a greenhouse on the roof of a garage or house
Video:
Why? Because at high temperatures they can begin to release toxic substances, as well as swell and become very hot.
The bathhouse is designed to improve health, and not contribute to its deterioration, so you should not do this.
Floor pouring technology
To understand that you can fill the floor in a bathhouse with your own hands, let’s look at some nuances:
- If you want to lay tiles in the future, then a simple cement mixture is suitable for screeding. Otherwise, you need to use a mixture of sand and cement. One bag of cement is needed per one and a half square meters;
- If you are laying tiles, you can make the task easier for yourself and use self-leveling screeds;
- The floor should be poured from the far corner from the entrance, using circular movements. This process should not stop, so it is better to do this work together: one pours, the other prepares the solution;
- To speed up the drying process, plasticizers are added to the solution, which will help avoid the formation of cracks and increase the strength of the screed;
- As a result, the color of the screed should be a uniform gray. All work is done correctly if the gaps are no more than 4 mm. Strength is determined with a hammer; if the surface is not damaged after impacts, then everything is fine.
For clarity, you can watch a video about how to pour the floor in a bathhouse.
Video:
Warm floor
The most important thing in a bathhouse is the floor, which must be warm. This can be achieved by installing a cable, or by using simple bottles.
- The first way is to install a heated floor system in the bathhouse. Guides are installed on the reinforcing surface. Before laying the cable, you need to measure the resistance to ensure its serviceability. Lay the cable correctly, slightly tensioning it and excluding kinks and twists. Next, install a thermostat to control the heating level. The temperature sensor is usually insulated with a corrugated tube, usually located at the same level with the concrete screed, so that if problems arise it can be replaced. You can watch the installation of a heated floor system in the video;
- A warm floor in a bathhouse can be made from bottles. The obvious advantages of this method are that you can do it yourself and not spend a lot of money on installing the system. Both glass and plastic bottles are suitable. The first ones must first be heated and closed with a tight lid. It is enough to fill plastic ones with something, for example, sawdust. After a kind of crushed stone cushion has been made on the floor and a reinforcing mesh has been laid, the required number of bottles are laid around the perimeter. It is better to place them with their necks facing each other so that there is as little space between them as possible. As always, do not forget about the slope and drainage of water. Next we fill it with concrete. After the first layer has dried, we begin pouring the second layer, approximately 5 cm thick. The floor made of bottles will last longer if it is iron-plated. That is, while the concrete has not yet hardened, we cover its surface with a layer of pure cement for strength. As usual, don’t forget about slope and drainage.
You will have to make the floor from bottles yourself, without involving specialists, since this is a folk method that violates all recommendations and SNIPs.
Video:
Basic work on creating a floor
Work on creating a floor in a bathhouse must be carried out carefully, with attention to all details. It should be remembered that in the steam room and washing room there is always a lot of water, and there are sudden changes in temperature. Therefore, a clear knowledge of how to fill the floors in a bathhouse under a drain, with or without a slope, under ceramics or plank flooring will help to do the job so that the coating lasts a long time and does not cause trouble.
- At the first stage, the surface of the rough supporting screed of the bathhouse is carefully waterproofed using a coating method. You can use both bitumen mastic and one-component polymers or special ready-made building mixtures.
- A special construction tape is glued around the perimeter of the room, which is separately coated with a waterproofing agent.
- The second stage is laying roll materials under the floor screed in the bathhouse. Ruberoid and glassine are effective, inexpensive, but have a limited service life. You can use a thick polymer film. Excellent results are shown by bituminous materials based on fiberglass and fiberglass. The strips are overlapped by 10-15 cm. In the case of bituminous materials, the joint area is melted with a construction hairdryer. The polymer film is glued along the seam with wide tape. The waterproofing should extend onto the walls, about 10 cm.
- The third stage is laying insulation. The classic option for bath floors is felt. Basalt, mineral, and glass wool show good results.
- The fourth stage is the creation of a second layer of waterproofing under the floor screed. Rolled materials are laid on the insulation. To save money, it is allowed to use polymer film. If you have some money left over, you can lay a one-sided membrane that will remove moisture from the insulation. The rules for creating a coating are similar to those given above for the first layer of waterproofing.
- The penultimate stage is gluing the perimeter of the bathhouse rooms with damper tape to compensate for thermal expansion of the final screed.
Video description
About fixing defects in the following video:
- The interval between the brackets is not maintained
. The distance between the holders of the plastic structure is set to 0.9 cm; if the system is metal, it can be increased to 1.2-1.5 m. An increase in these dimensions will also result in probable deformation, stagnation and freezing of ice.
- The edge of the roof is offset from the center of the gutter
in one direction or another. In this case, there is a great temptation to install the tray with an angle towards the wall (or vice versa). During heavy rainfall, water will begin to overflow even if the main slope is correct.
Deformations can be caused by external reasons. They are especially often found in early spring, when the period of snowfall and ice ends. To prevent gutters from being subjected to excessive snow loads and deformed, snow retainers and anti-icing systems are installed on the roof. Good thermal insulation of the roof will also be useful.
Anti-icing system Source liderbudowlany.pl
This might be interesting!
In the article at the following link, read about a modern house with cedar trim in Norway.
Floor care
After forming the floor surface, you should take care of it for 8-10 days. The screed in the bath should be moistened and covered with film to prevent severe loss of moisture. After this period, the surface is ironed. To do this, pour a layer of cement up to 3 mm thick onto it, wait for it to gain moisture until a slurry forms, which is rubbed into the screed.
The surface treated in this way becomes stronger, more durable, and after sanding it becomes smooth, suitable for laying any coating. Such a floor in the bathhouse is warm, smooth, and makes it easy to create a comfortable, stylish environment at the owner’s request.
Main stages of floor construction
Upon completion of the arrangement of the drainage and sewer system, we begin to form the foundation for the future floor. For this:
- We create a cushion for pouring concrete mortar, which allows us to limit heat loss. We deepen the soil by 50 centimeters. Three quarters of the total volume is filled with construction waste that is not subject to rotting processes.
- We cover the resulting surface with clay and, after drying, pour a fifteen-centimeter shock-absorbing layer of sand with fine gravel or crushed stone. This level will allow the absorption of moisture that results from temperature changes. We carefully compact the layer, maintaining the slope specified by the project.
- Pour the first layer of concrete mortar. If possible, we use perlite additive - an excellent heat insulator. When working with perlite, pay attention to its properties - especially fine fraction and minimal weight. When mixing the concrete solution, use a room protected from the wind to avoid increased dust formation. The thickness of the first layer of concrete when pouring the base should not exceed 4-6 cm. We isolate the joints between the base and the walls from moisture penetration with bitumen.
- We wait for the solution to dry. It depends on weather conditions, the period ranges from several days to 2-3 weeks.
- We lay thermal insulation material. To prevent it from being damaged by moisture, it is advisable to additionally use roofing felt for insulation.
The most important thing in a bathhouse is the floor, which should be warm
- The next stage is pouring the floor in the bathhouse with a second layer of concrete mortar. At this stage of work, a reinforcing mesh is used to protect the cement base from cracking during operation. We compact the concrete, trying to get rid of air cavities as much as possible.
- Leave the surface alone until completely dry. To ensure that concrete sets evenly during the hot season, we moisten the base using a sprayer.
- The final stage is applying the cement mixture to the entire surface and leveling the concrete according to the rule. Make sure that the slope of the covering is correct towards the drainage hole. Apply deep penetration waterproofing impregnation to the finished base.
We would like to focus your attention on the fact that if you do not plan to use the bathhouse during the cold season, then when mixing the concrete solution, you can exclude perlite from the recipe. Use the usual cement-sand composition of one to three, adding 1/10 of lime. This will reduce financial costs without reducing the strength of concrete.