Concrete screeding of a garage roof is only possible if you are confident in the reliability of the foundation and walls of the building. Most often, it makes sense to pour a screed on a brick garage, which is installed on a strip or slab foundation and is designed for a long service life.
Most often, a concrete garage roof screed is performed with a horizontal or inclined roof structure. The remaining options - gable or complex geometry of the roof structure - pouring concrete does not make sense, it is too expensive.
What are the advantages of a concrete roof screed over monolithic reinforced concrete floor slabs and when should you choose concrete roofing?
Slab reinforced concrete floors or concrete garage roof screed
Installing floor slabs on the roof is much more convenient and faster than pouring a cement screed. The only downside is that such coverage will cost more and you will need to hire lifting equipment.
When choosing a roofing option, an important fact is the load-bearing capacity of the walls and foundation of the garage. If the garage is old and the foundation is shallow and strip, then it is better to choose a roof structure made of wood.
Even at the roof design stage, it is necessary to calculate all the loads on the walls, taking into account the weight of the roof covering.
Concreting on corrugated sheets
The weight of the floor can be reduced by concreting the roof over corrugated sheets.
Sheets of grade “N” are strong and quite rigid, resistant to corrosion and light in weight. Thanks to the wave, the sheet forms additional stiffening ribs and, during subsequent casting of the concrete floor slab, increases the load-bearing capacity of the roof. Then, using such a roof, you can confidently build an extension over the garage.
The use of a profiled sheet when casting such a concrete slab reduces the cost of purchasing materials for formwork and reinforcing frame, since it itself is a permanent, durable formwork for the floor. The consumption of concrete mortar for such a floor slab will also be lower.
This method allows you to simplify the work of pouring a concrete screed for the garage roof and avoid installing complex formwork. This technology reduces the load-bearing load on the walls and foundation of the garage.
An additional advantage of the technique is resistance to adverse weather conditions and a beautiful finish inside the garage - a finished ceiling made of profiled sheets, resistant to open fire and high humidity.
When calculating loads and pouring concrete using this technology, it is important to take into account that when installing a frame for corrugated sheets, three load-bearing beams must be installed along the length of the sheet. To minimize the bending of the sheet, the pitch between the longitudinal beams is set to 50 cm.
Eliminating minor causes of a leaking garage roof
A partially leaking roof can be repaired locally and independently. For example, if it is made of slate, then you will need to remove the damaged areas and replace them with new ones or repair the small cracks that have formed with cement mortar.
If the roof in the garage, made of metal corrugated sheeting or metal tiles, is leaking, you will first need to clean off the rust and other debris from it, and then apply several layers of bitumen mastic to the defective areas or make a patch on the damaged small areas using a zinc-lead alloy using a soldering iron. When completing roof repairs, it is recommended to partially or completely paint it with anti-corrosion paint. If the damage to the corrugated sheet is more significant, the problem areas will also need to be replaced entirely, as is the case with slate.
Common causes of leaks in adhesive or adhesive-free drainage systems are violation of the instructions prescribed during installation, mechanical damage, or improper roof installation. If there is minor damage to the drain, it will either need to be cleaned of any debris that has gotten inside, or the seams that have come apart on the pipe will need to be re-strengthened.
If the insulation layer gets wet and the garage roof is leaking, then it can be dried in the wind and sun. However, if water has washed out the binders from fiberglass or basalt insulation, then it is not advisable to reuse such insulating material; it should be replaced with a new one.
You can also prevent local leaks using a superdiffusion membrane or a water barrier laid on top of the insulation.
Return to contents
How to make a simple screed on the roof of a garage - detailed instructions
A screed on the garage roof is the most reliable flooring option. If you choose a good roofing material, the durability of this coating is the highest among other garage roofing options.
Materials for concrete garage roofing:
- ready-mixed concrete (grade 250), it is advisable to choose a composition with anti-frost and water-repellent additives. The cost of such a solution will be about five percent more expensive, but the screed’s resistance to moisture and low temperatures will be much higher;
- preparing concrete mortar with your own hands using a concrete mixer. We take the composition in the ratio of 30 kg of cement (M400) - 40 kg of sand and about 30 liters of water, you need a solution consistency like thick sour cream, you will also need medium-fraction crushed stone. You can add lime for plasticity (the ratio to cement and sand is 1 to 6). Lime must be dissolved in water and infused, then added to the dry mixture of sand and cement;
- It is good to add ready-made air-entraining additives and anti-freeze additives to the concrete solution to reduce thermal conductivity (can be bought at a hardware store);
- for load-bearing roofs you will need I-beams (12 or 15) for a standard garage no longer than five meters;
- reinforcement (10 mm), for knitting the reinforcing frame you also need knitting wire;
- old boards or thick plywood for formwork;
- rolled roofing felt or steel sheets - the basis for pouring concrete.
Let's consider the work in stages, focusing on important nuances that must be remembered when pouring the garage roof.
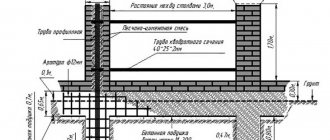
- first you need to position the floor beams, securing them securely in the wall (we cement them);
- then roofing felt (in two layers) or metal sheets are laid. You can also install profiled sheets over the beams, which will make the garage roof lighter and stronger;
- We begin laying the roofing felt from the bottom point of the roof. We place the sheets overlapping, it is necessary that the roofing material fits tightly to the roof, for this it is heated and compacted several times. It is important that after installing the roofing felt layer there are no bubbles or voids left;
- if the walls of the garage are one and a half bricks long and you are not sure that the support of the ceiling only on the walls is reliable, then you need to install additional supports;
- Now you need to set up the formwork. You can cover the roof with plastic film so that the concrete does not spread and cement laitance does not leak out.
- after that you need to set the beacons according to the level. We take into account that it is necessary to slope the garage roof by approximately two degrees to drain rain and melt water;
- reinforcement can be done using a mesh (cell 20x20) or by tying a reinforcing frame from reinforcement. It is not advisable to weld the frame, since when the concrete hardens, the screed may simply break;
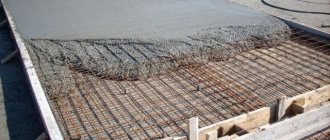
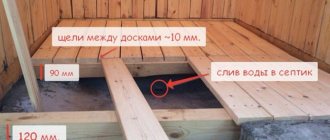
- It is necessary to leave a gap of 4–5 cm between the reinforcing layer and the formwork so that the metal does not protrude beyond the screed and critical cold bridges do not form. We level the surface with a layer of crushed stone of the middle fraction;
- It is better to pour the screed even with your own hands right away, in one go, this guarantees an even layer of concrete strictly along the beacons, without gaps and cracks;
- If it is not possible to fill the entire surface at once, then we concrete it in strips, along the beacons. Screed thickness – at least 15 cm;
- the inner surface of the formwork must be lubricated with working oil so that after the concrete has hardened, the boards can be easily removed without damaging the screed;
- During the concreting process, it is necessary to “pin” the layer with reinforcement to prevent the formation of bubbles and voids, and also to compact it thoroughly.
- To ensure that the concrete mixture is evenly distributed along the edges of the roof, tap the formwork around the perimeter during the concreting process. Fill the screed in two layers, leveling each one;
- when the concrete sets, it will take a maximum of a day, depending on the weather, it is necessary to level and rub the surface so that there are no cracks left through which the screed quickly collapses;
- Concrete hardens, depending on the brand and weather conditions, 14 - 28 days. In hot weather, the screed must be periodically moistened with water from a spray bottle to prevent cracks from forming, and in extreme heat, the concrete surface must be covered with a layer of film or boards. Concrete should not be allowed to dry in direct sunlight;
- During the hardening period of the screed, the surface is ironed several times. We water the screed with water from a hose, pour a thin layer of cement and rub it into the surface with a brush. It is necessary to ensure that the surface stops absorbing powder, is even and smooth, without a network of small cracks and water stains;
- in the first three days, when the concrete screed hardens, it needs to be moistened with water in the morning and evening, then one wetting per day for a week is enough. If the weather is hot and dry, then you need to wet the concrete every four hours;
- the formwork can be removed ten days after concreting.
If all work is carried out in compliance with technology and no expense is spared on high-quality additives, then such a garage roof will last for many years. How to repair a concrete screed?
Completing of the work
Flooding your garage roof is not a big deal. Here you just need to adhere to some rules. After all, the humidity in the room will depend on the correctness of the work, and this is extremely important for the car. Let's directly look at what to fill, how to fill, and what needs to be provided for this. All work is done with your own hands and therefore the price will not be high. Before starting work, you should look at photos and videos and draw up a work plan.
Features of the roof covering of a flat garage roof
A flat roof is the best roofing option for a garage. These structures are made of reinforced concrete slabs that rest on the walls of the garage. It should be noted that such a solution has a number of disadvantages:
- The presence of gaps between floor slabs and at the joints of slabs and garage walls.
- It is possible to use only rolled waterproofing materials.
- Surface screed is required.
Carrying out waterproofing using roofing felt
Before you start covering the roof, you need to clean the surface of dirt and debris. We check the condition of the roof for leaks and damage to the slabs. The wet surface must be dried, and the roofing itself is possible only in dry weather. You can use a blowtorch and torch to listen to the surface. If there is a roofing covering, it must be checked for holes, swelling and peeling. In some cases, a new screed is required. Why is a thin layer of concrete poured?
Don't forget about waterproofing
To complete this job you will need the following materials:
- Mastic.
- Ruberoid.
- Petrol.
- Primer for roofing felt.
- Bitumen.
- Also for work you will need spatulas, brushes, a bitumen container, a sharp knife and other tools.
The required amount of bitumen depends on the surface area and the presence of unevenness. In most cases, two buckets of bitumen are enough to cover the roof of a 30 square meter garage. We heat the bitumen in a metal container and prepare the primer.
Attention: Remember that when heating bitumen it is necessary to add low-octane gasoline to it. If you do not use gasoline, the mixture may ignite.
Surface preparation
Using a primer for roofing felt, we seal existing cracks, crevices and peelings. Final leveling is carried out using heated bitumen.
Attention: Remember that the maximum possible layer of bitumen should not exceed 5 millimeters. Otherwise, during the winter season, cracks and tears may appear in the roofing material.
We remove all the irregularities
If you are laying a new layer of roofing felt on top of the old coating, you must preheat the roof surface. After pouring the bitumen, you can begin laying the roofing felt:
- Installation work is carried out with an overlap with a tolerance of 15 centimeters.
- If the roof surface has a slight slope, the laying of roofing material must begin from the lowest edge and lay the sheets to the highest point of the roof.
- The roofing material must be thoroughly heated and compacted tightly. Unglued areas should be completely absent. For this work we can recommend using a special soft roller.
- When laying roofing felt, make sure there are no air pockets. Condensation forms in such air pockets, which leads to the destruction of the roofing.
- The roofing material on top is again filled with concrete, which is spread in a thin layer. The second layer of roofing material must be laid perpendicular to the first. The edges of the material are wrapped and nailed with slate nails. The roofing felt is again lubricated with mastic on top. To protect the coating from moisture and mechanical damage, we recommend treating the edges and joints with a primer.
- The top layer of roofing felt for a garage roof should have a coarse powder that will protect the material from mechanical damage.
Attention: Remember that installation of roofing felt is carried out exclusively on hot bitumen.
- After completing the work, we check the coating for the absence of bubbles and the quality of the joints. If high-quality materials are used and installation technology is followed, such a roof for a garage can last about 15 years. It will perfectly protect the garage from snow, rain and other weather conditions. The use of high-quality coating will allow the roof to operate for at least 30 years.
Experiment with liquid rubber and concrete
It is possible to use such roofing materials for the garage roof as liquid rubber and concrete:
Attention: Concrete coverings are used exclusively for flat roofs. If the roof has a slope, the concrete will begin to flow, which significantly complicates the quality of pouring the coating.
- Installation work is carried out using formwork, and concrete roofs are poured in two layers. The key to high-quality concrete pouring of the roof is the correct screeding of reinforced concrete slabs. The use of waterproofing compounds will allow you to avoid roof leaks (see Waterproofing a garage roof according to all the rules).
- It is necessary to ensure that there is properly drainage on the roof. When using concrete to pour a garage roof, it is necessary to prepare the mixture to be poured in advance, and then begin construction work.
Initially, liquid rubber was used as a roofing covering for utility rooms. Subsequently, the characteristics of this material were improved, which made it possible to use it to cover garage roofs. Liquid rubber has a long service life, resistance to cracking, excellent elasticity and frost resistance. So:
- This material can be applied to flat roofs even without a screed.
- Another significant advantage of using liquid rubber is that there is no need to pre-waterproof the roof. You just need to clean the surface from dirt.
Attention: Remember that if installation work is carried out on a roof that has a concrete screed, the concrete should not crumble. This will ensure a long service life of the roofing covering in the future.
Buyers are offered rubber coverings in a variety of colors, which allows them to give the roof a neat appearance. Tools for applying liquid rubber:
- Container for mastic.
- Gloves.
- Paint brushes.
Liquid rubber is applied to a well-dried surface in several layers. The layer thickness should be 1 - 2 millimeters. It is recommended to dilute liquid rubber with water:
- After applying the first layer, you must wait 4 hours, during which the material will dry, after which you can begin applying the second layer.
- Liquid rubber has the property of self-flowing, so the surface will take on a perfectly smooth appearance. The thickness of the top layer should be about 3 millimeters. It takes 48 hours for the surface to completely harden.
Attention: Remember that work on applying liquid rubber can be carried out at temperatures from five to thirty degrees Celsius.
The application of liquid rubber is carried out using characteristic crosswise movements. In some cases, if there are significant differences, preliminary leveling of the surface using special mixtures is required.
Garage roof repair
Repairing a concrete garage roof with your own hands is not difficult. The main thing is to find all the cracks, voids, gaps and chips and carefully seal them.
Some important tips:
- when sealing cracks and joints, first thoroughly clean the crack, and then seal it with a water-repellent sealant, wait until the composition hardens, and only then rub the repaired surface with cement;
- Basically, repairing a concrete roof comes down to removing the old destroyed coating, removing debris and dirt. It is important to remove the entire destroyed concrete layer and identify all voids and pockets in the screed. When re-pouring the roof with concrete, pre-moisten the surface with a deep penetration primer for cement, this will improve adhesion and ensure thorough sealing of the old concrete screed;
- It is safer and more practical to use liquid rubber instead of cement screed for the roof, which creates a durable water-repellent coating layer and does not carry a large load on the walls and foundation of the garage. The cost of such a coating is not much more expensive than a concrete roof.
The video story describes in detail the process of filling the roof with liquid rubber (step by step).
If you are looking for options for installing a monolithic, durable and strong roof for a garage building, then you definitely need to familiarize yourself in detail with our article and photos that cover the topic of how to fill a garage roof with concrete. Of all the options available, this is not only the most economical. It also has a long service life and a fairly simple but monotonous installation process.
A concrete roof for those who decide to do everything with their own hands is an excellent option, which requires strict adherence to all rules and recommendations. This is the only way to achieve high-quality coverage.
Repairing small cracks
If during the inspection it was revealed that the reason for the leaking of the garage roof is small cracks that appear on the surface of the roofing material due to temperature changes, then they can be repaired with bitumen. To do this, use hard bitumen, which must be melted, or ready-made liquid bitumen, supplied immediately in finished form. The technology for sealing cracks is as follows:
- The surface of the soft roll roofing is cleaned of debris and dust.
- Using sandpaper or a grinder with a grinding disc, carefully remove the armor coating from the roofing material, which interferes with the sealing of the crack.
- The surface of the roofing material is degreased with gasoline, alcohol or acetone.
- The crack must be carefully filled with molten bitumen or cold bitumen mastic.
- After the surface drying of the bitumen, the procedure is repeated 1-2 more times in order to level the surface of the roofing.
- In order to protect the roof surface from mechanical damage, until the mastic has dried, it is possible to sprinkle it with quartz sand or small stone chips.
Please note that when sealing cracks it is more ergonomic to use cold bitumen. Warm bitumen mastic requires careful handling and quick work, while cold bitumen mastic is sold ready-made, which makes it easier to use. To seal small cracks, 1 can of liquid roofing material is enough.
Step-by-step process of pouring a roof
When planning monolithic concreting on the roof, you should immediately dismiss interesting options for pitched projects.
Only a horizontal surface is ideal for concrete work for two reasons:
- Under its weight, the solution will constantly roll off even before setting, forming a “bald” top.
- There are options for pouring concrete on pitched roofs, but for this purpose complex reinforced frames and formwork are used. In this case, there are large financial costs and labor costs.
- Having dealt with the simplest things, you can begin the preparatory work.
What materials are needed for self-concreting?
It is important, when carrying out any construction work, to prepare all materials in advance.
In our case, we will need the following:
- Concrete M200 - 250. Prepare it yourself, or buy a ready-made mixture - it’s up to you. You only need to remember one thing: it is more advisable to use concrete prepared in a concrete mixer rather than by manually mixing the components. In the latter case, there is a high probability of heterogeneity, and as a result - a poor-quality mixture.
Advice. For a homemade batch, you need to use cement of a grade no lower than M400D20, sifted fine-grained river sand - or special sand sold in bags in construction supermarkets, crushed stone and clean water. In proportions 1:2.1:3.9. W/C = 0.61.
- Rolled metal. I-beam for load-bearing elements. To create a mesh, use reinforcement with a cross section of 10 mm. If knitting is required, wire is required.
- Formwork. To make it you need wooden boards and wood screws.
- Waterproofing - roofing felt.
Basic tools and equipment
For those who decide to make the solution on their own, you need to acquire a small concrete mixer or mixing container. If the sand is dirty and has large inclusions, a sieving mesh will also be required.
The following tools will also be needed:
- shovels and buckets for transporting the solution to the roof;
- deep vibrator and rule - for laying and smoothing the mixture;
- metal probe;
- screwdriver for formwork assembly.
Preparatory work
Having acquired everything you need, you can safely go up to the roof and clear the surface of debris and old coating. Typically, garage roofs are covered with roofing felt.
If there is one, shoot without regret. The old coating is not always airtight, and when you remove it, you can find a “swamp”, which causes the roof in the garage to become damp.
Before you concrete the garage roof, you need to properly waterproof it. This is not difficult to do - simply lay sheets of roofing felt over the entire surface, overlapping.
Attention! Such work is carried out only in dry weather!
Having completed this task, you can safely assemble the formwork from the boards. Please use this design responsibly. Insufficiently reliable fasteners and cracks can affect not only the tightness, but also the integrity of the form under concrete pressure.
Be sure to place small spacers in the corners. If the area to be filled is large, then in the middle. But such spacers are installed, if possible, after driving the mortar, or after installing the reinforced mesh.
To easily remove the formwork, before installation, wrap the boards with plastic wrap and lubricate them with waste oil. Before laying the reinforced frame, to level the base, a small layer of crushed stone or expanded clay is poured under it.
Manufacturing of reinforced frame
Installation of a reinforcing structure can be done in several ways:
- If the frame is supposed to be welded, then it is best to carry out such work below on the ground.
- Afterwards, the finished structure rises to the roof.
- In the case of knitting, work is carried out directly at the pouring site.
Reinforced mesh knitting pattern. Between the load-bearing I-beams, reinforcement is laid in the form of a mesh so that cells measuring 200x200 cm are obtained. The work is monotonous and requires extreme care. It is best to do it with assistants.
Pouring concrete
Pounding the mixture is a step-by-step process. It is best to produce it in small areas, systematically filling the entire space. The thickness of the concrete must be at least 15 cm.
Before leveling, be sure to thoroughly compact the mixture until cement laitance appears. Then leveling will not be difficult. Make sure that the grid does not move. If possible, use a probe to remove any voids that have formed. Avoid creating cracks.
Important! Pouring must occur continuously and require no more than one worker. This way you will avoid poor-quality foundation.
Curing concrete
In order for the poured surface to remain high-quality and durable, you must follow the rules for drying concrete. To do this, it must be kept in a constant wet state for three weeks. Ordinary shavings will help with this. They absorb moisture well and transfer it to concrete. Simply sprinkle the set concrete with shavings, pour plenty of water and seal it tightly with film.
Add water every two days. If the temperature outside is below freezing, be sure to cover the roof with thermal insulation material. Concrete loves moisture and warmth. After 10 days, you can carefully remove the formwork. And after another 11 days the roof can be considered completely suitable for use.
The video in this article tells more about monolithic concreting of a garage roof.
Restoring canvas using patches
Another simple and inexpensive method for fixing garage roof leaks is using roofing felt patches. It is suitable for small damage to the canvas, localized in various areas of the roof. For patch repairs, you need roofing felt with coarse-grained or flake coating, bitumen mastic, a knife, varnish and sandpaper. The technology for restoring a roof using this method consists of the following steps:
- Roof cleaning. The surface of the roof slopes is carefully cleaned of dust, debris and dirt.
- Preparation. The surface to be repaired is freed from the armor coating in order to improve adhesion between the layers, degreased and dried with a construction hairdryer.
- Cutting patches. Patches are cut out of a roll of roofing felt, the size of which is 1.5-2 times larger than the area of damage. In order for the patches to straighten, you need to leave them for 1-3 hours and lie on a flat surface.
- The area to be repaired must be filled with bitumen in order to create a film that improves the adhesion of the patch.
- The lower surface of the roofing felt patches is heated with a gas burner, and then pressed well against the roof surface.
- The patch is covered with 1-2 layers of kukersol varnish or the same bitumen mastic to enhance waterproofing.
Note! To make patches, it is recommended to use roofing felt with stone topping, the density of which is at least 400 g/m2. It is more ergonomic to patch the roofing sheet using self-adhesive material. Laying of built-up roofing material is carried out only at temperatures of +5 degrees and above.
Reinforced concrete garage roofs
An alternative option to monolithic concreting is prefabricated reinforced concrete attic roofs. Unlike the previous option, it is possible to arrange not only a horizontal, but also a pitched roof with or without an attic. But the price for such a coating is much higher than simply pouring concrete.
Still, this method has its place, so let’s look at how to make a reinforced concrete roof yourself.
A little about materials
I would like to immediately clarify that for such a roof it is best to purchase factory-made slabs. Hollow or ribbed ones are suitable for these purposes.
The self-production option is characterized by high material costs and labor-intensive process. And it is not a fact that good concrete structures will be obtained. All this is quite comparable with the purchase of ready-made reinforced concrete products.
Also, when choosing this method of constructing roofs, it is worth taking into account the heavy weight of the slabs, due to which it is necessary to use special equipment. Which, in turn, incurs additional financial losses, and considerable ones. But all this more than pays off with a long service life - more than 50 years, and complete tightness.
Installation of concrete slabs on the roof
If the project has a gable roof made of reinforced concrete slabs, then it is necessary to pre-fabricate a strong metal frame on which the slabs will be mounted. With a small garage and a flat roof, this is not required. Let's consider the last option.
- Stage 1. The slabs are laid.
- Stage 2. The cracks between them are rubbed with masonry mortar or concrete on small crushed stone.
- Stage 3. The mounting rings are removed.
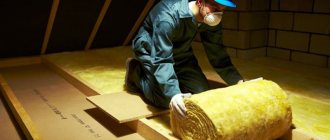
In principle, this is where the construction of this kind of roof ends. But if you want to organize insulation of a concrete roof from the outside, you will have to repeat several more stages of work.
- Stage 4. Roofing material is laid on the slabs for vapor barrier in several overlapping layers.
- Stage 5. Insulation is already laid on it, which can be polystyrene foam or mineral wool. The most popular and cheapest is the first option. But it is necessary to take dense sheets of polystyrene foam so that it does not sag due to constant rainfall.
- Stage 6. The insulation is protected with roofing felt or any other waterproofing materials.
- Stage 7. If desired, you can make a roof or leave everything as is.
We took a detailed look at how to pour concrete on a garage roof and build it using precast concrete. Which method is suitable depends on your desires. Monolithic concreting is a budget and reliable option that any craftsman can handle.
The second option will allow you to install roofs of various modifications without compromising durability. But the cost of reproducing all the work is three times higher than the previous method.
If you are looking for options for installing a monolithic, durable and strong roof for a garage building, then you definitely need to familiarize yourself in detail with our article and photos that cover the topic of how to fill a garage roof with concrete. Of all the options available, this is not only the most economical. It also has a long service life and a fairly simple but monotonous installation process.
A concrete roof for those who decide to do everything with their own hands is an excellent option, which requires strict adherence to all rules and recommendations. This is the only way to achieve high-quality coverage.
Main causes of leakage
Roof leaks typically occur for three main reasons:
- Leaks occur during even the slightest rainfall. This means that the seal of the roofing material is broken or damaged.
- Regardless of the weather, roof leaks are observed. This reason indicates that there is water in the insulation layer, that is, the roof has problems with waterproofing caused by minor damage to its coating.
- Leaks occur due to the formation of ice, which indicates problems with the drainage system, which is either frozen or clogged, for example, by fallen leaves from trees.
Other defects that may cause a roof to leak include factors such as poor-quality roofing or improper installation of fasteners during installation, natural wear and tear of the material, and other mechanical damage.
You can eliminate these problems yourself if you approach their solution competently and with confidence in your own abilities, but you should not neglect the advice or help of specialists.
Return to contents
Step-by-step process of pouring a roof
When planning monolithic concreting on the roof, you should immediately dismiss interesting options for pitched projects.
Only a horizontal surface is ideal for concrete work for two reasons:
- Under its weight, the solution will constantly roll off even before setting, forming a “bald” top.
- There are options for pouring concrete on pitched roofs, but for this purpose complex reinforced frames and formwork are used. In this case, there are large financial costs and labor costs.
- Having dealt with the simplest things, you can begin the preparatory work.
What materials are needed for self-concreting?
It is important, when carrying out any construction work, to prepare all materials in advance.
In our case, we will need the following:
- Concrete M200 - 250. Prepare it yourself, or buy a ready-made mixture - it’s up to you. You only need to remember one thing: it is more advisable to use concrete prepared in a concrete mixer rather than by manually mixing the components. In the latter case, there is a high probability of heterogeneity, and as a result - a poor-quality mixture.
Advice. For a homemade batch, you need to use cement of a grade no lower than M400D20, sifted fine-grained river sand - or special sand sold in bags in construction supermarkets, crushed stone and clean water. In proportions 1:2.1:3.9. W/C = 0.61.
- Rolled metal. I-beam for load-bearing elements. To create a mesh, use reinforcement with a cross section of 10 mm. If knitting is required, wire is required.
- Formwork. To make it you need wooden boards and wood screws.
- Waterproofing - roofing felt.
Basic tools and equipment
For those who decide to make the solution on their own, you need to acquire a small concrete mixer or mixing container. If the sand is dirty and has large inclusions, a sieving mesh will also be required.
The following tools will also be needed:
- shovels and buckets for transporting the solution to the roof;
- deep vibrator and rule - for laying and smoothing the mixture;
- metal probe;
- screwdriver for formwork assembly.
Preparatory work
Having acquired everything you need, you can safely go up to the roof and clear the surface of debris and old coating. Typically, garage roofs are covered with roofing felt.
If there is one, shoot without regret. The old coating is not always airtight, and when you remove it, you can find a “swamp”, which causes the roof in the garage to become damp.
Before you concrete the garage roof, you need to properly waterproof it. This is not difficult to do - simply lay sheets of roofing felt over the entire surface, overlapping.
Attention! Such work is carried out only in dry weather!
Having completed this task, you can safely assemble the formwork from the boards. Please use this design responsibly. Insufficiently reliable fasteners and cracks can affect not only the tightness, but also the integrity of the form under concrete pressure.
Be sure to place small spacers in the corners. If the area to be filled is large, then in the middle. But such spacers are installed, if possible, after driving the mortar, or after installing the reinforced mesh.
To easily remove the formwork, before installation, wrap the boards with plastic wrap and lubricate them with waste oil. Before laying the reinforced frame, to level the base, a small layer of crushed stone or expanded clay is poured under it.
Manufacturing of reinforced frame
Installation of a reinforcing structure can be done in several ways:
- If the frame is supposed to be welded, then it is best to carry out such work below on the ground.
- Afterwards, the finished structure rises to the roof.
- In the case of knitting, work is carried out directly at the pouring site.
Reinforced mesh knitting pattern. Between the load-bearing I-beams, reinforcement is laid in the form of a mesh so that cells measuring 200x200 cm are obtained. The work is monotonous and requires extreme care. It is best to do it with assistants.
Pouring concrete
Pounding the mixture is a step-by-step process. It is best to produce it in small areas, systematically filling the entire space. The thickness of the concrete must be at least 15 cm.
Before leveling, be sure to thoroughly compact the mixture until cement laitance appears. Then leveling will not be difficult. Make sure that the grid does not move. If possible, use a probe to remove any voids that have formed. Avoid creating cracks.
Important! Pouring must occur continuously and require no more than one worker. This way you will avoid poor-quality foundation.
Curing concrete
In order for the poured surface to remain high-quality and durable, you must follow the rules for drying concrete. To do this, it must be kept in a constant wet state for three weeks. Ordinary shavings will help with this. They absorb moisture well and transfer it to concrete. Simply sprinkle the set concrete with shavings, pour plenty of water and seal it tightly with film.
Add water every two days. If the temperature outside is below freezing, be sure to cover the roof with thermal insulation material. Concrete loves moisture and warmth. After 10 days, you can carefully remove the formwork. And after another 11 days the roof can be considered completely suitable for use.
The video in this article tells more about monolithic concreting of a garage roof.
How to fill a garage roof with bitumen
Typically, bitumen is used to repair roofs that are covered with soft roofing materials. Therefore, at the very beginning of the process it is necessary to inspect the coating. Detected defects will have to be opened. This is especially true for recessed areas where moisture gets in. Therefore, after removing part of the damaged roofing material, such areas must be dried.
In general, hot bitumen should be used only in dry weather with minimal humidity. In this case, the surfaces being repaired must be perfectly dry.
The next stage is the preparation of the bitumen itself. In principle, you just need to heat it and mix it with diesel fuel, kerosene or gasoline. You can warm it up in a metal bucket over a fire. After which the material must be cooled to +70C, and then diesel fuel is poured into it in a thin stream. The solution is mixed until homogeneous.
Next, a bucket of mastic is lifted onto the roof, where it is poured over the surface to be repaired and evenly distributed over the defective area with a roller or brush. If the defects are not very large, then bitumen is applied with a brush.
Reinforced concrete garage roofs
An alternative option to monolithic concreting is prefabricated reinforced concrete attic roofs. Unlike the previous option, it is possible to arrange not only a horizontal, but also a pitched roof with or without an attic. But the price for such a coating is much higher than simply pouring concrete.
Still, this method has its place, so let’s look at how to make a reinforced concrete roof yourself.
A little about materials
I would like to immediately clarify that for such a roof it is best to purchase factory-made slabs. Hollow or ribbed ones are suitable for these purposes.
The self-production option is characterized by high material costs and labor-intensive process. And it is not a fact that good concrete structures will be obtained. All this is quite comparable with the purchase of ready-made reinforced concrete products.
Also, when choosing this method of constructing roofs, it is worth taking into account the heavy weight of the slabs, due to which it is necessary to use special equipment. Which, in turn, incurs additional financial losses, and considerable ones. But all this more than pays off with a long service life - more than 50 years, and complete tightness.
Installation of concrete slabs on the roof
If the project has a gable roof made of reinforced concrete slabs, then it is necessary to pre-fabricate a strong metal frame on which the slabs will be mounted. With a small garage and a flat roof, this is not required. Let's consider the last option.
- Stage 1. The slabs are laid.
- Stage 2. The cracks between them are rubbed with masonry mortar or concrete on small crushed stone.
- Stage 3. The mounting rings are removed.
In principle, this is where the construction of this kind of roof ends. But if you want to organize insulation of a concrete roof from the outside, you will have to repeat several more stages of work.
- Stage 4. Roofing material is laid on the slabs for vapor barrier in several overlapping layers.
- Stage 5. Insulation is already laid on it, which can be polystyrene foam or mineral wool. The most popular and cheapest is the first option. But it is necessary to take dense sheets of polystyrene foam so that it does not sag due to constant rainfall.
- Stage 6. The insulation is protected with roofing felt or any other waterproofing materials.
- Stage 7. If desired, you can make a roof or leave everything as is.
We took a detailed look at how to pour concrete on a garage roof and build it using precast concrete. Which method is suitable depends on your desires. Monolithic concreting is a budget and reliable option that any craftsman can handle.
The second option will allow you to install roofs of various modifications without compromising durability. But the cost of reproducing all the work is three times higher than the previous method.
How to cover a concrete garage roof?
Although a garage is a non-residential premises, it is a mistake to neglect the covering of such a structure. If the coating is not strong enough or has cracks, you risk getting mold, which especially loves moisture. The garage roof is covered in the same way as any other residential space, that is, it is thermal insulation, waterproofing, and protection from various damages. The materials used to cover a garage are the same as when covering another type of building. There are a number of nuances here that can significantly affect the quality of the coating, its performance, strength and durability.
The roof of a garage can be covered with any material, but recently concrete has gained popularity. It is considered good because of its durability - a minimum of 15 years and above. Another good thing about such a roof is that you can install it yourself (of course, if you have the necessary equipment). These are the most important advantages of a concrete ceiling.
Features of flat roof covering
The most commonly used garage roof today is a flat roof, as it is convenient for a number of reasons. Typically, the structure of such a roof consists of reinforced concrete slabs resting on the walls. This design has several weaknesses:
- joints between the floor slabs themselves and joints between walls and slabs;
- It is recommended to cover this type of roof mainly with roofing felt and similar rolled materials;
- surface screed is required.
Let's take a closer look at how you can cover a garage roof using a bitumen-based material such as roofing felt.
For high-quality performance, it is better to lay a soft roof during the warm, dry season.
Before starting all work, it is necessary to clean the surface of debris, dust and dirt. After this, check the condition of the roof and see if the screed needs repair work. If the roof is damp, measures should be taken to dry it thoroughly. To do this, use a torch; a blowtorch is also suitable. If there was already a roof covering before, then you need to carefully inspect the garage roof for peeling, holes, and swelling. Such places will have to be cleaned; if desired, a new screed will be made.
To cover the roof with roofing felt, it is necessary to prepare the following materials:
- bitumen;
- special primer for roofing felt;
- petrol;
- roofing felt;
- mastic;
- as tools you can take: a container for heating bitumen, brushes and spatulas, a tool for cutting roofing felt, a sharp knife.
We begin the work by heating the bitumen, the consumption of which will depend on the uneven surface of the garage roof. With an area of about 30 square meters, about two buckets of bitumen are usually enough. It is better to heat bitumen in a metal container. While it is heating up, you should prepare a special primer for roofing felt. We gradually begin to pour molten bitumen into 76 gasoline, stirring it constantly. If this is not done, the resulting mixture can easily ignite.
Preparing the composition and roof surface for pouring
We are preparing the composition for pouring the roof over the floor slabs (mastic and primer). First, using a primer, carefully seal all the cracks, cracks, depressions, peelings, etc. After the surface of the slabs becomes relatively flat, we do the final leveling using prepared bitumen. Its layer should be no more than 5 mm so that no ruptures of the material occur in winter.
If roofing material will be applied over the old one, the roof surface should be preheated.
Layers of roofing felt.
After laying a layer of bitumen on top of the slabs, we begin to lay the lining layers of roofing material from the bottom up, that is, from the low edge of the roof to the higher one. Installation should be done with an overlap of 15 cm. The material is heated and trampled down tightly so that there are no untaped areas left. It is best to use a special roller made of soft material.
The roofing felt must be laid in such a way that there are no air pockets left, otherwise condensation will accumulate in them, and this will cause the garage roof covering to begin to collapse.
After this, we fill the roof with bitumen, or rather, carefully spread it with a relatively thin layer. The second layer is laid perpendicular to the first, its edges are rolled up and fixed with slate nails only on the reverse side. We lubricate the coating with mastic again. To ensure a better quality roof, all joints and edges can be additionally coated with a primer.
The top layer of roofing felt for the roof is characterized by the presence of coarse powder. The whole procedure is repeated, as with the first layers, the roofing material is laid only on hot bitumen. After this, you need to check all joints and edges for bubbles and other defects.
Such a roof made of slabs with a layer of roofing material will last about 10-15 years, it will provide excellent protection from weather conditions, rainfall, and snow. When laying, you need to make sure that there are no folds, unevenness, etc. If you take high-quality materials, the service life can be up to thirty years.
Preparing for work
The most common option is when monolithic concrete floors are used in the construction of a garage. In such cases, it is necessary to carry out especially careful preparation for working with the roof. It is worth noting that the roof covering process can only be carried out in dry and warm weather.
Before installing a new coating, you should get rid of the old one. It is not recommended to place new material on top of old one. Some people think that cleaning the base will be a waste of time, and the old coating will make the roof more durable. However, experts claim that this is the wrong approach, since a poor coating will not make the structure more reliable. Moreover, this will make it impossible to lay the new material evenly.
To clean the base, you need to stock up on the right tools and patience. This will require the use of physical force. To get rid of old material you will need a chisel, a wide knife and an ax. All tools must be pre-sharpened. Using an ax, notches are made on the old roof, and then the roofing material is pryed with a knife and torn off. Where the process will be especially difficult, you should use a chisel or chisel.
Sloping garage roofs: what to do with them?
Sloping garage roofs can be single-pitch or gable. When asking what the covering will be made of, it is necessary to take into account that the slope of such a roof is from fifteen degrees. Typically, slate, corrugated sheets or galvanized steel are used for this. To do this, a sheathing is mounted on the roof surface, to which the roofing material is attached.
When laying such roofs, you will have to take into account the characteristics of the material; additional work on waterproofing and insulation is often required.
When laying roofing on the roof of a garage, it is necessary to take into account the design features and installation requirements. Therefore, bitumen is most often used, which not only has a low price, but is also easy to install and at the same time allows for waterproofing of the roof.