Page navigation
Methods of arranging a floorArranging a concrete floorArranging an adobe floor on the groundArranging a floor on joists Monolithic slab
Basement base
How to make a floor in the basement of a house so that it is ergonomic and provides reliable protection against the penetration of moisture from the ground? After all, the foundation of the building is constantly exposed to soil pressure and the influence of groundwater. Therefore, special attention should be paid to the arrangement of the floor of the lowest floor. [toc>
Methods for arranging the floor
There are several ways to construct a basement foundation. The following options are mainly used:
- concreting;
- adobe floor on the ground;
- foundation on joists;
- monolithic “Swedish pie”.
Concreting the floor can be done directly on the ground, but it would be better to add a layer of gravel or sand. This option will increase reliability in areas with clay and loamy soil.
Concreting the foundation of the house
Clay floors are laid on the ground. The advantage of clay is its availability, heat and waterproofing. This method also saves the height of the room very well, which is an important factor for the basement.
Clay floor
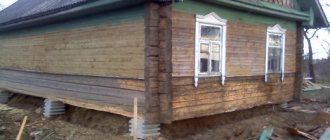
The floor is covered with joists if the site is on well-drained soil, or a high-quality drainage system has been installed around the perimeter of the house.
Floor on joists
Monolithic “Swedish pie” is a monolithic slab consisting of foam plastic in the lower layer and a built-in heated floor in the upper layer. This type of basement floor arrangement is suitable for water-saturated areas with elevated groundwater. Performed at the stage of constructing the foundation and installing the drainage system. In this case, the foundation of the house will be the most reliable, moisture-proof and warm.
Monolithic "Swedish pie"
Types of entrance to the cellar
The term entrance refers to doors and stairs. The design of each element depends on the type of cellar. If the storage is above ground or semi-buried, install entrance doors. In the first option, there is no need for stairs. It is more convenient to go down the steps into the semi-buried cellar. They are made from cinder block, wood, a metal march is welded, or a concrete structure is poured.
Doors are installed in deep earthen cellars or a manhole is constructed through a hatch. In the first option, the descent is similarly made in steps. If a manhole is provided, an extension ladder is placed under the hatch.
Hatches are more in demand when the cellar is located under the house. The lid is decorated to resemble the floor or is highlighted with an original finishing material.
Concrete floor installation
Before you begin arranging a concrete floor, you need to find out for which rooms and in what cases it is necessary and possible to concrete the base. Concreting is advisable for the following purposes:
- heated;
- with a basement residential floor;
- special purposes: workshop, boiler room, garage;
- cellar for vegetables and preservation;
- with excessive moisture content in the underground.
Concrete floor
The concrete floor of the basement of a private house has the following advantages:
- Concreting and mandatory waterproofing of the basement allows you to place a sauna, a recreation area, a garage, and a boiler room in the room.
- concreting reduces moisture content and extends the service life of the entire structure;
- the sanitary conditions of the premises are improved;
- Concreting prevents the appearance of insects and rodents, as well as fungus and mold.
The foundation walls are constantly exposed to groundwater pressure, so the iron reinforcement is destroyed by constant exposure to moisture. A concrete basement floor can create an additional barrier to moisture penetration.
Basement concrete base
Important! In a heated basement, the lack of a concrete base can lead to the destruction of the foundation structure, which will entail time-consuming and expensive major repairs.
An unheated basement, which is used only for storing food supplies, is not concreted.
Foundation of a private house with concrete floor
Tools and materials to perform the work:
- concrete mixer;
- vibrating plate;
- shovels and sump shovels;
- bucket for concrete composition;
- trowels and grout;
- Bulgarian;
- cement m-400;
- pebbles, sand;
- medium-fraction crushed stone;
- water;
- polyethylene, thickness 300 microns;
- plastic supports for reinforcing mesh;
- reinforcing mesh made of 3mm rod, with a cell size of 3-5 cm;
- knitting wire 3mm thick;
- lighthouses;
- damper tape.
Concrete basement base
Concreting stages
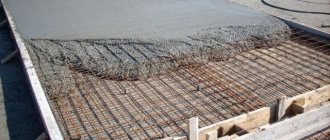
The construction of a concrete floor in the basement significantly increases the operation of all building structures.
Concreting the floor
You can carry out concreting yourself, following the step-by-step installation instructions:
- Dig up the soil by 30-40 cm, level it and compact it using a vibrating plate.
- Make a pillow from a layer of clay 7-10 cm high and a layer of pebbles with sand 7-10 cm high. Compact thoroughly.
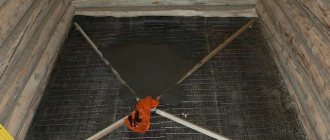
- Lay construction film overlapping the walls to a height of 8 cm.
- Place reinforcing mesh on the supports. It is necessary to join the strips overlapping one cell, tying them with knitting wire.
- Install the beacons using a level at a distance of 30mm from the reinforcing mesh. The distance between beacons is calculated based on the length of the rule and is 20% of its length.
- Glue the damper tape directly to the wall, first bending the polyethylene.
Important! If the length of the wall exceeds 7 m or the basement is L- or U-shaped, expansion joints must be installed. Before pouring concrete onto the reinforcing mesh, it is necessary to install wooden formwork to form rectangles of equal size. After the screed has dried, the formwork is dismantled and the seams are filled with damping material.
- Prepare concrete. Proportions for cement mortar: 1 part cement: 3 parts sand: 5 parts gravel, water. All ingredients are gradually added to the concrete mixer and mixed thoroughly. It is not recommended to mix the solution by hand with a shovel, as the mixture may turn out to be of poor quality.
- Pour concrete mortar onto the reinforcement, leveling it according to the beacons.
- As soon as the cement begins to set, it is necessary to remove the beacons, having previously laid a sheet of plywood, chipboard or boards so that the surface is not damaged and no traces of the sole remain. Fill the resulting holes with cement-sand mortar.
- Cover the concrete floor with polyethylene and wait for ripening. The density of concrete is gained within 28 days.
Floor screed is an effective method of getting rid of excess moisture and musty “basement” smell. Also a pleasant advantage is the availability of all materials, low price and the ability to carry out installation work yourself. Concrete basement base with integration into the floor screed https://www.youtube.com/watch?v=PjL95_pbP8k
What do you need to know before starting work?
The cellar in the basement of the house should be buried at least 150-180 cm deep. With less depth, the temperature in the basement will exceed +8 degrees, which will not have the best effect on the conditions and shelf life of vegetables.
Cellar in the house
How to store vegetables in the cellar
Before starting work, you need to establish the depth of groundwater passage specifically in your area. This is easiest to do at the stage of arranging the foundation of the house, because... geodetic survey is included in the list of mandatory preparatory activities.
If the house has already been built, but you have only now decided to start arranging a personal cellar, you will have to determine the point of passage of groundwater yourself.
This can be done according to the following methods:
- dig a hole with a depth of 250 cm and monitor its condition for several days in terms of filling with water;
- establish the depth of water in wells on adjacent land plots.
You can also contact a specialized company engaged in drilling wells.
Checking the groundwater level should be done during the spring flood or prolonged autumn rains. It is during these periods that groundwater aquifers rise to their maximum level.
If the groundwater is closer to the soil surface than 100 cm, you will have to refrain from constructing an underground basement, giving preference to a remote cellar on some other suitable site.
If the groundwater level is within 100-150 cm, you can reduce it using a drainage system laid around the perimeter of the building below the hollow of the future basement. In this case, special attention will need to be paid to waterproofing the basement walls.
Ideally, an underground cellar should have a depth of 200-230 cm. With such depth indicators, it will be comfortable to do your business in the underground room, and the atmospheric temperature will be set at approximately +4-5 degrees, which is the optimal indicator for long-term storage of canned goods, vegetables, etc.
Before you start arranging the cellar, you need to select suitable building materials. The walls of the room can be erected from concrete, natural stone, concrete blocks, ceramic bricks. It is better not to use sand-lime brick and cinder blocks.
Brick
Determine the optimal entrance to the cellar. The simplest option is to install a hatch in the floor of the room with the installation of a ladder to descend into the cellar. If possible, the descent can be made of full-fledged concrete steps - this is calmer. An inclined trench for arranging the descent must be provided at the stage of digging the foundation pit.
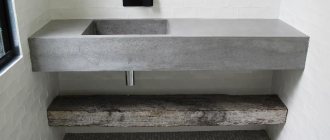
Arrangement of adobe floor on the ground
The main advantage of a ground floor is its thermal insulation.
Clay floor in the basement
If all the installation work is done efficiently, it will also serve as a good waterproofer. Materials for work:
- shovel;
- buckets;
- vibrating plate or garden roller;
- expanded clay or pebbles;
- chips or gravel with a fraction of up to 40mm;
- medium-grained sand;
- clay;
- finishing coating: linoleum; OSB or chipboard boards, plywood; porcelain stoneware or ceramic tiles.
Important! Open soils allow the moisture in them to penetrate into the basement, creating the necessary atmospheric conditions for storing food supplies.
The heated room forms convection, creating a pump effect that evaporates moisture. These evaporations dry out the surface, and the ground absorbs excess moisture. A kind of fluid cycle is formed.
Clay floor
Stages of work on installing an adobe floor:
- Prepare the bottom by digging up the soil to 40 cm and compact it with a vibrating plate or roller.
- Fill with expanded clay up to 10cm high. This layer will serve as thermal insulation.
- Mix the pebbles with clay and lay out the resulting mixture up to 17 cm high. Compact the layer conscientiously.
- Let the first tier dry.
- Pour a very thin layer of cement-sand mixture, further strengthening the embankment of crushed stone. Let it dry.
- Cover the second layer of crushed stone up to 10 cm high, carefully tamping the surface. Dry.
- Continue laying the mixture of clay and wood chips, reducing the layer height by 1.5-2 times to the desired floor height.
- Let the cake dry completely. Secure with a liquid clay solution or lime-clay solution.
- In areas with high groundwater levels, we lay a waterproofing layer of roofing felt, bitumen mastic, and concrete screed.
- Lay down the finishing coat.
Clay floor mortar
Laying out the floor using joists
The floor in the basement should be equipped with joists in areas with good water permeability. Otherwise, the wooden structure may be susceptible to rotting.
Laying lags
Materials for installing floors in the basement of a house using joists:
- wooden beams with a diameter of 15cm;
- tongue and groove boards 5cm wide;
- antiseptic;
- roofing felt;
- nails 7cm long;
- hammer.
Foundation of the house on logs
Stages of floor construction using joists:
- All wood must be treated with an antiseptic, paying special attention to joints and ends.
- The boards are measured to be 2-3 cm shorter than the length of the room. Cut the required number of pieces.
- At the location of the lag, 2 layers of roofing material are laid.
- Logs are installed at a distance of up to 3 meters.
- A floor of tongue-and-groove boards is laid on top of the joists, driving each next one into the grooves of the previous one.
- Nails should be driven in at a slight angle.
Floor joists
Ventilation features
Any storage facility cannot do without ventilation, otherwise the stored products begin to quickly deteriorate. For a cellar, a natural supply and exhaust system without forced exhaust is acceptable.
Ventilation is equipped with two pipes with a cross section of 80-100 mm. They are located on opposite sides of the storage. The exhaust pipe from inside the cellar is cut off at the ceiling. Only the pipe, up to 20 cm long, protrudes. The hood is insulated with a special shell or roll insulation.
The supply pipe inside the cellar is cut off at a height of about 20-30 cm from the floor; it is not insulated. Both air ducts lead through the ceiling to the street. The pipes are equipped with caps that protect against the penetration of rainwater. From the inside of the cellar, the air ducts are equipped with dampers for adjustment during severe frosts.