When building a house and creating a foundation, drainage is necessary because it allows you to minimize the influence of groundwater. This makes it possible to exclude the appearance of mold and fungal microorganisms, which worsen the atmosphere of the building and lead to damage to the foundation.
It must be emphasized that drainage of the foundation of a house or bathhouse requires proper organization, and the work carried out depends both on the nature of the soil of the site and on the type of foundation itself that will be used.
When you can't do without drainage
Wall foundation drainage is required in a number of cases, among which the main ones should be highlighted:
- if you plan to organize a deep basement, which will be located below the groundwater level, you cannot do without drainage;
- if the floor of the basement is lowered by more than half a meter from the groundwater level;
- if the soil on the site where it is planned to build a private house is clayey or loamy, and the underground premises are deeper than a meter;
- when constructing a private house in a capillary humidification zone.
Thus, drainage for the foundation is mandatory if groundwater flows close to the building or creates a swampy area.
If the soil is dry enough and the groundwater level under no circumstances reaches a critical level, drainage can be dispensed with.
What functions does a wall drain perform?
When arranging the foundation, drainage has very important functions:
- first of all, wall drainage of the foundation protects the structure from flooding;
- does not allow the site to become swampy;
- improves foundation waterproofing;
- reduces the level of soil heaving;
- prevents deep freezing of the soil in frosts and reduces its pressure on the base;
- Allows timely removal of excess moisture and groundwater.
Protecting the foundation from moisture using a special blind area
To drain rain and melt water, a foundation blind area is installed. First of all, it is necessary to determine the depth of the blind area, then dig a trench starting from the foundation. The width of the trench must be at least one meter. All plants are removed from it, the bottom is covered with sand, which must be compacted, watered with water, in order to give density. Maintain a layer of 100 mm. If you use the blind area as a path, lay an additional layer of gravel. The surface is poured with concrete. The blind area should also be sloped so that precipitation drains and the foundation is protected from water.
The following rules will help you install the blind area correctly. It should be uniform around the entire perimeter, without damage. Be sure to observe the slope. To ensure that concrete has water-repellent properties, its surface is coated with cement or waterproof glue.
The blind area allows precipitation in the form of rain and melted snow to be removed to a safe distance, but it is not capable of protecting the foundation from underground and groundwater. Therefore, to obtain an excellent result, it is necessary to install both a blind area and a drainage system. Together, these systems will do their job perfectly.
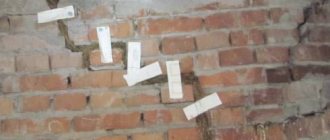
Special blind area and foundation drainage photo:
Foundation blind area
Installing the systems listed above is not such a difficult job. These recommendations will allow your home to stand for many years, and you will not need to repair or restore the foundation and other parts of the house.
Types of drainage
According to the types of drainage systems, they can be divided into two types of drainage: horizontal and vertical. There are also combined options.
As for the horizontal system, in this case the pipes are located parallel to the horizon line. Such drainage can be open or closed, and also consists of a collecting, water receiving and drainage element. In the open version it allows you to dry a large area, and in the closed version it is used in house construction.
The vertical scheme is most often used in wells and swimming pools. Involves the use of drainage wells and pumps that remove moisture.
Often the schemes described above are combined with each other.
Classify
The drainage of the foundation of a building is classified according to the depth of the drainage systems:
- surface ones are designed for drainage of storm and waste water; Most often, strip foundation drainage is performed in this way;
- deep - located below the groundwater level and when calculating them, you should know the depth of soil drainage or passage of ground moisture.
In both cases, layer or ring foundation drainage can be used. The latter is a closed loop, which is located at a short distance from the foundation along the entire perimeter. Deep options can be located radially.
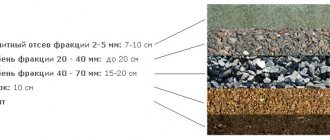
Reservoir drainage around the foundation is laid below the foundation plane. It is a bed of gravel and sand in which pipes are placed. The foundation slab is laid on top.
What is foundation drainage around a house?
First, let's figure out why it is needed. Everyone knows that the foundation is the foundation of every house. It is important that it is undamaged. The main factor in foundation corrosion is its contact with water. And if it is destroyed, the building may become distorted. This can lead to jammed doors and windows, but worst of all, it can lead to the destruction of the entire house.
In addition, humidity promotes the growth of mold, dampness, fungi and microorganisms. They appear not only on the foundation, but also in the basement, if there is one, and in the house itself on the floor and walls. To avoid this disaster, numerous methods of draining water are used. The following types are often used:
- drainage system around the house,
- special blind area.
First of all, survey work should be carried out and an estimate should be drawn up. But we will tell you further how to properly drain the foundation.
Drainage system design
The foundation drainage system consists of perforated pipes, making it very efficient. The pipes are equipped with holes through which water flows into a specially designated container. Of course, if you want to save money, you can buy any pipes that are equipped with holes.
Drainage system
Such a system must be installed around the entire perimeter of the building to protect the foundation from groundwater. Pipes with a diameter of 75 mm are suitable, but in some cases 100 mm are used. Polyethylene pipes are best and are very easy to work with.
Wall drainage: building rules and regulations
When organizing wall drainage of the foundation, SPiP provides for building rules and regulations. What is located, it should be no further than one meter from the base. Such a system consists of pipes that are sloped and located below the deepest point of the foundation.
According to SNiP, the wall drainage of the foundation must be closed and have inspection wells in the corners. They are designed for convenient cleaning of drainage pipes. The lowest point is a prefabricated well, filled around with crushed stone. It collects moisture, which is later discharged beyond the boundaries of the land plot.
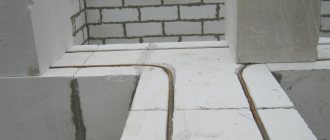
When organizing such drainage, the foundation itself should be carefully protected using high-quality waterproofing.
Drainage installation
Let's look at how to make a drainage system around the house in two ways.
Before carrying out the work, it is necessary to prepare the foundation, since the system will be directly adjacent to it.
To do this, the following work is carried out:
- The foundation from the outside is primed with a special bitumen primer.
- Bitumen mastic is applied to the dried surface.
- A reinforcing mesh with 2 x 2 mm cells is glued onto the mastic.
- The next day, after the mastic has hardened, a second layer of mastic is again applied to the mesh.
The photo shows the drainage system around the house - a trench and inspection wells along the edges
The foundation preparation is complete. Next, the main work is performed:
- A collector well is installed to which drainage pipes will be connected. It is located at the lowest point on the site;
- using a laser or building level, the slope of the trench running near the foundation is ensured towards the drainage basin;
- the bottom of the trenches is covered with a layer of sand of at least 5 cm;
- geotextiles are laid on the sand, the sides of which will subsequently be wrapped overlapping;
- a gravel backfill is created having a thickness of about 10 cm;
- Prepared perforated pipes are laid on the gravel layer. Their slope is ensured at 2 degrees;
- pipes are joined with adapters and corner connectors;
- at the corners of the building, all pipelines enter installed inspection wells;
- Pipes are laid from inspection wells to drain water into a collection well or drainage pit. These pipes are also located in trenches and have a slope;
- The pipes are filled with gravel (about 10 cm) and the entire contents are wrapped in geotextiles. Using synthetic ropes, geotextiles are firmly fixed;
- further backfilling of the trenches to the soil level is carried out with sand or turf soil.
We looked at how to make drainage around a wall-type foundation. Next, we will pay attention to the manufacture of trench drainage, which is even more popular.
For this type of work you will also need perforated pipes, crushed stone, sand and geotextiles. When a ring drainage system is made around a house, the technology involves digging trenches at a distance of 5-8 m from the foundation of the building to eliminate the possibility of subsidence of the soil around it. The trenches are located around the structure and form a closed system. The depth of the trenches should be such that the drainage passes 50 cm below the foundation level.
Immediately draw a trench (or several trenches) towards the main drainage well. The slope of the trenches is ensured at least 2-3 cm per linear meter. The slope can be adjusted by adding sand in the right places.
Drainage diagram around the house
Next, the following work is carried out:
- the bottom of the trenches is lined with a layer of sand, and then with geotextiles, the edges of which are wrapped on their walls;
- crushed stone is poured onto the geotextile in a layer of 10 cm;
- Pipes with holes drilled in them are laid out on the crushed stone. It is advisable to use a pipe diameter of at least 10 cm. It is advisable to first wrap all pipes with a layer of geotextile, which will prevent them from clogging;
- the slope of the pipes is checked, which must be at least 2 degrees;
- At pipe bends, inspection wells are installed, covered with removable covers. The same wells should be installed on long straight sections, in increments of 12 m;
- crushed stone or gravel is poured over the laid pipes in a layer of 20-30 cm;
- the entire “pie” inside the trenches is wrapped with geotextile overlapping;
- the remaining space in the trenches is filled with river sand and covered with turf.
Installation of drainage pipes in a trench
The construction of the drainage system for drainage from the foundations of buildings is carried out in such a way that it is not connected to the deep drainage system. Many people make the mistake of draining rainwater from the roof into the foundation drainage. This is a mistake, since this system is intended exclusively for drainage of groundwater. And the ingress of water into the deep drainage system at different times of the year can quickly disable it.
We invite you to read: Fireclay mixture instructions for use
And also a very important point where they make a mistake is the insufficient slope of the drainage pipes and, as a result, stagnation of water in them. This problem is very difficult to fix after all the work is completed. Therefore, the issue of correct and sufficient slope must be given attention from the very beginning of drainage installation.
Like any other utility network, the foundation drainage system requires periodic inspection and maintenance. This is due to contamination of drainage pipes during operation. For this purpose, inspection wells are provided at the corners of the building. You can lower the hose into them and use a jet of water under pressure to wash away all the sediment, but you need to start from the top point.
Video on arranging foundation drainage
Do it yourself
Do-it-yourself wall foundation drainage is performed in the following sequence:
- First, the basement walls are primed with bitumen dissolved in kerosene; after that they are covered with mastic and a reinforcing nylon mesh is attached and a second layer of mastic is applied;
- at a distance of a meter from the foundation, they dig a trench (its depth should not exceed 2.5 m), into which sand is poured, geotextiles are placed of such a width that the pipes can be completely wrapped; crushed stone of large fractions is filled in;
- they lay pipes, which are located at the same level as the lower part of the foundation, and their slope must be at least a centimeter per linear meter;
- crushed stone is poured again so that the height of the layer is equal to half a meter;
- the pipes are covered with geotextiles, and it is better to do the work with an overlap, and secure the material with a polypropylene rope;
- gravel or river sand can be poured on top;
- the entire backfill is carefully compacted.
This scheme can be used for different types of foundation, including shallow foundations.
Construction of a drainage system
Let's look at how to drain the foundation step by step.
Required Tools
To complete the work you will need a small set of tools, namely:
- Shovels – shovel and bayonet.
- Pick.
- Hammer with pneumatic or electric drive.
- Wheelbarrow for removing soil and transporting crushed stone.
Work algorithm
- Trenches for laying drainage pipes are dug at a distance of 1 meter from the foundation.
- The width of the trench should be 20 cm greater than the diameter of the pipes. So, if you plan to use a pipe with a diameter of 100 mm, then the width of the trench should be 30 cm. The trenches should be made with a slope of 1 cm per meter.
- The depth of the trench depends on the depth of the foundation. The pipes should be located half a meter lower than its lowest point. Only in this case will the drainage of the basement floor be effective.
- The bottom of the trench is compacted and a sand cushion 10 cm high is poured. The sand layer should be well compacted. Now you need to check the slope again, it should remain unchanged.
- Wide strips of geotextile fabric are laid on a layer of sand so that the side sections of the material protrude beyond the sides of the trench.
- We continue to build drainage around the foundation by backfilling with a layer of crushed stone, since this material is an excellent conductor of water. It is better to use crushed stone of a fairly coarse fraction.
- Now we proceed to the construction of the pipeline, making sure that the pipes lie with a slope towards the lowest point of the system.
- The pipes are connected using fittings using a press fit method. To reduce play in the connections, wrap them with insulating tape.
- The pipes are covered with a layer of crushed stone on top so that there is a layer 10 cm high above the pipe.
- The ends of the geotextile are wrapped and fastened with threads (stitched).
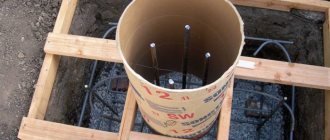
- Since the foundation slab drainage is built to drain water, a place should be provided where this water will collect. To do this, a water intake is installed at a distance of at least five meters from the house. It should be located about a meter below the pipe, but at the same time be higher than the groundwater level.
- The bottom of the hole under the water intake is covered with geotextile fabric, then a plastic container is placed there.
- Several holes are drilled in the bottom of the container and secured in case the soil shifts. Backfilling is carried out first with gravel, then with soil.
- The trenches are filled with soil so that a noticeable mound is formed above them. The fact is that the soil will still subside, and if you backfill it flush with the soil level, you will soon have to backfill it.
Rules for the location of inspection wells
When performing ring drainage of the building foundation, it is necessary to provide for the installation of inspection wells. They are placed in accordance with the following rules:
- The installation of wells is planned in the corners of the building.
- As a rule, the standard scheme according to which the basement drainage is built provides for the installation of four inspection wells and two receiving wells. Moreover, one of them will be used for storm sewerage, and the second for the drainage system.
Optional equipment
It is not in all cases possible to assemble drainage under the foundation using a standard scheme. In some cases it is necessary to provide for the installation of additional equipment.
So, if the water intake point is higher than the location of the pipes, then a drainage pump should be included in the scheme. This installation will be used to force the movement of collected water.
If the depth of the pipes is insufficient (above the freezing depth), it is rational to install heating of the pipes using a heating cable. The use of this element will allow you to 100% protect the drainage system from freezing during the off-season.
So, if you have the desire and free time, draining the foundation with your own hands can be done. Beginners in the construction business can be advised to carefully study the theory and watch a training video that shows all the work processes.
Drainage device for different types of foundations
Drainage of a slab foundation is performed in this way.
- First, a drainage well is organized, which should be located on average at a distance of 20 m from the building.
- Depending on the level of groundwater, the level at which the pipes are laid is estimated. The slope of the entire system, which can be up to a meter, should be taken into account.
- They dig a pit, the depth of which is up to half a meter.
- They begin to fill the pit. First, sand (10 cm) is poured, then gravel (20 cm), then insulation (10 cm).
- A trench is dug along the entire perimeter of the building, the depth of which should be 10-15 cm lower than the level of the pipes.
- Geotextiles are laid, the recommended width of which is 2 m.
After excavation work
- Sprinkle the structure with gravel and then compact it thoroughly.
- Lay the pipe, gradually filling it to securely fix it.
- After the pipe is completely covered with backfill, a ten-centimeter layer of sand is poured on top, which is thoroughly watered and compacted.
- Next, another layer of geotextile should be laid, and a layer of gravel on top.
- Unfilled areas of geotextile are brought up, laid, and covered with two layers of insulation.
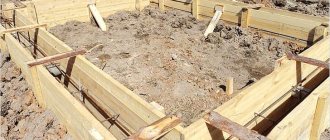
- The formwork is installed and covered with film.
- The reinforcement is installed and the entire structure is filled with concrete.
In this case, you can also cover the entire structure with tiles, which should be located at the level of the base.
House foundation drainage system: diagrams and solutions
When building a private house, the problem of draining groundwater from the foundation often arises.
This is very important when their level is high and the base of the soil is clay or loam. This is also of great importance if the house has a basement or basement. If you do not drain the foundation of the building, the basement will always be damp, the walls will become covered with mold, and the floor may also be flooded with groundwater. Water negatively affects the durability and strength of concrete structures of the foundation of a house, regardless of the quality and composition of the waterproofing. The foundation drainage scheme is developed at the design stage and is carried out together with the construction of the foundation, which allows saving on excavation work.
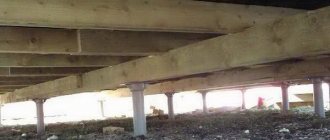
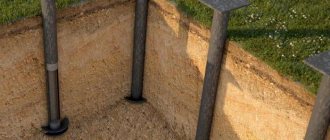
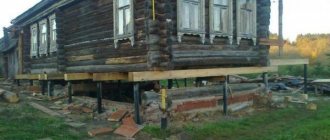
For pile and columnar foundations
Drainage of pile foundations, as well as columnar structures, is carried out according to the following scheme.
- A ditch is laid along the entire perimeter of the building, into which sand and crushed stone are poured (the total layer thickness should be about 20 cm).
- Drainage pipes are being laid.
- The pipes are covered with a layer of crushed stone (about 30 cm), and geotextiles are laid on top.
- The entire structure is covered with earth and compacted.
It should be emphasized that the blind area in this case is not mandatory. The advantages of this system include the simplicity of its design and the ability to do it yourself.
Such drainage can be done in the shortest possible time. It should be noted that such a system periodically needs to be thoroughly cleaned.
What you need to know when organizing drainage
- It is necessary to carefully consider the location of wells for collecting water. On average, six pieces are enough for a private house, two of which are reception rooms, and four are observation rooms. It is most convenient to place the wells in the corners of the future building.
- When calculating the slope of the drainage system, it is necessary to take into account where the main well is located. The slope should have the following direction: from the far observation point, located in the corner, to the central receiving one.
- Cleaning methods must be provided. This is a prerequisite for the full functioning of the drainage system and high-quality protection of the foundation from moisture.