The benefits of creating your own packaging
It would seem that the easiest way is to go to any store and shop and buy a bright box. But even in the current age of rapid decisions, people strive, as before, to make something with their own hands. And, if a gift is bought in advance, then, as a rule, they do the packaging themselves.
And there are several reasons for this.
- By creating a box with their own hands, people add something of their own to the prepared gift, thereby emphasizing the importance of the person to the giver.
- Looking at photos of beautiful boxes on the Internet or in printed publications, you can get ideas for your creativity.
- In this case, the packaging will be not only convenient, but also unique - even if you select identical materials, it will be impossible to arrange them in exactly the same way.
- In addition, they are often purchased exclusively for a specific event. Thanks to this, the created boxes become unique.
- It often turns out that a store-bought item looks bulky. When making it yourself, this problem disappears by itself.
- Having measured the necessary parameters, you can create a box according to individual dimensions. And then the gift will look stylish and neat.
Box with a surprise
Small trinkets, packed in beautiful boxes, made and decorated with your own hands, are sometimes valued much higher than regular bouquets and sweets
To show attention and respect, it is better to spend more time than money
This is one of the most wonderful gift ideas. The box opens on its own, you just have to lift the lid. There is some small surprise attached to the bottom: a cake, a folded banknote, an ornament or a decorative composition.
Several parts for the box are cut out (the internal ones are slightly smaller). The ribs are not connected by anything, only the lid is glued. Since the product will be quite fragile, the lid should be easy to remove. You should take this into account when decorating the box.
A bow or picture is glued to the top. Three-dimensional decorative elements, photographs, and cards with wishes can be attached to multi-layer walls. Even tea bags will come in handy if there is a sweet present inside. You can place small decorations in the center on springs or strips of hard plastic. Flowers, butterflies or confetti will fly up and out when the lid is lifted.
Popular articles Paper stand
This box is called a magic box, it is a bright representative of products using the scrapbooking technique. The magic box can be themed for any holiday
The main thing in this work is attention to detail and maintaining the overall style. And, of course, a sense of proportion
Creative materials
How to make a box with your own hands? First, you will need to go through your bins and see what is available and what will need to be purchased.
To create the packaging you will need:
- Cardboard, preferably white;
- Knives, scissors, pencils and ruler;
- Packaging material – bows, ribbons, braid;
- Glue for fixing elements; beads, beads, rhinestones, sequins - any decorative elements that may be needed during the work process.
Round
Cut out four circles from the selected material: two for the lid, the remaining for the bottom. The parts for the lid should be a little larger.
Let's measure the circumference and prepare 2 rectangles. It turns out that their length will be the diameter of the circle, and we will also add about one or two centimeters for the overlap that will be needed when gluing.
Let's connect two large ones and separate smaller ones. Apply glue to the overlap and glue a strip that serves as the base for the wall. We will also glue the sides of the top. Decorate as you wish (braid, lace, beads, etc.).
If you give it to girls, you can glue and sew, for example, velvet or lye fabric on the inside of the box, or put a satin pillow. They will never be superfluous, for example, they will be needed as a jewelry box or for any little thing. Below there is a point about decoration.
Templates
In some cases, it is convenient to use ready-made printouts of templates made on a color printer.
But to add gloss and sophistication, experienced craftsmen recommend the use of decorative elements.
Algorithm for working with templates
To create a designer box using a template, you need to perform a series of sequential steps. It is not necessary to carefully adhere to the list, but it is worth studying carefully - even such a seemingly simple job has its secrets and subtleties.
The first thing to do is print out the version you like. Please note: there are several tricks that will help your packaging acquire a signature style.
- One of them reflects the well-known saying: “Measure seven times, cut once.” The fact is that it is very important to carefully measure the distances of the sides of the future packaging and carefully check them with the existing dimensions in the figure.
- If necessary, you can slightly increase or decrease the proportions of the template photo to change the length and width of the box. Once you cut and discover an error, nothing can be changed.
- The second little trick is to use already colored templates. All that remains is to cut and glue, and the packaging will be ready in the best possible way. But there is a nuance here - it is best to print such a template on a color inkjet printer.
- This will ensure your drawing is as crisp and clear as a photograph, regardless of the print size.
The second step is cutting out the template. This must be done slowly and carefully, with sharp scissors, so that the edges of the cut remain smooth and do not bend to the sides.
- The next stage is gluing. Any glue that is convenient to work with will be suitable for these purposes.
- It is important to carefully coat the edges of the box so that when they touch tightly, they grip tightly.
- As a rule, fold lines and seam taping lines are indicated by dotted lines.
The final step is decorating the box.
- You can use ribbons and braid to create a flirty or formal bow.
- It is good to use additional materials - beads or rhinestones can be placed in the center of the bow or glued to the corners of the package.
- Then it will become truly original and unique.
Other gift packaging options
Gifts come in different forms, so it is difficult to cover all options in a short review. Let's look at just a few common solutions:
- pyramid;
- polygon;
- house;
- flat envelope box;
- box with a sliding compartment;
- a cardboard cup in which you can put a ring or chain.
Types of templates
There are many types of ready-made packaging box templates. They differ from each other not only in size, but also in shape. For example, you can package a gift in the shape of a flower or make a complex design in the form of origami.
Children will definitely be delighted with boxes of candy or carrots. And lovely women will be surprised to receive a gift in an incredible box, stylized as a dress or a diamond. Strict men will be delighted by the laconic beauty of square or round packaging.
How to decorate a gift for a man's birthday?
If you don’t have time for a long time wrapping a gift, you can use other methods.
- Make birthday gift tags. Even a bottle of alcoholic drink can be quickly packed in wrapping paper, and a tag can be attached to the neck of the container. The inscriptions on the gift can be very diverse: wishes of health, humorous phrases or even declarations of love. The tag can be sewn from fabric, made in the form of a small postcard, or made from salt dough. Make it in the shape of a butterfly, oak or maple leaf, car, heart. When making it, use various decorative elements: beads, rhinestones, embroidery, applique. If the gift is of an unusual shape, it is difficult to place it in a box or gift bag, make a tag in a matter of minutes, sign it - and the gift is ready. This method is well suited for large-scale gifts: a car, a boat, a fishing rod, a laptop. Even a wallet wrapped in paper with a tag attached to it will be an unusual gift for your loved one’s birthday.
- A man can pack a gift in a box made using the origami technique. Packaging made in the form of a shirt and tie is widely used. A paper tie is attached to the surface of the gift box. On the reverse side you can write congratulatory words. You can make a similar gift bag yourself. On a regular thick bag, make an applique in the form of a collar and tie. It is better to choose a monochromatic package.
This way, the gift will immediately take on the image of a present intended for a man, and will look more impressive than a box with a bow
- You can use the furoshiki technique. This is a Japanese invention, reminiscent of origami. Fabric is used instead of paper. The gift is wrapped in it, original knots are made and it turns out unusual and cool.
- You can give a gift in a glass jar. It is better to take the original form of the jar. A layer of plasticine should be applied to it. Attach various beads, seeds, cereals, buttons, and coffee beans to this layer. Place your gift in a strange vessel. Close the container. The gift is ready!
The original packaging sometimes delights more than the gift itself. Therefore, you will have to try if you want to truly surprise a person.
Making a gift for a man
Master classes
There are any options for creating packaging on the Internet. But what to do if time is short? Pay attention to step-by-step master classes on creating universal boxes with your own hands. They are suitable for gifts of almost any shape.
What do you need to get started?
We will need the following materials:
- Paper or cardboard (as you wish: colored, plain, or from household appliances that are not useful)
- PVA, instant glue, glue gun (depending on what you will be working with)
- Scissors or utility knife
- For decoration (ribbons, rhinestones, beads, ropes, etc.).
Advice! Before you start creating on good cardboard, practice on a simple A4 sheet. No one wants to simply crumple up the cardboard that they wanted to use, but something went wrong.
A product created by yourself will warm the soul of your loved ones. It will always surprise you with its exclusivity. The design will be according to your taste and the occasion of the holiday
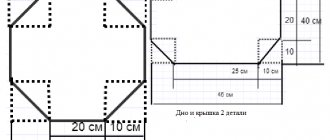
Box with lid
A square-shaped box with a lid will look very impressive as a gift. Despite the simplicity of the forms, it allows you to show imagination and creativity by creating unique packaging.
- First you need to print ready-made templates. In this version there will be 2 types of template - for the bottom and top of the box. At the same stage, it is worth marking the fold lines with a dotted line - from one valve to another, located strictly along vertical and horizontal lines.
- Carefully cut along the outer contours with sharp scissors.
- Bend the bottom piece along the dotted lines.
- Tip: Before bending, move the back of the scissors along the fold lines - this will allow the workpiece to be folded without problems or unevenness.
- Coat the valves well with glue and press for a few seconds.
- Tip: when using even the best glue, it is important to properly coat the edges of the workpiece. To do this, it is better to run over them two to three times.
- Lid. To fold it, repeat steps 3 and 4.
- At this stage, everyone can feel like a designer. You can decorate the finished box, giving it a unique author's style.
To do this, you can use any available materials:
- Lace and ribbons;
- Rhinestones and cabochons;
- Beads and seed beads.
Varieties
Depending on the type of material, gift filling can be made from different raw materials. For example it could be:
- paper (parchment, corrugated, craft, office);
- decorative tape;
- thin spiral rain of short length;
- foil rain for decorating the Christmas tree;
- a scattering of pink petals;
- sisal, mesh or regular sugar bag;
- translucent organza or decorative napkins;
- film for packaging flower bouquets;
- foil, silence, packing tape.
Each type of filler has its own characteristics. For example, thick paper holds the gift well, and therefore the item inside the box will not move spontaneously. Thin – good for lighter and smaller items. Craft wine is unique in that, with all its simplicity, it allows even the simplest gift to be made expensive at a moment’s notice.
Popular articles Mimosa
Organza is a sheer fabric with glitter that holds its shape well. It doesn't take much to fill the empty space of the box. The colors of this filler are varied; it also differs in the degree of softness.
As for the most common packaging option, paper is in great demand when decorating gifts. It can become a backing and decoration for a gift; it can be used to fill empty spaces to secure the position of the gift. To do this, you can combine colors, choosing shades of a related or contrasting range.
You can make a lid with a “window”
To do this, in addition to cardboard and decorative elements, you will also need transparent plastic sheets.
When forming a lid in this case, the steps become more complicated:
- To form a window, you need to mark a space in the lid according to its width and height. As a rule, it is enough to step back from the edges a couple of centimeters to make the “window” look organic and stylish.
- Cut out the “glass” for the lid. Please note - it should be 5-6 mm wider than the marked place on the lid itself.
- We glue the “glass” from plastic. It is better to take glue for these purposes with strong fixation. After gluing, you can cover the edges with tape or adhesive tape with a pattern that matches the overall design of the package.
- At this stage, you can start decorating the packaging itself. Any materials that you deem appropriate are suitable for this.
In such packaging, the gift will look bright and impressive.
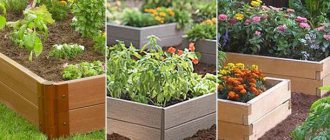
Large box for household needs
A DIY rectangular or square cardboard box for voluminous gifts will obviously not look entirely appropriate.
- Do-it-yourself dolls made of fabric - 145 photos and video description of how to sew a beautiful doll quickly and easily
- How to sew curtains for the kitchen - a detailed description of how and what to sew curtains for the kitchen from (video + 135 photos)
- Do-it-yourself felt toys: ideas, patterns, templates and felt patterns (135 photos and videos)
But large boxes can be very useful around the house, helping to organize the storage of things in rooms, in the kitchen and in the pantry.
In fact, good owners always have a supply of large boxes left over after buying shoes, a TV, a computer or an air conditioner.
But if you still don’t have any, you can easily cut out and glue a box of suitable sizes for any needs.
Self-closing box
In addition to the box with a separate lid, resealable packaging also looks stylish. To create a box, the first thing to do is print and cut out the template.
Tip: These boxes look especially beautiful if the template is printed on colored cardboard. You can also use thick matte photo paper.
In addition, the template can be enlarged to the desired size yourself.
- For especially large packages, it is worth dividing the template into several parts: bottom, sides.
- In this case, it is necessary to cut, stepping back from the edge by 4-5 mm - this distance will be needed to glue the workpiece into a single whole.
- At this stage you need to make slots for the closing valve. It is very important to do this with a sharp knife so that the edges of the slits are neat.
- It is necessary to bend the workpiece along the dotted lines - they are marked on the template.
- Tip: Before bending, use the back of the scissors to forcefully draw along the dotted lines. This will allow you to bend the workpiece without damaging it.
- It is necessary to glue the workpiece. If the printout consists of parts, you should first connect them. Just as in the case of making any other packaging, the edges must be carefully coated with glue.
At this stage you can decorate the box. Especially if the template was printed on white cardboard or photo paper. Satin ribbons, lace or velvet braid look good as design elements. These materials will add a special shine to gift packaging.
Paper pyramids
And finally, our favorite - paper pyramids! They look great and, despite their apparent fragility, are quite strong. The pattern for creating them is perhaps the most complex, but nothing needs to be glued or intricately bent. This box will perfectly fit a handmade chocolate candy, a flash drive, jewelry, a Christmas tree toy... Anything!
photo - linesacross.com. .
Notes and tips:
1. For the boxes - yay! – the double-sided paper that was purchased for origami was ideal. Pastel also behaved wonderfully.
2. We cut out a snowflake on the red box with a model knife, and so that it would not be visible through it what was hidden inside, we used tracing paper - we cut out a four-pointed star from it according to the size of the box and secured it with a glue stick.
3. It is convenient to make holes for the ribbon tie with a hole punch, but in the absence of one, you can cut it with a paper knife or pierce it with a needle.
PS
In the 21st century, it is impossible not to think about saving resources and ethical treatment of nature. If your inner ecologist protests against packaging as a harmful excess, but you still want to please the recipient with a beautiful box or securely wrap a fragile gift, then you can always find a compromise solution. We have already written above that the filler for boxes can be made from old parchment. Think, maybe, instead of origami paper, you can take a beautiful magazine sheet, instead of synthetic glitter, decorate the boxes with your own drawings, and replace satin ribbons with twine or cotton lace.
There are a lot of gift design options, it all depends on your imagination and, believe me, even if it seems to you that you don’t have a single worthwhile idea, they will appear as soon as you pick up paper and scissors and start creating your first homemade box!
Storage box
In addition to packaging for gifts, self-made boxes are also suitable for storing things. They look especially impressive with jewelry.
Also convenient to use for storing lipstick, mascara, pencils and other cosmetics. Men can store watches or cufflinks in them.
What templates are suitable for making your own storage box?
- In this case, a box in the shape of a rectangle or hexagon will look impressive. Making is available for needlewomen of any level of preparedness - from masters to those starting to take their first steps in creativity.
- Storage boxes made of thick felt look interesting. You can decorate them with any available material that matches the overall style of the idea.
- The versatility of the form allows you to experiment with styles: both shabby and steampunk will look equally impressive.
DIY boxes will always be the center of attention. They add soulfulness to gifts for dear and close people. With the help of designer packaging, you can enhance the surprise effect of a surprise for employees and colleagues. And storage boxes, made according to an individual sketch in any style, will complement the interior of apartments and houses.
Decor
A DIY cardboard gift box will look much more attractive if you decorate it with artificial flowers, beautiful wrapping paper, artificial pearls, beads or seed beads, multi-colored ribbons and beautifully tied lush bows.