Which formwork is suitable for garden paths
The use of formwork for garden paths allows you to pave large areas in a relatively short time. The speed of making paths using molds is significantly higher than when laying tiles.
In addition, the paths have a very attractive appearance and can become one of the decorations of your personal plot. Although, of course, the decorative qualities of concrete paths are inferior to those paved with natural stone. However, the cost of these arrangement options is incomparable.
To perform the work, you can use ready-made plastic molds, or you can make the molds yourself. For production, wooden blocks or thin strips of sheet iron are used.
Preparing to lay a garden path
Elements of a garden path can have any geometric shape: circle, square, regular or asymmetrical polygons, in the form of a human foot, a leaf of a tree, etc. Small boxes, wooden or plastic boxes and containers, and baking dishes are suitable for making tiles. A good option is to put together a mold frame from wood or make it from tin.
Before you begin work on the manufacture of tiles, it is necessary to carry out preparatory work:
- Consider the optimal approach to all buildings and the rational geometry of the road. A perfectly straight line is not always beautiful, and a too crooked one is inconvenient.
- Draw a site plan with the proposed path.
- Measure the length of the future path.
- Decide on the material to create the trail. If concrete, choose a tile design. Decide whether it needs to be tinted and decorated with patterns.
- Draw a sketch of the tile.
- Calculate how many elements will be needed to build the entire garden path based on its length, width and tile size. Standard width – 60 – 90 cm.
Now you can work on the form.
Laying a garden path according to shape
Choosing the shape of the tracks
Using plastic molds or homemade formwork allows you to create paths of various shapes. The most common options:
- Brickwork. For manufacturing, formwork should be used in the form of a lattice with rectangular cells with offset.
- Round stones. To make such a path, it is convenient to use ready-made plastic formwork, since it is extremely difficult to make round stencils from wood.
- Triangles. This is a simpler option and is available for self-production.
- Hexagons. The track pattern will resemble a honeycomb.
- Curvilinear figures. This formwork option will allow you to create a fantasy pattern.
How to make it yourself
You can make a garden path for your garden yourself. To do this, you need to prepare a cement-sand mortar and make a mold into which the concrete mixture will be poured.
Proportions for preparing concrete mortar:
- cement grade M500 - 1 part;
- river sand - 2 parts;
- filler for strength (crushed stone, gravel) - 2 parts;
- plasticizer;
- water (so that the solution looks like thick sour cream);
- coloring pigments;
- stone chips to imitate natural stone;
- additives for strength (propylene-based fiber).
Made from silicone
The mold for casting paving slabs can be made of silicone. It is sold in any hardware store in aerosol packaging. Silicone accurately repeats all the irregularities of the sample.
To make a small mold (30x30 centimeters), you need to buy at least 6 packages of silicone.
How to make tiles using a silicone mold:
- take a piece of relief board or tile imitating natural stone;
- build a wooden box according to the dimensions of the sample “plus” 2 centimeters in reserve;
- place the sample in a box, brush the surface and walls of the box with soapy water;
- cover the sample with silicone, fill the entire space of the box, level the silicone on top and cover it with a plywood sheet;
- allow the silicone to dry (1-3 hours);
- remove the mold from the sample, lubricate it with oil and fill it with concrete mortar.
See also
Instructions on how to properly install and secure the sink yourself
Made of metal
The form for pouring the concrete mixture can be made from metal barrel hoops. Metal can be given any shape, bent in any way you like. Concrete solution is poured into a homemade stencil, lubricated with machine oil, and allowed to dry for 3-4 days.
The form itself is placed on a sheet of metal covered with film. Then such a stencil is removed and used any number of times. The height of the form should be at least 3 centimeters.
Made of wood
You don’t have to spend money on buying a ready-made stencil for filling a garden path, but make it yourself from wooden blocks. In addition, the factory form has standard dimensions, which may not be suitable for making a path.
How to make a path using wooden blocks:
- make formwork from bars interconnected in the form of a square or rectangle;
- the length of the bar can be from 25 to 50 centimeters;
- the thickness of the concrete slab depends on the height of the block (minimum 3 centimeters);
- The middle of the mold needs to be greased with machine oil;
- place on a sheet of plywood or metal;
- put film on the bottom of the mold, lay out decorative elements (pebbles, crushed stone, broken tiles);
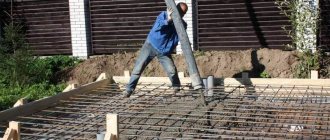
- fill the formwork with a cement-sand mixture;
- install, if necessary, fittings (drown in the solution);
- wait 3-4 days for the concrete to harden;
- the next day after pouring, the concrete should be irrigated with water and covered with film;
- In the first week after pouring, the surface should not dry out.
Made of plastic
A plastic basin is suitable for making a round element. It needs to be washed well, dried and lubricated with machine oil. The concrete mixture is poured into a plastic mold and allowed to dry for 3-5 days. The concrete is irrigated with water every day. Then the concrete element is removed from the basin and a new pour is made.
From scrap materials
A stencil for filling can be made from any available materials. For example, you can take rectangular or round children's sand molds, grease them from the inside with machine oil and fill them with concrete mixture. You can cast an element from a concrete solution using a baking dish, plastic packaging from sweets, or cookies. You can coat a burdock leaf with cement-sand mortar and let it dry. The result will be a beautiful element for decorating a garden path.
Manufacturing of formwork
Using ready-made forms is very convenient, as they are available in a large assortment. This will make the paths original and perfectly smooth. But if you want to create a unique version of the path, you will have to make the formwork for the paths with your own hands. First of all, you need to determine the size of the path.
Advice! Do not forget that the installation of trails should be carried out with a slight slope, this will ensure normal drainage of rainwater. In addition, it is important that the path rises at least 15 cm above the ground surface.
You can make your own paths from wood. This is the simplest option. To complete the work you will need:
- laminated plywood 20 mm thick;
- wood hacksaw;
- hammer;
- chisel;
- nails.
In addition, it is recommended to check the correct assembly using a building level, so you need to have this tool on hand. It is necessary to start production by drawing up a project. Draw a general shape and break it into tiles.
Next, we proceed to making a pallet from laminated plywood. This will be the basis of the form. Then you can start making the ribs. They should be equal to the height of the tile plus five centimeters.
Features of forms created with your own hands
Paving slabs always look solid, but rather monotonous. If you want to decorate your yard, give it a touch of originality and show your creativity to the fullest, you can make tiles yourself. And unique tiles require a unique shape. What features does it have?
- uniqueness. A tile created according to your own sketch will have no analogues. You can think about the desired size, shape and elements that match the overall design;
- the opportunity to experiment with color;
- if desired, you can add additional elements: shells, glass, pieces of porcelain stoneware, stones and create patterns from them;
- production of tiles of different strengths depending on the purpose. For the far corner of the garden - thin, for parking - more durable;
- Using one mold, you can make several molds at the same time.
- efficiency. The cost of making one mold and mortar is much lower than the amount spent on purchasing and shipping tiles.
Using special forms, you can create paths with a unique pattern.
The downside is the time required. It will take 2-3 days for concrete tiles to dry, and about a week to create 30-50 elements.
Preparation of solution and pouring
Having the formwork ready, you can begin making tiles for the garden path. To do this, a concrete solution prepared from cement grade M300 and higher is poured into the formwork. The best option is cement grade M400.
Advice! When purchasing, pay attention to the date of manufacture of the cement. It is not recommended to use cement produced more than three months ago to make paths.
Proportions for making the solution:
- 1 part cement;
- 3 parts sand, we use washed river or quarry sand;
- 3 parts of crushed stone, a fraction of 5-10 mm is suitable.
In addition, it is necessary to add special additives that increase the resistance of concrete to temperature changes, moisture and mechanical loads, since the paths are used in difficult conditions. If it is not possible to use special additives, then you can add to the solution:
- silicate glue to increase moisture resistance;
- fiber fiber, which acts as reinforcement, giving the tiles special strength.
But it is still better to use specially developed additives; they are added to the solution according to the instructions during the mixing process. Having prepared the solution, you can begin pouring concrete mixtures. This operation is performed in three stages:
- preparing the base;
- pour and level the solution;
- let the solution dry and remove the mold. Final drying is carried out outside the molds.
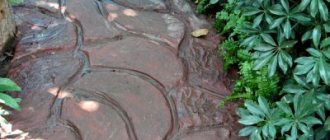
Imitation of natural stone
Scheme for laying a path made of natural stone.
You will need:
- hard sculpture plasticine;
- wooden boards;
- cement-sand mortar;
- pigment to match the color of the stone;
- natural stones (granite, cobblestone).
Imitation of natural stone is often used in the manufacture of garden paths. Concrete is poured into a specially prepared form that closely resembles the natural material, thus obtaining garden tiles that are no worse than store-bought ones. The first step is to soften the hard sculpture plasticine. Place the bars in a thick plastic bag and place them in hot water for 10-15 minutes. After the mass has softened, remove the plasticine from the bag. If you don't do this, you won't be able to handle this material. Crumple a lump of plasticine, roll out a layer 4-5 cm thick using a rolling pin or bottle. Take pieces of granite or cobblestones, press the stones into the plasticine mass (in a chaotic order), then carefully remove them and cut the edges with a sharp knife.
In order for the path to look natural, it is necessary to make at least 3 templates of the same size, but with different arrangements of stones.
Build formwork from wooden boards around the plasticine template, fasten the edges with self-tapping screws and metal corners. Sculptural plasticine is a fairly hard material, so there is no need to worry that it will soften under the pressure of the concrete solution. In order for the stones to acquire a natural color, it is necessary to add a special coloring pigment to the solution to match the color of the natural material, granite (marble) dust and fine crumbs. First, sand is mixed with stone chips, cement is added to it, then pigment (about 2-3% of the total mass), water is added. The solution is poured halfway into the mold, the reinforcement is laid, the remaining solution is poured out, covered with film, and left until completely dry. In this way you can make the required number of tiles for a garden path.
Decoration
Ways to decorate slabs for paving paths:
- add special dyes to the concrete solution to make colored tiles;
- after filling, treat the surface with a coarse brush to create a relief;
- relief can be created in other ways. For example, you can lay a film on a poured form and pour crushed stone on top of it, lightly pressing it into the solution. The next day, we remove the film along with the crushed stone and get a relief surface;
- You can make decorative prints of other objects. For example, palms or feet;
- You can press pebbles, pieces of tiles, metal balls and other objects into the uncured surface of the future tile.
Once the concrete has hardened, decorating options are limited, but they do exist. The easiest way to decorate is to pour loose decorative material into the seams, for example, marble chips or tinted sand.
So, for paving paths in a personal plot, you can use concrete mortar and special forms - formwork. You can buy ready-made molds from plastic, or you can make them yourself using laminated plywood and wooden blocks. After making the concrete forms, the finished tiles are laid on a well-prepared base. To give the paths a more complete look, homemade tiles can be decorated to your liking.
DIY forms for garden paths
They create shapes for garden paths using improvised materials. Sheet metal, pipes, their trimmings, and wooden blocks remaining after work are suitable. The simplest option is to prepare a silicone blank. This is an affordable and plastic material with a long service life. All you have to do is come up with the appearance of the product and the path itself.
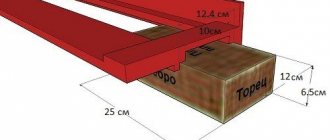
Wooden option
Prepare unnecessary wooden sticks and boards. The tools and consumables you will need are a hammer, a saw, and metal staples. Detailed instructions:
- Draw the template on paper in the form of a drawing. You can take the finished product and focus on its dimensions.
- Cut 5x5 cm pieces according to the template.
- Be sure to fasten the elements along the contour of the future shape. Pre-cut grooves at the corresponding ends. To make the mount strong, reinforce it with metal brackets.
- The resulting formwork is installed on site. Hint: carefully lubricate the wooden matrix with grease to use it repeatedly.
Wood stencil
Metal option
For a stencil, sheet material is often used, for example, an empty metal barrel. Additionally, you will need a grinder, metal scissors, and self-tapping screws. Procedure:
- Complete the drawing by drawing on it the outline of the future matrix with all the dimensional marks. An involuntary contour as an imitation of a stone of natural origin is more aesthetically pleasing.
- Cut strips of a given width using a grinder / metal scissors. The thickness of the garden path covering should be about 3-4 cm.
- Clean the edges of the workpieces, removing all burrs.
- Bend the strips according to the drawing. Secure the edges with self-tapping screws - their caps should be oriented towards the inside of the poured area. You can use rivets instead of self-tapping screws.
Blanks are also made from metal pipes. Just cut them into rings so that when pouring, dissimilar circles will be at a common height. Carefully clean all the workpieces and fasten them together with rivets, focusing on the drawing.
Metal mold for track
Silicone stencil
Silicone matrices are labor-intensive in terms of casting, but they provide the creation of high-quality imitation of natural stone and wood with structure. The material is ideal for repeated use. The only tools you need are a spatula and a brush. Step-by-step instruction:
- Choose a sample for the shape, for example, a stone. Take several to vary the look of the path.
- Make formwork from pieces of plywood or cardboard. Place a frame around the samples to create a sealed contour for pouring.
- Carefully coat the formwork and samples with grease on the side in contact with the silicone. This way the finished form will easily move away from the adjacent surfaces.
- Fill the space formed by the formwork with silicone. Calculate the optimal amount of raw materials and buy it with a small margin.
- Distribute the silicone with a brush, moistening it in any detergent. Level the silicone mass thoroughly to compact and remove air bubbles. The silicone layer should be at least 2 cm.
- Finally level the entire mass with a spatula. Soak the tool in soapy water.
- It will take 14-28 days for the silicone raw material to completely harden.
- After the entire mass has hardened, remove the formwork. Carefully remove all the stones from the resulting matrix.
Silicone mold for path
How to lay it correctly
First you need to choose the place where the path will pass. You need to mark the area, stick pegs into the ground, and tie them with rope. Using a meter and a rod, measure the width of the path.
How to lay road surface elements:
- at the marking site, dig a trench 25-40 centimeters deep;
- make a base for the road surface with a slight slope for water drainage;
- the bottom is compacted and covered with a layer of crushed stone of 10-15 centimeters;
- a layer of sand 5-10 centimeters high is laid on top of the crushed stone;
- You can pour crushed stone into a geogrid, then the base under the road surface will not move or be washed away by water;
- the base must be thoroughly compacted;
- the sand needs to be wetted with water, and the elements of the road surface should be laid on top;
- The gaps between the elements must be filled with sand and irrigated with water.
How to fill on site:
- at the marking site, they dig a trench 35-45 centimeters deep;
- a layer of crushed stone, gravel (20 centimeters) and sand (10 centimeters) is poured onto the bottom;
- the base is well compacted, leveled, and a slight slope is made for water drainage;
- the sand is watered generously;
- a form for filling is placed on top;
- the form is filled with concrete mortar;
- the surface is well leveled;
- when the concrete “sets” (after 3-6 hours), the mold is removed and a new pour begins;
- a wet surface can be rubbed with a mixture of cement and dye;
- the next day, the concrete is irrigated with water and covered with film;
- over the next 5-7 days, the concrete must be irrigated with water daily.