Fence panels
Decorative concrete fences are very popular among owners of country houses, cottages and townhouses. The demand for such products is so great that many are beginning to consider the production of concrete fences as one of the main ways to earn money.
In our article, we will try to describe as clearly as possible the technological process for producing fences made of cast cement, and will also dwell on several nuances, the observance of which determines the quality of the finished product.
Advantages of concrete fencing
There are many advantages to a concrete fence. Suffice it to say that you can choose any design solution in color, shape, cladding of the fence and the fence will look original and aesthetically pleasing. Concrete fencing is suitable for all types of buildings, sites and businesses. These structures are especially often erected in elite areas of cities; they give home owners even more solidity and respectability. What are the advantages of a concrete structure:
- strength and durability;
- sufficient sound insulation;
- wide choice in design;
- relatively inexpensive project;
- Possibility of construction in a short time.
It is worth adding to this that the fence can be installed on any type of soil, according to which a concrete strip under the fence is erected with your own hands. The strong and durable construction of a concrete fence will only require minor repairs and painting over time. This is an inexpensive and quick-to-build project if you use any type of hollow concrete blocks to build your DIY fence. One of the disadvantages that can be noted, however, as with all types of fences, is the seasonality of the production of a concrete fence. It is also necessary to carefully calculate the future design. Also, the project can be expensive if you select exclusive decorative panels.
How we are working
We offer the most profitable option for cooperation - a combined fence made of brick and corrugated board, wood, picket fence on a turn-key basis: thanks to our actions and the instructions of our customers, the result exactly matches the desired one.
The project implementation includes the following stages:
- Call us or leave a request for a call back.
- Visit one of 9 sales offices within walking distance from the metro. Each office provides samples of all fence options;
- There is no time to go to the office, just call and our specialist will come to any place convenient for you. The mobile manager service includes: consultation both on site and in any place convenient for you, measurement at the site and placing an order, provision of a full package of documents (contract, work order, check for payment), payment is possible both in cash and and on the map.
Types of concrete fences
Before deciding on the preparation of material, tools or even equipment, you need to decide what type of fence you want to install. There are several types and not everyone is suitable for independent construction:
- Monolithic fences, usually of the blind type.
- Stacked or sectional fencing, panels or solid structures are used.
- Decorative assembly, relief texture, stucco molding on the street side or double-sided can be used.
There are only two ways to install fences: the laying method or installation in a tongue-and-groove manner and monolithic pouring.
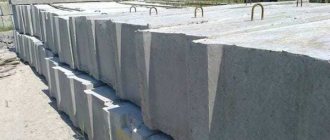
Monolithic fencing
These are very heavy, large structures, which are most often installed in enterprises and other facilities with a large territory. Monolithic structures are the most reliable of all types; their installation, as a rule, requires equipment. The fence is constructed from reinforced concrete slabs, under which a solid or columnar foundation is installed.
Interesting fact! Despite the roughness and large size of monolithic fences, well-chosen decorative elements can completely change the appearance of the fence, significantly improving the structure.
Decorative construction of a concrete fence
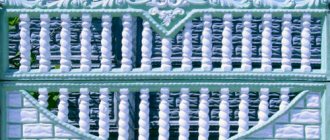
To make this type of fence completely on your own, some experience is required. If you have no experience, then in construction stores you can buy or order special molds for casting various elements. Decorative fencing can come in a wide variety of shapes, colors and styles. Craftsmen create forms into which concrete mixture is poured. As a result, we get elements that can look like wood, brick, or openwork forging. An imitation balustrade at the top of the fence or natural stone at the bottom of the fence gives the structure a very respectable appearance.
What materials and tools will be needed for construction?
To build a concrete fence with your own hands, you will need the following tools and materials:
- metal fittings from 4 to 8 mm;
- crushed stone - fraction size 2-6 cm;
- coarse sand;
- cement grade not lower than M400;
- plasticizer;
- level, spatula, trowel;
- molds for solution;
- concrete mixer;
- vibrating table
Of all the above, a vibrating table may not be useful. This equipment is used in the manufacture of decorative forms and blocks. With a concrete mixer, work will be done much faster and the quality of the solution will be higher, unlike when the concrete mixture is mixed manually.
Dimensions
Standard dimensions of a concrete panel: 2 meters in length, 50 cm in height, 4-8 cm in thickness. When calculating, a length of 2.06 m is taken as a basis (tolerances and gaps are taken into account). Average panel weight: 45-70 kg.
The height of the support column varies from 65 cm to 2.6 m, the cross-section is 15x15 cm, the average weight is up to 90 kg.
Expert opinion
Vladimir Ulyanov
I have been involved in fences for over 10 years, answering questions and helping people cope with the installation task on their own.
Ask a question to an expert
The recommended height of a concrete fence is 2 meters. This is enough to reliably close the area from prying eyes.
The calculations take into account the length of the slabs and the width of the support pillars. Thus, when installing a fence of 10 concrete slabs 2.06 m long and 11 support pillars, the total length of the fence will be 20.75 m (including the outer pillars).
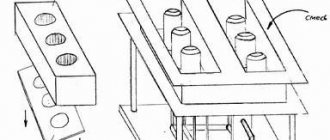
Making concrete forms with your own hands
Simple devices will allow you to create a variety of reliefs, bulges, through openwork elements, and imitation of natural materials on the fence: wood, stone. The form for making concrete fence posts is also selected; they usually have a special groove for connecting to the slabs. The choice of forms for creating a decorative fence depends on the budget and imagination of the master. You can buy one or two different shapes; you can choose a decorative plate-overlay specifically for concrete fence posts. Molds are made from different materials, the most affordable ones being PVC products.
For work you need a wide table, it would be good if it was a vibrating table. A form is placed on it, which is lubricated with a special paste that will prevent the solution from sticking. The solution is prepared in the following proportions:
- sand - 3 parts;
- cement - 1 part;
- crushed stone - 3 parts;
- plasticizer and drying accelerator.
When working with the last elements, always follow the instructions that should be in the package. The composition is placed in a concrete mixer and mixed thoroughly. After that, the mold is filled halfway with the mixture and the vibrating table is turned on. Then the reinforcement is laid and the form is filled with mortar to the top. Vibration is turned on and the process continues until the surface of the product acquires a glossy surface.
After the solution has dried, stripping is carried out - removing the finished products. The molds are cleaned of any remaining mixture and prepared for the next filling. Complete drying of products is carried out under a canopy.
Recommendation! If the pillars do not have grooves for installing panels, then reinforcement outlets should be made in the forms for subsequent connection of the elements by welding.
Adviсe
When choosing a brand of concrete for the manufacture of monolithic slabs, you should not save money. It is better to choose high-quality material with reinforcing filling.
If the fence does not involve installing a foundation, it is better to give preference to lightweight concrete grades, which are cheaper.
Expert opinion
Vladimir Ulyanov
I have been involved in fences for over 10 years, answering questions and helping people cope with the installation task on their own.
Ask a question to an expert
When installing a concrete fence yourself, it is better to entrust the choice of solution to a professional - this guarantees the strength and stability of the finished structure.
When choosing blocks for a concrete fence, pay attention to the quality of workmanship. Cracks, chips and other flaws on products cast from concrete do not indicate quality. Also, the strength of the finished fence directly depends on the grade of concrete and the reinforcement option.
Stages of constructing a concrete fence
When everything is prepared, you can begin the main work. In fact, there is nothing complicated, it is assembled in stages, the main thing is to install the pillars evenly.
- Examine the soil to determine the depth of the fence supports.
- Clear the area, calculate and mark the location of the main key elements - pillars, including those from the wicket and gate.
- Wooden stakes are driven into the planned places of the posts, between which a rope is stretched.
- Dig holes for the posts. The depth depends on the type of soil; on average, they dig up to 75 cm; on complex (heaving) soils, they dig up to 1.2 m.
- The pillars are leveled using a level; to be sure, it is advisable to check the distance with a plywood strip, precisely adjusted to size.
- The pillars are fixed with cobblestones, the level is used again, measuring the verticality, then they are filled with concrete mixture, based on the proportions: 1 - cement, 2 - gravel, 3 - sand. The mixture dries from one to three to four days, depending on the time of year: summer, spring or autumn.
- The sections are inserted carefully; if these are prefabricated structures, then first install the bottom row along the entire length of the fence. Having verified the row using a level, the next one is placed.
Recommendations. As you install the pillars, it is better to check the connection points, and at the same time the distance, using one of the prepared forms. This is an important point, especially if the elements are not connected by welding, but in a tongue-and-groove manner.
The final stage is painting the concrete fence. Painting can be one of the types of finishing. After priming, the fence is painted with acrylic paint. Experts also recommend rubber paint; it is not as durable as acrylic, but will preserve the pristine freshness of the fence for a long time.
Mounting options
Installation of a concrete fence is simple and is carried out by a team of 2-3 people. To assemble a fence from monolithic slabs, a truck crane is required, as well as preliminary pouring of the foundation.
There are several options for installing a concrete fence, and their main difference is the method of installing the sections.
Preparation for installation:
- A cord is stretched along the perimeter of the future fence at a height of 0.5 m, all vegetation is removed and the soil is leveled.
- Every 2.06 or 2.1 m, holes (glasses) are dug in the ground for support pillars (side width 20-25 cm, depth up to a meter).
- Drainage is poured into the bottom of the hole, after which a post is installed.
Further installation of the structure proceeds in one of the following ways.
First option
This method is aimed at reliable fixation of pillars with mandatory vertical and horizontal leveling. After this, wooden slats are inserted into the grooves, the underground part of the pillars is secured with pieces of crushed stone, concrete or crushed brick, rammed and cemented. A day after the support has been erected, the wooden slats are replaced with sections. The disadvantage of this method is the labor-intensive mechanism for aligning the supports.
Second option
This method does not require as much effort to level the support pillars. First, the first pillar is installed, leveled and concreted. All sections are installed into the grooves of this pillar at once, and on the other hand, bricks are placed under them for leveling. After this, the next pillar is installed, leveled and concreted, immediately connected to the sections of the first span, and the second span begins to be built. The disadvantage of this method is the possible subsidence of the load-bearing supports.
Third option
It is a compilation of the previous two. The first support post is carefully concreted and erected, after which the lower section of the fence is installed, and a wooden batten is laid on top. Then the next pillar is installed. This is how the fence with lower sections is mounted. After the cement has dried, the wooden beams are replaced with the remaining sections. This is the most practical and convenient way to install a concrete fence.
Useful Features, types and sizes of reinforced concrete fence, characteristics of reinforced concrete
Separately, it is worth noting the difficulties of installing a concrete fence on uneven terrain. This is done in steps, with each span located at its own height. Each section is checked for level, and if necessary, the pillar is sprinkled with crushed stone from below. Installation is carried out with the lower sections, and after leveling, concreting and standing, the remaining sections are mounted.
Which gate to choose for a concrete fence: swing or sliding
Swing gates are conventional structures that are supported by turned canopies. It is worth noting that for any type of gate, it is advisable to install pillars that are stronger than those of the rest of the concrete fence. Sliding gates are structurally different, but the mechanism is quite simple. Sliding gates move automatically (slide away) along the fence, from the inside. To do this, rails are installed on top, and rollers are placed on the collar-cloth.
Now you know how to install a concrete fence, all that remains is to make the calculations and begin construction.