Installation of plasterboard sheets can be done in various ways. If drywall is installed on a flat, smooth surface, then reliable fixation of this material can be achieved using various adhesives. One of the effective methods of installing gypsum boards is installation on liquid nails.
You can purchase liquid nails for drywall at any building materials store. But before you go shopping, you need to know exactly what this type of glue is.
Method one
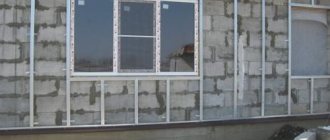
The first method can be applied to concrete walls - they are relatively flat, the adhesive layer will be quite thin, so it will not be possible to lay electrical wiring under drywall and you will need to make grooves for it, that is, recesses in the wall. To do this, first make markings on the wall under the wiring lines, cut out the grooves with a hammer drill or hollow out the grooves with another tool, and lay the wires in them, making sure to secure them with clamps every 40-50 cm. Also, using a diamond crown in advance, make sockets for the socket boxes at the marked places on the concrete, so that later you don’t have to make a hole in the sheet of drywall to remove the wire while cutting out the socket.
Then the surface, of course, needs to be primed. For untreated concrete, an ordinary primer is suitable, but if the concrete is painted, for example, with oil paint, then there are two options - remove the paint completely and then prime it with a regular primer, or buy a special primer and do not remove the paint layer. In the first case, you will have to tinker with removing the paint, in the second, you will quickly cope with this stage, making your wallet much lighter. By the way, such a primer will have either the word “concrete contact” or “beta contact” in its name. You can be sure that drywall glued to a previously painted wall will hold up so well that even the Egyptian pyramids will envy its potential age.
After the primer has dried, you can begin the main work:
- 1.
First, stir the adhesive solution according to the instructions on the package. Keep in mind that some brands of glue set very quickly, so read the instructions and dilute as much glue as necessary. Otherwise, while you glue one sheet, the remaining glue will simply dry out. - 2.
Next, on a sheet of drywall you need to mark and drill out the outlets for the socket switches; an ordinary crown (for wood) will do for this. Make sure that the holes in the sheet coincide as much as possible with the cutouts in the concrete. - 3.
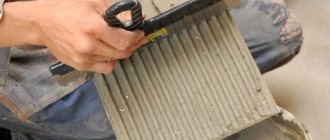
After this, you need to apply strips of glue onto the sheet with a notched trowel. It is usually recommended to apply glue around the perimeter and in the middle, but we recommend treating the entire surface - this will allow you to perfectly align the sheet on the wall. - 4.
The next step is to install the sheet on pads (they can be cut from the same drywall) with the front side facing the floor. You need to move the sheet to the wall and bring the ends of the wires into the holes, just don’t rush to press it to the wall - first you need to align it using the rule. - 5.
Now you need to lift the sheet and glue it to the wall, pressing harder in those places where it sticks out, checking the verticality with a level.
Mandatory surface preparation
Wall priming scheme.
Professional repairs differ from homemade ones mainly in that professional builders understand the importance of cleaning the surface from dust and dirt and covering it with soil. It is the soil that significantly increases the adhesion of the adhesive mixture to the surface. The surface of the wall or ceiling must be thoroughly cleaned, large irregularities removed and covered with a layer of soil in the ratio: 1 part soil to 3 parts water. Soil diluted with water penetrates deeply into the surface and adds strength to it - such a surface can withstand heavy loads. Leave the primed base to dry for 24 hours. Then cover it with a layer of undiluted primer and let it dry for 24 hours. This layer of soil prevents the absorption of liquid from the glue and thereby preserves its adhesive properties. The floor near the wall must be leveled or wooden supports installed on it using a level for installing plasterboard sheets (the space from the floor to the plasterboard sheet must be filled with glue). Leveling the floor surface is of great importance - due to an uneven floor, you will not be able to glue drywall evenly.
Method two
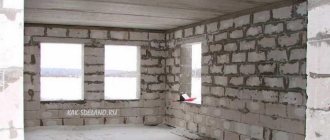
The second method is essentially not very different from the previous one, but is used on more uneven walls, such as brick, and therefore the glue needs a different brand and composition, and the glue layer will be thicker. The wall preparation stage includes the same steps - gating for wiring, drilling for switches and priming.
Glue (here you will need Perflix) should be applied to the drywall in small parts (piles) along the entire length of the perimeter of the sheet, using an ordinary narrow spatula or trowel, maintaining a distance of 20-25 cm. In the middle part of the sheet you also need to lay out piles of glue in two rows along the entire length, the distance between the rows is 40-50cm, between the piles - 30-35cm. After which you can put the gypsum board on the pads and level it according to the rule.
Please note that the layer of glue should be from 5mm to 30mm (already pressed down), so determine the volumes and sizes of the piles in advance based on the thickness and viscosity of the adhesive composition.
After applying the glue and leveling, the sheet is pressed against the wall and the vertical is checked for level, then a rule is applied and tapped on it to level it. However, if your rule is combined (often with a level), then experts recommend doing the following: attach the tool to the sheet, mark the indicators for yourself, remove it and tap the right places with your hand, otherwise the level may deteriorate and subsequently begin to “deceive”.
Note that in this method you can apply glue directly to the wall, however, practice shows that this is not entirely convenient.
Expert advice
Before finishing the walls with plasterboard begins, the aerated concrete surface should be puttied and leveled. Significant damage and uneven areas are repaired with plaster mortar.
To finish a high ceiling, a frame fastening option is used, because in this case it is considered more reliable. For low ceilings, it is allowed to use glue, but such work requires a lot of labor associated with holding heavy sheets of plasterboard material at the desired height.
For interior wall decoration, only high-quality plasterboard material is used. Experienced craftsmen prefer to work with products from Knauf, which has long been a leader in the global building materials market.
Method three
The third method of covering walls with plasterboard is suitable for very uneven surfaces. Here you will need to first work with the drywall itself - you need to cut strips 10 cm wide from solid sheets. The number of these stripes depends on the height and width of the walls. They will form the basis for the sheets of drywall - they need to be glued to the wall around the perimeter of the room and vertically at a distance of 40-60cm from each other. This way we get a frame in which the stripes serve as beacons. Sheets of drywall will also be attached to the frame using glue, and not screwed, as is the case with profiles.
When gluing the frame, do not forget to set the ideal vertical using the same tools - a rule and a level. The glue must be applied in such a way as to achieve complete leveling, that is, in some places you will need to lay just a little, and in others a pile 2-2.5 cm high.
As for the electrical wiring, if the space under the beacons allows, it can be simply hidden under the frame without grooves, but be sure to be secured to the wall. After all this preliminary work has been completed and the glue on the beacons has completely dried, you can begin gluing sheets of drywall to them. You can use the same gypsum glue or attach the sheets with liquid nails - they will hold just as well, even better, but it will be much more expensive. Here, to each his own: some have the motto “victory at any cost,” while others have “victory with a minimum budget.”
Also, some use polyurethane foam for this purpose, but such daredevils are simply peace incarnate. Because it is very troublesome and time-consuming. And you need to press the sheets against the beacons very firmly, pressing every 15 minutes for an hour, otherwise you won’t be able to hold the foam behind the sheets, lumps will form, the foam will harden, you’ll have to break everything and start over - there’s no other way to solve this problem. But the efforts will be 200% worth it, because it will stick conscientiously. So if you haven’t invited professionals, it’s better to buy glue; although beginners are lucky, everything doesn’t always work out right away.
By the way, my friends and I completed the renovation of the bedroom on time; the chaotic contents of my head turned into a clear knowledge of how to glue drywall to the wall. In general, this is not so difficult to do without profiles and bolts. Of course, I had to spend a little time and effort, but the result was worth it.
To the home handyman "
You can also read:
How to build a plasterboard partition with your own hands
The process of making a partition from plasterboard with your own hands is considered step by step. You can not only...
How to make a niche from plasterboard
This detailed tutorial will teach you how to make plasterboard niches. The publication describes the entire work process step by step, starting from niche measurements and...
DIY plasterboard ceiling
Detailed instructions that tell you how to make a plasterboard ceiling with your own hands. Having studied it...
Polyurethane foam
To cover walls with plasterboard using polyurethane foam, you must:
- drill 7-9 holes for screws, distributing them evenly over the sheet area;
- around these holes, at a distance of 3-4 cm, drill holes with a diameter of 5-6 mm;
- stick pieces of thick foam rubber at a distance of 10 cm from each hole (with them it will be easier to align the sheet);
- level the floor surface, place a sheet of drywall against the wall, fasten it with screws, putting washers on them (so that the polyurethane foam does not displace the sheet when drying) and level the sheet;
- Pump mounting foam into the 5-6 mm holes so that the contact area of the foam with the wall is 10-15 cm;
- when the foam has dried, unscrew the screws, remove the washers from them, and screw them back in, sinking their heads into the drywall.
When is wet plaster for aerated concrete better than dry drywall?
Plaster on aerated concrete is a champion in freeing up the interior space of the house. The thickness of the plaster layer on a high-quality wall is 2 mm. This is much smaller than the cross-section of a plasterboard sandwich: a frame with a screwed-on gypsum board shortens the room by 10 cm - 5 cm on each opposite side.
Geometric accuracy is the royal feature of gas blocks. Walls made from them always turn out smoother than from other materials. The waviness of aerated concrete masonry under any conditions is within 4 mm. Most often, the difference between the bumps and depressions is 1–2 mm.
Even if suddenly, for some reason, the wall turns out to be uneven, the blocks can be easily sanded. To get a quick result, use an electromechanical tool - all work with it takes a few minutes. With manual devices you can also achieve perfectly smooth walls - the process will simply take a little longer.
Under these conditions, it is advisable to use thin-layer plaster solutions. Most proprietary mixtures contain additives that bind water and prevent it from penetrating the masonry.
However, when choosing a composite, you must take into account the degree of its vapor permeability. After curing, many compositions create a dense polymer film on the walls. Such mixtures should absolutely not be used for outdoor work.
To prevent aerated concrete from accumulating moisture, which inevitably forms during human use of premises, the outer plaster layer must be more permeable than aerated concrete. Internal plaster, on the contrary, should partially prevent the passage of steam. Then the walls will retain the ability to “breathe” and be able to remove excess moisture outside.
For the same reason, it is not recommended to decorate rooms with polyvinyl wallpaper. In this case, gas exchange in the house will be insufficient and forced exhaust will have to be provided.
In general, according to everyone, the best plaster for aerated concrete is gypsum. If gypsum board slabs were thinner, their heat and vapor barrier parameters would be considered ideal. Therefore, even despite the disadvantage of consuming living space, this material remains one of the most popular for interior finishing of aerated concrete walls.
Is it possible to glue drywall to aerated concrete?
Answer: plasterboard can be glued to aerated concrete. A reliable, strong connection is obtained. The labor intensity of the work is minimal, but at the same time the plasterboard sheets adhere tightly to the aerated concrete. After all, both materials - wall blocks and finishing panels - are created from minerals.
- Gas silicate is similar in chemical composition to heavy concrete - it is a mixture of sand and cement.
- A plasterboard is a paper shell filled with gypsum (93%) and fine perlite (3%) with additives.
Features of covering aerated concrete with plasterboard
Much has already been said about the advantages of aerated concrete walls. Both expert builders and marketers have repeatedly emphasized the useful characteristics of products. There are many advantages. The main features: light weight, quick laying, dimensional accuracy, thermal insulation - 6 times better than brick.
However, if there is an excess of moisture, aerated concrete loses some of its advantages. First of all, this relates to thermal insulation ability: wet blocks do not retain heat. For this reason, it is more advisable to carry out all work with cellular concrete using dry technology.
One of the ways to keep walls dry when plastering is to cover aerated concrete with plasterboard. The finished panels have a mirror-smooth surface, so gypsum plasterboard walls are easier to finish.
The choice has been made. Now it remains to figure out which method of fastening sheets is more reliable and cheaper.
Safety precautions
When starting to work with drywall, take a couple of minutes to review the safety requirements. First of all, familiarize yourself with the factors that can cause harm to health or injury to a person. It is also useful to study the conditions that should be followed during work. It would be good to take into account mistakes that have more than once led to injuries to other, less careful workers.
- falling parts and assemblies, equipment, tools;
- moving frames and other structures;
- work at height;
- unstable scaffolding, ladders, stepladders;
- electric shock;
- uneven metal surfaces, burrs;
- super heavy loads;
- low illumination of processed objects;
- unfavorable microclimate.
- You should work in comfortable overalls and shoes.
- It is prohibited to perform any operations while intoxicated.
- Do not use a faulty tool. Particular attention should be paid to the performance and serviceability of electrical devices and machines.
- During installation, care must be taken not to injure other people.
- Fire safety rules are the first law. Particular attention should be paid to observing them when working in fire hazardous areas.
- Lifting and moving loads weighing more than 50 kg per person.
- Unreliable – even for a short time – fastening of plasterboard structures.
- Holding a power tool by the cord, as well as pulling it up or handing it over to others.
- Cleaning moving and rotating parts from chips and dust while operating a power tool.
- Careless handling of electrical cables, laying them on a metal frame, cluttering the work area.
There are much more requirements for safe work - we recommend that you familiarize yourself with them in detail before starting work. If you comply with the above conditions, then your work will be effective and, most importantly, safe.
source