A slab foundation is a flat or ribbed slab of reinforced concrete formed under the entire area of the building.
A slab foundation is suitable for any type of soil; it provides sufficient reliability and stability to the entire structure.
To ensure a cozy atmosphere in the building, prevent dampness, and the possibility of using basements as gyms and laundries, it is impossible not to create insulation for the slab foundation.
Advantages of insulation
By insulating the foundation slab, durability and long-term operation are ensured without the need for intermediate repairs. For owners of apartments on the ground floor, houses, cottages, this problem arises often; a project for insulating the foundation with polystyrene foam is needed. To avoid heat losses, the foundation slab is insulated. In what cases is the foundation insulated?
- ensure the level of waterproofing of the fundamental base;
- reduce the rate of thermal insulation losses;
- reduce waste on heating a living space;
- prevent excessive formation of condensation on the surface of the load-bearing walls of the building. After all, condensation leads to the destruction of buildings, no matter how strange it sounds;
- make living conditions comfortable in an insulated building;
- Stabilization of temperature conditions indoors, residential buildings.
Classification of materials for insulation
Very often, homeowners have many difficulties in choosing one material or another; foundation insulation becomes a problem. People get confused about the names and properties, mix up thermal insulation characteristics, which only complicates the process for both parties when purchasing. In order to provide methodological assistance, we will consider the insulation of a slab foundation, materials and characteristics.
The material is selected depending on the thermal insulation characteristics and climatic conditions of the region. The second point: the use of special equipment for spraying a chemical reagent - polyurethane on a shallow surface. The third factor is the availability of financial resources, since insulation is not a cheap procedure.
- Polyurethane foam: Penoplex slabs for foundations are a popular material among the rest of the line of insulation materials. Made from oxygen foamed plastic. The chemical mixture itself is prepared directly on site during construction. There the procedure of mixing two reagents for insulation takes place. Foam sheets or polyurethane foam have excellent properties for preserving thermal energy in a building, reducing noise levels, and increasing sound insulation. Not susceptible to the negative effects of moisture, resistant to fire;
- polystyrene foam - insulation for foundation slabs contains hygroscopic foam at the base. Extruded foam plastic is also used to insulate facades and other parts of structures. Tile foam has a low strength coefficient and is unstable to mechanical damage on a shallow surface;
- EPS extruded polystyrene foam - insulation for foundation slabs: takes an honorable first place in functionality and application. Manufactured in a standard rectangular shape. The sheets consist of a cellular structure. The material is able to withstand loads, is not subject to change, and is resistant to temperature changes. It is used for thermal insulation of the foundation with polystyrene foam, and additional protection is not required. Presence of holes for drainage of condensate and moisture.
Separately about aerated concrete
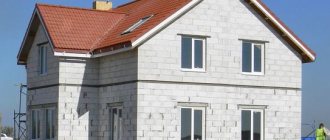
Very often, when carrying out work on the construction of a house box from aerated concrete blocks, owners ask themselves the question: how to insulate aerated concrete floors and is it necessary to do it? The choice of thermal insulation material depends on the location of the floor: the first floor or the interfloor ceiling. The answer to the second question is: yes.
In most of Russia, the insulating properties of gas blocks are not enough for comfortable use of housing; the material requires an additional layer of thermal insulation. In addition, if the warmth of aerated concrete itself is not enough, and it is decided to insulate the floors, you should carefully consider the location of the dew point in the ceiling: from the inside out, the materials in the floor pie set should be more vapor permeable.
Aerated concrete flooring has a distinctive ability precisely due to its base material. Let's remember school physics. Air is perhaps the best heat insulator.
But the problem with aerated concrete blocks is that their porosity is open. This means they miraculously absorb water. And as we have already considered, the higher the moisture absorption, the worse the thermal insulation. This means that the surface of the blocks must be waterproofed.
Insulation of the slab
In order to insulate the foundations, granulated polystyrene foam (foam) is used in shallow concrete. Also called warm concrete. Preparation of insulation for slab foundations is possible both at the factory and directly at the construction site. This depends on the customer and the ability of construction equipment to access the site to insulate the foundation with expanded polystyrene.
It is recommended to use EPS with a density of at least 1200D for slab foundations. Project: for one cube of concrete mixture: 0.3 tons of M400 cement, one cube of granulated polystyrene foam, 0.8 tons of sand, saponified resin as needed.
When laying concrete, the shrinkage rate is taken into account, one millimeter for every meter. The thermal conductivity of the mixture will not be great. You need extruded polystyrene foam under the slab from below, but not from above. The foam layer should have a layer thickness of no more than 10.0 cm.
Possible options for insulating a concrete floor
Insulation under a concrete floor is the most preferable thermal insulation option, but is only possible during work during the construction phase. The material is laid on compacted soil, after which concrete is poured.
- Additive to concrete mortar. Occurs when using expanded clay. The most economical way.
- On top of concrete pouring. Such insulation is arranged in the case when a wooden floor will be laid on logs in the future. Requires a finishing layer. This method is remarkable in that it makes it possible to use any insulation.
- It is not necessary to limit yourself to one layer of insulation. For example, you can lay penoplex on the ground, and then fill in the screed with the addition of expanded clay. The combination of various thermal insulation materials will give the greatest insulation effect.
What to consider when choosing insulation material
Since not every product may be suitable for use as insulation, when choosing you need to be guided by the following factors:
- water resistance indicator: the less the foam absorbs water, the longer it retains its beneficial properties, and vice versa. During periods of negative temperatures, water crystallizes, expands, changes the molecular structure of the element, and violates its integrity;
- strength coefficient: data is important when constructing a foundation on moving soil masses and rocks. The points can cause deformation and damage the foundation;
- resistance to various environments: each type of soil has its own characteristics and composition, both chemical and biological. Because of this, the level and concentration of salt increases, which leads to premature destruction of fine insulation.
The technology (project) for insulating the foundation with penoplex also provides for installation from the inside. But the material must be resistant to fire. When ignited, a minimum amount of toxic substances should be released. Often these vapors serve to induce suffocation in asthmatics.
The shelf life of the panel should not be less than that of the finishing material. Otherwise, you will be forced to dismantle the layer ahead of time.
It is better to insulate the foundation with extruded polystyrene foam. In this way, protect the structure and retain heat.
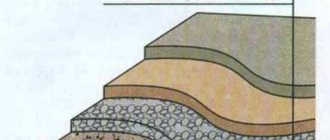
Classic design of an insulated foundation slab
- Compacted soil surface;
- geotextile layer;
- a layer of sand cushion no more than 20.0 cm deep;
- a layer of crushed stone cushion no more than 20.0 cm deep;
- 10-centimeter level of shallow concrete slab;
- waterproofing ball;
- insulation layer with a thickness of at least 5.0 cm;
- 35 cm monolithic slab;
- concrete grillage measuring 50 x 50 cm;
- metal rods of the third class with a diameter of at least 1.2 cm;
- a row of aerated concrete 37.5 cm wide;
- from the front part there is a row of facing bricks covering aerated concrete;
- ventilation gap 3.0 centimeters;
- waterproofing, insulation, grillage lining on a polystyrene base.
Characteristics of expanded polystyrene
The average service life of expanded polystyrene is 30 years. If maintained, the house will last forever. The following factors negatively affect the period:
- the front surface on which the material will be glued is not leveled, there are air gaps and plugs;
- PPS boards are not manufactured using technology and do not have adequate protection from the negative effects of ultraviolet radiation;
- Before installation, the material lay in an open space and was exposed to weather conditions.
Insulation materials, regardless of name and marking, have an increased level of ignition. Belong to third and fourth grade. Currently, most manufacturers add a chemical reagent such as antipyrine to the composition. The main feature is attenuation upon ignition. The “C” mark is added to the standard marking.
- Excessive release of smoke during combustion, during which cyanide and hydrogen bromide are released into the atmosphere;
- minimum water absorption rate;
- increased bending strength;
- insulation function - minimum heat transfer rate;
- interaction with petroleum products.
Neutral interaction with bitumen, cement, gypsum, lime, asphalt.
Insulating the foundation is a simple project. It is enough to have a construction site with access for equipment. Otherwise, you need to prepare the concrete mixture yourself, taking into account proportions and ratios. The initial stage may seem costly, but these costs will pay for themselves in full within the first year. Is it worth insulating the foundation slab with polystyrene foam sheets, definitely yes.
Heated floor pipes must be resistant to damage, since during installation they are subject to mechanical stress. The best option is products made from cross-linked polyethylene PE-X. Photo: StoneHut (2)
How to calculate the thickness of the slab and the cross-section of the reinforcement?
In this case, one should be guided by the standards (SP 50.101.2004 and SP 63.13330.2012). A simpler way involves using ready-made projects, which are available from all large construction companies. To check calculations and compare options, it is worth using special computer programs, such as Foundation, GIPRO or WINBASE.
You can immediately build walls on a “classic” Swedish slab by placing two layers of rolled waterproofing under the first crown (or row of masonry). Photo: StoneHut
Is drainage needed around and under the foundation slab?
In swampy and flooded areas it is extremely desirable. In this case, the function of the drainage layer is performed by a backfill of coarse crushed stone (20–70 mm). The system will be more effective if tubular drains are laid in the thickness of the bedding (their optimal pitch is 1.5–2 m). Drainage is also necessary around the perimeter of the slab or blind area. Water should be discharged into a drainage well or onto a descending terrain; when the groundwater level is less than 1 m from the surface, it is advisable to use an automatic system. The presence of drainage will reduce the risk of soil freezing under the house, extend the life of the foundation and reduce the risk of cracking of the blind area.
The slab is poured under the entire house, including the porch and terrace (veranda). If these elements are added later, there is a high probability of distortions and cracks forming at the junction of the walls.
How to lay communications?
Water and sewer pipes, as well as electrical cables (if underground input is provided) are laid when installing the pillow. They are protected from possible damage by a layer of EPS or wrapped in several layers of waterproofing material. In principle, it is possible to connect to communications even after construction is completed - through an insulated wall box.
But sometimes a monolithic or masonry base is built first. Photo: “Foundation 47”
Is it possible to build a slab foundation in the cold season?
This is possible, but is associated with increased costs and the risk of reducing the reliability of the design.
Concrete with winter modifying additives is 25–40% more expensive than usual, and the construction of a heated dome, which is essential in severe frost, will cost 30–100 thousand rubles. In winter, excavation work is very difficult, and all other tasks are complicated by the cold and lack of daylight.
The blind area is poured over the drainage pad and reinforced with road mesh. Photo: IZBA De Luxe
Is it possible to build a slab foundation from homemade concrete?
Only for small buildings for household purposes. If we are talking about a house, then this method is excluded, because when pouring concrete in small portions, it is impossible to avoid numerous “cold” seams, which will catastrophically reduce the rigidity of the slab and its resistance to cracking. When delivering ready-mixed concrete, the interval between arrivals of automixers should be 3–4 hours.
It is advisable to perform a non-insulated blind area in fragments 1–1.5 m long to avoid the appearance of cracks. Photo: IZBA De Luxe
Is it possible to lay the flooring directly on the surface of the Swedish slab?
Yes, as a rule, you can do without. As a last resort, add a thin layer of self-leveling mixture. Note that it is advisable to lay coatings that conduct heat well on the Swedish stove, for example, porcelain stoneware or stone tiles, or a special laminate.
On open terraces, a weather-resistant coating with an anti-slip surface is laid on top of the slab, for example, porcelain stoneware or clinker tiles, larch or composite decking boards. Photo: ShutterStock/Fotodom.ru
3 myths about reinforcement
- The reinforcement should be knitted rather than welded, since welding negatively affects the strength of the metal. In reality, this only applies to alloyed reinforcement, which is practically not used in individual construction. Knitting reinforcement is easier and cheaper, which explains the popularity of this installation method.
- You can knit the reinforcement with anything and not necessarily tightly, since the connections are only necessary for the mounting positioning of the frame elements. Meanwhile, according to building regulations, when knitting lap and cross-shaped joints, the rods must be pulled together without any gap. The overlaps (their length is equal to 40 diameters of the reinforcement) should be tied with steel wire in several places.
- The diameter of the reinforcement is not important as long as the required reinforcement ratio is met (the ratio of the cross-sectional area of the reinforcement to the cross-sectional area of the concrete structure). In fact, the use of thin reinforcement (8 mm) increases the complexity of installation and complicates the quality control of the work performed.
In private construction, it is advisable to increase the reinforcement coefficient by at least 20% compared to recommended standards and use high-quality concrete.
Design option for an insulated slab foundation
1 — sand-gravel cushion; 2 — insulation (EPS boards); 3 - drainage pipe; 4 - reinforcement frame; 5 — pipes of the heated floor system; 6 — flooring (tiles); 7 - drainage membrane; 8 - ; 9 – gravel backfill; 10 - moisture resistant finish. Photo: TechnoNIKOL
The underfloor heating system is tested in two stages. After installing the pipeline and before pouring the concrete slab, the integrity of the pipes is checked with a liquid pressure exceeding the working pressure by 1.5 times. The duration of the test is 3 hours. As an exception, if a hydraulic test is impossible (for example, due to frost), testing with compressed air is allowed. When pouring concrete, the pipes must be filled with cold coolant and be under pressure (working or test). After the concrete reaches the required strength, a thermal test is carried out, which lasts seven days. First, a coolant heated to 20–25 °C must circulate in the system for three days. The maximum operating temperature is then set and maintained for four days. During this period, the uniform heating of all circuits is checked using a contact thermometer.
Sergei Bulkin
REHAU expert
Enlarged calculation of the cost of construction of an insulated slab foundation with an area of 80 m2
| Name of works | Quantity | Cost, rub. |
| Geodetic alignment | 12 000 | |
| Excavation work, pillow installation | 16 800 | |
| Drainage devices | 18 000 | |
| Laying out water and sewer pipes | 14 500 | |
| Installation of formwork, insulation, reinforcement cage | 32 000 | |
| Installation of heated floor pipes | 34 200 | |
| Concreting, vibrating concrete | 26 000 | |
| Total | ||
| Materials used by section | ||
| 14 500 | ||
| Crushed granite | 8 m3 | 16 000 |
| Edged board | 3500 | |
| Pipes (PVC and polypropylene) | Set | 22 000 |
| Reinforcement (bar 12 mm and mesh 8 mm) | 1.1 t | 32 000 |
| EPPS sheets CARBON ECO SP 1180 × 580 × 100 | 235 pcs. | 79 900 |
| Gaskets and fastening materials | 7 500 | |
| Concrete M300 | 13 m3 | 44 200 |
| Total | ||
| Total | ||
The slab base can withstand significant external influences and is suitable for construction in areas with complex, unstable soils, prone to frost heaving, and high groundwater levels. Insulating the foundation slab will help to significantly reduce heat loss through the base and reduce the impact of frost heaving of the soil. When the soil moves, the building rises and falls along with the foundation, which protects the house structure from the formation of cracks.
Step-by-step instructions for installing a slab foundation
Step-by-step diagram of the slab base installation
Surveys and calculations
Taking soil samples
When designing a monolithic slab, it is necessary to take into account the experience of similar structures in the region, the results of surveys (ground level, nature of the soil, bearing capacity of the layer), conditions of the technical specifications (number of storeys, wall, roofing materials). The survey includes a minimum of five geological pits (corners + middle of the slab).
The result of the research is the characteristics of strength, deformation of different layers of soil in the building area, prediction of changes in the chemical composition during the operation of the home, and the degree of aggressiveness of groundwater.
It is necessary to compare several solution options to identify the best combination of construction budget and technical characteristics. Step-by-step calculation instructions:
- concrete grade – M200 and higher for slabs, M50 for preparation, according to SNiP 2.02.01 for the foundations of structures and buildings;
- groundwater depth – anti-corrosion measures in the presence of high water;
- when calculating prefabricated loads, the weight of the slab on sandy soil is not taken into account;
- The load-bearing capacity and deformations that can destroy the structure are calculated.
For this purpose, special programs are used that have proven the performance of foundations manufactured based on their results in real operating conditions. The main documents at this stage are:
- soil classification – GOST 25100;
- enclosing and load-bearing structures – SP 70.13330;
- anticorrosive structure of the building's load-bearing frame - SP 28.13330;
- design, manufacturing MZF – VSN 29-85; 37-96.
Unlike strip foundations, the slab has an increased support area, prefabricated loads from the building are distributed evenly, and the strength margin is very large.
Marking and excavation work
Removing the fertile soil layer
It is forbidden to pour the slab over the fertile layer. The house layout diagram looks like this:
- axes - are carried out in the building area with a cord attached to pegs installed beyond the perimeter of the drainage system;
- the pit is 0.5 meters larger than the slab on each side (for drainage), the slab protrudes beyond the dimensions of the building by at least 10 cm (depending on the project).
Due to the small amount of work required to remove the fertile layer (20–40 cm) for a residential building, the work is carried out with one’s own hands without the use of special equipment. At this stage, it is necessary to ensure protection of the monolithic structure from soil moisture (overwater). To do this, drains are laid around the perimeter:
- geotextiles extending to the edges of the ditch;
- layer of compacted crushed stone;
- perforated pipe (corrugated or smooth in a dornite filter) with a slope towards the underground reservoir;
- backfilling with a natural filter (crushed stone fraction 10/20);
- covering with the remaining geotextile.
Drains must not be installed under a concrete preparation or foundation slab. The height of the backfill should be level with the crushed stone base cushion.
In addition, after pouring the slab into the building, it is impossible to enter communications, so cold water and sewage pipelines are laid at the same stage. They do not have to be buried below the freezing mark, since the thermal insulation of the base of the slab will retain geothermal heat and the ground under the cottage will not freeze. A depth of 1 - 1.2 m is sufficient.
Substrate
We arrange a sand cushion. Sealing is required.
Another measure to reduce heaving forces is the substrate. It is made by hand using the following technology:
- layer-by-layer compaction of sand - 10 cm backfill, abundant moisture, compaction with a vibrating plate, a second layer of similar thickness;
- layer-by-layer compaction of crushed stone - fraction 10/20, similar.
Lay a layer of crushed stone.
Instead of crushed stone or sand, a mixture of ASG can be used to a depth of 40 cm with compaction using the specified method. Only in this case will the monolithic foundation of the house receive reliable support on the lower layer.
Concrete preparation and waterproofing
We do concrete preparation.
A monolithic slab requires a lower waterproofing cutoff to prevent corrosion of the concrete and reinforcement inside it. Laying a waterproofing carpet made from roll materials over a layer of crushed stone does not satisfy the operating conditions:
- sharp edges of stones cut through the material;
- the seams cannot be properly sealed.
Therefore, when building the foundation of a house with your own hands, concrete preparation is often used. This is a regular screed that solves two problems:
- providing a flat surface on which it is easy to stick the bitumen base of Bicrost, Linokrom, Technoelast, and reliably seal the seams;
- creating a level base for the slab, strengthening its strength, and stabilizing its geometry.
We install waterproofing.
The method of pouring into the formwork is standard, the thickness of the screed is 5 cm, no reinforcement is required. Roll materials provide a minimum construction budget, impregnation, primers are not used here. The recommended overlap of the strips is 15 - 20 cm, the seams are treated with hot or cold bitumen-based mastics. The edges of the waterproofing carpet extend beyond the perimeter of the concrete preparation so that after pouring the slab, they can be launched onto the sides and top surface.
Insulation
We lay insulation under the entire area of the building.
Extruded polystyrene XPS is used as a heat insulator. It is laid in two layers (10 + 10 cm) close together for smooth slabs. If the project provides for stiffening ribs, the first layer is laid end-to-end with your own hands, in the second layer gaps are created along the width of the ribs:
- along the perimeter;
- perpendicular to the long wall after 3 m.
In this case, the monolithic slab has a large margin of safety, and the house is free from distortions during operation.
Reinforcement
We create a reinforcement frame in accordance with the project.
Reinforcement of the slab with reinforced belts is carried out in accordance with the regulatory documentation for reinforced concrete and concrete structures SP 63.13330. The reinforcement scheme looks like:
- production of clamps - a smooth 6 mm rod, bent in the form of a square or triangle;
- creation of reinforcing mesh - longitudinal, transverse bars of a periodic profile with a diameter of 12 - 16 mm, connected with knitting wire or connected by welding (cell 15 x 15 cm);
- reinforcement of stiffeners - four longitudinal rods connected with clamps;
- laying the lower chord - installed on concrete pads (thickness 15 - 25 mm, section 10 x 10 cm) to provide a protective layer (the reinforcement must be recessed in the concrete);
- installation of the upper belt - clamps are placed on the lower mesh, and the upper card is attached to them.
The slab is reinforced at the ends with U-shaped clamps.
It is not advisable to use separate rods inside the armored belt. They need to be bent in curved sections, in places where communications enter nodes with common grid maps. To save reinforcement, the cell in some cases is enlarged to 20 x 20 cm.
Formwork
We install and strengthen the formwork.
To fill a monolithic structure with your own hands, you need to install formwork around the perimeter. It is constructed from OSB, chipboard, plywood or edged boards in the form of panels. The inner surface is sheathed with roofing felt or film to prevent concrete from spalling during formwork removal. The main document for the construction of formwork are GOST R 52085 standards; 52086.
The panels are mounted around the perimeter; to protect the structure from freezing, 10 cm of polystyrene foam can be placed vertically inside them. This insulation is also laid under the blind area of the house to prevent lateral freezing. It is laid at the level of the base of the slab, flush with the bottom or top layer of heat insulation inside the formwork.
Pouring and maintaining concrete
Pour concrete into the formwork and level the surface. Sealing is required.
Requirements for the design and manufacture of MZF are specified in the VSN 29-85 standards; 37-96, according to which the work is carried out. When filling, the following conditions must be met:
- filling the formwork with concrete in one step;
- the maximum interval between feeding the mixture with a mixer after vibration compaction of the previous section is 2 hours in warm weather;
- It is forbidden to move concrete with shovels around the entire perimeter from one place - it is necessary to rearrange the mixer or use a concrete pump;
- vibration compaction is carried out until cement laitance appears, crushed stone is hidden and there are no bubbles;
- the step of lowering the nozzle of the deep vibrator cannot exceed its radius of action;
- in winter, the mixture is heated with a cable laid inside the formwork, covered with film materials, and heated with steam;
- vibrator attachments are prohibited from leaning against the mesh of armored belts;
- stripping is possible on the fifth – seventh day under normal conditions;
- The surface of the concrete must be protected from precipitation, covered with burlap, and wetted from a watering can in hot weather.
If technologies, recommendations for the selection of materials, and reinforcement sections are followed, the slab foundation will not require restoration and will serve at least three generations of property owners. All of the above technologies comply with the requirements of the specified regulatory documents and have operational experience in the regions of the Russian Federation.
general information
The design of the slab base consists of layers:
- geotextile is covered with overlapping strips on the sand layer, the joints are taped;
- pour crushed stone in a layer of 15-20 cm;
- pour a leveling layer of cement mortar, 5-10 cm thick;
- be sure to isolate the structure from moisture using rolled or coating materials;
- arrange a heat-saving layer;
- cover with plastic film in stripes overlapping by 20 cm;
- lay the reinforcing mesh;
- poured with concrete.
Installation and insulation of a slab monolithic foundation is expensive due to the high consumption of building materials. When the soil freezes to a great depth and a significant deepening of the strip foundation is required, installing a slab will be cheaper and less excavation work will be required.
Advantages of a slab foundation
The slab base has the following advantages:
- the concrete slab serves as the floor of the first floor, which further reduces the cost of its installation;
- is an excellent option for the foundation of a house, the construction of which is carried out on floating soils; the slab and the entire house along with it move simultaneously with the soil;
- the slab can be mounted on any type of soil, even on peat bogs and marshy areas;
- the slab is erected above the soil freezing level, thanks to the sand cushion, frost heaving has virtually no effect on the structure;
- reinforced concrete slab is not subject to shrinkage;
- suitable for the construction of buildings up to 3 floors.
Insulating the foundation slab reliably protects it from deformation during seasonal soil heaving and extends the life of the structure.
Advantages of slab insulation
Polystyrene foam, polystyrene foam, and polyurethane foam are used as thermal insulation materials. Mineral wool is not suitable due to its low strength and high degree of moisture absorption.
There is a technology for installing a Swedish stove. The main difference is that the concrete structure is built on a layer of heat-saving material, thanks to which the soil under the house does not freeze or heave.
The main advantages of the Swedish stove are:
- the construction of the foundation and the laying of communications are carried out in one technological cycle;
- the heat-saving layer allows you to increase the efficiency of the heated floor;
- installation of the foundation is carried out without the involvement of a large amount of construction equipment.
A drainage system consisting of pipes for draining rain and melt water is provided around the building.
The design of the slab helps to transfer all the loads from the building to the layer of heat-saving material, therefore increased demands are placed on the materials used.
Technologies for installing various types of thermal insulation
Concrete floors always require additional treatment. Such measures include waterproofing, sound insulation and insulation. Sometimes, the materials used for insulation also have soundproofing properties. Thus, you not only insulate the floor, but also make your floor quieter.
How to properly insulate a concrete floor?
The answer to this question depends on the initial data:
Thermal insulation under concrete screed
This method of insulation is suitable for installation in houses where there is no basement. In fact, thermal insulation material is laid on the compacted soil, and the floor cake is poured on top. In this case, the floor slab can be an independent element, or it can be part of the foundation.
Disadvantages of a slab foundation
A slab foundation is not always the best option. You always need to perform all the necessary calculations in advance and select the most suitable type of foundation for the house.
Disadvantages of the stove:
- not suitable for construction on sloped areas;
- to build a house with a basement on a slab, you need to dig it to a great depth, this will be very expensive;
- it is difficult to repair communications carried out under the foundation slab;
- During construction in winter, additional costs will be required for heating the concrete and maintaining the required temperature on the site.
A slab foundation is erected only when it is impossible to install a strip foundation.
Technologies and methods
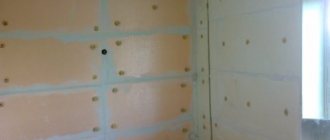
Insulating the slab foundation of a building requires certain knowledge and the study of step-by-step technology. Much depends on the choice of materials, the installation methods of which may differ. Installation is carried out both from the inside and from the outside. If penoplex is used for exterior work, this will protect not only the slabs, but also the walls from freezing. Arranging the inside of the base will improve the microclimate in the room, but will not protect the walls from severe frosts.
What conclusion follows from this? External insulation of the foundation with penoplex is an excellent option for any buildings. Its use is possible only in the initial stages of construction. Otherwise, it will be possible to carry out insulation only from the inside.
It is necessary to insulate the base of the building in advance, in the warm season, when the weather is dry. This is especially true for regions with cold climates, where cooling occurs much earlier and the soil freezes to a greater depth. During construction in winter, additional costs will be required for heating the concrete and maintaining the required temperature on the site.
In the insulation of slab facades, each process is of great importance. Compliance with phasing and technology will allow you to achieve high-quality work, reduce heat loss of the entire future building and maintain its durability.
Slab materials for insulation are used more often than others. This is polystyrene foam, polystyrene foam, and sometimes mineral wool. A layer of 5-10 cm will be enough. If mineral wool is used, then the surface of the base will not need to be leveled first.
We invite you to read: Methods for winter storage of dahlias
The slab material can be mounted in one of two ways: with glue or with self-tapping screws. The process is carried out according to the following scheme.
- If self-tapping screws are used, the insulation sheet is attached to the surface of the foundation slab. For every sq. m. you need to prepare 8-10 consumables.
- In the second option, a special adhesive solution is used.
There are general rules for each type of fastening. The insulation material is mounted horizontally, starting from the bottom corner. Each subsequent sheet is applied to the side of the previous one. The rows of insulation are positioned so that the seams between the sheets are slightly shifted and do not form a continuous gap.
Liquid polyurethane foam, after hardening, provides excellent thermal insulation and additional protection against moisture. Just 5 cm of the cellular structure of the material can be compared in density to a meter thick polystyrene foam. This means that there is no need for additional insulation inside the building.
The technology for insulating sprayed insulation is as follows.
- By mixing the components immediately before work, the necessary insulation is obtained.
- Using special equipment, the material is sprayed onto the surface of the foundation.
- After hardening, the foam turns into a durable layer of insulating spray.
The method of thermal insulation with polyurethane foam has a number of advantages:
- saves time. In one work shift, several hundred square meters of base can be insulated;
- the surface to be coated does not need to be leveled before installation;
- creates a continuous layer on the foundation without seams or joints;
- is the warmest of all existing insulation materials;
- has good adhesion to the concrete surface of the base;
- eliminates the need for additional waterproofing;
- the operational life of the material is more than 35 years;
- environmentally friendly and does not create harmful emissions into the atmosphere.
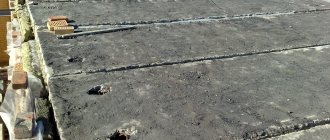
Liquid polyurethane foam is often used to insulate a monolithic foundation.
With so many advantages, polyurethane foam is not without its disadvantages. Its cost is several times higher than, for example, polystyrene foam or mineral wool. Special equipment is required to work with the material. It is not resistant to sunlight, so it needs a protective lining.
Using bulk material such as expanded clay is one of the simplest ways to insulate a monolithic slab. To do this, you will need a wider trench into which a layer of 50-70 cm will be poured. If the thickness is less, the material will not be able to perform its functions. The installation technology is as follows.
- The wall is additionally waterproofed with primer, plaster, mastic, etc.
- The bottom of the trench is lined with film or geotextile. If ordinary polyethylene is used, then at least two layers are made.
- The next layer is approximately 15-20 cm of crushed stone.
- A drainage pipe is laid in the crushed stone to drain water.
- Next, the trench is filled with expanded clay.
It is also recommended to make a partition from brick, slate, plastic or metal panels, and fill expanded clay between it and the foundation. This will be a kind of barrier that prevents moisture from entering the insulation.
The final stage in insulating a monolithic foundation slab will be protecting the thermal insulation. This will protect the material from deformation and moisture. A layer of foam will protect the brickwork. For polyurethane foam and sheet materials, sheathing is made from wooden beams or metal profiles. The frame is attached to the foundation, and a layer of insulation is mounted between it and the wall. On top of the frame, any protective layer is attached to self-tapping screws. If it is metal, then either stainless steel or galvanized sheets should be used.
The technology of foundation insulation will seem complicated only in the first stages. If you understand its nuances and do everything according to the rules, the result will exceed all expectations. Doing the work yourself allows you to save on specialists and installation of thermal insulation will not cost a pretty penny.
As mentioned earlier, the insulated slab under the house developed by Swedish builders is energy-saving. During its construction, permanent formwork made of extruded polystyrene foam is used. As a result, heat leakage into the ground is minimal. The second fundamental difference is the water heated floor system built into the slab.
Since engineering systems are poured deep into concrete, it requires accurate and competent calculations. High demands are also placed on execution. Even small mistakes are critical. You can make USP yourself, but it is better to order the project. See the following photo for an approximate breakdown of costs. The amounts are no longer relevant, but the percentages are correct. The cost of the foundation project is about 1%.
Approximate percentage of costs for a monolithic slab foundation
In the following videos you will see the stages of making a Swedish stove for a specific house. Many useful devices are described that will make work easier, and explanations are given for some of their features.
And look how the Germans pour such a slab. There are also many useful nuances.
In general, there are two ways to get a warm concrete floor. The first is to warm it up. The second is to take care of insulation, but in this case the floor will not be warm. With the right solution, it will not be cold, and this is a significant difference. We will not consider the installation of heated floors, since these are special technologies. Now there will be a list of ways to get a non-cold concrete floor.
- Insulated screed. Insulation (EPS) is placed on the concrete base, and a reinforced screed is poured on top. Sometimes pipes are rolled into it to create a warm concrete floor from heating.
- Logs are laid on a concrete base. The distance between them is filled with mineral or basalt wool. A base for laying the finishing coating is nailed on top of the joists.
You can insulate a concrete floor in a private house or apartment in various ways.
- Dry screed using Knauf technology. This is a backfill with expanded clay sand, on top of which a gypsum fiber sheet (gypsum fiber sheet) with a thickness of at least 20 mm is laid. The result is a floating floor.
- Use “traditional” floating floor technology. Lay insulation (EPS) on the concrete slab, plywood or the same gypsum fiber board in two layers.
These are the main ways to insulate a concrete floor in a private house or apartment. The first option is where the screed is poured over the insulation layer; it is the “coldest” of all. At the same temperature, concrete will feel much colder than all other coatings. All other methods use sheet materials as a base for the finishing floor covering.
Before insulating a concrete floor in a house, it is worth deciding on the methods for laying the sealant. You can do the work in three different ways:
- The easiest way to insulate the floor is on a concrete slab, laying the material in a continuous layer. Before this, you need to thoroughly clean the base and eliminate any unevenness. If necessary, you can use a leveling solution. The seal is attached to dowels or glue (a combined method can be used), after which the finishing coating is installed. Some materials are sold ready-made, which saves time and effort.
- Frame method. Logs are placed on the concrete surface, insulation is placed between them and the finished floor is laid. This option is quite complex, but allows you to use materials with low density.
- Compactor flooring under the screed. Thermal insulation is installed on the concrete surface and filled with a cement-sand composition on top. The result is a strong monolithic base. To implement this method will require a lot of time and effort, but the base will be universal. It is ideal for any type of flooring - from linoleum to tiles. In addition, the method is used when installing water and electric heated floors, since it allows the heat supply to be evenly distributed.
We suggest you read: What do moths eat in an apartment?
To decide on the insulation method, you need to take into account the characteristics of the floor covering. For example, rolled and soft surfaces are not suitable for laying in a screed, since they are not designed for increased load. You should also remember that insulated screed and joists “take away” up to 15 cm in height, so for rooms with low ceilings it is better to choose the first type of installation.
Insulation materials
The table shows the materials used to insulate the foundation slab and their characteristics:
| № | Thermal insulation material | Characteristics |
| 1 | Styrofoam | Consists of cells filled with air. Available in the form of sheets, it has insufficient density, so its surface needs additional protection. |
| 2 | Extruded polystyrene foam | Able to withstand significant compressive loads without changing its size and structure. It is produced in the form of rectangular sheets with small cells filled with air. Lay the sheets in 1 or 2 layers. The second layer must be laid out so that the seams of the sheets of the first and second row do not intersect. During installation, provide holes for moisture drainage. |
| 3 | Polyurethane foam | It is a type of foamed plastic with many pores filled with air bubbles. The composition is prepared directly at the construction site. The two components are mixed, resulting in a dense, solid foam that is applied to the surface. The slab insulated with polyurethane foam has high thermal and sound insulation properties and can withstand moisture. Refers to low-flammable materials, and some brands are difficult to burn. |
Most often, extruded polystyrene foam is used as insulation under the foundation slab.
Thermal insulation materials
Insulation for a concrete floor must have certain properties.
Before choosing a material, you should understand which qualities are most important:
| Property | Description |
| Strength | The weight load on the floor causes an increased requirement for fracture and bending resistance of the materials used for its construction. |
| Water absorption | We recommend materials with this indicator, the value of which is close to zero, especially if the floor is placed directly on the ground. |
| Density | The higher the porosity of a material, the worse its thermal conductivity, which means the material retains more heat. |
| Life time | If the insulation is laid under the screed, then replacement or repair in the future will be very difficult. Therefore, a material with a long service life should be used. |
Taking into account the listed qualities, and depending on the location of the work, you should select a material suitable for a particular case.
Types of materials
Before making a concrete floor warm, you should not only become familiar with the properties of the materials in general, but also choose an option that optimally meets the given requirements. For working with concrete, there are several most common insulation methods.
Conventionally, they can be divided depending on the physical state of the insulation:
Each method has its pros and cons.
To understand how to more effectively insulate concrete floors, let’s compare the properties of thermal insulation materials:
| Material | Advantages | Flaws | Photo |
| Penoplex |
|
|
Note! Material markings usually have three thermal conductivity values. The manufacturer specifies the value of this parameter for three cases:
- when operating the insulation in a dry room at a temperature of 10 0 C;
- dry room at a temperature of 25 0 C;
- operation at different humidity levels.
After analyzing all the information, you can choose the best way to insulate a concrete floor, depending on the location and purpose of the room. In this case, you can take advantage of the experience of experienced builders.
Practice shows that it is better to use:
- Insulating a concrete floor with penoplex is suitable for rooms with large weight loads, or when insulation options are limited by height.
- It is better to insulate a concrete floor slab above the basement or between floors using mineral wool.
- If thermal insulation is carried out during the construction stage, use expanded clay during work. It will not only insulate the room, but also level the floor surface.
- Polystyrene foam, as concrete floor insulation, is suitable for balconies and loggias.
Thermal insulation of concrete is a multilayer structure, this is especially true for the floors of the first floor. In this case, the insulation can be located at virtually any level, and sometimes on several layers of the “pie” at the same time.
Installation of insulated slab
The construction of a monolithic slab foundation requires performing all calculations taking into account geological, climatic conditions and the mass of the building.
Insulating a slab foundation allows you to save significant money on heating the room during operation.
Site preparation
At the creation stage of the project, it is necessary to take into account that the area for the foundation slab must be wider than the house building by at least 1 m on each side.
Instructions for performing preparatory work:
- The site where construction is taking place is cleared of debris and the root system of trees and shrubs.
- Mark the position of the slab according to the design.
- The fertile layer of soil is cleared and removed. The degree of slab burial depends on geological and climatic conditions. Most often, the thickness of the slab varies from 20 to 30 cm, less often the base is buried by 50 cm.
- They dig a pit and manually level its bottom and side walls.
- Pipes are installed around the perimeter to drain rain and melt water.
- Geotextiles are laid out in overlapping strips. The material should cover the bottom and extend to the entire height of the walls.
- Drive in wooden stakes or metal rods. Pull the cord strictly horizontally. It will serve as a guide for uniform filling of sand and crushed stone.
- Pour sand 20-30 cm thick. Distribute the sand evenly over the entire area, moisten it with water and compact it well.
- Lay out geotextiles.
- Pour crushed stone, distribute it evenly around the perimeter, and compact it thoroughly.
- Conduct all necessary communications. They dig trenches under them in the rubble a little wider than the cross-section of the pipes. The pipeline is laid and a layer of sand is poured on top.
- The sandy surface is leveled.
If the pipeline is laid before the crushed stone compaction stage, the pipes may crack.
Insulation of the slab
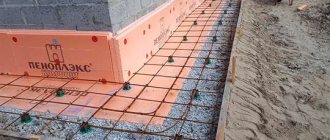
Step-by-step instructions for insulating a monolithic foundation slab:
- They install removable formwork from boards and install supports so that the structure does not fall apart under the weight of concrete.
- A layer of concrete 50 mm thick is poured.
- After the cement mortar has completely hardened, sheets of penoplex are laid on it close to each other and glued. The adhesive composition is applied in dots along the perimeter of the sheet and in the center. A layer thickness of 10-20 cm is sufficient. The joints of the row are placed in a checkerboard pattern, offset by 1/3. When laying in two rows, the joints should not intersect.
- Spread thick polyethylene in overlapping strips. The joints are sealed with tape.
- The reinforcement frame is laid and the formwork is filled with concrete.
After the slab has dried, the formwork is dismantled, the side walls are thermally insulated with the same material that was used to lay it under the slab.
The insulated base helps to increase heat saving indoors.
When installing insulation on bitumen insulation, you need to wait until it dries completely. If laid on a damp layer, the materials may be damaged and the effect of thermal insulation and waterproofing will be reduced.
Carrying out insulation measures during the construction process
The procedure for insulating the foundation with expanded polystyrene must be carried out at the initial stage of construction work. Developers should strictly follow the technology:
- First of all, a pit is dug in which a monolithic concrete slab will be created. Its depth should be 1 meter. At the bottom, depressions are made into which drainage pipes are laid, the functions of which are to drain surface water into specially created wells. Such measures will protect not only the foundation, but also the walls of the building from getting wet.
- After laying the drainage pipes, the bottom of the trench is leveled and a special material, geotextile, is rolled out on its surface. It will prevent the germination of rhizomes of trees and shrubs that can disrupt the integrity of the supporting structure.
- A layer of sand and crushed stone is laid on top of the geotextile. Thus, a sand-crushed stone cushion (approximately 30-40cm thick) is created at the bottom of the pit.
- Utilities, such as water and sewer pipes, are laid. After laying them, the surface is sprinkled with sand and leveled.
- Formwork is constructed around the perimeter of the prepared pit. For these purposes, it is customary to use boards or sheets of moisture-resistant plywood. From the outside, the formwork must be supported with jibs or stops so that the wooden structure can withstand the load that the concrete solution will exert on it.
- A small amount of concrete is poured into the bottom of the pit, which will create the first foundation layer. After it hardens, the developer must begin carrying out waterproofing and thermal insulation measures.
- Due to the fact that the monolithic concrete slab will constantly be in the ground and in contact with a humid environment, the developer must provide it with high-quality waterproofing. For these purposes, in the construction industry it is customary to use rolled or coating material. The concrete base must be thoroughly cleaned of debris and then removed from dust. To increase its adhesive properties, it is recommended to treat it with diluted kerosene or solvent. After this, roofing material is rolled out on the prepared concrete base, the sheets of which should overlap. All joints should be treated with mastic, after which experts recommend laying another layer of waterproofing. If the developer decides to use liquid insulation, then he needs to apply it several times to the surface of the concrete base and, after complete drying, continue construction work.
- At the next stage, the slab is insulated. For these purposes, most developers use sheets of extruded polystyrene foam (15 cm thick). This material is usually laid in two layers. Care must be taken to ensure that the top sheets overlap the joints of the bottom panels.
- The foundation structure is being reinforced, which will increase its strength and load-bearing characteristics.
- The concrete solution is poured in several stages. After pouring the first batch, the developer must use a deep vibrator to remove air and eliminate the resulting voids. After this, the remaining solution is poured out.
After the concrete has hardened, the developer can continue construction work. In order to protect the building as much as possible from the harmful effects of harmful environments, he must carry out internal insulation of the foundation. To do this, you should use sheets of extruded polystyrene foam, which are glued to the floor and walls of the premises and are subsequently finished.
| Expanded clay |
|
| |
| Mineral wool |
|
| |
| Styrofoam |
|
| MarkingHaving decided on the material that will be used to insulate the concrete floor, you should pay attention to the packaging labeling. Even within the same species, the properties of materials can vary significantly. To avoid unpleasant surprises in the future, read the signs on the packaging: |
| Designation | Property | Meaning of marking | |
| G with number | flammability | G1 - weak flammability, G4 - quickly flammable or intensely combustible, NG - non-combustible material. | |
| D with number | fire safety | Smoke level during fire: from D1 to D3. | |
| RP with number | fire spread speed | RP1 - the flame will not spread if there are no flammable materials nearby. RP4 – the flame quickly spreads through the insulation. | |
| W.S. | water absorption | The closer to zero, the worse the material absorbs water. | |
| TR | density | ||
| I | thermal conductivity | The lower the number, the better the insulation properties. |
Rules for installing heating pipes
When installing USHP, heating pipes are used. There are the following rules for their installation:
- More dense pipe laying allows for higher room heating temperatures.
- The distance between external walls and pipes should not exceed 150 mm. Closer to the center, the laying step can be increased to 250 mm.
- To minimize hydraulic losses, the length of one loop should not exceed 100 m.
- Do not lay pipes closer than 100 mm from each other.
Heating pipes must not be installed at the junction of monolithic slabs. In this case, it is better to lay two circuits. The pipeline crossing the joint is insulated with steel sleeves 30 cm long.
You can see how to make an insulated Swedish slab with your own hands in the video: An insulated foundation slab allows you to reduce heating costs during operation and helps reduce the level of frost heaving in the soil. Thanks to this, the life of the foundation is extended, and living in the house becomes more comfortable.