How to fix a ladder post to the floor?
For the stability of the entire staircase structure, it is very important to securely fasten the support pillar and railing. Even craftsmen sometimes need help attaching poles to the floor, or attaching balusters and railings to steps. Therefore, if you are not confident in your abilities, then use the help of a specialist. Familiarizing yourself with the methods of attaching a support to a wooden base will help you better understand the entire process, and you can decide whether such an undertaking is up to you.
- A groove is cut out at the bottom of the wooden support, a hexagonal fastener is installed into it, which attaches the post to the floor;
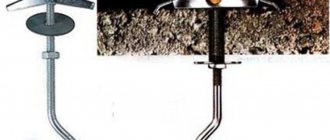
- For the second method, you need to cut a very small hole and fix the fastening element in it using a bayonet nut;
- In the third method, fastening is done with a zip bolt, which means two holes in the support itself and one hole in the floor. This method is the most universal and reliable.
These methods will help both attach the pillars of wooden stairs to the floor and install balusters. The only difference is that they are attached to the steps, if the staircase is on corsours, or to the bowstring.
Features of fastening wooden balusters to surfaces
The fastening of stair railings must be reliable and as strong as possible. The safety of people who will use the stairs depends on this. At the bottom, balusters can be attached to the floor, steps or string.
Fixing to the floor
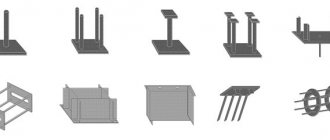
Floor installation of pillars is provided for the lower and upper support elements, on which the handrail rail subsequently rests. To fix their position, a hole is drilled in the floor and the following can be installed:
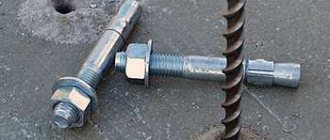
- expansion anchors for concrete floors and monoliths with reverse conical thread;
- embedded elements for reinforced concrete monoliths;
- steel studs with a metric thread on one side and a conical thread, like on screws, on the other for wooden floors.
In the first case , before attaching the balusters to the floor, a hole corresponding to the diameter of the anchor is drilled in the concrete. When screwing in the metric thread of the pin, the fastener expands and is firmly fixed. After this, the wooden support post is screwed onto a cone-shaped thread protruding from the floor, pre-lubricated with glue.
How to Secure a Stair Post to a Concrete Floor
Of course, the most reliable way is to make a hole in the concrete and then attach a support base for the stairs there. However, this will take a lot of effort, because you will need to disassemble a section of the floor and then reassemble it again. The cleanest solution would be to use a pin screw. The stud must be placed in the concrete using an anchor, and then the support must be placed on the screw. Another method is to use a zip bolt and a chemical anchor. This will save time and effort. Whatever you choose, you need to carefully calculate and check everything, because the stability of the entire structure will depend on this.
Attaching the tray to the ceiling and ceiling structures
| Ceiling mounting with bracket and stand | Installing a tray using a mounting profile and stand | Mounting to the ceiling on a C-shaped suspension | Mounting the tray to the ceiling using a stud |
| Using punched paper tape to mount the tray | Installation to corrugated sheets | Attaching the cable route to the ceiling beam | Mounting the tray to the ceiling using a stud and bracket |
Recommendations for the method of attaching the tray to ceiling racks:
The method is similar to attaching shelves and brackets to the wall, with the only exception that the brackets are not attached to the wall, but to special ceiling racks or to prefabricated structures made of ceiling supports and a mounting profile.
- The trays are fastened to the ceiling using brackets using a prefabricated unit - a ceiling bracket.
- The ceiling bracket assembly is attached to the ceiling using bolt anchors or a drive-in anchor. The anchor is driven using a special tool for driving the anchor, and then the bolts are screwed into it. Anchor installation makes it easy to sort out or dismantle mounting structures.
- The ceiling bracket should be installed every 1-1.5 meters (i.e., just like with any other installation method: at the joints and in the middle of the cable tray).
In a similar way, installation of trays is carried out using free-standing (without support to the wall) floor racks.
Recommendations for using perforated steel tape:
- Mounting on punched tape is the cheapest solution, but due to insufficient rigidity it has limited use: low load, low suspension height, small width of cable trays, difficulties with expanding mounting structures.
- The punched paper tape is attached to the ceiling using bolts screwed into anchors.
- The channels are attached to the punched paper tape using screws, nuts and washers.
- The distance is selected in the same way as when fastening with brackets - at the joints of the trays and in the middle of the tray (1-1.5 m).
As a more convenient, practical and reliable alternative to this method, it is proposed to attach the trays to the ceiling using C-shaped hangers.
About using studs and mounting profile:
To attach the tray to the ceiling, which is used for laying a large number of cables at sites, two studs and profiles are mainly used, which are mounted between the studs.
For cable support systems with low loads, you can use one stud with fastening the profiles in the middle. This makes it possible to simplify and speed up installation, while reducing the cost of installation structures, but sets strict restrictions on the load-bearing capacity.
By installing several profiles, you can create several parallel cable channels.
How to attach posts and balusters to the floor?
Good day! In the attic I want to install a wooden staircase railing (balustrade). Coniferous material: support posts 80x80 or 90x90, balusters 40x40 or 50x50. I plan to attach the posts and balusters to the wooden floor using plumbing pins 8x80 and 6x80. I screw the self-tapping side of the stud into the posts and balusters, and screw the threaded side into the floor.
Please advise where to screw the studs: just into the hole in the floor, into the mustache nut, into the anchor nut? Maybe there are better options that will ensure a strong connection?
Complete the self-tapping part that you will screw into the balusters with some kind of glue such as chemical anchors. Make a hole in the floor, place a baluster and screw it to the floor from the bottom through a washer. But in your case this may not work, in which case attach the bottom of the baluster to chemical anchors. The main thing is that your stair railing has a turn. Otherwise, over time, such a structure will sway.
San Sanych (Moscow) wrote: Complete the self-tapping part that you will screw into the balusters with some kind of glue such as chemical anchors. Make a hole in the floor, place a baluster and screw it to the floor from the bottom through a washer. But in your case this may not work, in which case attach the bottom of the baluster to chemical anchors. The main thing is that your stair railing has a turn. Otherwise, over time, such a structure will sway.
San Sanych (Moscow), Thank you for the interesting idea. Unfortunately, it will not be possible to secure the baluster from below. I'll read about chemical anchor. Question: which studs are best to install then (is 80 mm long enough)? Although, when drilling for a stud, you probably shouldn’t make a through hole in the floor, i.e. you need to take into account the thickness of the floorboard.
What are balusters for stairs?
Balusters are special supports installed vertically to which handrails are attached. They perform not only a protective function, but are also a decorative element. In order for the staircase to last as long as possible and be safe to use, you need to properly install and secure the balusters.
Depending on the design solution, balusters can be made from:
Preference is mainly given to wood products. They are strong, reliable, durable, have a relatively low price and go well with any interior style.
When choosing balusters, you need to pay attention to their shape, since when installing several elements in a row, the gap between them should have an attractive outline.
Bar counter for a small kitchen
For a small kitchen, a small “classic” bar counter is quite suitable. Using the method that will be discussed further, you will be able to create even a corner counter in the kitchen. The following elements need to be cut from chipboard sheets:
- A circle with a diameter of 175 mm with a hole in the center for wiring.
- Floor circle – 500 mm.
- Circle for raising the support – 300 mm.
- Two identical rings - a frame for the down tube. With external diameter – 250 mm, internal – 200 mm.
- Make a strip 900 mm long and 270 mm wide, which will serve as a kind of wall between the table top and the shelf.
- It is also necessary to make a blind hole in the tabletop - 16 mm wide. The support pipe will be attached to it.
When the main structure is ready, it must be installed on the tabletop and secured. Do the same steps with the shelves. If necessary, you can open it with varnish.
By putting these simple tips into practice, you can easily transform your kitchen or living room. The bar counter allows you to experiment and show imagination. And you can feel the convenience that this design will bring already at the first holiday, when your house is full of guests, and the bar counter will become an excellent additional place for sorting and preparing dishes.
Related article: Is it possible to putty concrete walls without plaster?
Tips on how to install balusters on the stairs with your own hands correctly
There are two structural types of stairs: on stringers and on a bowstring. The baluster is attached directly to the steps if the supporting structure is made on stringers. If it is made on a bowstring, then the balusters are attached directly to it.
I mainly install support posts at the beginning and end of the stairs, as well as in those places where the railings make a turn. They help make the stair railing stronger and safer. If the staircase is made on a slope, then the supporting pillars can be attached both to the floor and to the steps.
Important points to consider when installing balusters:
- According to safety rules, the height of the railing must be at least ninety centimeters;
- The recommended distance between vertical support elements is fifteen centimeters (if there are small children in the house, the distance should be reduced to ten centimeters);
- The baluster must be securely fixed both above and below;
- Handrails must be installed taking into account the needs of the residents of the house (they must be smooth, non-slip and comfortable).
It should be taken into account that the railing must support the weight of an adult leaning completely on it.
Dimensions and safety requirements
Scheme for attaching a baluster to a dowel.
The installation of supports is subject to certain requirements.
The height of the balusters is usually made about 90 cm. Experienced craftsmen advise choosing so that the main size corresponds to the average height of the inhabitants of the house. Usually 80-100 cm is used.
The elements are fastened at a distance of no more than 15 cm. In houses where small children grow up, the gap between the balusters should not be more than 10 cm.
In order for the structure to be as reliable as possible, the craftsman needs to attach each vertical post to the bowstring below and to the handrail at the top. Fasteners must not be skipped, otherwise the structure will not withstand the load.
Reliable fastening of balusters to the string of the stairs yourself
Balusters can be attached in three main ways: on studs, on self-tapping screws or on dowels. Each method has its own advantages, and the master himself chooses which one to use.
It is strictly not recommended to secure balusters with nails, because over time the structure may become unsafe.
The procedure for performing installation work:
- Fastening the upper and lower balusters;
- Marking the location of supports on the bowstring;
- Marking the center of the balusters (it is better to do this with a carpenter's pencil or waterproof marker);
- Adjusting the supports to the design features of the staircase (in some cases, an oblique cut is made both above and below the baluster).
- Installation of balusters.
How to attach a support post to the floor
Even experienced craftsmen sometimes do not know how to properly attach a support pole to the floor. This is a rather complicated operation, but knowing a few secrets you can perform it quickly and easily.
There are three simple and reliable ways:
- At the bottom of the post, a piece of wood is cut out to create a groove into which a special fastener with a hexagonal head, called a capercaillie, is screwed. With the help of it the pole is attached to the floor.
- The second method is similar to the first, but the groove is cut out very small, and the fastening element is fixed with a bayonet nut.
- In the third method, a very small technological hole is drilled in the support column and floor, and then the two elements are fastened together using a zip bolt.
In hardware stores you can purchase special decorative plugs that can be used to easily close the hole left after installation using the third method.
Attaching the tray to the ceiling.
To attach the tray on the Bracket to the ceiling (KRP), assemble and attach the Bracket to the ceiling (floor) in accordance with paragraph 7.3 of the technical data sheet. Next, align the holes of the tray (2) and the bracket (1) and through them secure the tray and the suspension to each other using an M8x16 Bolt (3), an M8 Washer (4) and a Nut (5) (Figure 14). Hardware used for assembly: Bolt (3) - M8x16; Nut (5) - M8; Washer (4) - M8.
Figure 14
Attaching the tray to the ceiling using the KRP Double Bracket is done in the same way (Figures 15,16).
Figure 15
Figure 16
To attach the tray on studs using the ceiling suspension shelf PPP 50-600, prepare holes in the place marked on the ceiling and install drive-in anchors in them. Screw two full-threaded M8 studs (6) into the anchors, put the PPP suspension shelf (1) onto the studs through the holes, securing it on both sides with M8 washers (4) and M8 nuts (5). Next, align the holes of the tray (2) and the PPP suspension shelf (1) and through them secure the tray and the suspension shelf to each other using an M8x16 Bolt (3), a washer (4) and an M8 nut (5) (Figure 17). Hardware used for assembly: Hairpin (6) - M8 fully threaded; Nut (5) - M8; Washer (4) - M8; Bolt (3) - M8x16.
Figure 17
To attach the tray using the PM mounting strip, bend the PM mounting strip and attach it to the ceiling using the kit: M8 hammer-in anchor and M8 full-threaded bolt. Next, align the holes of the tray (2) and the PM mounting strip (1) in one or two places and through them secure the tray and the PM mounting strip to each other using an M8x16 bolt (3), an M8 washer (4) and an M8 nut (5) (Figure 18). Hardware used for assembly: Bolt (3) - M8x16; Washer (4) - M8; Nut (5) - M8.
To build any cable network (power and low-current cables, signal lines, security and fire alarms, SCS and LAN, etc.), it is necessary to lay a large number of cables that come out of the work premises.
The use of metal cable trays to create a system of cable channels on site is one of the standard solutions. Trays are installed in technical rooms, cable tunnels and shafts, mounted in corridors, workshops and even in offices and shops.
Since the load on the trays is large due to the large number of cables being laid, it is necessary to use reliable methods for installing and fastening the trays.
Let's look at the main methods of attaching trays. For convenience, the circuits are divided into three groups: installation to the wall, ceiling and floor.
DIY wooden staircase to the second floor
Installing a wooden staircase with your own hands is a labor-intensive and quite complicated process for a beginner, as it requires certain training, skills and abilities.
It is obvious that securely fastened and perfectly adjusted staircase elements make the structure as stable and reliable as possible, eliminating creaks, swaying and deformation. However, novice craftsmen often neglect simple rules, which leads to distortions, premature destruction and other extremely unpleasant consequences.
In this article we will try to talk about the key points of assembling and installing rotary flight stairs so that you do not make mistakes in practice.
If you don't have a finished project, we recommend that you use our online staircase calculator . It allows you to receive a ready-made estimate, a set of drawings, a 3D model and recommendations for manufacturing the most convenient design.
Introduction
Installation of a staircase, like any other structure, is carried out in stages. First of all, parts are always installed that perform the function of load-bearing elements and access to which will be difficult in the future.
However, each master has his own exact sequence of assembling individual elements, and any of these methods does not claim to be the only correct one.
To avoid asymmetry, after each stage of work, check with a level that the horizontal and vertical projections are observed.

