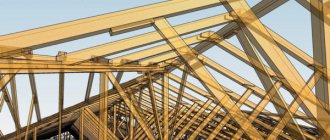
Connecting reinforced concrete products is impossible without additional elements. Concrete is not welded, and cement installation, which is relevant for brickwork, is irrelevant under serious weight and technical loads. To fasten two elements, embedded parts are used. And in this article we will talk about what it is, what types there are, and how to install it in certain situations. Let's look at situations when it is more relevant to contact a company that provides ]production of custom-made embedded parts[/anchor], and when it is easier to make such hardware yourself.
What is an “embedded part”
An embedded part is a fastener that allows you to connect elements that cannot be connected without additional parts. The most striking example is two FSK slabs. They are made entirely of concrete, and in order to connect the two parts, at the time of their production, metal plates with pins are installed inside, the upper part of which protrudes above the surface. Thanks to the embedded parts, we have the opportunity to weld any metal element to the plate.
The embed is also used to lift parts. They are called rymy. The design is similar to conventional mortgages, but instead of a top plate, a hook or eye is used, to which a sling is hooked.
Essentially, a mortgage is any element placed inside a product that cannot be connected without it. Another interesting example is a pipe support embedded in the ground. On its top there is a coupling with holes identical to that used on the bases of lamp posts. With this installation, the pole itself does not need to be dug into the ground. It is fixed with bolts to the mortgage and can be dismantled at any time without carrying out excavation work, and just as easily installed back.
Types of embedded parts and installation features
Unlike other fasteners, the mortgage is not hardware, with a set shape and specific configuration. This is any part that performs the main function of fastening monolithic products. Its appearance can be varied, as can its shape. It all depends on the type of products being connected and the required load. Mortgages are also used when pouring the foundation.
The type of installation of embedded parts also differs. They can be attached to the frame of a monolithic product; in this case, they are welded before the concrete is poured and make the structure as strong as possible. In some cases, the embedded parts are immersed in the concrete mixture after pouring, but before the concrete hardens. If it is necessary to connect two monolithic blocks in which mortgages were not provided at the production stage, two fastening methods can be used:
- Superficial, when the hardware is simply immersed in the drilled hole.
- And end-to-end.
The second option is more durable and reliable, but is not always available. The type of mortgage also differs. If the fastening is through, threaded anchors are used, with a die on one side and threads on the other. The hardware is immersed in the hole so that its second end passes through the product. After which another die is put on, and it is secured with a nut. Such a connection is more reliable, and if this is not possible, it would be relevant to use anchor systems with an expanding element. When the nut is tightened, it expands inside the hole and makes removing the hardware almost impossible.
Design
Since the embedded part is not hardware with a strictly regulated shape, its design can differ significantly depending on the purpose and a number of other factors. Moreover, the differences concern all structural elements. The headboard, that is, the top plate, can be square, rectangular or round. It all depends on the convenience of future work.
The location of the anchor parts, that is, elements immersed in the body of the concrete product, also differs. They can be:
- Perpendicular to the die;
- Sloping;
- Parallel;
- And mixed.
The inclined arrangement is the strongest, and is used when there is no attachment to the metal frame of the concrete block. Accordingly, the perpendicular fastening is the weakest, especially when the hardware is horizontal.
Manufacturing materials
For the manufacture of embedded parts, steel of various grades is used, and its choice depends on operating conditions, as well as loads. In private construction, the choice of steel is not relevant and is important only during the construction of large objects, where increased attention is paid to the reliability of fasteners. The most serious requirements are placed on the steel from which the anchor element is made. It is made from reinforcement of smooth or periodic cross-section. When operating an object in a temperature range down to minus 30 degrees, any steel will do and there are no requirements for the cross-section of the reinforcement.
At temperatures below -30, the use of smooth hot-rolled reinforcement made from steels St3kp3 and VSt3kp2 with a diameter of 8 to 22 millimeters is excluded. Extremely low conditions exclude most steel grades and allow the manufacture of anchors only from VSt3sp2, VSt3ps4 and VSt3ps6 steel. In the case of periodic profile reinforcement, the use of grade 10GT is allowed.
To protect exposed parts, that is, dies or tops, weather-resistant primer or, in some cases, galvanizing is used. Electroplating in the manufacture of mortgages is acceptable and has its place, but in practice it is used extremely rarely due to the high cost and complexity of the process, as well as the lack of need for such manipulations.
Dimensions
During capital construction, the size and shape of embedded parts are subject to strict regulations. They depend on two factors:
- Tension or non-tension of the reinforcement used;
- And the overall dimensions of the monolithic product.
It makes no sense to list all the requirements, since they are freely available and described in detail in GOST 10922-90. The standard takes into account the load on the product and the grade of steel from which the hardware is made. The shape of the mortgage, the location of the anchors and their distance from each other are also regulated. In short, reinforcement with a diameter of 8 to 22 millimeters is most often used. The section is smooth or profiled, and the steel grade is selected depending on temperature conditions.
Installation of embedded parts in concrete
Published Feb 19, 2013 | Tags: | Comments (0)
9.5. Stage five – installation of mortgages.
And if everything is in order with the pipes and cables, then the next step after plastering is the installation of embedded elements and their filling.
The installation of mortgages must strictly comply with the project or drawing.
Installation of mortgages in concrete pools under tiles.
When installing embeds (spotlight, skimmer, nozzle, bottom drain, etc.) in a concrete pool, first prepare the niches of the embeds as follows:
- if the surface is smooth, then it is necessary to make notches with a hammer drill.
Rice. 9.41. Applying notches in smooth niches.
- reinforcement of holes - if the hole exceeds an area of more than 350x350, it is necessary to randomly drill the reinforcement (4-8 pieces per opening) - reinforcement ¢8А400С.
Rice. 9.42. Chaotically drilled fittings.
- remove dust and debris and niches, slightly moisten the surface of the hole (it is better if it is cement laitance).
— transfer the placement marks of the embed relative to the bowl onto 10mm thick plywood. If the embedded hole exceeds the area of 300x300mm (vertical wall), then it is necessary to reinforce the plywood with a board or timber.
- attach the embed to the plywood according to the markings and the method of installing the front part (if the embed is attached inside the embed, then it is necessary to make a hole in the plywood with a 6mm recess; if the front part of the embed covers it, then there is no need to make a hole in the plywood).
Rice. 9.43. On the left is the fastening of the mortgage with the front part covering it (the mortgage is attached closely without recess). On the right is the fastening of the embed with the front part screwed into it (the embed is attached to the plywood closely with a 6mm notch).
- treat the outer part of the embed with a thin layer of plasticizer (Mapei) Planicrete (or (Litokol) Idrokol X20 (for characteristics, see Appendix 20)).
— attach the plywood with the embed to the wall using 6/60mm dowels.
The following figure 9.44 shows an example of skimmer installation. The first step is to make markings on board.
Rice. 9.44 Marking the wall for installing the skimmer.
And then attach the skimmer to the plywood and make horizontal/vertical markings on the plywood. Next, the skimmer with plywood is attached to the board using dowels.
Rice. 9.45.Attaching the skimmer to the board.
- cover the outer part with plywood.
- pour the concrete mixture through the mounting hole in the upper part of the plywood, followed by shrinking it by lightly tapping the plywood with a hammer.
Fig.9.46. Mounting hole for pouring concrete and pouring the embed.
Materials used – Planicrete or Idrokol X20 (0.5 parts);
– cement grade M500 (1 part);
– crushed stone of fraction 5-20mm fine granite (3 parts);
– river sand (3 parts).
If the pool bowl is cast well and concrete of the appropriate grade is used, then the latex additive may not be used, because the hole to be filled will be under the waterproofing, it is enough to correctly connect the surface being poured (to ensure appropriate adhesion of the two surfaces (existing and being poured)), grind the already filled hole and waterproof the sealant around the embedded hole.
- remove the plywood after 24 hours and make a 10x10 sample around the embed using fresh concrete.
Rice. 9.47. Making a sample in the plaster around a 10x10mm embed.
Fill the hole with one-component hydro-expanding sealant Mapeproof Swell (for characteristics see Appendix 10).
- cover the mortgages with tape or thick film so that during construction work the solution does not get inside, especially on the threads. Do not stuff foam, rags, etc. inside the pipes. or wrap it in paper.
— level the plaster around the mortgage (using the grinding method).
When installing embedded spotlights in a hole, perform the following steps:
— release enough cable from the mounting so that it is enough to remove the spotlight on board to replace the lamp in it;
— all seals of the mortgage are tightened using a wrench;
— if the spotlight is located in a blank wall and an external cable is connected to it, then it is necessary to solder the supply cable and the spotlight cable without using acid fluxes, insulate the soldering points with electrical tape and waterproof it with a heat-shrinkable tube;
Features of anchor connections with embedded parts
The embedded part consists of two elements: the die and the anchors, but we only see the die, which is why it is most often called the embedded part. In fact, any metal plate attached to a concrete base is already such a part, and there can be many methods for attaching it, and they are selected based on several factors:
- Fracture load;
- Windage of the structure;
- Pressure on the part;
The higher the load, the more difficult the fastening should be. The most durable option is to weld it to the frame before pouring concrete. However, it is not always possible to carry out such fastening. Often there is a need to connect a die to the surface of a finished concrete structure, and here it is necessary to take into account all types of load on the future product.
For example, when making a canopy, only inclined fastening of anchors is used, since any canopy has a high windage capacity and, even with a large weight, can be broken by gusts of wind.
Important! Profile reinforcement is more durable than smooth reinforcement, since it has better adhesion to the walls of the hole. A square rod is also used, drilling a hole two millimeters smaller than the diameter of the rod. This fastening is the most durable, but from the hole it is necessary to remove as much as possible the remaining concrete that crumbles during drilling.
In this case, at least four anchors are required, located at the corners of the die. Holes are drilled in it, after which the die is placed on the future mounting location, and inclined holes are drilled in the concrete. The slope should be in different directions, from the die. Next, anchors, the role of which is played by reinforcement, are driven into the holes and welded in a circle. All that remains is to cut off the excess and clean up the mortgage.
Nuances of installing embedded parts
There are a number of factors to consider when installing embedded parts. They are relevant both in private construction and in global construction. In the second case, there are always regulations and engineering calculations, while when building a private house or small object, you have to rely on calculations “by eye”, and here it is better to overdo it and make a more durable fastening.
The greatest load is created in products that work in tension, when the part is pulled out from the fastening point under the weight of the structure. Difficulties may also arise with concrete cracking. In regulations and GOSTs, recommendations for indentations from the edge are clearly indicated, and failure to comply with them leads to chipping or cracking of the structure. If the embed is installed too close to the edge, even fastening to the frame will not help, especially if the concrete product is subject to a fracture load.
Lifting eye
A lifting eye is a part by which a concrete product is lifted. In most cases, it is installed during pouring, and manufacturers try to secure it as firmly as possible by welding the eye directly to the frame of the product.
The eye is subject to a load equal to the weight of the monolith, which often reaches several tons. When installing a lifting eye on a product where it was not provided for by the design, you should take into account not only the fastening of the embedded part, but also the breaking load of the weld. Often the eye is simply welded to the die, and here it is important to look at several nuances at once:
- The diameter of the reinforcement from which the eye is made;
- Length of the weld along the circumference of the reinforcement;
- Weld quality;
- Reliability of fastening the mortgage.
If the eye needs to be welded to the die, that is, there are no embedded parts in the product at all, you first need to drill two holes and pass the reinforcement through them, welding from the bottom and top of the die. This significantly strengthens the structure.
Important! With a large load and weight of the concrete product, it is necessary to make eyelets from solid reinforcement, that is, bend an arch from a rod, and not weld it from several elements. The rupture of the rod is much higher than in the weld.
It is better to avoid simply hammering the eye arch into the structure, since such fastening will be the weakest and when lifting the product, the likelihood of the reinforcement coming out of the seat increases significantly. You should also firmly secure the die itself, and here an inclined fastening of the anchors is used, that is, driving them in at different angles. And another important factor is the distance from the edge of the product. The closer the eye is installed to the edge of the slab, the higher the likelihood of concrete splitting.
Bonding
The task of the fastening embedded part is to connect two concrete monoliths to each other. As mentioned above, there are two methods of fastening:
- Unilateral;
- And end-to-end.
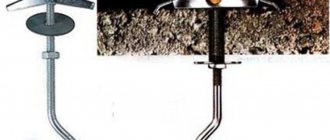
If it is possible to make a through fastening, you should not refuse it, as it is more durable and reliable. The type of embedded part will be different. When through drilling, a special anchor with two dies is used. One is welded and the other with a hole. After the anchor is driven into the hole, a die is put on the other side and fastened. This can be done using a nut if the anchor has a thread, or by welding, in which case threads are not needed.
Fastening parts are also often used to restore a concrete monolith that has begun to crack over time. The through screed returns the structure to its original strength. If it is necessary to fasten the structure, but it is not possible to drill a through hole, use tightening anchors. They look the same as regular fasteners used to install windows or doors, but they are larger and more durable. Such an anchor is hammered into the hole and by tightening the nut, the sleeve expands inside the monolith, thereby ensuring reliable fastening at the base.
Important! When using conventional reinforcement as anchors, a hole of smaller diameter is often drilled, and when driven in, the pin fits more tightly into the base. This is not done with expansion anchors, and the hole is drilled to a strictly defined diameter, and in some cases 1-2 millimeters larger. The anchor must fit freely into the seat. As a last resort, gentle blows with a hammer are allowed.
With this fastening method, it is important to accurately calculate the depth of the hole and the length of the anchor. If in the case of reinforcing pins this does not matter, since the excess can then be cut off, this will not work with anchors, and they must completely fit into the monolith.
Support
The design of support-type embedded parts depends on the load on the future product. There are special hardware designed for installing lighting poles or just supports. These are flanged structures, the lower part of which is made of a pipe, and a flange with bolts or holes for them is welded on top. The system is reliable and durable, but its main advantage is convenience. If the support needs to be removed or replaced, there is no need to gouge out the concrete. Simply unscrew the flange and that's it.
If we are talking about a solid structure that will not be retracted, for example a canopy, then we should take into account not only the pressure on the mortgage, it is very low here, but also the windage of the structure. It is the windage that will create the greatest load on the product, so the die should be attached to the slab or monolith only with the angular inclination of the anchors. Each anchor tilts in its own direction, making it very difficult to pull them out of the base, and the strength of the entire structure increases.
Supporting embedded parts are often used in the construction of metal fences. When pouring the foundation, you can immediately install the pillars, but you will have to carefully set their angles and measure the distances, which creates additional difficulties. It’s easier to weld it to the foundation frame or immerse the embed in uncured concrete, leaving only a die outside. After the concrete has hardened, fence support posts can be welded to these dies.
Another option for installing a mortgage in the foundation is to place round wooden wedges in the solution. After hardening, they are easily removed, leaving holes of the required diameter. There is no need to drill the foundation, and this is especially true in private construction, when the thickness of the poured block is small, and chipping and cracking often occur during drilling.
Connective
Connecting embedded parts are used to attach metal elements to a concrete monolith, but in a horizontal plane. They are often used in the construction of stone fence posts when planning to insert steel parts between the posts. Drilling in such a situation is not the best option, especially if decorative brick or stone is used, which do not withstand the blows of a hammer drill.
Considering the fact that the fence sections are fastened on both sides, that is, the element fits into the spacer, it makes no sense to carry out complex fastening of the mortgage. It is enough to simply install the simplest embed with straight anchors into the concrete, and it will do its job perfectly.
In global construction, increased demands are placed on such hardware, since when the mortgage is positioned horizontally, it is subject to load in several directions at once. The use of direct anchors is only permissible when fastening a metal part on both sides. In other cases, only knee placement of anchors in different directions is used.
The same requirements apply to mortgages used on entrance gates. Such parts are subject to maximum load in all directions, including windage. It should also be taken into account that the gate is constantly moving, which creates additional load. In this case, it is advisable to install the mortgages in connection with the frame. When building fences, a pipe is installed inside the monolithic support; it is to it that the hardware must be welded, and after that pour concrete or lay decorative stone.
Installation of embedded parts in concrete
MINISTRY OF TRANSPORT CONSTRUCTION OF THE USSR
STATE ALL-UNION ROAD
FOR INSTALLING EMBODIED PARTS AND ANCHOR BOLTS BY BOLTING TO CONCRETE AND PROTECTING THEM FROM CORROSION
Ph.D. tech. Sciences B. S. Maryshev
They allow you to reasonably assign geometric parameters for attaching embedded parts and perform high-quality gluing of them to the surface of concrete and (or) in holes drilled in it.
Provision is made for gluing embedded parts to concrete in the form of:
steel plates with anchor rods welded to them;
steel plates attached to concrete using anchor bolts;
anchor rod with a ring, plate or hook for fastening communications or equipment;
steel plates attached to concrete using through anchor bolts fixed to the flashing.
All types of necessary work are described: from the design and calculation of embedded parts to quality control of their gluing.
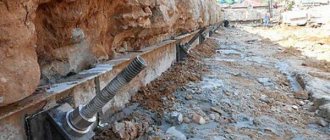
During the operation of bridge structures, it becomes necessary to replace worn expansion joints, build up curbs, install parapet or barrier fences instead of curbs, install additional reinforcement, etc. When performing this work, it is necessary to attach additional embedded parts and anchor bolts to the concrete.
These “Methodological recommendations for installing embedded parts and anchor bolts by gluing to concrete and protecting them from corrosion” provide a technique that allows you to reasonably assign the geometric parameters of the attached parts and perform the listed work efficiently.
Methodological recommendations were developed by candidates of technical sciences B. P. Belov and I. D. Sakharova.
The authors agree to provide practical assistance in implementing the recommendations on a contractual basis.
Please send comments and suggestions on this work to the address: 143900, Moscow region. Balashikha-6, Soyuzdorniy.
1. General Provisions
1.1. “Methodological recommendations for installing embedded parts and anchor bolts by gluing to concrete and protecting them from corrosion” should be followed when installing embedded parts and anchors in reinforced concrete, concrete and stone structures for any purpose during their construction, repair or reconstruction.
1.2. These Methodological Recommendations have been developed to develop current standards and recommendations for the design of steel embedded parts for reinforced concrete structures and reflect the design features of embedded parts, calculations and technology for their installation by gluing to concrete.
2. Designs of embedded parts and calculation of their fastening
2.1. Embedded parts can be made in the form of:
steel plates with anchor rods welded to them (Fig. 1, a);
steel plates attached to concrete using anchor bolts (Fig. 1, b);
anchor rod with a ring, plate or hook for fastening communications or equipment (Fig. 1, c);
steel plates attached to concrete using through anchor bolts fixed to the plate (Fig. 1, d).
Rice. 1. Embedded parts:
1 - steel plate; 2 - anchor rod; 3 - anchor bolt; 4 — washer; 5 - nut;
6 - hole; 7 — anchor rod with a ring for fastening; 8 — overlay
2.2. The thickness of steel plates is determined by formula (1), but it must be at least 5 mm:
where d is the diameter of the anchor rod or bolt;
Rs is the design tensile strength of the anchor rod or bolt steel;
Rsq is the design shear strength of the plate steel.
2.3. Reinforcing steel of periodic profile with a diameter of 12-25 mm should be used as anchor rods and bolts. For bolts, it is preferable to use screw profile reinforcing steel.
2.4. The calculation of concrete for puncture by anchor rods (bolts) and the determination of the number and diameter of anchor rods are performed in the same way as the calculation when using embedded parts installed in the formwork before concreting the structure.
2.5. When fastening embedded parts to concrete, steel plates are glued along their planes and anchor rods and bolts are glued into the holes (Fig. 2).
Rice. 2. Fastening embedded parts to concrete, reinforced concrete and stone structural elements: 1 - concrete, reinforced concrete or stone element; 2 - glue; 3 - steel plate; 4 - anchor rod; 5 - hole filled with glue; 6 - washer and nut;
7 - anchor bolt; 8 — overlay
2.6. It is recommended to assign the gluing depth L of anchor rods and bolts (see Fig. 2, a, b) no less than calculated by the formula
where D is the diameter of the cylinder on the surface of which chipping is checked;
t is a coefficient that takes into account operating conditions and depends on the composition of the glue and the depth of gluing of the anchor rod; taken according to the table. 1;
Rв,sh1 - the calculated shear resistance of the connection is taken according to the table. 2.
Amount of hardener, % optimal
Coefficient t at gluing depth
anchor rod, cm
Notes: 1. Above the line are the values for “concrete - glue” connections, below the line - “glue - anchor rod”.
2. It is recommended to take the optimal amount of hardener introduced into the adhesive composition (% of the mass of epoxy resin): UP-0633M - 16, complex amine - 15, diethylenetriamine - 9.
The estimated gluing depth of the anchor rods is calculated twice (the spalling is checked at the “concrete-glue” and “glue-anchor rod” connections and the corresponding diameter of the spalling cylinder and the calculated shear resistance of the joint are assigned.
Connection strength indicator
The value of the joint strength indicator, MPa
“glue - anchor rod”
Design resistance Rв,sh1
Temporary resistance Rв,sh2
Standard deviation Rв,sh3
Notes: 1. When calculating long-term load and endurance, the strength indicator value should be multiplied by coefficients of 0.6 and 0.7, respectively.
2. The strength of the “concrete-glue” connection is given if there is class B40 concrete in the gluing area of the embedded parts. To establish the strength of the connection for concrete of other classes, a correction factor should be entered, taken according to table. 3.