- November 6, 2018
- Construction
- Roman Zhdanov
Keeping your car in a garage is not a luxury, but it is a safety issue considering the cases in our world. Buying a ready-made prefabricated garage or buying a garage project is an expensive business, so you can consider the option of building a garage yourself and without a project; today we will look at all the nuances of such an event.
Garage size
Initially, you need to decide on the size, or more precisely, at least the number of parking spaces in your future garage. Will it be a garage for one car or, for example, two at once? Think about this point, even if now you only have one personal car at your disposal, you need to look to the future!
In addition, determine the size of the garage, sometimes you just need a room for storing a car, and sometimes you need a whole personal workshop, so you need to take the dimensions so that later there will not be enough space.
The height of the entrance to the garage is also an important aspect, because, for example, now you have a family sedan, and a little later you will change it to a tall SUV or a minibus, the roof of which is even higher. It’s more logical to think through this point in advance and take the indicators with a margin. Therefore, think immediately about how to make the entrance to the garage, or rather, what height it is.
Future garage project
There are ready-made garage projects. But they cost money. To be honest, a garage is not a building that necessarily requires spending money on its design. Of course, it will be good if you get a ready-made garage project somewhere for free, but if this is not possible and there is not much extra money in your family budget, then you can do without the project.
Let's give an example of a garage project that is simple and quite practical. You can focus on this project or come up with your own version of a garage that will be “tailored” just for you.
This is an option for one car. A fairly simple project designed to be practical and save money.
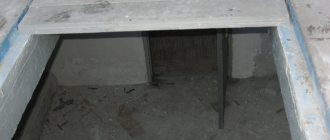
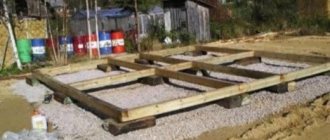
Device
The coating is laid on concrete, asphalt (solid base) or on the ground (with a cushion made of bulk materials). In the first case, the slope should provide not only convenient entry, but also drainage of water from the garage (performing the function of a blind area). Waterproofing the foundation is desirable in any case, but if the garage is portable, then you can get by with a light embankment without waterproofing.
When working on swelling soils, make a deep excavation and lay a thicker layer of base. In the area adjacent to the gate, thermal insulation can be laid under the base.
Garage material
Most garages are built from wood; garages made from aerated concrete, foam blocks and other things are also gaining popularity. Brick garages are less common. Garage buildings are quite expensive and heavy. Garages made of corrugated sheets or other profile metal have proven themselves to be excellent. Let's also talk about garages made of concrete and concrete slabs. As a rule, a garage made of concrete slabs is built by those who have access to such material. Still, the leading material among all of the above is wood.
How to make a garage entrance
As a rule, the entrance to the garage is an inclined surface. There are several popular options for creating a garage entrance. So, how to make a garage entrance? You can fill the inclined surface with some kind of bulk material; it is very practical and aesthetically pleasing to do this with the help of medium-sized crushed stone. But this is expensive material. What else can I use to cover the entrance to the garage? You can use sand, but it is worth considering that this sand will also always be present in your garage; this is a feature of the material; it will never be compacted into a hard surface.
You can go another way. You can fill the driveway with concrete. Then the question immediately arises, which concerns how to pour concrete on a slope? Let's talk about this issue in more detail.
Why do you need a garage ramp?
Often the garage is located at some distance from the road or entrance to the yard. To prevent the car from driving from the road to the garage on the ground or through mud in rainy weather, this area is concreted or paved with paving slabs. If the distance from the road to the garage is very small, then instead of a ramp you can use a concrete blind area or screed.
A ramp is an inclined surface. The slope allows rainwater not to accumulate on the surface, but to drain into the ditch. It is advisable that the slope of the ramp does not exceed 10 degrees. For natural drainage of rainwater, a tilt of 2 degrees is sufficient. However, usually the level of the road and the level of the garage are not the same, and the slope of the ramp can be more than 10 degrees.
The ramp does not have to be a rectangular platform. It may look like a path with a turn or a descent into an underground garage. In this case, you will need to take care of collecting rainwater below the garage door.
Concreting the entrance to the garage
In this question, there is an analogy with the creation of blind areas for various buildings, as well as the organization of ramps. We can say that in this case a ramp is created for entering the garage.
For a ramp with a lift into the garage, special side curbs are installed; they act as a limiter to prevent the car from sliding out. As a rule, the width of the car ramp into the garage is thirty centimeters greater than the width of the garage door itself; at the far end the ramp widens slightly, this is done in order to simplify entry into the garage itself. The most optimal length of the ramp to the garage is about five meters, but this figure can be changed according to the characteristics of the site or at the request of the owner. The most important thing is that the angle of entry into the garage is not too steep.
How to make a ramp for a basement
Some garages are made recessed, and here it is also important to know some nuances. After all, this ramp will be somewhat different from what you install and build if you have a garage in a cooperative or in the yard of your own private house.
So, how to enter the garage if you have a garage, but it is located in the basement of a residential building. The ramp should be made according to the following scenario. If you follow all the following recommendations, you will have a safe entry into the garage without any problems.
Attention: It is important to remember that the ramp leading to the basement garage must be straight and long. This ensures that your vehicle is safely placed in the garage. The ramp must be made wider than the garage door itself. The margins on both sides must be at least half a meter!
- The length of the ramp must also be appropriate , and do not forget to maintain the slope angle. It should be about twenty degrees.
- The coverage should not be too thick. This is important because in winter you must be able to drive your car into the garage without any problems.
- Cement just won’t work here; it’s better to take a mixture of cement with asphalt and gravel chips . This ensures the safety and durability of the walkway in your underground garage.
- Don't forget about the canopy either . The ramp should not be exposed to moisture or precipitation. This damages the surface, so it must be protected in every possible way.
- A counter ramp is also desirable . Moisture and rain should not get into the garage. There should be some distance between the counter ramp and the ramp itself. It is not necessary to make it large, a maximum of a meter in length.
- Side walls, canopy, correct mixing of the solution - all these conditions must be carefully observed. That's when you get the perfect ramp.
How to enter the garage on site - you will already understand the parameters of your car. Constructing a garage on site is not a complicated process, but quite responsible. So don't neglect it.
Garage entrance drainage
A car ramp always has a special surface slope, and a drainage system is organized, and a special groove is made in front of the threshold, it is needed to drain water, it is covered with a grate, this is done so that precipitation flows to the edges, and then is drained away.
Together with a car ramp into the garage from the side of the garage floor, a special ramp from the threshold of the garage door is very often used; it is sometimes also called a counter-ramp; it is made to create a soft entry into the garage and to reduce the load on the car’s suspension.
Sometimes a canopy is installed over the ramp, which protects the structure from heavy rain or snowfall.
Materials for car ramp
It is more correct and logical to make a ramp from concrete. It will last a very long time. If you follow the technology, then such a garage entrance will easily last up to a century. This is the best value for money.
There are options for making an inclined garage entrance made of wood. The material is light, relatively cheap, but it is not durable; no matter what impregnation you use, the wood quickly becomes unusable and requires replacement.
There are metal options. Metal itself is a very durable, strong and reliable material, but in winter or autumn at subzero air temperatures it becomes very, very slippery. This is a big minus. The material cannot be called cheap.
Very wealthy people make a ramp to the garage from paving slabs. It is very durable, quite stylish and extremely expensive. There are options from an asphalt drive into a garage. This is a controversial point; asphalt cannot be called an aesthetically attractive or too cheap material. In any case, the choice of material is yours!
There are interesting solutions that wealthy people resort to. They install various types of “warm floor” in the car ramp screed. Such a garage entrance will not be covered with snow and will not become icy in winter. But such pleasure is close to the category of “luxury” and the costs for such an event are appropriate. Heating the entrance to the garage is relevant primarily for residents of cold regions of the country. Before such “insulation”, it is worth weighing everything and drawing up a cost estimate for this category of work. Let's say right away that a warm entry into the garage occurs in isolated cases.
Standards
As we said above, the entrance to the garage should not be too steep. In general, there are specifically established norms and requirements on this issue. According to the current SNiP 21-02-99 clause 5.28, which is devoted to everything related to “car parking”, it is stated that the longitudinal slope of open ramps (street) should be equal to or less than 10%. In other words, with a height difference of ten centimeters, the lower part of the car ramp must have a length of at least one meter (1:10, 10%).
Retaining walls
When remodeling a garage ramp, it's time to repair the retaining walls if they require it. Depending on their condition, the designer makes a decision on the profitability of a major overhaul. It often happens that it is cheaper to demolish old walls and build new ones.
The main reasons for the destruction of retaining walls are water, frost and tree roots. As a rule, repairs are appropriate if their structural basis is not destroyed. The walls need to be completely dug out and freed from the old waterproofing, and the plaster removed. After the walls have completely dried, they are re-plastered on the ground side and waterproofed with a complex of modern materials. At the top of the walls it is necessary to provide a cap installed on top of a layer of film or roofing felt waterproofing.
When organizing drainage, a profiled membrane, a layer of clean crushed stone of the same fraction and geotextiles are laid on top of the waterproofing, which will protect the drainage layer from silting. The profiled membrane in this system protects the waterproofing from damage by crushed stone. It is laid with spikes facing outwards, the spaces between which serve as drainage channels. The lower part of the membrane layer forms a trough under the drainage tube, in which water collects.
Thus, all conditions are created for fast and efficient water drainage. Protected retaining walls will last a long time; It is advisable to plaster them on the side of the ramp, and waterproof the underground part and, if necessary, arrange drainage.
Ramps in parking lots must meet the following requirements:
a) the longitudinal slope of closed straight ramps along the axis of the traffic lane should be no more than 18%, curved ramps - no more than 13%, the longitudinal slope of open (not protected from precipitation) ramps - no more than 10%;
b) the transverse slope of the ramps should be no more than 6%;
c) on ramps with pedestrian traffic, a sidewalk with a width of at least 0.8 m must be provided.
1:10 - 10% - one in ten, i.e. with a height difference of 1 m, the length of the ramp should be 10 m, with a height of 0.5 m, the length of the ramp should be 5 m, etc. In this case, the slope of the ramp will correspond to 5.7 degrees.
1:12 - 8% - one in twelve, i.e. with a height difference of 1 m, the length of the ramp should be 12 m, with a height of 0.5 m - the length of the ramp should be at least 6 meters, etc. The slope angle of the ramp will be 4.8 degrees.
1:20 - 5% - one in twenty, i.e. with a height difference of 1 m, the length of the ramp should be 20 m, with a height of 0.5 m - 10 m. The slope angle of the ramp will be 2.9 degrees.
Many city planners would prefer a car-free world. Leisure spaces and even entire areas of cities are becoming car-free. Those who live within walking distance of their place of work or near rapid transit lines may be able to beat their car to or from work. Yet most people rely more on their car than on public transport. The car has become an essential factor in modern life, and a place should be organized for it in close proximity to the home. As more and more cars are purchased, it becomes more difficult to determine the amount of storage space that needs to be provided in a residential home. Although zoning codes determine the minimum number of off-street parking spaces, residents' lifestyles, financial status, proximity to public transportation, and other factors also play a role. For residential buildings near the city center, 60% of apartments can be provided with parking; in buildings where apartments are sold - 100%, and on the outskirts of the city it may be necessary to increase the ratio of apartments to parking lots to 1:1.5. In senior housing, it is sufficient to provide parking for 20-35% of apartments, and in most cases the local government will allow this ratio, despite the fact that zoning regulations provide for higher rates for conventional development.
Let's consider solutions for the relationship between housing and parking depending on the type of building, site conditions and financing,
1. Open parking at ground level (a more common solution for low-rise developments and the construction of mid-rise and high-rise buildings for families with low incomes if there is sufficient space on the site for this). 2. At ground level under the building (mainly in mid-rise buildings). 3. In separate garage buildings connected to one or more residential buildings (most often found in multi-storey buildings when the site is large enough). 4. In the garage (under the building), forming its stylobate; It is most widely used in multi-storey buildings in cramped areas.
1 - open parking; 2 - parking on the ground floor; 3 - garage separate from the building; 4 - garage under the building
a - parallel to the movement; b - only on secondary passages; c - on highways; g - two-way traffic; d - one-way traffic: 1 - street; 2 - building line; 3 - sidewalk
Regardless of the location of the garage - along small streets, in small yards or in large areas - in addition to the basic technical measures (covering, drainage, safety barriers and emergency lighting), it is extremely important to take into account other aspects related to the design and operation of parking lots. A large parking area can become a very unattractive “sea of asphalt”, especially when viewed from the upper floors. Smaller parking areas are more convenient to use. The installation of lightweight carports with partial coverage of cars is usually too expensive. Trees, especially trees with a dense crown that can serve as wind protection, can be a good element in solving the parking space, which should be placed taking into account minimal disruption to the parking lot. The solution for all parking elements must be agreed upon with the landscape architect.
Careful consideration must be given to parking lot fencing, which is especially important in areas with high crime rates. A fenced parking area is less visible and therefore less safe. If you decide to make a fence, it can be different: barriers, garden fences, dense vegetation, raising the ground level, if site conditions allow; a partially buried parking area can have a similar effect. Oscar Niemeyer suggested that a well-designed recreational area near parking areas significantly improves their safety conditions.
Due to the fact that the area of open parking lots is increasingly increasing, it is very important to determine the distance between the car and the home. Even parking for guests’ cars should be no further than 60 m from the home, and for residents it is preferable to reduce the distance to 30 m, with a maximum of 45 m.
Placing cars in garages costs 6 or 7 times more than setting up open parking lots, and the compactness of its solution plays a very significant role.
Particular attention should be paid to the placement of columns. They should be located so that they do not interfere with the placement of machines. The recommendations of the Department of Housing and Urban Planning indicate the dimensions of driveways and parking lots, which have worked well in practice, especially in cases where the garage is not structurally connected to a residential building. Parking depth
| When installing machines by owners | When installing machines by employees | |||||
| 45° | 60° | 90° | 45° | 60° | 90° | |
| Depth of parking from the walls (A), m | 5,3 | 5,8 | 5,5 | 5,2 | 5,4 | 5,5 |
| Passage width (B), m | 3,8 | 5,5 | 7,9 | 3,85 | 5,25 | 6,7 |
| Garage bay width, (B), m | 14,4 | 17 | 18,8 | 14,3 | 17,6 | 17,6 |
| Width of parking along the wall (D), m | 3,8 | 3,2 | 2,7 | 3,4 | 2,8 | 2,4 |
Note: Where parking at 45 or 60° angles is required, one-way traffic must be provided.
In small areas, especially when the garage is located under a residential building, the size of driveways and parking areas should be much smaller. By moving the columns away from the edge of the roadway, the width of the parking lots themselves can be reduced.
Arranging parking at an angle of 90° to the wall on both sides of the roadway allows for the best use of space, while at an angle of 45 or 60° it requires movement in one direction. Aisles with a width of 6.7-7.3 m with parking lots located at an angle of 90°, which are wide enough for traffic in both directions, represent a great opportunity to choose the overall layout of the garage. However, even when constructing parking lots at an angle of 90° with driveways of 6.7 m, if possible, one should prefer to organize traffic in one direction.
Before deciding on the organization of a specific construction site, it is necessary to establish the possible loading of the garage. A typical cell between the columns (when installed at an angle of 90°) occupies 7.9X18, or 142 m2, which allows for placement of six machines. Taking into account the intersection of road corridors, the area required for ramps, stairs, etc., at least 34.5 m2, should be added to the cell area (28 m2 is required for open parking lots). It is important to keep in mind that serviced garages allow for greater utilization of space. In this case, the machines can be placed in two or even three rows. However, according to existing standards, only those parking lots that are in the first row and from which cars can move without moving other cars are counted in the standard number of parking lots.
If the garage is not located under a residential building, a satisfactory solution is achieved by using 7.6-10.5 m spans between columns (with heavy 20-25 cm flat concrete slabs with column caps). When placing a garage under a building, a different solution is required. In this case, the location of the columns is dictated by an economical solution to the layout of the apartments, and not by the layout of the garage. Although the columns can be moved at the garage level, this solution is very expensive and should be avoided if possible. Therefore, it is rarely possible to achieve a solution for a garage with a specific area per car of 34.5 m2.
a - the passage area under the building is free of columns; 6 - the inside of the building where elevators, staircases, etc. are located; c - placement of parking in the internal zone only when installing cars by employees
The layout of the residential part of the building, especially with a certain rhythm of spans between the columns on the facade of the building, is of serious importance for the solution of the garage under the building. When choosing the rhythm of the columns of a building in the residential part, it is necessary to consider the influence of this rhythm on the layout of the garage.
a - different spans; b - equal spans
Ramps are usually used to move vehicles from one level to another. In cases where the area is very tight, elevators can be used. However, building elevators not only costs more, but also increases operating costs and requires 24-hour maintenance personnel.
The length of the ramps, of course, depends on the height of the floor. When determining the height, it is necessary, among other things, to take into account the need for fire sprinklers. The code sets a minimum height for sprinkler heads above the floor. Typically, a floor with a height of 5.5 m satisfies both functional and fire safety requirements. If building codes require the use of ramps as an escape route in case of fire, the slope of the ramps should be gentler (the maximum slope is determined by the code) than that allowed only for vehicle traffic. For circular ramps, the minimum radius is 18 m. The roadway used for turning on and off the ramp must be at least 7.6 m wide. The parking area above the top and below the bottom of the ramp may be increased as much as possible. floor height.
If it is difficult to place a ramp in two-story garages, you can cut its length in half by deepening the bottom level of the garage and reducing the rise of the top floor by half the height of the floor.
The figure below shows diagrams and gives dimensions of ramp systems in garages under a residential building. It should be borne in mind that ramps such as Palladian stairs (lower diagram) are more expensive than ordinary ones.
The technique of deepening the lower level of the garage by half the height of the floor in order to reduce the length of the ramp can be used not only in a two-story garage. When cars are placed in place by the owners themselves, three-row parking is unacceptable. It is therefore difficult to combine the length of the 18 m ramps with the dimensions of two 12 m long parking lots. However, the length of 12 m is more than sufficient for a ramp located between levels that differ in height by half the height of the floor. Further development of this principle leads to the construction of a ramp garage, in which the roadway and parking areas form continuous gentle ramps.
A - ramp with two-way traffic; B - ramps with one-way traffic (like a Palladian staircase): a - two transverse passages with one-way traffic; b - cross passage with two-way traffic; c - cross passage with one-way traffic; g - maximum possible distance
The combination of a garage and a residential part of a building requires special attention in multi-story construction. For small lots, most of the garage is located directly underneath the building, which greatly reduces the garage's capacity. There may also be ramps under the building, which is important to consider when placing columns. Even when the site is not so small, the space under the building along its perimeter is often used for parking. On large areas there is always a wide choice of places to place ramps. If the building is located above the middle of the garage area, it is necessary to provide for the displacement of part of the building columns to create passages under the building. The most rational garage layout is achieved when its structures do not depend on the residential part of the building and are connected to them through a “bridge”.
Regardless of how the connection between the garage and the residential building is resolved, free access and egress of vehicles must be ensured. It is very important to know the local conditions of its organization (direction, intensity of traffic, state of street lighting, width of branches from main highways, their minimum distance from intersections, etc.). These most important factors characterizing normal traffic flow can be provided by the following solution options:
1) a taxi can drive up to the entrance to the lobby (without entering the garage), drop off or pick up passengers (under a canopy or arcade) and drive off;
2) the tenant can drive up to the entrance to the lobby, get his family out of the car and then drive into the garage without returning to the street;
3) the car can be taken into the garage and brought to the lobby for loading without leaving the site.
1 — entrance to the garage; 2 — vestibule; 3 — access for cars of residents and guests; 4 — taxi entrance; 5 - when parking cars by employees, central control is preferable
The required number of escape routes and the specified maximum distance to the nearest exit are determined by local garage codes. In some cases, a ramp can be used as one of the required escape routes, in which case the regulations establish an acceptable slope. Typically, garages located under residential buildings are fully or partially (the part of the garage that is located under the building is required) provided with a sprinkler system, and in this case, the codes usually allow less stringent requirements for the distance between exits. But when the garage is small, the two staircases of a residential building can serve as escape routes for it too. These staircases, as well as the elevators connecting the garage to the residential floors, should be separated from the garage by a vestibule with highly fire-rated barriers, most commonly four-hour fire-rated, and Class A doors on both sides of the vestibule.
Garages are rarely heated. However, according to the code, they are provided with forced ventilation, except in cases where a certain part of the external wall area (usually 50% or more) is open. Such garages are naturally more economical than closed ones. In this case, it is necessary to take into account the lighting of the garage, the rhythm of the placement of lamps, which can usually be neglected. Enclosed garages are more expensive, but even without heating, they minimize the time when the temperature drops below the freezing level of water. A number of local codes require the construction of openings in external walls that are spaced a certain distance apart to allow fire service access.
The roof of the garage may well serve to accommodate recreational areas. When constructing multi-storey residential buildings, this solution is not only the cheapest, but often the only one that meets recreational needs.
1 — fire vestibule; 2 — door category “A”; 3 - wall with a four-hour fire resistance rating
In low-rise construction, when several buildings are being built, there is usually enough territory for both open parking and recreational spaces. But if there is not enough space, then they use the garage roofs as a recreational space for relaxation and games. This solution is somewhat more expensive than open parking lots, but it is advisable when the area of the site is insufficient. Properly designed (in size and location) openings in the roofs will provide natural lighting to the garage and ventilation, and through them trees can rise from ground level; it looks much better than trees growing in boxes on the roof of the garage. The cost of a garage increases due to code requirements for the need for fireproofing between the residential part of the building and the garage (concrete slab), as well as waterproofing and the use of protective slabs or other hard coverings for waterproofing layers. The increase in cost should be compensated by the obvious advantages of the development planning solution.
The easiest and fastest way to connect two horizontal areas that are at different levels is to build steps. But there are exceptions when it’s impossible to get by with just steps.
After all, for example, it is almost impossible for people with limited abilities to climb even 2-3 steps in a wheelchair without outside help, and cars are still completely unsuitable for moving up steps. The construction of a ramp will help solve this problem, and the most common materials for building a ramp are concrete and metal.
Ramps are divided into the following types:
- Stationary, which are installed on a permanent basis, usually at the entrance to any premises
- Folding, they are installed if the passage space is limited and unfolded only when necessary. Typically, such ramps are attached with special clamps to the wall of the passage.
- Removable ramps come in the form of ramps, roll ramps, telescopic or sliding structures. They are installed to overcome a specific obstacle at a given time. Their convenience is that they are mobile; it is possible to fold them and transport them in a compact form from place to place, using them as needed.
But before you make a ramp with your own hands, you need to correctly calculate the slope angle and the length of the ramp. The calculation of the ramp is carried out according to several values: angle of inclination, width and length.
Parameters for building a ramp
The slope of the ramp for disabled people who move using a wheelchair is calculated in degrees and, according to GOST requirements, should not exceed 2.9 degrees or 5% per 80 cm of length for a stationary structure. If the ramp is installed temporarily, for a short period of time and the difference in height between the platforms is no more than 50 cm, then the maximum slope of the ramp for disabled people is permissible at 4.8 degrees or 8%, with a minimum width of the structure for one-way traffic of 1 meter cm, for two-way traffic, respectively, 2 times wider.
At the beginning and end of the lift, as well as for every 80 cm of the lift, it is necessary to provide a flat platform, which in size must exceed the dimensions of the stroller, to allow for a turn. The correct design of the ramp has mandatory sides at the edges to prevent the wheels from slipping. The height of the ramp fence is at least 5 cm.
Also, for more comfortable and safe movement, the ramp is equipped with handrails, which are located on both sides of the structure from the inside. The railings must start at least 30 cm from the start of the climb and be continuous along the entire length of the ramp for adults at a height of 70 and 90 cm, and for children 50 cm, the maximum diameter of the railing is 30-50 mm.
Let's take a closer look at how to calculate the length of the ramp. There is a very simple algorithm for calculating the length of the ramp, in which we take as a basis the required angle of inclination of the structure. We calculate the length using the formula: 1: angle of inclination * height of rise = length of the ramp in meters.
For example, the length of a ramp with an inclination angle of 8% with a rise of 90 cm will be 1: 8 * 90 = 11.25 meters. Installing a ramp at the entrance is mandatory, especially if a person with disabilities lives there and is forced to use a wheelchair to get around. When calculating and choosing a design, the specific parameters of the wheelchair are taken into account: its dimensions, height and distance between the wheels, weight. If the ramp is not supposed to be used too often and there is a limitation in space, then it is possible to install a folding lift, but stationary ones, which are made of metal, are most often used. For safe use in winter, the ramp can be covered with a special coating or a metallized strip that has a texture like sandpaper.
Car ramps
The optimal ramp slope for cars is considered to be 15%, and the maximum allowable is 25%. Moreover, in enclosed spaces no more than 16%, and when placed outside buildings, in places exposed to atmospheric influences, the angle of inclination should not exceed 10%. The recommended width is 20-40 cm greater than the width of the gate.
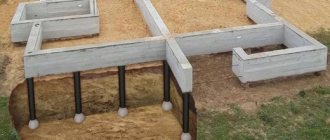
Typically, a concrete ramp is made monolithic and is used for car entrances to the garage, as well as for heavy vehicles. If the car's passport indicates technical characteristics, such as the angle of the ramp, the maximum inclination of the plane and the angle of the front and rear overhangs, then of course it is correct to use these data to calculate the parameters of the ramp. Then there is a full guarantee that when entering or leaving the garage you will not get caught on the bottom due to differences in the height of the garage floor and the ramp.
Work is underway to construct a ramp using the technology of constructing a concrete platform. It is best to replace the soil before the freezing mark with a sand-gravel mixture and make a frame from reinforcement. If the machine is not too heavy, then it will be enough to reinforce the concrete along the top of the ramp with a metal mesh with cells of 100-150 mm and a thread thickness of 6 mm. For a heavier car, it is recommended to put a net on the bottom as well. To prevent the car from sliding, the ramp is covered with bitumen paint or special metallized strips.
The process of filling the entrance with concrete
We will consider this issue step by step to remove all ambiguities. Let's start:
- Initially, it is necessary to remove the soil to a depth of approximately forty centimeters, the area corresponding to the size of the future race.
- Filling the sand cushion, after this you need to compact it and spill it a little with water.
- Filling the second layer of sand, compacting it and pouring water on it.
- Laying a layer of fine crushed stone to the top level of the excavated pit.
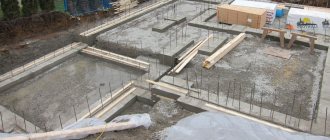
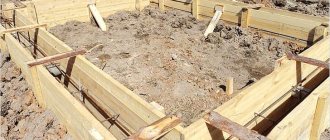
- Installation of appropriate formwork.
- Laying a special insulation (extruded polystyrene foam boards) on a crushed stone cushion over its entire area. It is enough to take slabs five centimeters thick.
- Next, we connect the reinforcement frame for pouring the solution with crushed stone.
- To prepare the required solution, you can add “Fairy” as a plasticizer. This is advice from ordinary people, not from professionals. Should I use it? You decide.
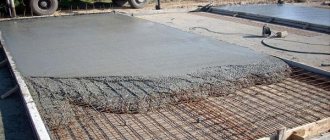
- Next, pour the main concrete layer using a vibration compactor.
- After laying the main concrete layer, a reinforcing mesh with a cell of fifty millimeters by fifty millimeters should be laid on it.
- After this, mix the concrete solution, without adding crushed stone to it this time (only a plasticizer (if you think necessary), cement and sand).
- The final screed is being made.
Next, the surface of the finishing screed is leveled; this can be done using an ordinary board.
Additionally, you can iron the screed by adding moisture to the surface of the screed in the required volume. The finished screed should be immediately covered to protect it from birds and animals while drying.
Drying of this concrete screed lasts about two weeks. The screed should be watered with water during the first week, this is done in such a way that it (the screed) is constantly wet. Additionally, you can cover the screed with plastic film.
Concrete entrance: step-by-step detailed instructions for pouring
Before pouring concrete into the entrance, let's calculate the size of the garage. To do this, the most convenient and practical way is to draw a scale diagram. It will allow you to calculate the consumption of materials and the timing of the work.
There should be a gap of 2–3 cm between the entrance and the gate so that the gate does not jam due to heaving of the soil.
Required:
- cement M400 30 kg – approximately 3 pcs.,
- sand and gravel (medium or fine fraction),
- lumber (for formwork),
- plasticizer,
- reinforcement 5–9 mm,
- concrete mixer or trough,
- a couple of buckets,
- shovels and bayonet shovels.
| On the site in front of the gate, we remove the soil to a depth of 35–40 cm. The width should exceed the width of the gate, as can be seen in the photo. | |
| Pour sand in a layer of about 7 cm. | |
| Compact with a hand tamper. | |
| Sprinkle with water to thicken. And we make a second similar layer. | |
| Then we fill it with crushed stone/gravel. | |
| We level and tamp. | |
| It was decided to expand the landscaped area in front of the garage using crushed stone. First remove the plant layer and spread geotextiles so that the crushed stone does not mix with the ground over time. | |
| They pour crushed stone. | |
| Formwork is installed on three sides (not on the foundation side). Lay a layer of waterproofing. In this case, linochrome is used. The insulation is extruded polystyrene foam of 5 cm thickness. | |
| The reinforcement frame is tied together. | |
| Now let's prepare a solution to concrete the entrance. The ratio of cement, sand and crushed stone is 1:3:5, respectively. Add a plasticizer (ordinary Fairy can act as it; pour it on the eye; when foam begins to form during mixing, that’s enough). When pouring, use a vibration compactor. | |
| The main layer is filled. Its thickness is approximately 15 cm. | |
| Now lay a 50x50 cm mesh. | |
| Fill in the finishing screed; do not add crushed stone when mixing the mortar. The ratio of cement and sand is 1:4. | |
| Level the screed with a rule or a flat board. | |
| When the screed has settled a little, dry concrete is sprinkled on top. This will increase its waterproofing properties. | |
| Iron tie. | |
| Ready screed. |
Gates
The gate is an important point in the conversation about how to make an entrance to the garage. Gates can be made of different materials and also have different opening mechanisms.
The gate size must be appropriate. You should not crowd into them (gates) with your car. Getting in and out should be easy and comfortable. Also, do not forget that the dimensions of your current car may be noticeably smaller than the dimensions of the one that will be in your use after some time. In order not to redo the gate later, it is better to make a reserve in advance.
The classic option is wooden swing gates. The only point that can be improved in this classic is the installation of automatic electric opening drives.
Sliding gates are most often made of metal. The gate can roll away along the floor or move along a special strip and on rollers at the top. Such gates can also be equipped with automation for greater comfort and ease of use.
There are also special folding gates, most often these gates fold up, they can be equipped with automation.
This is not the end of the types and types of gates, we just looked at the most popular options, but this is not the entire list. Which gate to choose for your garage? Decide based on your budget, as well as your preferences and needs. After all, if you use the garage, for example, once a week, then you are unlikely to need to install expensive electric automatic drives on your garage door. It's simply illogical.
And vice versa, if you use the garage several times a day, your day is scheduled minute by minute, then you simply cannot do without automation, because there is no time for endless manual manipulations of opening and closing the gate.
Preparing for construction
There is nothing particularly difficult about the question of how to make a ramp, but there are tasks that need to be carefully worked out. It is important to remember that the types of construction directly depend on the location of the object. In this case, the main task is to create the most convenient access route, which eliminates sudden rises in height (the entrance should be as flat as possible). Note that the design of the ramp is also affected by the height of the floor in the garage (below the threshold, flush with the threshold or above the threshold).
When considering how to make an entrance to a garage, you should start by selecting the optimal size of the entrance. The dimensions and shapes of the ramp are different for each specific case, but the most effective and cheapest option would be a direct drive, which is approximately 20-30 cm wider than the gate (on each side) and has an extension on the side opposite the gate. In this case, it is more convenient to drive onto the ramp itself. To make the height difference between the ground level and the threshold smoother, you will also need to select the length of the ramp.
Most often, the length of the ramp is 5-5.5 meters, but if the garage is on a slope, it can be longer. When deciding how to make a ramp, special attention should be paid to the height of the structure itself. At the same time, it is important to make a smoother drop both outside and inside. Entering a garage whose floor is level with the road still has a raised threshold (by about 15-25 cm). For the slope of the ramp to be optimal, it should not exceed 25°.
The use of concrete is recommended as a construction material. Concreting the entrance to a garage does not require a lot of hassle and large financial costs, but it will be very durable. In order to make a high-quality entrance to the garage, regardless of the design of the garage itself and the conditions, it is necessary to calculate its dimensions. To do this, it is best to draw up a large-scale diagram that will take into account all the details of construction and allow you to calculate the required amount of materials. It is important to consider the following:
- A curb that will prevent the car from leaving the ramp (otherwise the car may sit on the bottom).
- Drainage system. This should include the calculation of the slope of the ramp, a system of grooves for draining water and drainage.
- Organize a “soft” exit from the ramp.
- If necessary, you can build a canopy (canopy) over the driveway for cars.
Bottom line
Today we completely dismantled the garage entrance device. From the above it can be understood that there is nothing complicated in this matter. Even a garage project, as it turns out, is not necessary in order to build a garage with your own hands on your site. Believe in yourself. In fact, you already knew how to make an entrance to a garage or what material to build a garage from, etc. Today we simply structured all the knowledge in this area and simply talked about it in more detail.
You will sometimes spend quite a lot of time in the garage, this means you need to make it (the garage) so that being in the garage is not tiring for you; for this, as a rule, you need space. Build a garage with reserves in terms of dimensions, also not forgetting about the height of the ceilings, which should not “press” on you. Under the high ceiling you can organize excellent shelving for storing various things.
Experienced people say that you can build a good garage in a week if you have all the necessary materials and tools. But the main thing you should have is desire!
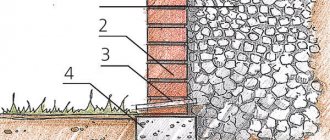
We build a blind area around the garage with our own hands
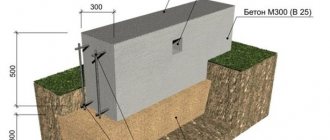
Step-by-step instructions for creating an architectural element with your own hands include preparing materials and tools. Before carrying out work on arranging the protective belt, soil is excavated to a depth of 40 cm and a distance of 60-100 cm from the base. After this, the soil is carefully compacted, and geotextiles are laid on the bottom of the base, which will provide drainage and prevent the growth of weeds. Sand is poured into the bottom and compacted with water. Crushed stone is poured on top and formwork is installed.
To add strength to the structure, it is recommended to lay the reinforcement in the form of a mesh. You can divide the poured space into sections using wooden boards, which are pre-impregnated with bitumen mastic.
This event prevents cracking of the monolithic slab and relieves the internal stress of the structure. Before pouring the concrete mixture, the surface of the foundation is cleared of debris and covered with a primer for better adhesion to the blind area. When pouring, make a slight slope to allow water to drain. The blind area is periodically moistened, preventing intense evaporation of water. After drying, decorative finishing is carried out. A plasticizer is added to the plaster mixture, which ensures the homogeneity of the mass. Its use eliminates the appearance of bubbles, which negatively affect the quality of the coating.