Types of solutions and features of their choice
For interior work, cement, lime gypsum plaster or special compositions based on gypsum and cement mixtures can be used, the use of various fillers gives such materials special properties, such as plasticity, additional wall insulation, and sound insulation.
Before you start plastering brick walls, you need to determine how you will do this and what solution to use.
To perform this work, the following materials can be used:
- drywall, used for dry plaster;
- cement sand mortar;
- mortar;
- clay mixture;
- gypsum plaster.
Until recently, brick walls were usually plastered with cement mortar, but now gypsum plaster is increasingly used.
The technology for performing work using various mixtures is the same, but when using gypsum solutions, it must be taken into account that they set quickly , so they need to be prepared a little.
Which is better
Experts consider cement plaster to be the best option for brick walls. This is due to the fact that it is easy to apply and its cost is low.
Another advantage of this solution is the ability to make a layer up to 7 cm thick, which allows you to qualitatively level the surface of the walls.
Do I need to prime before applying?
Gypsum compounds are often used to finish a brick wall; their advantage is that the surface does not need to be primed, since this solution has high adhesion.
If there is a need to plaster finishing bricks, then a primer and, in some cases, reinforcement must be used.
Such surfaces are very smooth, so to ensure normal adhesion of the plaster to the brick, additional measures must be taken.
What is the best primer before applying the solution? To carry out priming of brick walls, it is necessary to choose compounds that have the inscription “deep penetration”.
Basic preparatory work
Even those walls that were erected just the day before can be plastered. In addition, you should keep in mind the fact that the preparation of surfaces for this process may differ depending on the material on which the wall is built. And this is worth remembering.
Next, we will consider in detail the specifics of the preparatory work:
- Walls made of concrete blocks. The bad news is that cement slips off concrete blocks incredibly easily. This is due to the fact that the material has an almost perfectly flat and smooth surface. Accordingly, in this case you need to be especially careful so that the final result is completely acceptable. As for the preparatory work, in this case it makes sense to pay attention to a couple of tips. First of all, you can apply a thin layer of tile adhesive to the wall surface. First you need to prime the wall. This will increase the adhesion of the cement (plaster) to the surface. In addition, you can install a plaster mesh, which makes the created cement layer much stronger. In some cases, builders deliberately make uneven surfaces on the wall, but this is a rather risky option for beginners.
- Brick walls. Often the problem is that building bricks cannot be plastered. However, there is a way out of this situation. Most often, to plaster the walls, a lathing is created. Often, to do this, nails are driven into the spaces between the bricks, onto which wire is wound. Then you can freely begin plastering. Alternatively, as with concrete blocks, a thin layer of tile adhesive can be applied to the wall surface. After just 24 hours, the main repair process can begin. Again, do not forget about the plaster mesh, which also performs its function very well.
- Plasterboard surfaces. To plaster plasterboard walls, you simply need to prime the surface. It is worth recalling that drywall plastering often occurs within the bathroom.
- Walls made of cinder blocks. Most often, cinder blocks have a rough surface, so plastering them is incredibly easy. To do this, you just need to wet the wall, and the cement mortar will stick securely.
- Walls made of wood. Of course, wooden walls very rarely lend themselves to some kind of finishing, but if it is necessary to plaster this surface, you should, again, prime the surface and also install a plaster mesh.
- Walls made of shell rock. Here the situation is almost similar to what we have with cinder blocks. To plaster, moisten the surface generously with water.
In addition, there are some specific situations that you should definitely be aware of. It often happens that the walls are distinguished by the presence of irregularities. In some cases, the recesses on the surface are 10 or 20 cm. Obviously, before any work related to finishing the wall, it should be brought into proper condition. To do this, you can use the most ordinary cement mortar, which needs to be used to fill in the depressions and other irregularities. Only after complete hardening can repair work be continued.
In addition, there are situations when it is necessary to finish a previously plastered wall. In this situation, there is a need to remove the old plaster. Fortunately, this process is quite simple. To do this, you need to arm yourself with a hammer drill and remove all remnants of the plaster. If you don’t have a hammer drill, then an ordinary ax will do just fine. However, such work should be carried out carefully. If the plaster was created on the basis of lime and sand, then separating this material from the wall will be incredibly easy, even without using a hammer drill.
If the process of removing the plaster turns out to be too difficult, the problem may be hidden in the existing layer of paint. In this case, you need to take a sharp object (awl, scissors) and try to remove the layer.
Plastering technology
If the building is built correctly, then the height of the walls in the room should not exceed 10 mm, but often they reach 25-30 mm.
When using gypsum mortar, it is recommended to apply it immediately in such a thickness that will level the surface.
Cement plaster is applied in several layers, first the base layer is made, it should dry for 24 hours, and then a leveling layer is applied.
Solution application technology
Knowing how to properly plaster walls with cement mortar, you can quickly and efficiently level the walls with your own hands. Firstly, depending on the expected thickness of the plaster layer, you need to select a tool for applying the composition: a ladle or a trowel. The first of them is more often used for large volumes of work.
Wall plastering process
Unlike other materials, the sand-cement mixture does not require quick use, so while working with it you can inspect the result from the outside, making the necessary adjustments.
To begin with, the surface is sprayed with a more liquid cement mortar to improve the adhesion of the coating. Even if the first layer was applied unevenly, this does not need to be corrected. Such a flaw will be hidden later.
A thicker solution for plastering walls can be used approximately 2 hours after the first one. For better adhesion to the surface, the base composition should be applied using the throwing method. This action is carried out from the bottom up. The border of this layer will be beacons. To align a layer, the wizard needs to apply a rule. It is necessary to work with this tool from the bottom up, performing movements in the form of a zigzag.
If after leveling there are small defects left on the surface, you can additionally add a little mixture from the trowel and level it again using the rule. To achieve greater evenness, grout is used at the final stage of work.
To thoroughly plaster the entire surface of the wall, you need to work in areas between the beacons. When one fragment is completed, you can begin the next segment.
Advantages of using the mixture
Plaster material has certain advantages:
- the surface is able to resist the effects of water, dries quickly after getting wet, without deteriorating its properties;
- excellent vapor permeability ensures a comfortable indoor microclimate;
- the material is environmentally safe and meets all hygienic and sanitary requirements;
- with the help of such a mixture it becomes possible to change the decor style;
- the composition fully complies with fire safety requirements;
- low cost and low expenses associated with organizing plastering work;
- provides additional protection from extraneous noise.
The plastered surface gets a presentable appearance, and it becomes possible to perform finishing with various materials - wallpaper, paint, etc.
In addition to the listed advantages, developers also note a number of disadvantages of the material:
- During the operational period, cracks may form on the surface of the plaster layer. This is associated with shrinkage of the structure or violations committed in the technology of making the mortar and carrying out plastering work;
- working with such a mixture is allowed only at positive temperatures;
- plastering walls with cement-sand mortar involves preliminary preparation of the walls - installing a reinforcing layer, applying notches, priming;
- the work is performed manually, which takes a lot of time;
- According to established construction standards, it is allowed to apply a layer of plaster of a certain thickness.
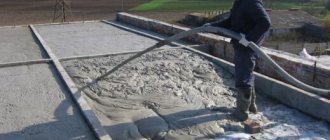
Mechanized plastering of walls using beacons
Now that you know how to plaster walls on your own to a smooth surface, it should be explained that there is also a mechanized method of applying plaster. This type of finishing work is usually carried out by specialists from a construction company and is most often used in large industrial and public buildings. Of course, a layer of plaster applied in this way will differ from a man-made one in its ideal smoothness, but it will also be thinner, which cannot but affect the performance characteristics of the coating, despite the obvious advantages of the method.
Mechanized plaster is produced using a special plastering machine, in which, directly during application, a dry cement-sand mixture and water supplied under high pressure are mixed. The sprayed composition spreads evenly over the surface and dries quickly. The coating created in this way is characterized by high wear resistance and impact resistance, which is suitable for industrial premises.
Simpler, but also mechanized methods include applying plaster using a pneumatic hopper. In it, the solution is sprayed by pumping air, which makes it possible to cover fairly large areas with an even layer. Using various attachments, you can process corners, slopes, transitions and other hard-to-reach places.
Having examined all the presented algorithms of actions when applying plaster to level walls, one cannot help but notice that even a beginner can cope with this task. Proper preparation, a well-thought-out plan of action, high-quality building materials and durable tools will help you complete all the planned work with ease. If you are not confident in your abilities, it is better, of course, to turn to professionals; if you like to do everything yourself, be patient and get to work.
Necessary equipment
Before plastering the walls, it is recommended to prepare everything you need to complete the work. The kit looks like this:
- trowel or ladles;
- rule;
- grater and grater;
- construction level;
- lighthouses;
- a shovel and a container of a suitable size for making a batch (for large volumes of work, it is allowed to use a concrete mixer);
- buckets;
- spray bottle for moistening walls;
- fishing line or cord;
- hammer, chisel, brushes.
Preparation of the solution
You can start plastering the walls only after all the work described above has been completed. Once they are completed and the beacons have dried (at least a day after installation), you can begin to prepare a solution based on cement and sand. The ratio of the components usually depends on the brand of cement used (400 - 4 buckets of sand, 500 - 5). Otherwise, the proportions may fluctuate if there is no confidence in the manufacturers, increasing towards cement.
When using old material 400 grade, it is recommended to make a ratio of 1 to 3. It is most effective to stir the solution using a concrete mixer if a significant amount of the mixture is required, because otherwise its use is not justified. If a small volume is needed, kneading can be done in a trough or any other similar container.
The level of density of the solution should be such that during the vertical tilt of the trowel it could not stay on it, but at the same time it could hold onto the pile.
Preparing the walls
This stage is always performed, because the solution is applied in a thick layer, and poor adhesion to the surface leads to its peeling and collapse.
Preparatory work is carried out for all walls according to the same principle, but there are some aspects related to the type of building material.
Made of brick
If you plan to plaster brick walls with cement-sand mortar, carefully inspect the surface of the masonry and remove excess mortar. The thickness of the applied layer depends on the evenness of the wall, and if this value does not exceed three millimeters, then it is quite possible to do without a reinforcing mesh.
Dust is cleaned off, dirty stains are washed away, the dry wall is covered with a primer mixture that prevents the absorption of water from the applied solution.
Made from concrete
The preparatory process for such a surface is somewhat simpler. Protrusions are removed, dirt stains are washed away, priming can be omitted, because the concrete wall does not absorb moisture.
Immediately before plastering, the concrete is moistened.
Made of wood
Wood material is more susceptible to negative influences than others, so the wall will have to be prepared carefully.
To improve adhesion, a primer must be applied, and a mesh for reinforcement is fixed along the entire wall with self-tapping screws.
Plastering walls: main stages
Strictly speaking, the technology of plastering walls using beacons includes three main stages, the correct observance of which allows you to achieve the desired result in a short time:
- Wall preparation;
- Installation of beacons;
- Actually, the application of plaster itself.
If you are interested in plastering walls with your own hands, and you want to cope with this task no worse than professionals, then following the presented steps will allow you to save money and effort, and the result will not be long in coming.
Preparing the walls
The very first and most important stage in the process of plastering surfaces. Depending on the condition of the base, the further fate of the leveled surface will be determined. That is why when preparing the walls it is necessary to perform the following steps:
- Visually note the condition of the wall, mark irregularities, if necessary, use a level;
- Mark the places where the beacons are attached - at a distance of 30 cm to the corners and slopes. Divide the remaining part of the wall into equal parts and also mark the fastenings. To determine the horizontal axis of the fastening, retreat 18-20 cm from the ceiling and floor;
- Prime the surface of the walls. The primer will provide better adhesion to the mortar and eliminate excess construction debris.
After the walls are ready, you can proceed directly to the actual placement of the beacons.
Installation of beacons
There are two types of fastening construction beacons to the wall surface: with mortar or with fasteners.
If you decide to place the profiles on the mortar, then you will need a composition with a high cement content. The pre-prepared mixture should be thrown onto the wall at the intersection of the designated horizontal and vertical axes, but so that the thickness of the layer does not exceed the thickness of the lighthouse. Then attach the beacon and press it firmly into the solution. You can strengthen the base using a rule, using it on the sides of the profile.
If you give preference to the strength of the fastener, then you will have to place self-tapping screws at the intersection of the axes. Make sure that their caps are at the same level, then you will not need to align the placement of the profiles for a long time.
Once you're done placing the beacons on the walls, it's time to apply the solution. To do this, you will first need to prepare a plaster mixture. Pay attention to the instructions indicated on the packaging of the mixture. Only correct adherence to all points will allow you to create a high-quality composition that allows you to properly plaster surfaces.
Applying plaster
This is how we approached the final and most important stage of the entire process - applying the plaster solution. The application order is as follows:
- Use a wide spatula to scoop out a small amount of the mixture;
- Throw this solution into the gaps between the beacons, filling all the free space;
- Using the rule, which must be moved perpendicular to the beacons from top to bottom, remove excess solution.
After the solution has completely hardened, a perfectly flat surface will await you. If necessary, the beacons can be removed, but most often they are left.
We display beacons
How to properly plaster a wall with cement mortar? Masters recommend setting up beacons. This is done as follows:
- the wall is checked for vertical evenness;
- guides of appropriate length are prepared;
- at a distance of twenty to thirty centimeters from the corner area, a line is drawn from the ceiling to the floor, and mortar slats are thrown along it in increments of fifty centimeters;
- According to the applied markings, the rail is installed.
The remaining beacons are placed in a similar way, the distance between which should be slightly less than the length of the rule. As a rule, the pitch varies from 150 to 160 cm.
We place beacons
In construction, guides used when leveling walls using liquid mixtures are usually called beacons. As a rule, perforated profile strips made of rolled T-bars act as beacons, but in some cases, in order to save repair costs, wooden slats are used. Special profiles are good because, upon completion of the work, they do not need to be removed from the wall and the resulting grooves need to be sealed.
The width of the profile is selected based on the thickness of the finishing layer. Before installing the beacons, the treated surface is cleaned of old cladding, primed and checked for deviations in the geometry of the walls vertically, horizontally and diagonally. To do this, you will need a plumb line, a rack level, a square, as well as a two-meter rule and a tape measure.
Use a square to check the perpendicularity between the walls. A plumb line is needed to determine the verticality of the walls. A rack level reveals the slope of the surface from the horizontal. Identified irregularities are marked with a marker. Using a tape measure, existing deviations are measured and the diagonals of the room are calculated. The diagonals must be equal, otherwise it can be argued that the corners in the room do not correspond to 90º. Based on the data obtained, a decision is made on the placement of beacons.
Marking for beacons begins from the corners of the room, from which they retreat 30 cm. At this distance, vertical lines are drawn under the outermost beacons. All subsequent lines are marked at intervals of approximately 160 cm. This gap will allow you to freely move the rule along adjacent beacons without fear of the plank slipping or missing some sections, which will greatly facilitate the process of leveling the walls with your own hands.
After marking is completed, the actual installation of beacons begins:
- To determine the location of the lower and upper fastenings of the lighthouse, subtract the length of the bar from the ceiling height, and divide the resulting value by two. At these points, holes are drilled into which dowels for self-tapping screws are driven. The seating depth of the screws is determined based on the identified irregularities. The head of the self-tapping screw should be above the wall at a height equal to the curvature of the surface in this place, increased by the height of the profile and a margin of 0.3-0.5 cm. The procedure is repeated on all markings.
- To assess the verticality of the resulting plane, a sharp edge of the rule is applied to the screws installed at the edges of one marked line. If deviations are detected, the seating depth of the screws is adjusted. A similar method is used to check the horizontal position of the future coating. More accurate positioning of self-tapping screws is obtained by using a laser level, but in the absence of this device, you can get by with the usual rule.
- A cord is pulled along the top and bottom row of screws, under which the beacon is placed. If the strip passes freely under the thread, it is considered that the screws are screwed in correctly.
- The plaster mixture, brought to the consistency of a stiff dough, is poured along the marked line so that the layer covers the heads of the screws.
- Using the rule, the beacon is pressed into the formed mound until the level of the screw head and the top point of the beacon coincide. The rule is to check the correct fit of the beacon, after which the screws are removed from the wall. If you are installing the beacons yourself, make sure you have a partner to help you press down the beacons, since doing it yourself is not so easy.
It is very important to thoroughly clean the rule after installing each beacon, since dried mixture can ruin the perfect line of the edges of this tool.
Preparation of working solution
Having completed the preparatory activities, we begin to prepare the plaster solution. We recommend that you act in a certain sequence:
- we clarify the proportions for making the batch, measure out the components in the required proportions;
- add the required amount of sand to a portion of Portland cement and mix the ingredients thoroughly;
- Water is added portionwise, everything is kneaded to the required consistency.
You should understand which solution is best suited for plastering walls. The consistency of the mixture of sand, cement and water, reminiscent of thick sour cream, will facilitate the spreading process and prevent it from slipping if the solution is applied in a thick layer. Particular attention should be paid to ensuring that there are no lumps of sand or cement in the mortar mass.
If the mixing is completed in accordance with the requirements, the solution retains its original shape without spreading over the working surface of the trowel.
Features of plaster mortar
According to statistics, the effect of plastering a surface depends not only on skills and craftsmanship, but also on the quality of the base that will be used for the wall processing process. That is why it is necessary to prepare the solution taking into account the recommendations of specialists, and you can familiarize yourself with the basic provisions at any time when visiting numerous sites. The fact is that if the solution is mixed incorrectly, even if all the proportions provided on the packaging are observed, then the following may appear on the treated surface in the future:
- Cracks.
- Peeling.
- Other defects.
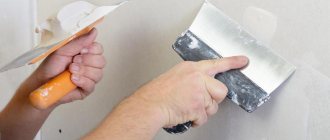
Applying plaster
Let's consider the technology of plastering walls with cement-sand mortar. Having mastered all the techniques, it is possible to level the walls yourself quickly and with good quality.
Considering the expected thickness of the plaster layer, you should choose a tool suitable for the job - a trowel or ladle. The second one is used in most cases when working with large volumes.
A distinctive feature of a mortar made from sand and cement is that it does not require rapid production, so during work there is always the opportunity to inspect the plastered area and make certain adjustments.
Before you start plastering the DSP with your own hands, the wall surface is sprayed with a liquid mortar mixture that improves the adhesion rate. This layer can be applied unevenly, the main thing is to cover the entire area. After two hours, you are allowed to begin finishing with a second, thicker solution. It is applied by throwing it on to improve adhesion. Work is carried out from the floor to the upper section of the wall, in areas whose boundaries are indicated by beacons.
Final preparation of walls for finishing
The surface must be grouted before the covering dries. For grouting, prepare a more liquid plaster solution, which is distributed over the wall with a trowel placed at an angle of 45º. The surface is ironed until excess mixture no longer accumulates on the ironing iron. The plaster is grouted in sections. Each subsequent area is connected to the previous one by overlapping the solution onto the edges of the adjacent area.
When the coating has dried, the plaster is first treated with a plastic or wooden grater, which is moved counterclockwise, pressing firmly against the wall, then with a grater covered with soft fabric (felt, felt).
Plastering walls along beacons is considered complete only after the final smoothing of all irregularities. With certain skills, all stages of rough wall finishing can be completed with your own hands, without the involvement of a construction team.
How to get to hard-to-reach places?
A developer who plasters walls with cement mortar with his own hands should know that in the most difficult places it is better to work at the final stage of the process, when the main surface of the wall has dried. Such areas are the corners of walls, abutments to the ceiling, spaces surrounding the elements of the heating system.
When plastering corners, you must initially apply the solution in the usual way, then press down the thrown mass with a rule, the corner of which is cut off. In this case, the lighthouse installed first from the corner is taken as a landmark.
The mortar mixture is poured into the openings near the pipes with a spatula or trowel, and grouting is done with them. It is recommended to finish the areas near the ceiling on the second day after completion of the main work. When leveling the layer, they are usually placed vertically, and are oriented not towards the lighthouse, but towards the dried plaster layer.
To prevent the layer of cement-sand plaster from cracking in the future due to rapid drying, several techniques are used:
- eliminate strong heating of the room and the possibility of drafts;
- during plastering work, the wall surface and working tools are often moistened;
- grouting is carried out several times;
- the surface of the plaster layer is coated with a moisture-repellent composition.
Each method increases the drying time of the wall surface, while maintaining the evenness of the coating, which, after such finishing, can withstand any negative impact.
Leveling the walls
Direct plastering of walls using beacons begins with the preparation of a solution. Fill the bucket about 1/3 with water so that when mixing the solution with your own hands, the mixture does not splash out of the container. Then pour the plaster into a bucket and use a construction mixer to bring it to the desired consistency. The density of the plaster mixture is determined based on the consideration that to finish the walls with a thicker layer, a thicker solution will be required.
Porous surfaces that absorb moisture well are moistened generously with a spray bottle so that the plaster does not crack due to drying too quickly as a result of intensive penetration of liquid into the wall.
Plastering on beacons involves applying the solution in three layers:
- Spray. For this stage you will need a creamy mixture, which is poured portionwise onto the wall with a trowel. The thickness of this layer should not exceed 5 mm for hard bases (concrete, brick) and 9 mm for pliable wooden surfaces.
- Priming. The walls are treated at this stage with a thicker mortar, which is laid at a thickness of 10 mm. Work is carried out only after the spray has completely dried. The mixture is applied using a wide spatula and leveled with a rule that is moved along the beacons from bottom to top. The resulting voids are filled with a solution, after which the treated area is again smoothed with the rule. To obtain the most even surface, the procedure will have to be repeated 3 or 4 times. Using the rule, you should avoid zigzag movements, which can increase the curvature of the walls.
- Covering. This layer is applied over wet soil. If the soil has had time to set strongly, it is moistened with a wet soft brush. The solution is applied with a spatula. The coating is leveled with a trowel, which is moved in a circular motion. The thickness of the covering should not exceed 2 mm, since its main purpose is to prepare the wall for final finishing. Sand for covering must be sifted through a fine sieve, so that when plastering the walls with your own hands, unwanted lumps do not attach to the surface.
Finishing work
As soon as the walls covered with plaster mixture have completely dried, the final stage of repair begins - finishing. It is performed in several ways:
- using spraying, they form the original texture of the wall surface;
- the walls are painted with compositions of different color shades;
- The surface of the wall is made rough.
The required finishing option is determined taking into account the individual wishes of the developer.
Mashing the solution
It is necessary to start rubbing when no mark remains on the applied solution with slight finger pressure. To carry out this procedure, you need to have a polisher or grout board, with which you should sand the wall in a circular motion until it becomes smooth. In places where there is corrosion on the plaster, you need to apply a solution and rub it until it is completely ready. Grouting of the plaster mixture can be done even the next day, while ensuring it is lightly wetted.
To avoid cracks in the plaster, you must not allow it to dry out too quickly, especially if the ambient temperature is quite high. To do this, you need to periodically moisten the wall with water. If necessary and if desired, it is possible to prevent the formation of cracks in the plaster mixture, but additional rubbing will be required.
Note! The tools used during the work must be regularly moistened with water to prevent the solution from sticking to it. Upon completion of any of the processes, the devices and containers in which the solution was mixed should not be left dirty and not completely washed until the next day.
To carry out plastering of surfaces yourself, you do not necessarily need to have extensive experience in performing such tasks. In this case, on your own, with considerable effort and spending a sufficient amount of personal time, even a beginner will still be able to achieve the desired effect, taking into account all the above-described processes and recommendations for them during the work. After becoming familiar with the sequence and the correct technology, each person will not only have an idea of how to plaster walls with cement mortar with their own hands, but will also be able to do it in practice.
Video:
Possible difficulties
Many people are trying to find out how to quickly complete plastering work without spending extra time and money on it. In a hurry, repairmen neglect some rules, and the consequences after this become very dire.
It would not be superfluous to talk about the mistakes made by beginners who do not have proper experience in plastering work. This mainly relates to the process of preparing the mixture, observing the ratios of the components used for this. If you add more cement than is required according to the norm, you will get a solution that does not have the necessary plasticity. This means that at the drying stage, during shrinkage or under the influence of unfavorable factors, cracks will appear on the surface of the layer and its partial collapse will begin.
If an inexperienced craftsman, in pursuit of the goal of saving money, adds more sand to the solution than is required according to the norm, the composition does not adhere well to the surface, and after drying a lot of dust will form in the room.
The problem can be determined visually using a spatula - a mixture with excessively added sand does not stay on the tool, and plaster with excess cement sticks to the working surface and is difficult to clean off.
It is recommended to carefully examine the previous covering layer of the surface. The cement mixture is applied boldly without preliminary cleaning if the coating was previously made of a similar material.
Please note that this plaster composition is not used on gypsum or lime coatings.
It is important to first apply a layer of spray to the wall surface if painting is planned in the future. If this condition is not met, the mortar mass dries unevenly, shrinks, and all defects become clearly visible after applying paintwork materials.
Etching the finished surface
Etching cement plaster with a neutralizing solution is carried out in order to extend the life of the wall. After the coating dries, pores form on it, which are a convenient place for fungi and mold to grow, so etching the wall is simply necessary. The neutralizing solution for etching must be acid-based. Such environments will not be able to harm cement plaster, and will destroy bacteria.
Safety rules when working with etching:
- Work is carried out only in a well-ventilated area.
- The use of protective gloves, goggles and thick clothing that covers the entire body is mandatory.
- Prevent the possibility of children and pets entering the premises during work.
- If the solution gets on your skin, you must immediately rinse the damaged area with warm running water.
On a note! Once acid gets on your clothes, the item of clothing is unlikely to be saved, so it is recommended to use special clothing or clothing that you don’t mind.
The etching process for cement plaster is as follows:
- The first step is to remove dust and possible contaminants from the surface being treated.
- Then prepare the pickling mixture following the manufacturer's recommendations.
- The finished solution is poured into a specially designated container and a paint brush is dipped into it.
- The tool is used to process the entire surface of the wall without gaps.
- The wall is left to dry.
- Finally, the etched wall is washed with water.