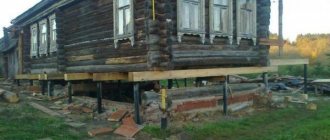
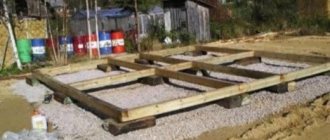
Laying timber on the foundation
The first row of timber has been laid.
How to lay timber on the foundation when building a house, bathhouse or other building from it? There are various fastening options. An important point is the waterproofing of the base.
Protection from water is needed to prevent the lower crowns from rotting. If the differences in the foundation level exceed 1 cm, then the supporting surface must first be leveled.
Compliance with the technology of installation work allows you to obtain a high-quality result - a durable structure.
The lower crown of timber for a log house or frame-panel structure requires replacement most often, so the installation is carried out in such a way that repairs can be easily carried out.
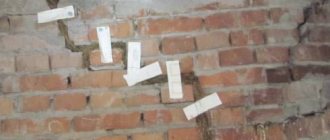
Anchoring scheme
It happens that builders do not attach the first crown of timber to the base. Due to the significant weight of the structure, they believe that the erected structure will not move.
The studs are laid when the base is poured with concrete. At the same time, their height reserve is taken such that the first row of timber can be tightened using nuts without problems. To secure the lumber, holes are drilled in it for studs.
note
Pins are reinforcing pins. They are also embedded in the foundation slab or tape at the concreting stage, in order to then lay the beams.
On screw piles with U-shaped or plate heads, the crowns located below can also be changed if they use up their resource.
Anchored, rigid fastening does not allow the structure to be repaired in the future.
Metal corners, staples, and nails (including wooden ones) are also used to secure laid beams to each other. These fasteners are used in conjunction with groove joining.
Base insulation
Before laying the first crown, the upper foundation surface is leveled even if there is a centimeter deviation of its level from the horizontal plane. Afterwards, waterproofing material must be laid.
Waterproofing the foundation under the lower beams of the building
The upper surface of the base must be without slope, drops, and perfectly leveled. They check this with a laser or water level, or a construction level. Leveling is often performed with cement-sand mortar.
It can also be used to close a gap if there is one between the lower crown and the foundation surface. Recently, construction foam has been mainly used for these purposes. After hardening, its excess is cut off with a knife.
At the end of the work, the sealed area is covered with a decorative strip or ebb.
The first crown must be placed on top of the waterproofing. This is due to the fact that capillary moisture reaches the lumber from the soil through the monolithic base. The wood quickly rots and the building requires repairs.
Working with a chainsaw
The preliminary stage before laying the first crown of timber on the foundation is to prepare the material and tools.
Everything you need for the job is presented in the table below.
No.Tools and accessoriesMaterials
| 1 | large mallet, tape measure, square, marker | wooden beam |
| 2 | ladders or trestles | anchors, staples, nuts with washers, dowels, studs, nails, metal corners |
| 3 | levels of different systems (water, laser) | antiseptic compounds |
| 4 | wrenches, plane | polyurethane foam |
Wooden products must meet the following criteria:
- be free from knots and also free from jagged edges;
- the surface of the beam must be flat;
- For work you need to use lumber from the heartwood of trees, which does not give off a blue tint.
It is recommended to give preference to lumber with a large number of annual rings.
For a log house, the height of the strip base above the ground surface should be at least half a meter. Additional construction is often done with bricks.
The material for row 1 can be treated with waste oil, and the rest with antiseptic compounds.
Important
Before starting construction, it is recommended to check all lumber for minor defects by marking these sides. They will place the timber up or down. The sides with bulges should be lateral.
The beams should be processed carefully so as not to miss any area. Otherwise, it will serve as a source of spread of the putrefactive process. The quality of the selected material is of paramount importance in ensuring the durability of the building.
The timber is laid on the foundation with or without securing it. If structural elements are joined to locks, then if dismantling is necessary, the entire dismantling process becomes much more complicated.
Fixing beams on piles
The joining of beams in the corners is carried out in the following basic ways:
- in half a tree with a tenon, when on one beam the upper half is cut off (the length of the width of the lumber being joined), and on the other - the lower half;
- into the paw, while the cut out connecting parts of the logs are connected without including their end parts.
The latter option has received the greatest practical distribution. The photo below shows, in addition to the main ones, rarely encountered methods of connecting beams without and with residue.
Options for joining beams together
The sequence of actions showing how to correctly lay timber on a strip or slab base is as follows:
- determine the evenness of the tape or slab;
- if necessary, level their surfaces;
- choose the optimal method of joining lumber;
- With a smaller diameter than the studs used, holes are drilled in the beams;
- anchors are concreted;
- lay the lower crowns;
- fix them with nuts, having previously placed washers under them;
- use nails to connect the corners of the structure;
- check the level of the laid row;
- Use a plane to cut off any irregularities.
If, when pouring the base, fastenings were provided for the lower beam, embedded in concrete, then this greatly facilitates the entire process, speeding it up.
In this case, the studs are inserted into the not yet hardened solution a third of their length every 50 cm. The minimum number of bolts (fasteners) for each crown should be two.
The lumber is pre-prepared by drilling holes of the required diameter with the required pitch. Do not tighten the nuts too much to avoid distortion.
To secure the crowns to the piles, caps (for example, U-shaped) are mounted, which have holes on the sides for fastenings. The supports are first coated with roofing felt (2-3 layers). The beams are mounted in grooves, connecting in the chosen way in the corners. They are connected to the supports using pins or screws.
If the heights of the piles differ slightly, then timber is cut out in the required places.
The technology of overhead installation involves the absence of fastening of lumber to the base. The entire installation process is carried out similarly to the option involving rigid fixation, only without the use of fasteners.
The crowns must be connected at an angle of 90 degrees. Otherwise there will be problems with the further construction of the building. If you follow the technology, checking the geometry of the structure being built, then the likelihood of deformation of the building will be minimized over time.
The installation process of the first row of timber is shown in the video below.
Various methods of laying the first crown of timber on the base have their supporters and opponents. There is no clear opinion on this issue.
Advice
Most experts recommend that the first row be secured because of the possibility of foundation movement. The rigid mount will take over the movements. Only under heavy loads can the harness move, tearing out the anchor.
Reliable fastening will give stability to the constructed structure.
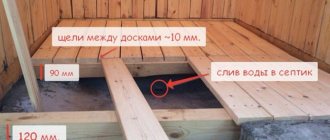
The technology for installing the bottom row of a timber house requires a certain sequence of work. Firstly, antiseptic-impregnated slats 10-15mm thick are laid on the foundation on top of the waterproofing layer in increments of 25-30cm. The gap is subsequently filled with polyurethane foam. Next, the first crown of the timber house is mounted on them.
The first row of timber should be laid taking into account the correct design of the corners. One side must be strictly perpendicular to the other, with the exception of projects involving a complex house shape in plan. After installing the lower crown on the foundation, the correspondence of the dimensions of the diagonals between opposite corners is also checked. If the structure is rectangular, then both lengths should match.
Fastening timber to a strip or slab foundation
High-quality installation of wooden beams to the tiled base of the building is impossible without a number of works. At the initial stage, you should install a wooden element with special holes in the grillage. Installation occurs using locknuts that are screwed onto the anchors. This design is used during the construction of buildings from various types of timber.
After pouring the foundation of the building, anchor bolts should be installed in the still uncured concrete. The bases of fasteners can be conical or curved. Bolts must be installed every 50 centimeters, so about three fasteners should be mounted on one beam.
Now you need to wait for the base of the house under construction to dry and start preparing the timber to be installed. These works at this stage include exclusively drilling holes for anchor studs, which are located on already installed bolts.
After these steps, you need to arm yourself with a building level and check the horizontalness of the structure. All detected defects must be eliminated immediately, for example, if you find a hill, you should cut it off with a knife, if a depression has formed, then it must be filled with solution.
After arranging the most even base, it is necessary to lay roofing felt sheets on it, which perform waterproofing functions.
As mentioned above, the layer of roofing felt cannot be left open for a long time, therefore, immediately after its installation, it is necessary to install beams that were cut into fragments of the required size in advance.
The corner joints of the beams are connected to the outlets, but you can do without them. To achieve the most durable connection, you must use corners made of metal. These metal products should be installed on self-tapping screws.
After this, a wide washer should be installed on each anchor stud on the bolts installed at the base of the building, and then the contact should be secured with locknuts. To prevent the occurrence of unevenness, the nuts must be tightened not one by one, but in parallel, and each time make two or three turns.
Now you know not only how to lay the first crown of timber on the foundation, but also how to create the rest of the supporting structure. This method is quite simple and if you have the necessary tools and some experience in construction work, you can do it yourself. As a result, you will receive a strong and durable building foundation, which is the key to a successfully built house.
Waterproofing device
At the junction of the foundation and the walls, a waterproofing layer must be laid. First, level the upper horizon of the plinth or grillage. Most often, a concrete solution is used for this, which allows you to qualitatively smooth the surface. In the case of metal pile piping, the heads are set according to the level, on which the profile element is laid.
We suggest you familiarize yourself with How to lay a foundation and walls yourself using bricks
Next, waterproofing of 2-3 layers of roofing material is carefully laid. After laying, the canvases should protrude beyond the outer edges of the sides by about a quarter of a meter.
It should be understood that the lower crown takes on not only the most significant loads from the ground part of the structure, but also comes into contact with the foundation. In the absence of waterproofing, capillary moisture will begin to rise, causing the wood to become wet. This will lead to swelling of the timber, the appearance of mold and the gradual destruction of the wood structure as a result of the activity of the fungus. In this case, even the best antiseptic impregnation will sooner or later be powerless.
How smooth the future structure will be depends on many factors. What is important is the clarity of the initial marking of the axes, the correctness of the foundation, ensuring the horizontal level of the upper cut of the plinth or grillage, as well as other, no less significant aspects of the construction process.
The list depends on the design features of the object, which, in turn, determine what exactly you should pay attention to. For example, for a log house, the decisive stage of work is the careful laying of the first crown on the foundation.
It requires a careful and deliberate approach, compliance with technology and regulatory requirements.
Quality materials to get the job done
To lay the timber you will need:
- bars;
- roofing felt;
- stekloizol;
- metal dowels;
- nails;
- staples;
- rule;
- bitumen mastic;
- hydraulic level;
- antiseptic;
- polyurethane foam.
Before laying the timber, be sure to lay 2-3 layers of waterproofing, then a lining. After this, you will need to lay 1 more layer of waterproofing.
First you must waterproof the base.
To do this, you will need to lay roofing material 2 times and glass insulation 1 time. Just keep in mind that the width of the laid layers should be 20 cm greater than the width of the foundation.
To waterproof the base of the log house, use glass insulation.
When you lay the beams, make sure that they touch tightly. Also, don't leave any voids in the walls. As a rule, the bars are fastened together with metal dowels. And with the help of a mallet they are finished off. If the bend on the block is very small, then it must be laid down with an even part.
Please note that sometimes additional staples or nails are required to connect the bottom beams. Place them every two items.
Before installing waterproofing on a roofing felt base, check that its upper plane is horizontal. To properly check levelness, you will need a hydraulic level. The differences should not be more than 1 cm throughout the entire base. If the differences are large, then you will need to level the plane using a solution.
How to properly lay a log frame on a foundation
The condition of a wooden house is assessed by the three lower crowns of the frame: if the wood is different in color, we can say with confidence that the house was not built correctly.
Upon closer examination, a black mold coating will be found on the surface of the timber. The cause of these problems must be sought in the mistakes made during the construction of a wooden house.
Among the troubles that can arise as a result of improper laying of a log frame on a foundation are the following:
- The lower corners of the log house freeze, the floors in the house are cold in winter;
- There is high humidity in the underground space, condensation forms;
- Wetting of the lower crowns of the log house, the appearance of fungus and mold;
- Skewed structure.
All these troubles can be avoided or minimized by following the rules for laying the casing; this operation is called tying the foundation, and the casing is called strapping.
The frame is the load-bearing base for the walls of the building; logs for the floor and for internal partitions are cut into this structure.
For buildings erected on columnar or pile supports, the flashing crown can be used as a grillage. In this case, a double harness is needed.
A layer of roll waterproofing on a bitumen basis is applied to the basement - upper surface of the strip foundation. The material is laid in 2-3 layers and filled with bitumen mastic. A thermal insulation layer is laid on the hardened waterproofing.
Jute tape or construction felt is used as a heat insulator. It is best to place the waterproofing material on a dry base and carry out the work in dry weather.
Before installation, it is recommended to dry the surface of the plinth with a gas burner.
When installing a pile foundation, the places where the grillage is laid on the posts are subject to waterproofing.
The secrets and tricks of experienced craftsmen include the use of lining boards to minimize the consequences of seasonal movements of the structure.
A hardwood board 40-50 mm thick is laid on the waterproofing layer. The bottom and side parts of the board are treated with bitumen mastic, and a heat-insulating lining is laid on top of the board.
Tools and materials used for applying waterproofing:
- Ruberoid or rolled bitumen-polymer membrane;
- Bitumen-latex mastics for hot and cold use with antiseptic and herbicide additives;
- Gas-burner;
- A brush with metal bristles, a corrugated metal spatula, a construction knife.
For strapping, it is best to use timber made from hardwood; the additional costs for purchasing it are minimal; such a batch will amount to less than 5% of the total volume of lumber. If this is not possible, lumber blanks without visible defects with a smooth surface are selected from the entire batch; if necessary, the lower and upper sides are additionally planed.
When building a log house from corrugated timber, the casing crown is made from solid timber. The lower part of the first timber laid on the flashing is planed before the profile is removed.
The strapping is cut using the half-tree method, the connection in the corners is made “in the paw”. This method of laying corner joints is the most reliable and can withstand multidirectional loads. The laying of corners and the connection of beams in subsequent crowns can be done in any way.
When laying the tying crown on a strip foundation, you may encounter unevenness on the base, reaching 10-15 mm. Such irregularities are eliminated by increasing the thickness of the mastic layer of waterproofing. The best solution for laying the first crown of timber on the foundation is an even and horizontal grillage.
Attaching a crown made of timber to a plinth is done in various ways:
- In strip foundations and concrete grillages, anchors with a diameter of 12-16 mm are poured every 1.5-2.0 m; the crown is attached to the strip base with an anchor bolt with a nut;
- Square plates are welded onto metal piles, the grillage and frame row of timber are fastened to the plate with a through bolted connection, the nut is located in the lower part of the fastening.
Holes are drilled for the fasteners with a margin of 3-4 mm, and flax tow is stuffed into the gap.
The next crowns of the log house are attached to dowels, the dowels are installed vertically with tension in specially drilled holes, the edges of the dowels are recessed and do not protrude above the surface.
Professionals recommend paying attention to the leveling of the casing; when setting the horizon, the height is adjusted with wooden wedges between the plinth and the first beam, and the resulting voids are sealed. The operation is performed using a building level. After leveling is completed, the nuts on the anchor fastening are tightened and fixed.
The gap formed at the place where the casing is laid on the waterproofing layer poses a serious danger to the entire structure; atmospheric moisture stagnates in this part.
This drawback is eliminated by installing metal ebbs around the perimeter of the log house. On a strip of iron 20-25 mm wide, a bend is made at an angle of 120 degrees, the structure is fastened with self-tapping screws, and the area adjacent to the beam is treated with sealant.
For the manufacture and installation of the drip sill, all the tools are available in the household.
The laying of the very first crown of a house made of timber must be done very thoroughly and with a mathematical approach so that the walls of the house stand exactly at 90 degrees.
Correctly laying the first crown of timber on the foundation is not such a difficult task if you do everything thoroughly and prepare well for this event.
And if you want to build a house from timber that will serve you for many years, take this stage of construction very seriously.
Even before laying the first crown, we lay two layers of waterproofing, a backing board, and then an additional layer of waterproofing.
But before you begin installing waterproofing on the foundation, you need to check that it is horizontal.
A simple level can give a large error and for this it is better to use its hydraulic version, which you can buy or use a transparent hose for this.
Advice
The difference in level should not exceed 1 cm throughout the entire foundation. The plane can be leveled with a solution, using a backing board of different thicknesses or a different number of layers of waterproofing.
If the difference in level is significant and there is no time for leveling with a solution, you can use bars of different thicknesses under the backing board or adjust the thickness of the backing board with an electric plane.
The next stage in the process of laying the first crown of timber is the selection and processing of the correct material. Under no circumstances should you just take the first timber you come across and start installing it.
Indeed, in the future, your choice will determine the time it takes to replace the lower crown.
A poorly processed beam, or a beam mounted without taking into account the selection requirements, will lead to an earlier start to work on replacing the lower crown.
We invite you to familiarize yourself with the Warm corner of a timber house made using tenon and groove methods
Choosing the best timber for the first crown is the key to a long “life” of the house
We begin to prepare the timber for the first crown in advance.
As soon as you deliver the lumber to the site, you need to choose the best beams, without a large number of knots, without blueness, straight without flaws.
Based on the cut of the annual rings, you need to choose a beam whose density of rings is as high as possible, and the beam itself is the middle part of the tree. At the end you should see circles diverging from the center.
The wood must be completely coated several times with liquid bitumen mastic, mixed with used machine oil, so that this composition penetrates deeply into the structure of the wood. You can also use special impregnating agents for deep wood processing.
The ends do not require processing; they should remain clean. Excess moisture will be removed through the ends.
Therefore, take your time and thoroughly prepare all the material for the lower crown. And although the installation of a ceiling in a wooden house made of timber is still quite far away, the first step has already been taken!
Fastening the lower crown at corner joints
The first crown does not need to be attached to the foundation. The fact is that a house made of timber is itself a heavy structure and will stand perfectly without fastening with anchors.
Corner joints are made without locks, joining the timber at the ends. This is done so that it is possible to replace any timber, without the need to disassemble in the corners.
The beams in the corners and at the junction of partitions are held together with metal fasteners: fastening perforated plates or brackets.
note
Before final fastening of the timber in the corners, you need to check the aspect ratio of the house and the correct, one might say “ideal” geometry of the house, so that the corners are exactly 90 degrees.
If the lengths of the opposite sides are equal to each other, and the diagonal distance of the house between the opposite corners coincides, we can conclude that the corners of the house are correct.
To check the corners, you can use a factory sheet of plywood or OSB if you attach it from the inside of the beam to the inner corner and align the beam along it.
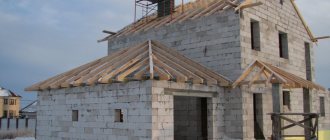
Construction of timber house walls
So, you have already built the foundation for your bathhouse, and you have chosen timber as the material for the walls.
An excellent option, quite durable, environmentally friendly and easy to use! If you are new to construction, then timber is the best choice. However, even such a simple and versatile material requires some knowledge and skills that are necessary when constructing walls. Especially for a structure such as a bathhouse, the arrangement of which requires certain additional steps.
Before you start building a bathhouse from a material such as timber, you should calculate the correct size of lumber for the walls, find out how to connect beams and splice them along their length, choose insulation for laying between the crowns and much more. Let's look at these questions one by one.
Building a bathhouse, especially its walls, can be quite expensive. The modern construction market offers a huge range of materials, both traditional and modern, which are widely used in the construction of buildings for specific purposes. But wood for a bathhouse is the most popular product for many reasons. These include long-standing traditions in construction, wide distribution, relatively low price, environmental friendliness and ease of use.
In this case, timber is a much simpler material to work with, and also does not require additional processing if you buy it and do not make it yourself.
In order not to incur additional costs for wall insulation, it is worth taking timber with a cross-section of 150 x 150 mm. This thickness of wood walls is optimal and will allow you to use the bathhouse throughout the year. To make the connection between the beams more dense, and the appearance of the finished wall to be aesthetic and pleasant, each beam must be properly planed.
One of the main positive qualities of timber is that walls made of this material do not require additional external finishing; they look self-sufficient, you just need to carefully process the beams. If you plan to decorate the external sides of the walls, then it will be enough to plan the material only from the side oriented towards the interior space of the bathhouse.
The first step in building a bathhouse from timber is installing a strapping crown on the prepared foundation. The best option for choosing timber timber for the strapping crown is hardwood ash, oak and larch. Be sure to treat the building material with antiseptic substances.
The quality and stability of the entire log bathhouse depends on how well you install the first crown. And you should prepare for this work thoroughly, calculating each step in advance.
Before laying the first, initial piping crown, a layer of waterproofing should be laid on top of the bathhouse foundation. Before doing this, check the surface of the foundation using a level: it must be exactly horizontal. If there is a difference of more than 1 centimeter, level it using concrete mortar.
After this, place the roofing material evenly in several layers coated with each other with mastic. Experts call the following installation technology optimal: 2 layers of roofing felt, laying board, another layer of roofing felt. Connect the beams of the first crown together into half a tree, and in order to prevent possible subsequent shifts of the beams, arrange a hidden tenon.
Next, use steel staples to fasten the casing crown. The staples are driven in from the outside of the beam, and after the construction of the bathhouse frame is completed, they can be removed.
The next step is insulating the trim crown. For this, a layer of flax-jute fiber laid on top of the timber is optimal. The next crown is laid on the insulation layer, and so on, alternating timber and thermal insulation. This will help avoid airflow in possible cracks, and will also play an important role in the subsequent hydro- and vapor barrier of the bathhouse from the inside.
The timber must be selected and prepared in advance so as not to be distracted by small details and shortcomings during the construction process. To install the first crown, you should choose high-quality material, since the integrity of the structure during operation depends on it:
- the timber must be perfectly flat;
- there should be no knots or chips on the surface;
- the main condition is the maximum density of the timber rings; to make such material, the middle part of the tree is taken;
- timber with traces of blue on the surface of the wood is categorically unacceptable not only for the first crown, but also for the entire log house.
The finished timber produced at the factory is usually already processed and completely ready for use, but additional processing will not hurt, especially for the construction of a bathhouse. Thoroughly coat the timber with mastic, which is pre-mixed with the waste. Impregnation based on this composition is perfectly absorbed into wood. The ends of the timber do not need to be processed; they should remain bare and release moisture during drying and shrinkage of the structure.
It is how carefully you process the timber that determines how long the lower crown, and therefore all the walls of your bathhouse, will serve faithfully.
There are several ways to connect timber in the walls of a bathhouse, which will avoid the influence of wind and cold temperature on the room from the outside. Let's look at each of them in more detail.
Method one: butt connection. With it, the beams are connected at their ends to each other, and each connecting seam is overlapped from above by the next one. To ensure that the butt connection is reliable and does not lose its qualities over time, pay attention to the ends of the beams: they must be absolutely even. The cut makes an angle of 90 degrees.
For such a connection, a special groove is made in the end part of one of the beams, and a vertical tenon is made in the other beam, at the end. In some cases, knitting is done according to the principle of a double or triple slotted tenon, that is, several vertical tenons are made on the beam, respectively.
Whatever type of beam connection you choose for the walls of your bathhouse, the most important thing is to remember to lay inter-crown insulation between the beams. This will simultaneously increase the density of the joints of building materials and serve as excellent thermal insulation for the entire log house.
Sometimes during construction it may be necessary to splice beams along their length. In this case, the “butt” method for splicing is not recommended for use. For such work, there are different types of splicing that have been used for a long time:
- inclined cut at the ends, or oblique butt;
- an end butt with a ridge that prevents the formation of cracks;
- direct laying method, in which the cutting length is twice the thickness of the timber;
- a relatively new and more practical method of slashing and slashing, providing resistance to lateral loads.
As mentioned above, flax-jute fabric is the most optimal material for providing insulation between the crowns. Now you can buy it at any construction supermarket. This insulation is available in rolls of different widths, depending on the size of the selected log or beam, which greatly simplifies the choice, and it is also very easy to cut into strips according to the selected length. This material is made from natural fibers of jute and flax, the composition is maintained in strict proportions.
We invite you to familiarize yourself with Materials for finishing the steam room of a bath
During the production process, a fabric of high density and uniform thickness is obtained, in which the fibers are fastened together using special barbed needles.
By laying flax-jute fabric between the beams as insulation during the construction of walls, you will save yourself from the need for additional caulking, and after the shrinkage of the timber is completed, the walls will take the form of a solid monolith. Such a fabric will not unravel due to the loads imparted by the crowns, will provide uniform insulation along the length of the seam, and is resistant to moisture, wind and dust, temperature changes and other climatic disturbances.
Dowel for timber
The crowns of the log house should be connected to each other along the entire perimeter, as well as in the corners at the locking joints using dowels or wooden round dowels. Such dowels should be made from hardwood, that is, larch, oak or ash. The process of making a dowel is as follows: take an inch board, cut it into square slats. Then cut them to the required length. Give the slats a rounded shape by trimming and chipping the sides.
There is a much simpler and less expensive, “lazy” way to make dowels. Buy ready-made shovel and rake handles at the store and cut them to the desired size. This can save a lot of money and especially time.
The installation of dowels in the timber is done at a distance of a meter and a half from each other, and without fail on each side of the log house in the corners. It is necessary to fasten the timber in those sections of the wall where windows and doors will be located, and the fastening should be done 15-20 centimeters before the cutout for the box. This will prevent the timber from subsequently being twisted out of the masonry mass during the drying of the wood and during the shrinkage of the sauna log house.
In order to install the dowel, holes are drilled in the top of the beam in such a way that the two upper beams are stitched through, and in the third there is a groove with a depth of 5 to 7 cm, no more.
Strictly maintain the diameter of the dowel: it should be approximately 2 mm smaller than the diameter of the hole. If you do not follow this rule, then during the shrinkage of the frame the walls may “go wild”, which will lead to their significant distortion and affect the frames for windows and doors.
The dowel should easily fit into the hole when driving and be recessed into the top beam by 5 centimeters.
This method of installing dowels is one of the most common, but far from the only one. Many masters have found their own method, which has become familiar. After all, the most important function of the dowel is to prevent the timber from moving inside the masonry and to ensure that the log house shrinks correctly during drying, during which the wood will move freely along the surface of the dowel.
Timber quality
Lumber for the first crown must be selected taking into account certain requirements. It should not have knots or blue spots, and all four surfaces should be smooth, without nicks, depressions or sharp bends. The timber must be pre-treated with an antiseptic and fire retardant. Even if the seller assures that the material was impregnated under production conditions, he will not be able to provide truthful information about the thoroughness of processing, the circumstances and shelf life of the timber. So it's better to play it safe.
When buying solid wood timber, you need to pay attention to its cross-section. High-quality material has an average core location and annual rings evenly moving away from the center. When drying lumber with a different “pattern”, problems may arise associated with various deformations of the wood - bending, twisting, severe cracking, etc.
You can hear different opinions about applying a film-forming composition to the ends of solid timber. Some opponents argue that cross-sections need to be “sealed” immediately so that moisture does not leave the wood too quickly. Others give arguments about the inadmissibility of such actions, although they agree that the ends need to be covered.
Checking the design for durability
Scheme of options for laying a log house.
Before installing the log house, check whether the structure is durable. Next, lay out the material, the thickness of which is 12-14 cm. Just apply an antiseptic to them in advance. After this, place the beams on the exposed slats. Thanks to the slats, the base will not come into contact with the crown. This is how you can increase the lifespan of wood. And the gap between the timber and the base will need to be filled with polyurethane foam.
After this, you can check the evenness of the surfaces. You need to understand that if the first crown is uneven, the walls will turn out crooked. Once you have eliminated all the unevenness, proceed to the next step - fill the gap with foam.
When you take the tools to the site, prepare the bars. It is worth buying high-quality products, without darkening and with a minimum number of knots. When choosing timber, pay attention to the cut of annual rings: purchase products that have a high density of rings. Using this method, laying the timber will be of better quality.
Be sure to apply bitumen mastic and treatment to the purchased tree. This is how the mixture is well absorbed into the bars. This needs to be done a couple of times. The ends do not need to be processed; with their help, moisture will be removed from the wood. If you treat the log house with high quality, it will last as long as possible.
In addition, in certain situations the first crown is not attached to the base - the building will turn out to be very heavy and will stand well on the base without anchors.
Waterproofing device
At the very beginning of building a house made of timber, a rather difficult task arises: how to lay the timber on the foundation? After all, without a foundation, not a single wooden house will stand for long: despite all efforts to preserve the lower crowns, they will very quickly rot from moisture constantly coming from the ground. And in order to successfully fix the first crowns on a concrete or brick foundation, you need good theoretical preparation and at least minimal practical skills.
Scheme of fastening the lower trim and waterproofing under the first crown.
To build a house from timber, shallow strip or pile types of foundations are most often used. It is possible to build such a house on a monolithic foundation, but this is only justified if the construction is carried out on moving soil. In other cases, the cost of constructing a monolithic foundation is not justified purely economically.
Scheme of laying timber on the foundation.
Monolithic and strip foundations serve as a grillage for the log house. When using a pile foundation, the grillage is formed from the first laid crowns. Attaching the beam to a monolithic or strip foundation can be done in two ways:
- rigid fixation;
- overhead installation.
The first option is much superior to the second both in reliability and complexity of implementation. Therefore, in practice, the second option is often used as it is easier to implement. But, regardless of the chosen method, the following tools will be needed to carry out fastening work:
- hydraulic level;
- plane (it is preferable to use an electric one);
- hand saw;
- large wooden mallet;
- a set of wrenches (for a rigid mounting option).
Scheme of fastening the beams to each other.
After the foundation has hardened, but before laying begins, you need to check it horizontally using a hydraulic level.
Such a horizontal plane of the foundation must be absolutely flat, since the quality and reliability of the future log house directly depends on this. The difference on the tape of one wall should not be more than 1 cm.
If bulges are found, they should be cut off with a grinding machine, and the depressions should be filled with cement solution and given time to set securely.
note
Immediately before laying the crowns, you need to waterproof the foundation. It is performed in at least two layers, with a lining board laid between them. The backing board, and accordingly the second and subsequent layers of waterproofing, should be approximately 25 cm wider than the foundation strip along its entire perimeter.
Two layers of roofing material are most often used as an insulating material, and recently, for greater reliability, it has been customary to add a layer of glass insulation on top. When performing waterproofing work, it is necessary to take into account that in the corners of the foundation the layers of roofing material must be overlapped.
Formwork diagram for the foundation.
Rigid fixation is performed using foundation bolts or clamps. If, when pouring the foundation, a scheme was provided for attaching the bottom row of timber to the foundation, then this is the best and easiest way.
Such a system is formed from foundation bolts embedded in the top layer of the foundation during the pouring process. To do this, immediately after completion of pouring, foundation bolts with conical ends are immersed into the upper layer of the foundation for at least a third of their length in increments of 0.5 m. In this case, it should be possible to fix each laid crown with at least two bolts.
The crowns are secured to the foundation with locknuts; wide washers are first placed under them for better fixation. Moreover, in order to avoid distortions, the nuts must be tightened sequentially along the entire perimeter of the foundation, turning each no more than 2-3 turns.
Types of foundation.
The scheme for fastening the crowns on a pile or pile-screw foundation looks a little different. To attach the first crowns to such a foundation, special caps resembling the letter “P” in appearance are mounted on piles sunk into the ground. Their side plates are pre-provided with holes for fastening.
Important
In the heads mounted on piles, a sheet of roofing material is laid in 2-3 layers and only then - the crowns. The timber is placed in the grooves of the heads, connecting it at the corners into a “claw” or into a “bowl”, and fixed with screws or studs and locknuts. In the latter case, it is necessary to additionally drill through the entire crown, and the pitch of the holes in the crown must exactly coincide with the pitch of the holes in the head.
Overhead installation for forcing log houses is used much more often, since when it is performed, there is no rigid fixation of the log house to the foundation, and the immobility of the lower rims is ensured by the very weight of the log house. With this method, laying the first crown on the foundation is carried out according to the same scheme as with rigid fixation, with the exception of the use of foundation bolts and nuts.
We invite you to find out which foundation is better for a house made of expanded clay blocks
Having completed the processes of waterproofing and preparing the lower crowns, you can proceed directly to the installation of the lower trim. It is very important for her to choose the highest quality timber.
To do this, you need to sort it out in advance. Material that looks blue, is deformed, or has a lot of knots is best left for the top of the log house.
The lower crowns must be treated with antiseptics and fire retardants before installation.
The main task of the lower trim is to ensure the connection of the timber at the corners strictly at 90º.
The design of the nodes of the first crown of a house made of timber.
It is this requirement that makes the tying process very slow, since upon completion it is necessary to check the angles using the intersecting diagonal method (measure with a cord or thick fishing line the distance between 1 and 3 corners, and then between 2 and 4). If there are the smallest discrepancies in measurements, the harness must be redone until the measured diagonals show exactly the same result.
They begin laying the crowns from the corners, where they are joined together according to the chosen pattern: in a “bowl” or in a “paw”. For the first row you need to choose the most even beams. First, wooden slats with a width of at least 15 mm are laid on the waterproofing layer in increments of no more than 30 cm. This will eliminate direct contact of the timber with the foundation, greatly extending the life of the frame being built.
The first row of beams is mounted on top of the laid slats. They need to be laid so that there are no gaps between them. For the crowns laid below, this is very important, since in the future they will constantly experience the pressure of the entire wall. Even small cavities left between them can play a very cruel joke, as a result of which you will have to go through the entire log house.
Advice
The beams laid in the bottom row must be fastened together at the corner joints with construction staples or nails, additionally ensuring the strength of their adhesion.
Having connected all the crowns of the lower row together and made sure that all corner joints are equal to 90º, it is imperative to measure the horizontal position of the laid crowns using a hydraulic level. And only after the flat horizontal plane of the bottom row has been achieved, you can begin further installation of the walls.
The gap remaining between the first crown and the foundation due to the placed slats must be eliminated.
Usually it is sealed with polyurethane foam, which firmly connects the foundation and the timber, protecting the latter from subsidence and providing the entire structure with additional support.
The quality and durability of the entire log house largely depends on the quality of laying the lower crowns. Therefore, it must be done very carefully, following the saying “measure seven times, cut once.” And then the built house will delight you with its warmth and unique charm of a wooden house for many years.
Are you interested in how to lay profiled timber when building a house? You will learn about this from this article.
The timber used in construction is a material with many advantages. For example, a house made from it is built an order of magnitude faster than a similar structure made from rounded logs. It is also initially aesthetically more attractive, and therefore a house built from such material practically does not need additional finishing.
Section of timber
150x150 mm. 180x180 mm. 200x200 mm.
Beam length
5 m. 6 m. 7 m. 8 m. 9 m. 10 m. 11 m. 12 m.
How to lay timber
Installation of timber
An important point before the construction of a log house is the calculation of the amount of building material that may be required during the construction of the house. When calculating the amount of timber, it should be understood that it is practically not deformed. Therefore, as much as you calculate, so much material will go away, and you won’t have to buy more due to shrinkage of the walls.
So, how to lay timber when building a house?
Construction using timber is a multi-stage process, first of which the main building material is prepared. Wood with many knots and blue staining, as in the photo below, is not recommended for laying in the lower rows.
Therefore, at the beginning of construction, you should use the best material available. Before laying, we carefully select the timber based on its external characteristics and treat it with an antiseptic and anti-feather compounds. (cm.
Read more in the article Treatment of timber against rotting is the key to long-term operation of the building)
Do-it-yourself timber house walls
Further construction of timber walls consists of the following stages.
Grooves are made in the bars of the external walls for all laid beams of the basement floor.
Grooves are made on the bars of the internal wall(s) to secure the opposite end of the basement floor beam. The depth of each groove is 8 cm, the width is 2 times the thickness of the floor beam. In addition, you need to take into account that simultaneously with the beams, metal plates with a thickness of 2-3 mm will be inserted into the grooves.
The beams of the 3rd row are laid on top of the installed beams. Mark the places where they mate with each other, as well as with the floor beams. The bars of the 3rd row are fastened together.
The partition bars are cut into place. To make the partition, use a beam equal to the distance between the outer and inner walls plus 8 cm (for ridges 4 cm long).
To ensure a tighter fit in height, tow is laid between the beams. Its fibers should be located across the beam, and also hang down on both sides by 3 cm.
They continue to work on laying the beams of the 3rd row, then fasten the beams in height. First, holes are drilled in the beams, which should be located one below the other.
Holes must be made both in the corners of the future house and along the entire length of the wall beams. Each beam of the 2nd row is drilled through, and the beams of the 1st and 3rd rows are drilled halfway through. When drilling, you must ensure that the drill is positioned strictly vertically. As a result, the holes in the beams laid one under the other should coincide.
The grooves in the beams of the external walls are made by first marking them. The wood is selected at the outer edge of the beam to a depth of 8 cm, at the inner edge - to a depth of 3 cm. First, an electric saw is used in the work, and then a hacksaw and a chisel.
When assembling the walls of a house from timber, wooden pins with a diameter of 3 cm are used to connect the drilled beams to each other. Their length should be 3 cm less than the total length of the holes in the beams, laid one under the other. One dowel connects 3 rows of beams. The beams of the next three rows are laid and fastened together in the same way. When laying the 4th row of beams, it is necessary to provide doorways. It is necessary that their width is equal to the width of the door frame plus 2 cm.
The pins are installed in a checkerboard pattern. During work, the grooves located around the perimeter of the window and door blocks are caulked.
From time to time, use a level to check the horizontal position of the beams, and use a plumb line to check the verticality. Work continues on laying beams.
Window frames are fixed into the walls. The ends of the partition beams, including the beams on which the frame rests, must have ridges, and grooves along the outer contour of the window or door frame.
We suggest you familiarize yourself with Installing a pipe into a bathhouse through the roof: passage through the roof for a chimney
The walls of a house made of timber are an opportunity to quickly and inexpensively build your own home. Without exception, all types of timber allow for any finishing work both outside and inside the building. We invite you to find out about the required thickness of timber walls for different climatic conditions. The article also describes the installation technology and construction of a house with walls made of timber.
Cobblestone walls have a smooth surface. In addition, they are much easier to build than from solid logs, since there is no need to manually process the wood (remove bark and sand it). Many owners prefer to clad the house with siding, brick or other finishing material after construction is completed.
The thickness of the walls made of timber is selected depending on the temperature in winter: at -40 ° C it is better to use timber with a thickness of 18 × 18 cm, up to -30 ° C - 15 × 15 cm. The timber for internal walls has dimensions of 10 × 18 cm and 10 ×15 cm respectively.
The required shape and size of the beams can be given manually or purchased ready-made material at sawmills.
In the manual method, a tool for longitudinal sawing is used. The slab remaining after this procedure - the trimmed part, flat on one side and convex on the other - is used for attic floors or temporary floors.
The shape of the timber can be standard or profiled. The cost of the latter is slightly higher. Its main difference is the presence of a tongue and groove, which reduce the air flow of the house, increase heat-saving properties, and also connect the walls more firmly and reliably.
When laying profiled timber on the lower crown, a timber with a ridge is used, and in the next row - with a groove. The ridge can be in the form of a rectangular hump or a small step, which fits tightly into the grooves of the corresponding shape.
Cutting out profiled timber yourself is quite labor-intensive, and material consumption increases significantly. In addition, the shape of the timber does not fundamentally affect the construction of walls.
Constructing timber walls requires experience and practical skills. Walls made of beams are installed in two ways - “in the area” (with the remainder) and “in the paw” (without the remainder). Moreover, unlike log walls, they have flat horizontal seams. A heat-insulating material (tow or felt) must be laid between the beams, rolling it along the entire length of the beam. In this case, thick felt is laid in one layer, thin felt in two layers. This is how timber walls are installed.
Thermal insulation material between the beams in the photo.
Rain and snow falling on the insulating material can cause the wood to rot. To avoid this, arrange a drain for water by removing a 30 mm wide chamfer from the outside of the upper edge of each beam (a line is drawn on both sides of the edge at a distance of approximately 2 cm and the layer is carefully cut off).
There is a certain technology for a wall made of timber - when constructing walls, the beams are stacked on top of each other, like logs, in one row (crown): two beams on opposite sides, then two more on top on other opposite sides, the corners are connected. To give the walls strength, they use root tenons and dowels, which are vertically inserted into the beams at a certain interval, starting from the corners of the house.
To connect the corners into a bandage with a root tenon, a root tenon or a sinus is first cut out in each beam for a tighter connection. The tenon is made on the inside of the beam. To do this, a layer of material about 3/4 long is sawed off from the end. The remaining 1/4 of the protruding part will be the main tenon.
Greater strength in fastening the beams is provided by dowels - round wooden spikes, similar to nails, with a diameter of 30 mm. In the corners of the beams, holes are pre-drilled one below the other and then several rows are connected with one dowel. In addition, dowels are also placed along the length of the walls at a certain distance from each other (1-1.5 m).
When cutting half a tree on dowels, each beam at the joint must be cut in half: on one side from the bottom, on the other - from the top. Subsequently, these halves are docked with each other, forming a kind of castle. After laying several crowns, round wooden dowels with a diameter of 30 mm are inserted into the corners, which fasten two or more rows.
Methods for fastening beams at the corners in the photo.
An even tighter fit is provided by insert keys, which are placed in grooves of equal size cut into the beams.
When constructing a wooden house, sometimes both methods of cutting corners are used simultaneously: the first crown is laid in half a tree, and the subsequent ones are tied with a root tenon or using a dowel.
Both options involve the use of the “paw” method, that is, without residue. But if you make the ends of the beams longer and leave them outside the corners, you will get a cut “in the middle” (with a remainder). However, this method for constructing timber walls is used extremely rarely.
You can build walls from timber with your own hands, based on the instructions.
All photos from the article
How this was achieved, how to lay the material correctly, we will analyze in this material. Today we are laying 6x6m timber. These are the dimensions of a country house or cottage.
Photo of the timber construction process.
Fastening the timber
There are also disagreements among masters on this issue. The first are convinced that the erected log house with its mass is capable of reliably pressing the first crown to the foundation, therefore the stability of the house is ensured based on the laws of physics. By the way, replacing a loose beam, if necessary, will be much easier also because the corner joints here are connected not with locks, but with brackets or metal plates.
Representatives of another group of specialists have their own opinion. They prove the need for rigid fixation of the lower crown to the foundation using anchors. They claim that in this way it will be easier to maintain the correct geometry of the log house during its construction. In addition, for a house on stilts, attaching the timber to the underground part of the building will give greater stability.
Well, both methods have a right to exist. The main thing is that the work on laying the first beam on the foundation is carried out carefully, without undue haste. Then the house will last longer.
How to ensure rigid fixation?
Formwork diagram for the foundation.
Rigid fixation is performed using foundation bolts or clamps. If, when pouring the foundation, a scheme was provided for attaching the bottom row of timber to the foundation, then this is the best and easiest way.
Such a system is formed from foundation bolts embedded in the top layer of the foundation during the pouring process. To do this, immediately after completion of pouring, foundation bolts with conical ends are immersed into the upper layer of the foundation for at least a third of their length in increments of 0.5 m. In this case, it should be possible to fix each laid crown with at least two bolts.
Before installation, it is necessary to prepare the lower crowns by drilling holes in them. The pitch of the holes must coincide with the pitch of the bolts embedded in the foundation, so that their studs can fit into the holes directly during installation. The crowns are adjusted to the size of the foundation if the log house will be driven “into the paw”, or left with a reserve if it is planned to force the log house into the “bowl”.
The crowns are secured to the foundation with locknuts; wide washers are first placed under them for better fixation. Moreover, in order to avoid distortions, the nuts must be tightened sequentially along the entire perimeter of the foundation, turning each no more than 2-3 turns.
The scheme for fastening the crowns on a pile or pile-screw foundation looks a little different. To attach the first crowns to such a foundation, special caps resembling the letter “P” in appearance are mounted on piles sunk into the ground. Their side plates are pre-provided with holes for fastening.
In the heads mounted on piles, a sheet of roofing material is laid in 2-3 layers and only then - the crowns. The timber is placed in the grooves of the heads, connecting it at the corners into a “claw” or into a “bowl”, and fixed with screws or studs and locknuts. In the latter case, it is necessary to additionally drill through the entire crown, and the pitch of the holes in the crown must exactly coincide with the pitch of the holes in the head.
Overhead installation for forcing log houses is used much more often, since when it is performed, there is no rigid fixation of the log house to the foundation, and the immobility of the lower rims is ensured by the very weight of the log house. With this method, laying the first crown on the foundation is carried out according to the same scheme as with rigid fixation, with the exception of the use of foundation bolts and nuts.
Before installation, it is necessary to prepare the lower crowns by drilling holes in them. The pitch of the holes must coincide with the pitch of the bolts embedded in the foundation, so that their studs can fit into the holes directly during installation. The crowns are adjusted to the size of the foundation if the log house will be forced into a “paw”, or left with a reserve if it is planned to force the log house into a “bowl”.
Types of foundation.
The scheme for fastening the crowns on a pile or pile-screw foundation looks a little different. To attach the first crowns to such a foundation, special caps resembling the letter “P” in appearance are mounted on piles sunk into the ground. Their side plates are pre-provided with holes for fastening.
In the heads mounted on piles, a sheet of roofing material is laid in 2-3 layers and only then - the crowns. The timber is placed in the grooves of the heads, connecting it at the corners into a “claw” or into a “bowl”, and fixed with screws or studs and locknuts. In the latter case, it is necessary to additionally drill through the entire crown, and the pitch of the holes in the crown must exactly coincide with the pitch of the holes in the head.
The first crown of a house made of timber - how to properly lay and fasten it to the foundation video work
Building a good-quality house from timber is a difficult process, in which each operation must be carried out with special care and reason. Much attention should be paid to laying the first crown, because this is what will affect the quality of the entire structure. If you do this step correctly, the walls of the house will stand straight, forming angles of 90 degrees.
The first crown should be laid slowly, in accordance with all requirements and technical standards. In addition, you need to prepare for work no less carefully. Even before you start laying the crown of a house made of timber, you need to take care of waterproofing the foundation.
How to properly attach timber to the foundation?
Beam 150x150
We suggest you familiarize yourself with draining rainwater from the roof with your own hands - Sewerage
The best building material is considered to be timber with the fewest knots, without the slightest shade of blue and not touched by woodworms. Pay attention to the density of the annual rings; the smaller the distance between them, the higher the quality of the so-called “winter” wood.
There are several ways to lay the corners of a timber house:
- "in the paw";
- “into the bowl” (another name for “into the cloud”);
- “in the groove”;
- "into the key";
- "at the joint".
The first two methods of corner joints are more common, but also more labor-intensive to implement. Installation using these methods is best left to professional builders.
The methods of laying timber “in a groove” and “in a key” are simpler; even a novice builder can handle them.
This is what a correctly made connection of a beam into a paw looks like
How to lay a house made of timber with a “claw joint?” It’s very simple - using a template, identical notches are marked on all the beams.
It is necessary to start cutting a notch with a cross-section halfway through the thickness of the wood, and only then begin to cut out the longitudinal bevels.
The bars are connected into the bowl with locking grooves; they can be one-sided, two-sided or four-sided. This method is considered traditional - the edges of the timber extend beyond the end of the building, which gives the house a special flavor. But this significantly complicates the further cladding of the house (if it is planned, of course).
Bowl connection
To connect these methods, a groove is cut out at the end of one of them - a recess. The second beam is cut to the width and length of this groove. Fold the connection.
At the ends of both beams, notches of the same size are cut, taking into account that the sides of the beam should form a right angle. When the notches are aligned, a hole is created into which a wooden block is driven. The key must fit tightly into the groove, otherwise the connection will not be reliable. The joint and key joints are alternated in a checkerboard pattern.
Keyed connection
This type of installation of a house made of timber is considered the simplest method. The building materials are laid together and secured with staples, nails, or studded metal plates. However, despite the obvious advantage (speed of assembly), experienced builders do not recommend such a corner connection (except for the first crown) since there is a significant loss of heat.
Butt joint of timber
Now is the time to talk about how to lay crowns from timber for your home. We will analyze in detail how to correctly place the first and second crown.
It is very important to install the first crown of the house correctly and evenly; great attention must be paid to its installation.
The construction of buildings of any purpose from timber involves fastening the timber to the foundation. This procedure is complex and labor-intensive, and also requires the employee to have certain qualifications and experience.
The reliability and durability of the entire structure depends on how well the first crown was secured. That is why installing timber on the foundation is an extremely important stage in the construction of buildings.
In this article we will look at options for installing wooden beams on various types of bases.
The installation of timber should only begin when the foundation is equipped and has stood for more than a week. As already mentioned, installing timber on a foundation is a rather complicated process, and to facilitate it, the first row is used, which is called the bottom trim.
To increase the strength of the structure, the harness must be made of wide material.
Before starting all work, you should stock up in advance with all the necessary tools and consumables. Here is their list:
- antiseptic composition;
- building level;
- anchor bolts;
- cement composition;
- sand;
- roofing felt;
- anchor studs.
Return
The condition of a wooden house is assessed by the three lower crowns of the frame: if the wood is different in color, we can say with confidence that the house was not built correctly. Upon closer examination, a black mold coating will be found on the surface of the timber. The cause of these problems must be sought in the mistakes made during the construction of a wooden house.
Among the troubles that can arise as a result of improper laying of a log frame on a foundation are the following:
- The lower corners of the log house freeze, the floors in the house are cold in winter;
- There is high humidity in the underground space, condensation forms;
- Wetting of the lower crowns of the log house, the appearance of fungus and mold;
- Skewed structure.
All these troubles can be avoided or minimized by following the rules for laying the casing; this operation is called tying the foundation, and the casing is called strapping. The frame is the load-bearing base for the walls of the building; logs for the floor and for internal partitions are cut into this structure.
The construction of buildings of any purpose from timber involves fastening the timber to the foundation. This procedure is complex and labor-intensive, and also requires the employee to have certain qualifications and experience. The reliability and durability of the entire structure depends on how well the first crown was secured.
The first stage of this process is the arrangement of a really high-quality foundation for the construction of a building, on which it is necessary to apply two layers of roofing felt sheets, and fill the surface with a cement mixture. Only now should you begin installing wooden elements on the base of the building under construction.
The installation of timber should only begin when the foundation is equipped and has stood for more than a week. As already mentioned, installing timber on a foundation is a rather complicated process, and to facilitate it, the first row is used, which is called the bottom frame. To increase the strength of the structure, the harness must be made of wide material.