06.08.2019
Life often presents us with surprises, and they are not always pleasant. Sooner or later, each of us happens to encounter various everyday problems that we have to solve on our own.
It is unlikely that anyone will turn to specialists if a hole has formed on the surface of the wall. It doesn’t matter how it appeared, but it must be eliminated.
However, in reality there is nothing difficult about fixing a hole in the wall yourself.
How to repair holes in a brick or concrete wall
The extent of repair work to the surface of a brick or concrete wall will depend on the extent of the damage. If these are holes left when old nails, screws or dowels were removed, then it is enough to cover them with putty or a special repair mixture.
Let's take a step-by-step look at how this can be done:
- To do this, take a long nail or screwdriver and widen the hole. This must be done so that the putty penetrates as deeply as possible inside.
- Then use a dry brush or vacuum cleaner to remove any accumulated dust and crumbs.
- Now moisten the resulting hole with water. For this purpose, you can again use a brush or a spray bottle, or a piece of foam rubber. This should be done so that moisture from the repair mixture or putty does not quickly absorb into the wall.
- After a few minutes, putty the damaged area, carefully rubbing the mixture into the hole.
- Once completely dry, sand the surface with fine-grained sandpaper.
- Now the area can be painted over or wallpapered.
If the hole in the wall is large and deep enough, for example, it was left after replacing pipes or dismantling an electrical outlet, then putty alone will not be enough. You will need either cement, gypsum, or a ready-made concrete repair mixture, which can be purchased at a hardware store.
What to do in this case:
- Before you fix a hole in the wall, prepare the hole by clearing away any debris and moistening it with water.
- Then fill the void with pieces of stone or brick mixed with cement mortar. This will save putty and strengthen the area being restored. Cement mortar for this purpose is prepared from one part cement and three parts sand. In such a case, you can also use building gypsum or concrete repair mixture.
- When this cement (or plaster) “patch” has dried, putty it, carefully filling and leveling the remaining voids and cracks that have formed.
- The area treated in this way should dry well. This will take at least 12 hours.
- When everything is fairly dry, smooth the surface with fine-grit sandpaper. To prevent this place from showing off as an ugly bump, it should be leveled with the rest of the wall surface.
- The wall is leveled, and now it can be painted or wallpapered.
If, during the shrinkage of the building in the room, the interpanel seams have come apart or a deep crack has formed, then there is no need to rack your brains about how to repair such a hole in the wall. In this case, use polyurethane foam, which is sold in aerosol cans at any hardware store. It perfectly fills voids, easily penetrating even hard-to-reach places. In this article you can learn how to repair cracks of varying complexity.
Polyurethane foam adheres perfectly to various surfaces and quickly hardens in air. So you are guaranteed a good result in the process of eliminating deep cracks and holes.
- Before you start work, prepare the place - clean it of dirt, dust and other debris. Wet the wall surface.
- Before applying the foam, you need to shake the can well so that its contents turn into a homogeneous mass. This will take you at least a minute.
- During operation, hold the container upside down, since the gas contained in it, which displaces the polyurethane foam, is lighter than it.
- Vertical cracks should be filled from bottom to top.
- If the hole is too deep, apply the contents of the can in layers, applying a new layer after the previous one has dried.
- After filling the hole, do not touch the damp polyurethane foam with your hands, this can change the structure of the material and slow down the process of its hardening. Wait until it dries.
- Remove excess dried foam with a knife and putty the surface.
- When the putty is dry, smooth the area with fine-grit sandpaper.
Now you can see for yourself that it is simple and easy to repair any hole in a concrete or brick surface, no matter what size, without outside help.
The main thing is to correctly assess the scale of the repair work and carry it out in accordance with the rules for using the material that you will use when restoring your wall.
How long does a repaired hole last?
Regardless of the materials and methods of filling holes, the patch, as a rule, lasts a long time, along with the rest of the wall surface.
Important! If you do not disturb the patch, do not apply loads to it and comply with the operating conditions of the room, then you do not have to worry about the re-formation of the defect.
It is obvious that even the most serious damage can be repaired by the residents of the premises on their own without the involvement of professionals.
How to Fix Holes in Drywall
Nowadays, in many houses and apartments the walls are finished with plasterboard. By the way, you can use plasterboard to level the walls. It is worth noting that the material is quite fragile and can easily cause serious damage. As a result of an accidental impact, the plasterboard sheet may break. And how to repair a hole in the wall in this case? You certainly shouldn't prepare for major repairs.
In such a case, it is enough to put a simple patch on the canvas.
To do this, use a hacksaw to cut a rectangle around the damaged area. Make a patch from a new sheet of drywall using a cut piece of old sheet as a template. On the back side of the hole formed in the wall, use self-tapping screws to attach two wooden slats parallel to each other. Now insert the prepared patch there and secure it with screws. Caulk the edges. When the surface is dry, sand it with fine-grit sandpaper. That's all. Decorate this place and no one will know that there was once a hole here.
Nail or screw holes in drywall do not require patching. It's enough to simply putty them.
That's all the tricks for sealing holes in the wall. We hope that our advice will help you cope with this problem with dignity.
Useful materials
After work has been carried out on laying pipes or during the operation of the premises (for example, when installing a holiday tree, changing risers for hot and cold water supply, sewerage), holes and cracks form on the ceiling. This does not add aesthetics to the design or joy to the owners. How to fix a hole in the ceiling? The answer to this question depends on the type of ceiling and the quality of the hole itself.
Often, the technology for eliminating holes is not much different from sealing ordinary cracks. This applies mainly to minor damage. If the hole is huge, then more intensive methods of elimination are used.
Damage restoration methods
There are several ways to repair damage to a wall. The method and scale of repair depends entirely on the size of the defect. If holes remain after removing unnecessary nails or screws, then it will be enough to use putty or other cement-containing material.
For deep and large cracks, more serious measures are required. Such holes often occur after replacing heating systems or electrical wires and sockets. Typically, cement or repair plaster must be used to repair serious defects.
The specifics of the work on restoring concrete walls depend on the scale of the problem, but the set of tools you will need is almost the same for all cases. To clean surfaces, you need to stock up on a dry brush or a household vacuum cleaner. When filling cracks with polyurethane foam, it is necessary to prepare a knife to cut off excess material.
In order to fill a hole with putty or cement mortar, you will need narrow and wide spatulas. They are convenient for covering problem areas. In case of major damage, as well as to provide strength, reinforcing tape will be required. It is covered with a cement composition and becomes a full-fledged component of the wall, which will protect it from repeated destruction.
Don't forget about the final stage of wall restoration. To grout the surface, prepare fine-grained sandpaper.
Before starting work, you need to decide on the scale of the restoration and prepare the necessary tools. The concrete surface is restored using the following means:
- cement;
- sand;
- ready-made concrete solution;
- fragments of bricks, stones, rags;
- gypsum;
- primer;
- antifungal agents for walls;
- putty.
Sand and cement.
Necessary tools for repairing most defects:
- vacuum cleaner to remove dust;
- eye protection glasses;
- sandpaper for cleaning the surface;
- brushes of different diameters;
- narrow and wide spatula;
- dowels;
- knife, screwdriver.
Dependence of work quality on the type of ceilings
For each individual case there is a qualitatively different approach to partial repair. Select your type of ceiling, its material, coating and, based on these parameters, follow the instructions below. They are given for total damage, that is, when the hole is through.
Gypsum ceiling
If you have a pipe hidden under a suspended ceiling, the slabs of which are fixed separately from each other, then you are in luck. The algorithm in this case is as simple as anything ingenious. The hole is foamed and covered with a new sheet of drywall. The retail cost of such a sheet usually does not exceed 50 rubles. If it is not possible to find a sheet of a suitable color, then you can purchase sheets of a different color. These sheets, when replaced on the ceiling, will create a design that suits your taste. If you have this type of ceiling, then your case is the easiest.
Fixing a hole in the ceiling
From the general provisions on the repair of plasterboard surfaces, we can emphasize the sequence of operations necessary for partial repair of a plasterboard ceiling:
- Insulate the through hole with construction foam. To do this, insert the nose of the tool into the hole and press the trigger. Wait until completely hardened. After drying, remove the residue with a knife;
- Cut out a stencil from cardboard. It can be square, rectangular or triangular. The main thing is that it exceeds the size of the hole in area and can completely cover it without greatly increasing it;
- We apply the stencil to the area of the ceiling with the hole and trace it. We get an uneven hole, around which a regular geometric figure is described with a pencil;
- Using a hacksaw, saw or other suitable tool, we give the hole the correct shape. It's better to start from the middle and take out pieces one at a time. It is necessary to achieve full size matching. It is very important;
- We cut out a suitable strip from a piece of plywood. We take into account the radius of the pipe and cut a hole of the required size. We insert these auxiliary strips under the surface of the drywall and secure them with dowels from the outside. It is necessary to use two or three pieces of screws or dowels on each side. The caps should not rise above the surface, since there will be a layer of plaster above them, and then leveling them will have to be very long and tedious;
- The stencil is applied to the drywall, traced and a piece of the appropriate size is cut out. Insert it into the widened hole. If there is a pipe running through the middle, then a round hole of the appropriate diameter is cut out for it and inserted into a piece of drywall. You can go another way. Cut a line from the circle, under the pipe, to the perimeter of the figure and insert the pipe through it;
- Secure the patch with screws. It should perfectly coincide with the hole and be fixed on the lower plywood section;
- Applying putty. If there are minor gaps, you can use reinforcing tape. It is pressed in and covered with putty;
- The coating dries in about a day. If necessary, apply the second, third and fourth layers. If the putty layer exceeds 2 cm, then it is necessary to lay reinforcing tape to ensure that it stays on the surface.
Stretch ceiling
Cut in suspended ceiling
If there is a hole in the suspended ceiling, then you need to act immediately. After all, over time, the hole may increase. If it is not possible to eliminate the damage as soon as possible, then you can seal it with masking tape and gain confidence that the surface of the hole will not increase. Ideally, it is better to contact specialists. To those who installed suspended ceilings. At the very least, notify the company that you are unauthorizedly intruding into its area of competence.
Holes and cuts in suspended ceilings occur more often than in others due to their greater vulnerability. If you touch an ordinary ceiling with the end of a Christmas tree, nothing will happen to it. Whereas the suspended ceiling will react to this act of vandalism immediately. At a minimum, it will begin to sway menacingly, and at maximum, a nice or not so nice hole or a large hole will form in it.
The sequence of steps in this case is as follows:
- take the appropriate piece of canvas;
- covered with special super glue;
- the patch is easily pressed against the hole.
Some subtleties: don’t put too much pressure on the patch. Otherwise, the glue will leak out and the hole will be noticeable.
If the hole is located on the suspended ceiling very close to the edge (less than 15 cm), then you can make a cut along the closest edge, re-stretch the ceiling and insert it into the already fixed profile. If you are installing a pipe, this approach will not work. A suspended ceiling is a rather delicate thing, and by re-stretching it from a distance of more than 15 centimeters from the edge, you risk tearing the entire structure.
Small holes in suspended ceilings are simply mended with nylon thread and carefully painted over.
Ceiling covered with plaster
In this case, the question of how to seal the hole in the ceiling around the pipe will be the most pressing and requires scrupulous meticulousness.
Hole in the ceiling covered with plaster
First of all, you need to decide on the material. In the vast majority of cases, this material is repair plaster mortar. Sometimes wood glue is mixed with tooth powder and chalk and the hole is sealed with this solution. Residues are cleaned off with a sharp knife. Glue, chalk, cement and gypsum are also effective in mixtures. Its only drawback is that it must be diluted in small portions: the plaster hardens quickly. You need to be careful with cement mortar, as if applied incorrectly, the pipe may burst.
The repair algorithm is as follows:
- For better joining of materials, small notches are made around the hole with a hammer or chisel;
- Then the surface to be treated is coated with moisture-resistant impregnation;
- Dilute the cement-sand mixture according to the instructions. For strength, you can add a little PVA glue;
- Cover the hole with sand mixture. It is better to do this in several layers. Before applying the next one, be sure to wait for the previous one to dry. Then slightly moisten the dried surface, re-dilute the mixture and proceed to the next layer;
- After the last layer has dried, it is necessary to cover the surface with a primer and plaster. Plaster can be purchased not only in large bags, but also in small, pre-packaged ones.
Plasterboard ceiling
Fixing a hole in drywall
Around the hole, especially a large one, you need to lay pieces of profile or wooden beams. It must be secured from the outside, so the size of the bars may exceed the size of the hole. Having screwed the bars with self-tapping screws, you can cut out a piece of drywall and insert it into the hole.
After this, you need to carefully coat all joints with primer. To make it easier to cover with plaster, you can place a serpyanka under it.
A special case
A hole in rooms with high humidity may place special demands on itself. The fact is that a huge amount of condensate can accumulate in such vulnerable places. For this reason, once you encounter such a problem, it needs to be resolved as soon as possible. Otherwise, the hole can become home to mold, mice and other unpleasant companions of human habitation.
You can find very original solutions on the World Wide Web. For example, craftsmen screw plywood from the inside of a hole. Next, a rag is soaked in a gypsum solution and wrapped around the pipe. The plaster sets quickly. Then they are reinforced with wire or a special mesh. Next, the classic layers are primer and plaster. There is not much aesthetic value from this approach, but the assigned task - to close the gap - was completed one hundred percent.
How and with what to fill a hole in the wall
An example of filling a hole in the wall
Often during repairs it turns out that a hole has formed in the wall. In order for the finish to look beautiful, the damage must be repaired. The technology of restoration work differs depending on the size of the damage and the material from which the wall is built. Even a person without experience in construction work can properly repair a hole.
Why do holes form in walls?
When old wallpaper or other decorative covering is removed during renovation, they discover that holes have formed on the walls. Before answering the question: how to repair a hole in a wall, you need to understand what kind of holes there are and why they arise.
Small holes on the wall arise from dowels, nails, screws driven into them, or as a result of mechanical damage.
Holes from relocating sockets can detract from the appearance of the finish. How to repair a large hole in a concrete or brick wall will be described below.
Through holes occur in places where communications pass through mechanical stress, when deep cracks are not repaired for a long time.
Cracks form when the house shrinks and when the building is exposed to vibration loads.
Timely repairs extend the life of the building and ensure a beautiful appearance of the decorative finish.
Restoring surfaces with small holes
If there is a dowel left in the wall, you must first pull it out. To do this, screw a screw into the dowel, grab it with pliers and pull it out of the wall with loosening movements.
After this, the hole is cleared of dust, which will be an obstacle to the surface from adhering to the solution. Wet the hole with water. The following can be used as a mixture for sealing holes in walls:
- cement-sand mortar mixed in a ratio of 1:3;
- building gypsum;
- Ceresit tile adhesive.
The prepared solution should have a creamy consistency. If the hole is large, add small pebbles to the mixture.
Push the solution to the very base, compact it well with a thin stick or other object. After the surface has dried, it must be plastered, filling the remaining voids and cracks formed during drying.
When the surface is completely dry, grout with sandpaper.
The interpanel seams have come apart
This section provides information on how to repair a hole in a concrete wall if the seams have come apart.
If cracks have formed in the interpanel seams, they need to be repaired urgently. To close deep holes in the wall, use foam. It is sold in two types: professional for a construction gun and non-professional with a straw. If the house has a device for a foam bottle, it is better to purchase a professional type, since it has lower consumption and higher quality.
Step-by-step instructions on how to repair a hole in a concrete wall:
- Clean the surface from dust and debris. Cleaned from remnants of building materials.
- Polyurethane foam adheres better to a damp surface, so before applying it, the gap is generously moistened with a spray bottle.
- Shake the container well and fill the hole with foam. If the hole is very deep, the foam is applied in layers. Each subsequent one is applied after the previous one has dried.
- Within 1-2 days, the foam expands, filling the smallest microcracks on the wall. Until it dries completely, its integrity must not be disturbed.
- When the foam hardens, cut off its protruding parts with a knife.
- Level the surface with plaster or putty, then sand it with sandpaper.
When working with polyurethane foam, you need to be careful. The material adheres firmly to skin and clothing. Can be washed off the body with a solvent. If it gets on clothing, it will be damaged.
Crack repair
The surface of the crack is expanded with a grinder and its edges are leveled. For better adhesion to the material used for repair, apply two layers of primer. The next layer is applied after the previous one has dried.
How to fill a hole in the wall:
- Cement mortar with added lime. Most often, cracks form at the joints of bricks, at the junction of a concrete surface with a brick wall. In this case, construction mesh is used during repairs. The cavity is filled with solution, and a steel mesh is laid on it. After the first layer has dried, fill the remaining space with lime-cement mortar.
- A waterproof putty is prepared from a mixture of concrete and paint. Cement is poured into the paint and stirred constantly until a mixture of creamy consistency is obtained. Fill cracks with this composition.
- Wood glue is mixed with chalk powder until a creamy mass is obtained. Apply the composition to the cracked area. Protruding excess is immediately removed.
Crack in a concrete wall.
It is important to detect and repair a crack at an early stage. Otherwise it will gradually increase.
Restoring the integrity of the wall after moving sockets
When moving sockets, excess holes must be sealed with cement or gypsum mortar. When the hole is large, the question arises of how to seal the holes in the concrete walls so that the material does not crack.
The technology of restoration work depends on the depth of the hole. If it is more than 5 cm, you will need a stone or piece of foam of the appropriate size.
Step-by-step instructions on how to repair holes in a concrete wall:
- The cavity is cleaned of dust and debris. Moisten with water.
- Drive several self-tapping screws along the edges; they will hold the solution and filler.
- Fill the bottom of the hole with solution.
- Cover the inside with stone or foam.
- Fill the hole with cement or gypsum mortar. If cracks form after it dries, seal them again.
- Apply a thin layer of finishing putty to a dry surface.
- The putty hole is cleaned with fine-grained sandpaper.
Holes left after moving sockets.
Compliance with the work technology helps to obtain a flat surface. It is not recommended to blow out dust; it may get into your eyes; it is better to use a vacuum cleaner.
Through Hole Repair
Holes drilled through for installation of communications in a brick wall or panel are sealed using silicone sealant, polyurethane foam or cement-sand mortar.
How to fill a through hole with cement mortar:
- Clean off dust and wet the surface.
- Prepare cement mortar. Add small stones to it. If there are none, take a rag and dip it in the solution so that it is well soaked. Stuff the fabric into the hole. It is compacted well. It may take several cuts to fill the entire space. The fabric should not protrude outward.
- Cover the remaining space with concrete.
- After drying, complete leveling is performed with finishing putty.
Technology when using polyurethane foam:
- Remove dust using a vacuum cleaner. Spray the cavity with a spray bottle.
- Blow out the space with foam.
- After drying, cut off the protruding material with a knife.
- Perform final leveling using putty.
Fixing a through hole in the wall.
This method of restoring through holes is suitable for both dry and wet areas. Cement mortar can be used in the bathroom and kitchen; it is not afraid of exposure to high humidity.
Restoring a plasterboard wall
Drywall is one of the most used materials in construction. They quickly and easily level walls. The disadvantage of this material is its fragility.
As a result of careless actions when moving and rearranging furniture, the material may be damaged. If you do not calculate the load and hang a heavy massive shelf on a plaster wall, it can completely tear out a piece of material.
Stage of repair of plasterboard surface.
Technology for repairing holes in drywall:
- A rectangle under the ruler is drawn around the damaged area.
- Cut with a knife along the marked line.
- On the back side of the resulting hole, two wooden slats are attached parallel to each other, which will hold the patch.
- A rectangle is cut out of a piece of drywall of such a size that it fits tightly into the place of the cut out area.
- Insert the patch into place and secure it with self-tapping screws.
- First they putty the joints, and then the entire surface of the rectangle.
How to cover screw holes:
- Prepare a putty solution. It is sold dry and ready-made. If the amount of work is small, it is better to purchase a dry mixture. The finished putty dries quickly after opening the container.
- Fill the hole with solution.
- After drying, rub with fine sandpaper.
If there are holes from self-tapping screws on the plasterboard wall, you can simply fill them with putty.
You can see how to cover up a groove in one go in the video: During renovation work, it is often necessary to repair holes in the walls. This type of work does not require specific skills. Even a teenager can fix a hole in the wall. If the work is carried out in accordance with the technology, no one will even guess that there was a hole in this place recently.
moyastena.ru
Where do defects in concrete come from?
Before repairing a hole in a concrete wall, the master must understand the reasons for the appearance of such a defect. Otherwise, all the work done will have to be repeated again and again.
The most innocent possible reason is human intervention. Through channels are cut out in concrete walls to bring the pipeline from the air conditioner outside, blind recesses are drilled for fasteners for a bracket or sconce, and shafts are punched for supply and exhaust valves. Over time, the air conditioner, sconce or TV moves to another place, but the hole remains, along with the problem of how to repair the hole in the wall. But this problem can be solved simply - without any preliminary work.
The intervention of nature is a more complex case. Temperature deformations of the soil and building materials lead to the appearance of cracks, chips and other defects covering the structure from the foundation to the roof. In this case, before repairing the holes in the concrete wall, the owner of the building will have to strengthen the foundation using solutions recommended by the architect and designer. Well, after completing the work to eliminate defects in the integrity of the wall, you will have to restore the thermal insulation and waterproofing of the load-bearing structures.
A slightly less complicated case is destruction “from old age,” when part of a reinforced concrete slab begins to crumble, exposing the reinforcement skeleton. After discovering such a defect, it is enough to simply repair the wall and cover it with waterproofing.
Reasons for the formation of defects
Concrete walls, like other various surfaces, are subject to destruction.
The hole can form as a result of uneven shrinkage of buildings and structures. Often, uneven shrinkage is the cause of improper load on wall structures or as a result of mistakes made during the soil compaction process. Cracks can form due to exposure to climatic conditions, namely: sudden changes in temperature, high wind speeds or sunlight. The joints between the external and internal walls on staircase floors and high floors of the building are most at risk.
The walls are subject to the formation of defects as a result of the drying of the concrete solution over time. Reinforced concrete buildings have a risk of through holes. Deformations in concrete pavement may be the result of attaching cabinets, shelves, fixtures, or moving switches and electrical outlets.
Concrete, like other building materials, has a degree of wear and service life. The quality of a building material is determined by such parameters as the composition of the material, proportions of components, type of filler, vibration, weather conditions, etc. In addition to low-grade material, the formation of holes and openings in a concrete wall is caused by many factors:
- Uneven shrinkage of the structure and vibration. It occurs due to incorrect distribution of the load on the walls of the building or improper laying of the foundation. Subsequently, gaps and cracks form in the wall. When significant deformations of the structure occur, collapses of ceilings and walls occur, so first the root causes are eliminated - the supports and foundation are strengthened and issues with shrinkage and vibration load are resolved. Only after this work is done to seal the holes.
- Impact of natural conditions. Temperature changes, active solar radiation, and strong winds negatively affect the condition of concrete masonry. External seams, staircases and the upper floors of the building are primarily affected.
- Drying out of the concrete solution over time leads to the appearance of holes and cracks. Reinforced concrete structures are characterized by through cracks and gaps.
- Repair work. Moving sockets and switches, laying pipes, rearranging kitchen furniture, attaching cabinets, chandeliers, plumbing fixtures, and air conditioning leads to the formation of various kinds of holes in concrete structures.
Hole in a concrete wall.
In addition to holes and gaps, cracks, joint cracks and chips form in concrete walls. Repair work to eliminate cracks in joints is slightly different from filling holes:
- The gap is widened along the entire length by 1 cm with a grinder, the edges are aligned.
- The crack is cleaned with a sharp object to remove any remaining dirt and dust.
- For better adhesion, it is wetted twice with a primer mixture. The second layer is applied after the first has dried.
- The crack is sealed with a solution, and after hardening it is sanded using sandpaper.
If gaps occur at the point where the concrete meets the brick, a construction mesh is used. The crack cavity is filled with concrete mixture, and a steel mesh is placed on top. After drying, the remaining area is filled with cement mortar with the addition of lime.
In addition, waterproof mixtures of concrete and paint are used to fill cracks. Cement is poured into a container with paint and mixed until a thick mixture is formed.
Small cracks are lubricated with a mixture of wood glue and powdered chalk, brought to a creamy consistency. The resulting mass is applied to the cracked area, the excess is removed.
Small holes after laying cables and small-diameter pipes are covered with silicone, large cracks are foamed.
Plaster peelings and chips are cleaned, treated with special antifungal agents (if necessary), primed and plastered in several layers. Each layer is completely dry before applying the next one. This sequence of application will protect the surface from further cracking.
The time and method of eliminating defects in concrete structures are closely related to the size of the hole, opening or crack. Minor damage is covered with a ready-made putty mixture. Large holes require following step-by-step restoration instructions. All problem areas are pre-prepared, cleaned, plastered and then sanded.
If the technology and algorithm of actions for repairing the gap are followed, the solution reliably fixes the patch, keeping it from cracking and peeling. Guided by the restoration schemes for various types of damage, even an inexperienced person can easily repair a hole in concrete with his own hands.
Before repairing damage in concrete structures, it is necessary to find out what factor influenced the occurrence of damage. Land shrinkage is a common cause of cracks in walls; at the initial stage of construction, the future load on load-bearing surfaces was not calculated or soil compaction was not performed correctly. In this case, filling the holes begins only after solving the problem of soil mobility.
The impact of climatic factors has a negative impact on building elements. Daily temperature changes, solar radiation, and wind erosion destroy concrete every second; the joints between the internal and external structures of high-rise buildings, as well as the components of staircases, are especially vulnerable to such forces.
The holes are a consequence of pipes being laid into the room.
Damage occurs when the concrete solution dries out over time, and there is a risk of through holes appearing. Economic activity leads to destruction of the material - laying water pipes, sewer communications, heating plants, installing air conditioners, lamps, banal moving of a TV - and the hole remains in the wall (although this is not the worst case).
The walls are subject to the formation of defects as a result of the drying of the concrete solution over time. Reinforced concrete buildings have a risk of through holes. Deformations in concrete pavement may be the result of attaching cabinets, shelves, fixtures, or moving switches and electrical outlets.
How to repair a crack in a concrete wall
- cracks at the junction of the ceiling and wall;
- peeling of plaster on the ceiling;
- holes near the pipes.
We suggest you familiarize yourself with the minimum temperature tomato seedlings can withstand.
Sealing cracks and holes at the junction of the ceiling is done according to the standard scheme, but there is one significant difference: before work you need to widen the hole around the entire perimeter.
If a hole appears on the ceiling in the form of peeling, the first thing you need to do is check the surface for fungus. In this case, the area to be treated is lubricated with an antifungal agent, and only then repair work is continued in the following order: primer, putty, leveling with a spatula.
Defects that occur near the pipes are sealed with silicone sealant. But if the hole is too large, you need to use polyurethane foam, which is subsequently cut off and covered with putty.
Materials and tools - what do we need?
Before fixing a hole in the wall, we need to prepare materials and tools. The following options can be used as a filler for a blind or through channel in a concrete wall or ceiling:
- – an ideal material with high moisture resistance and heat resistance, but very low structural strength.
- Cement-sand mixture, plaster or putty - these materials have high structural strength, but they lack heat resistance and moisture resistance. In addition, the materials from this set are resistant to temperature deformation.
- Mastic is an option with sufficient strength and high moisture resistance. In addition, mastic is not afraid of temperature deformation. However, not everyone will like the appearance of a wall covered with mastic.
In addition, before filling a hole in the wall using the fillers mentioned above, the master must prepare the following set of tools:
- A hammer drill, a paint brush and a vacuum cleaner are useful for expanding and cleaning cracks.
- A bucket and a construction mixer will be needed to prepare fillers from dry mixtures.
- Spatula, trowel, sandpaper - necessary for adding and grouting viscous fillers.
Well, the process of adding filler itself depends on its dimensions and the depth of the excavation. Therefore, further in the text we will consider the technology of sealing both small and large defects in the walls.
Sealing a through hole
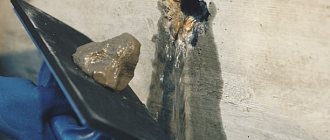
A through hole in the wall is covered on both sides (Fig. 2). To do this, it is first covered with a piece of suitable stone or brick, after which a cement-sand mixture is applied to the defective area (first on one side, and then on the other).
After the solution has dried, finishing plaster is applied and the surface is smoothed with sandpaper.
If for some reason you do not have access to the opposite side of the wall, then the problem that has arisen can be solved as follows:
- using an electric drill and a concrete drill, install 4 dowels into the walls of the hole, which will serve as a kind of support for the stone;
- fill the hole with a piece of stone, adjusting it to the size of the hole;
- strengthen the stone in the hole using a cement-sand mortar prepared in a ratio of 1:3;
- After the mixture has dried, level the damaged area with plaster and sand it with sandpaper.
How to seal a small hole?
With blind recesses on the inside we proceed as follows: we expand the defective area onto a cone with a hammer drill, and the base should be deep in the wall. We remove dust from the recess with a brush or pump it out with a vacuum cleaner. Mix the plaster or sand-cement mixture (3 to 1), obtaining a solution of medium humidity (slightly thinner than plasticine).
Before filling the hole in the wall, inject about a quarter liter of water into the channel. The walls must get wet, otherwise they will draw moisture from the plaster or cement, causing a crack to appear. We take a little mortar on a spatula and press it into the wall, moving the tool parallel. We continue this operation until the recess is completely filled. We glue a reinforcing mesh onto the damaged area (usually it is used to glue the joints of drywall sheets) and putty the wall using the same solution.
If the channel is located on the outside, then the elimination of this defect will proceed according to the following scheme: we expand the recess, removing loose concrete, and remove dust with a vacuum cleaner or brush.
Mix the solution (one part sand to one part cement), and fill the recess with this mixture. We restore the thermal insulation layer and install a waterproofing patch using hot mastic or tar. Very small defects (from dowels or similar) can be repaired with polyurethane foam without cleaning or moistening. After hardening, the foam is cut off and sealed with mastic or wallpaper.
We are closing a big gap - how to do it?
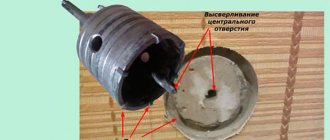
How to close a hole in the wall if the through hole is large? Of course, with the same concrete. In this case, we must simply fill the hole by arranging a cement-sand plug that fills the huge gap. Before you begin restoring the integrity of the wall, you will have to reinforce the future plug with a reinforcing frame. To do this, you need to remove pieces of loose concrete using a hammer drill and drill channels with a diameter of 10 millimeters in the side “edges” of the breach. It is desirable that they are on the same line.
- After this, you fill the drilled points with cement (by a third) and drive reinforcing rods there. Tie the touching ends of the rods with wire (or weld). As a result, you get a reinforcing frame embedded in the wall. Moreover, if there is wall reinforcement left in the gap, then no drilling is needed - you can weld the reinforcing lattice directly to it.
- Having finished with the reinforcement, you can begin building the formwork for the cork. To do this, you need to take sheets of DSP or OSB and fasten them to the wall (inside and outside), covering almost the entire gap. Fixing the sheets can be done using dowels, reinforcing them with oblique supports. Moreover, the shields should not completely cover the gap - the upper cut of the formwork should be located below the edge of the gap (8-10 centimeters).
- After this, you can begin preparing the solution. And if you do not know the brand of concrete used in the construction of the wall, and you do not know how to cover the hole in the wall, then it is better to focus on the following proportions - 1 bucket of cement, 3 buckets of sand, 3 buckets of crushed stone. After thoroughly mixing this solution, pour it into the opening closed by the formwork through the gap left.
- After 10-14 days, the formwork can be removed and plastered or puttyed with cement plug, leveling the wall. Moreover, before you plaster a hole in the wall, or rather a hole closed with a cork, you will have to brick an 8-centimeter gap in its upper part.
After completing the construction of a plug that has blocked a large hole in the wall, the area of the repaired defect is treated with mastic, onto which thermal insulation slabs are glued.
What to do with cracks - simple instructions
How to fill a hole in the wall if its width is equal to the thickness of a human hair? Yes, almost the same as any small defect. First, we take a hammer drill or wall cutter and widen the crack on the inside of the wall, cutting a groove with rectangular walls. Remove dust and plaster residues with a vacuum cleaner. Secondly, we treat the groove obtained at the crack site with a primer that increases the adhesion of concrete. After applying the primer, it is better to wait 1-2 hours, after which we repeat the procedure, moistening the groove.
Thirdly, we prepare a sand-cement mortar from a dry mixture. Some craftsmen recommend using regular starting plaster, but such mixtures do not have the required safety margin. In particularly critical cases, reinforcing fiber can be added to the mixture to increase the strength of the solution. Fourthly, fill the groove with solution using a spatula. Finally, we paste fiberglass tape onto the sealed area and putty it flush with the wall. Moreover, before the finishing putty, the wall is left alone for a day, waiting for the surface layer of the sand-cement plug to harden.
Fifthly, the outside of the crack is coated with mastic, having previously expanded it with a perforator. As a last resort, you can use liquid solutions that increase the waterproofing properties of the wall. Self-healing concrete can also be a good option for aggregate. However, ordinary mastic will give good results at a minimal cost of consumables.
A hole appears.
It can be large or small - a piece of plaster falls off, a hole is made that becomes through, a hole is mistakenly drilled with a hammer drill in the wrong place.
After this, fixing a hole in the wall is a headache and the responsibility of either the owners or the repairmen.
They can be divided by size - large and small.
Large holes will require significant volume.
Most likely, in this case you will have to finish the entire surface of the wall in order to hide it again.
Fixing a small hole in a wall is much easier.
Here you can limit yourself to finishing work on a local scale.
For large holes, it is necessary to fill the hole using stone materials.
How to repair a hole in this type of wall? Best of all is what the wall was made of before. For example, for a brick wall, sealing with brick is suitable; for a wall made of aerated concrete, you can use. For a tongue-and-groove wall, take a piece of a tongue-and-groove block. For a concrete wall, take a brick.
The material for laying in the hole is selected taking into account the material from which the masonry is made. For brick and aerated concrete, you can take cement mortar and place a piece to fill the hole on it.
For the tongue-and-groove, be sure to use gypsum masonry mortar. Be careful - it hardens quickly! You should not use rotband and other gypsum plasters for this purpose - the adhesion will be fragile. But you can use fine-grained gypsum putties, such as Fugenfüller - they will adhere well to the tongue-and-groove block. In this case, it is advisable not to make the layer thicker.
Before you start filling the hole, try to line up the edges, especially the bottom. This will avoid problems with . You can level it with a chisel or a hammer drill. Be careful not to completely gouge the wall or break too much. It is also advisable to trim the edges. It is convenient to fit a piece of block or brick under the hole using a stove hammer, making gentle blows and breaking off small pieces.
If it is a plasterboard wall, such as a multilayer partition, screw a piece of plasterboard from inside the main one. This is done like this:
- Cut out a piece of drywall larger than the hole, 3-4 centimeters in all directions, then cut it in half.
- A door handle is screwed to the front side of one cut piece using self-tapping screws.
- The sheet is inserted behind the main cladding and screwed on the outside with self-tapping screws. The handle is unscrewed.
- Also screw the second half, joining an even seam approximately in the middle of the hole.
After the hole in the wall is sealed, the masonry has dried and finally set, plastering work is carried out.
How to repair fallen plaster
Small-scale plastering work will have to be carried out both after stone work to fill holes, and after the plaster has fallen off from a small area.
The easiest way to do this is to use quick-hardening gypsum plasters.
These compositions allow you to immediately apply a large layer, especially in a local area, and do not have to wait long for the plaster to set.
What is the best way to seal a hole in the wall using gypsum compounds?
The most common such composition is the rotband. The time it takes for it to fully set is about three hours, and for complete drying to take place – about a week (depending on the air humidity in the room).
You can use plasters from other manufacturers. It is better not to use pure alabaster - it gives unpredictable adhesion to the surface and then it is unknown how it will lie on a large alabaster platform.
Before filling the hole, it is cleaned. Take out all the pieces that fall off and move, sweep away the dust with a brush. The surface is moistened and primed with compounds intended for plastering work. After this, a layer of plaster is applied.
It is more convenient to do this when filling holes using a small ten-point spatula. Apply until the entire surface is filled to the plane of the wall. After this, the layer, while it has not yet set, is carefully cut off according to the rule, flush with the main wall.
Acrylic sealant is good because almost any paint fits well on it and sticks to it.
Sealing deep cracks in the wall
Very often, during the process of formation and shrinkage of a house, the seams between the panels may come apart or deep cracks may appear. Restoring these damages will not cause serious problems.
The easiest way is to seal them with polyurethane foam. It is supplied in aerosol cans, which allow you to easily and quickly repair such defects. Foam perfectly fills empty spaces and penetrates deeply into the most inaccessible crevices. The material adheres perfectly to various surfaces, expands and hardens in a matter of minutes when interacting with air. When using polyurethane foam, a good result in eliminating deep holes and cracks is guaranteed.
How to make a defect invisible
For small defects sealed with sealant, you can make them invisible using a small brush and paint.
Simply paint the white caulk over the edge of the resulting hole with a brush.
It is advisable to match the paint by color, but if it does not match too much, it is not a problem.
In a small area this will not be very noticeable.
For larger defects, full finishing is carried out.
If the defect is on the wallpaper, it is necessary to putty the defect and align it with the rest of the wall, and then replace the sheet, carefully cutting it along the adjacent wallpaper. If the defect is on a painted wall, it is puttyed and painted over.
In this case, you need to very accurately select the paint color to match the base color. If on a tile, several tiles are placed at the site of the defect. If it is not possible to hide the defect, the entire wall is refinished externally.
How and with what to seal the grooves is shown in the video:
Noticed a mistake? Select it and press Ctrl+Enter
to let us know.
It often happens that when preparing an apartment for renovation, it is discovered that all the walls have holes and resemble Swiss cheese. Holes and grooves remain from old wiring, nails for cabinets and shelves, former sockets and switches, and simply from plaster falling off along with a piece of the wall. The ceiling window into the bathroom is also an eyesore. But it’s not for nothing that they say that the eyes are afraid, but the hands do. Let's roll up our sleeves and start fixing the defects, especially since there is nothing complicated here.
Final part
The technology for sealing holes in concrete walls mainly depends on the size of the damage. For small defects, it is enough to cover the problem area with regular putty. For larger holes, you will additionally need to prepare DSP or construction plaster.
When carrying out restoration work, the main thing is to properly prepare the defective area for applying the repair mixture. Only in this case will you achieve reliable fixation of the solution to the base and prevent its temporary cracking and peeling.
What to do with the middle hole in the wall?
Repairing a hole from an old outlet or a carefully removed utility pipe is not much more difficult than getting rid of a small hole. The principle of surface treatment is the same:
- We remove all parts falling off the wall. Including suspiciously wobbly ones - they can cause a lot of trouble after the repair is completed.
- Using a brush or vacuum cleaner, remove crumbled pieces and dust.
- Spray the surface generously with water from a spray bottle.
- For better adhesion of the mortar to the wall, it is necessary to use
- We fill the hole with a solution of sand, cement and water (3:1:1) or use a ready-made plaster mixture and let it dry.
- We control the drying process: if cracks appear, we rub it with a primer, leveling the surface. Dry and then, if necessary, repeat priming.
- We finally level it with a sander or by hand using medium-grain sandpaper.
- After complete drying, we can consider that the hole is sealed and the surface is ready for finishing.
The solution takes at least 12 hours to dry. At this time, no manipulations with the treated surface can be performed.
Through holes from pipes are first supported on one side with a piece of plywood. Having sealed the surface on one side of the wall, we carry out the same procedure on the other.
Filling a hole with a repair mixture
When starting to repair a large hole, add a large putty knife and repair mixture to your standard tool kit.
Sequence of work performed:
- Using a regular vacuum cleaner, thoroughly clean the hole;
- We wet the inner surface of the hole with water, using a regular brush or a piece of foam rubber, and let it soak in;
- if the hole is not too large (depth no more than 5 cm), then we close it with a spatula and repair mixture;
- if the depth is greater, then it is recommended to insert a piece of brick of the appropriate size into it on a cement base;
- Having sealed the hole in this way, lay a layer of repair mixture on top;
- After drying, carefully sand the surface using sandpaper.
How to repair a large hole?
Sometimes it happens that when repairing walls, not only pieces of plaster fall out. They may be joined by broken pieces of concrete or brick. In this case, it is necessary to use additional reinforcement of the wall surface.
- Similar to the previous cases, we clean the hole from everything unnecessary.
- We drive in dowels or screw in powerful screws. If the pothole is large enough, they need to be additionally tied with wire.
- Remove debris and dust with a dry brush or vacuum cleaner.
- Wet the surface with plenty of water.
- Add broken brick or crushed stone to a standard cement-sand mortar.
- Use the resulting mixture to seal the fallen piece of the wall, let the solution sit and dry.
- If necessary, we plaster the surface of the entire wall or locally a section of the hole, then dry it and repair the cracks.
- Now you can start finishing.
Cement mortar should be applied in thin layers, allowing them to dry thoroughly. A thick layer is guaranteed to crack or fall off.