Redevelopment! Who hasn’t encountered yet another rearrangement of furniture to create a new interior to replace the old boring and rather boring furniture arrangement.
There can be many ideas for refurbishment of the territory. It all depends on the design of the room being created. Maybe the room should be expanded, or vice versa, a large space should be divided into small parts - zones. Only a partition can cope with such a task.
Partition in the room between the living room and kitchen - photo
There are several valuable tips on how to make a room divider. Lightweight or stationary structure, built from foam blocks or bricks. Completely partition off the room or just part of it. It all depends on the wishes of the owner of the premises.
So, tips and the most important rules for remodeling rooms and installing partitions in them.
The basic rules for refurbishment of the interior of residential premises are as follows:
- Before drawing up a project for the internal refurbishment of a room, the load-bearing wall should be marked, since it is not subject to demolition, according to the Rules and SNIPs.
- A partition can be tied to the load-bearing wall, which does not contradict the permitting system of the Building Rules for the reconstruction of the interior of the housing stock.
Room partitions are an excellent option for dividing rooms into functional zones. Owners of a one-room apartment know very well how difficult it is for one family member to work when the other person is on vacation. In this case, a room partition can solve the issue of creating an independent workspace and relaxation area.
Depending on the installation methods, partitions are created in the form of mobile or stationary room structures:
- plasterboard;
- glass, using a metal, aluminum or polyvinyl chloride (PVC) frame;
- transforming.
As well as foam block, brick or wooden room partitions.
“The partition, in essence, is the partition that partitions the existing space into zones with different functions. The room space can be divided, either completely or partially. The thickness of the wall depends on the materials used. The standard thickness of the bulkhead will be 120 mm. But there are also non-standard solutions, for example, if the partition is built using cabinets, racks or shelves,”
says leading architect-interior designer of the Moscow design studio AvKube Grigory Solomin.
Plasterboard partition
The most important rule when creating a plasterboard mediastinum is to take accurate measurements and maintain an angle of 90°. To begin work, a reference point is designated, which is the beginning of the demarcation zone, and from it a line is drawn to delimit the space to the finishing point.
All work to achieve accuracy when making vertical lines should be carried out using an electronic plumb line or a laser building level. This operation becomes more successful when such work is performed together.
Attention, before starting the construction of the pier, a very important point is the control measurement of all designated points and additional recalculation of computational measurements.
An interior wall made of plasterboard is an economical option. The partition frame is created from profiles, which are very quickly installed according to preliminary calculations. All wiring is laid inside the structure.
The bulkhead is created from plasterboard with a standard thickness of 12 mm. To achieve greater strength of the wall, it is recommended to lay a double layer of material, and then you can easily hang shelves, cabinets or a TV on it, having previously strengthened the inside of the frame.
Partition in a room made of plasterboard - photo
Drywall is a material with a high level of flexibility. It easily accommodates any modifications, for example, the creation of various decorative niches, as well as openings for the output of lights, sockets and switches.
Attention! When installing doors in a partition, the doorways must be strengthened. The best material for reinforcement is wooden beams.
If desired, the inside can be insulated, but not with foam plastic, but with mineral or glass wool, since rodents prefer to live in foam plastic. And it doesn’t matter on which floor, not to mention a private house, the partition was erected. In addition to its heat-insulating qualities, mineral wool is an excellent noise insulator.
Partition material
Typically, the following materials are used for partitions.
Drywall
The simplest and most common material for partitions.
Advantages: simple installation, lightness and low cost. The material is universal, has a smooth surface, suitable for any finish.
Disadvantages: low strength, poor sound insulation.
More on the topic: DIY plasterboard partitions
Brick
Reliable, undeservedly forgotten material for partitions.
Advantages: durability, excellent sound and heat insulation.
Disadvantages: labor-intensive construction, the need for additional finishing, dust and dirt during work, requirements for the qualifications of the performer.
Foam concrete
Lightweight, durable, non-flammable, smooth material.
Advantages: excellent sound insulation, easy to process, low cost.
Disadvantages: low compressive strength, need for plaster and surface finishing.
Gypsum blocks
Lightweight, smooth and durable material, suitable for any interior decoration (wallpaper, tiles, etc.).
Advantages: quick installation, moderate noise insulation, no need to plaster after installation, low cost.
Disadvantages: low strength, instability in moisture.
Glass blocks
Glass blocks of square or rectangular shape, various sizes and colors.
Advantages: excellent light transmission, sound insulation, noise absorption, ease of installation, reliability, non-flammability.
Disadvantages: it is impossible to install communications inside, glass blocks cannot be cut or anything can be hung on them.
Tree
Wooden partitions are considered somewhat outdated.
Advantages: they can be stationary, sliding, rectilinear or curved, round, etc. They fit perfectly into the interior, can serve as furniture, environmentally friendly material. They do not require additional finishing and can be combined with other materials and decorative elements (fabrics, glass, mirrors, etc.).
Disadvantages: high cost, fire hazard. They are afraid of water, temperature changes, poor sound insulation.
We recommend reading: How and with what to level walls in a private house
Tongue-and-groove slabs
Gypsum boards with grooves for connection.
Advantages: low cost, small volume, good sound insulation, ease of installation.
Disadvantages: low strength, low water resistance, instability, the need for reliable fixation, difficulty in mounting on the wall.
We recommend: What and how best to insulate a private house from the inside? Options for proper thermal insulation
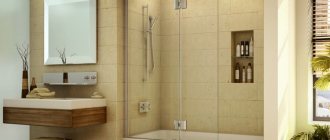
Glass partitions in the room
When creating an interior, one cannot help but pay attention to such a decorative element as glass partitions. Framing them in a metal or aluminum profile gives a special charm to the room. Despite the fragility of glass structures, glass partitions are given greater preference when creating an exclusive interior. It all depends on the parameters of the material used:
- material thickness;
- quality of natural or acrylic glass;
- size of glass sections.
Glass partitions in the room - photo
You can, of course, create a glass partition yourself. Such work involves a certain kind of physical effort and financial costs. But the result can fully compensate for the force expended on installing the glass structure.
Ideas for partitions for zoning space - photo
Note! How to draw pictures on the walls in an apartment with your own hands
Let's discuss this article together:
Click to cancel reply.
Transformable partition
This is the simplest and most transformable mobile version of interior partitions. It is an ordinary screen, with sections covered with fabric. Or created from plexiglass frames, which are fastened together with hinged hinges.
The undeniable advantage of this type of partitions is their mobility. Such a bulkhead can easily be moved in any direction, creating a temporary zone. If necessary, the transforming partition can be removed completely, combining the space into a single whole.
Transformable partitions, in addition to screens, include sliding partitions with the functions of doors assigned to them, and cabinets dividing the room space. But the disadvantage of the delimiting design of cabinets is that they take up a lot of space and are irrational in a small room, since the remaining living space is, to put it mildly, somewhat small.
Sliding partition - photo
The most optimal option for creating lightweight structures to delimit functional areas is a sliding or transforming screen. This design takes up little space and is very easy to use. Most often they create wooden structures or transformers decorated with glass. The principle of sliding the panels of the transforming partition is similar to the compartment system and is mounted using one of two methods:
- Installation of the bulkhead along the guides.
- Using pendant mounting.
The transforming partition is moved along special guide rails, or along the wall when the transformer is a single integral structure. Or by creating a special niche in the cavity of which the partition is completely hidden.
DIY construction
Making a partition in your home yourself is not at all difficult. The only thing you need to remember: if in a multi-storey building you are going to build a partition from heavy material (for example, brick) and the load on the interfloor floors will be significant, you must coordinate the construction and obtain a special permit for it.
If the partition is light (plasterboard) or you are going to build it in a private house, there are no obstacles and you can begin work.
Marking the area of the room
This is a stage that needs to be treated with special responsibility, since it determines how smooth and beautiful your structure will stand.
For marking, it is better to use a laser level; if you have such a device, marking can be done quickly and accurately. However, it is not cheap and is purchased mainly by professionals, so we will use the simplest construction tool.
We will need:
- the ruler is long (rule);
- construction tape;
- square, plumb line;
- folding meter;
- marking cord (dyed twine);
- marker for marking.
Sequence of work:
- The first step is to determine the mark of the separated zone. From the corner of the room, along the line where the floor and wall meet, you need to measure the distance at which the partition will be. This point will become the main reference point for all other marking lines.
- If the partition runs across the entire width of the room, you need to make a mark on the opposite side at a similar distance. Now you should check the corners of the resulting rectangle. To do this, measure the lengths of two diagonals, which should be equal if the angles are right. You can connect the points on opposite walls with painted twine, stretching it from mark to mark and marking a line on the floor.
- Using a plumb line on opposite walls, mark vertical lines that coincide with the marks on the floor. Hold the plumb line against the wall so that it does not touch the floor and is accurately aligned with the marks. Along the twine, draw dotted lines on two opposite walls, the verticality of which can be checked with a level.
- Mark a line on the ceiling (you can use a painted cord). Check the correctness of the beat with a plumb line. From the line on the ceiling, the plumb line should exactly fall on the connection line between the two points on the floor that we marked at the very beginning.
- It remains to mark the width of the doorway on the horizontal lines of the floor and ceiling. The frame is not mounted or masonry is not performed in this area.
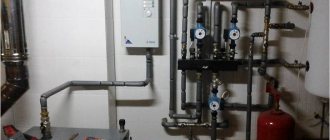
How to make a partition from plasterboard
A plasterboard partition is placed on a frame made of a metal profile or a wooden beam with a cross-section depending on the desired thickness of the partition.
Sequence of work:
- Secure the guide to the ceiling with dowels or anchors. The mounting pitch is 150–170 mm. To ensure a better fit of the profile to the ceiling, you first need to glue a double-sided adhesive polyethylene seal onto it.
- Also glue the measured parts of the profile with the seal to the floor.
- Attach vertical profiles to the walls, connecting the upper and lower ones to form a profile frame.
- Also install the doorway from a profile, having previously inserted a wooden beam into the cavity. Secure the profile at the top and bottom with special self-tapping screws. Attach a profile defining the height to the vertical width profiles. For rigidity, fasten the horizontal strip of the opening to the top guide with two sections of profile.
- Install the remaining vertical elements of the profile frame in 600 mm increments. If the sheathing sheets are below the ceiling, then transverse profile fragments are attached between the vertical profile. Its ends should be cut and bent at a right angle.
- To cover one side, sheets of plasterboard are tightly joined in the middle of the vertical posts. The sheets should be screwed with self-tapping screws, deepening the cap into the sheet by 1-2 mm.
- After sewing one side, insert sound insulation between the vertical sections of the profile. The material must be installed tightly, then cover the other side with plasterboard.
- Insert the door frame into the opening and secure it to the vertical posts. Screw the screws into the profile through the wood of the box. They should be recessed by 1-2 mm.
- Seal the drywall seams with gypsum-based putty, having previously secured fiberglass mesh to the joints. It is usually sold with glue. You can also fix it by drowning it in a layer of putty.
- After the seams have dried, clean the surface of the sheathing on both sides, prime and putty on both sides completely under the decorative coating.
We recommend: Advantages of wallpaper as a wall finishing material
Installation of drywall on wooden blocks is carried out similarly with some features.
Construction of a partition made of blocks, slabs or bricks
The three listed types of material do not differ fundamentally in terms of masonry in partitions, but each of them uses its own type of masonry mortar:
- For brick - cement-sand mortar in a ratio of 4:1 or 5:1.
- For gypsum boards - gypsum-based mounting adhesive.
- For foam concrete - glue based on cement or gypsum.
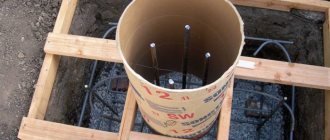
Let's consider the construction of a foam concrete partition:
- Clean the floor at the site of the future partition from dust. Under the masonry on the floor, place a layer of dense polyethylene or roofing felt along the auxiliary beam. Apply masonry adhesive to the roofing felt, wall and block. Lay the outer block, level it, and carefully tap it to the floor and wall with a rubber hammer. Lay the first row, cut the block at the opening with a saw and grinder.
- Secure the block against the wall with a profile hanger, bending it to 90 degrees. Nail it to the block and wall using dowels. Do this on both sides and repeat every 2-3 rows of blocks.
- Place the mortar on the first row and level it with a notched trowel. Start the second row with half a block. Tap it with a hammer and check with a level. Start the third row with a solid block. Thus, raise the partition to the ceiling, leaving a small gap of 3-5 cm.
- Fill the gap with foam. Check the doorway with a plumb line and level. Mark vertical and horizontal lines and make precise cuts. The upper part of the opening should be reinforced with two reinforcing rods. Using a hacksaw, make cuts 30-50 mm wide and 120-150 mm deep on the sides of the opening wall. Knock out the sawn-off parts, insert the rods, secure with spacers and fill the knocked-out parts with mortar.
- Wait three days until the solution has completely set, then apply an antiseptic primer to the masonry and let it dry thoroughly.
- Plaster the wall, after drying prime it and treat it with finishing putty. Insert the box into the doorway, fill the gaps with foam, cut off the excess after drying. After the putty has dried, you can begin finishing.
Installation of glass block partitions
To install a glass block partition, you can choose one of three options:
- Using an installation kit, including glass blocks, guides and special glue.
- Installation of blocks on special metal stands, with reinforcement and the use of construction adhesive.
- Glueless installation of blocks into a frame made of wood or metal with rubber gaskets.
Using the full set
A very simple and convenient method, accessible to everyone:
- Apply “Moment” or “Sealant” glue to the cleaned surface of the floor and walls according to the markings and stick the profiles of the required length. After drying, apply glue to the profile, install the first glass block from the wall, onto which a short profile is glued to the side. So assemble the first row of blocks.
- Glue a long profile on top of the first row. Mount the second row in the same way. After 6-7 rows, take a break for a day to allow the glue to set. Then finish installing the glass blocks, give it a day to dry and fill the gaps between the blocks with grout.
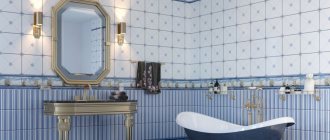
Several photos of interesting partitions
Some type of partitions are created specifically, simultaneously pursuing several goals, both to create a comfort zone and to decorate the interior.
We present several photos of interesting and quite bold solutions for creating interior partitions in the interior.
Unique bedroom design with divisions into zones, created from a combination of glass and wood
Interesting wall design using an aquarium as the lower part of the partition
Zoning space using natural materials
An interesting solution in the interior designating the work area and bedroom using a bookcase
Interior partition - photo