Using a grinder
Using a sander, you can correct defects in concrete or wood floors.
Before grinding, the concrete base must be thoroughly cleaned of dirt and the top layer of screed must be removed. Then existing cracks or seams are repaired with ready-made mixtures. The next step is tapping the base for voids. If there are bumps and potholes larger than 5 mm. they are knocked down before polishing. The grinding itself is carried out in several stages, at each of which different abrasives and impregnations are used. For rough finishing, coarse abrasives are used. Then hard-to-reach parts of the room are processed. Final polishing (if necessary) is carried out with a thin abrasive tool.
Subfloor for laminate
The substrate must be clean, dry, hard and level for the coating to remain durable and aesthetically attractive for a long time. Each defect under the flooring can manifest itself at any time with annoying creaking, cracking, damage to locks and destruction of panels.
Depending on the type of surface and the layout of the floor, the evenness of the base is achieved using different methods. The optimal option is determined by the possible labor costs, time and budget allocated for repairs. For example, you can easily and quickly lay a heated film floor without a screed under a laminate, but not under ceramic tiles.
Choosing this type of heated floor is not only convenient and effective, but also beneficial for residents of apartments with low ceilings. Unlike cable underfloor heating, which is installed on a concrete screed, it does not reduce the height of the room.
Film flooring under laminate does not reduce the height of the room
If the floor structure is unreliable and there are large irregularities on it, it is prohibited to pour a thick layer of cement screed. In this situation, dry leveling is used and proceed according to the following scheme:
- the base is covered with insulating material (the joints of the film are glued with tape);
- beacons are installed along the insulation, a layer of granular backfill is poured (fine crushed stone, expanded clay);
- put plywood, gypsum fiber board, gypsum board or chipboard on top and attach them with self-tapping screws to the beacons.
No subsequent leveling is required. A backing made of foamed polyethylene or cork is placed on the base. A laminated coating is installed on top.
Making a pillow for the foundation
For convenience, we will outline the process of making a pillow with your own hands in the form of step-by-step instructions:
- First, we calculate the thickness of the pillow. To do this, we compare the depth of the pit with the project using a level. Ideally, we will determine the elevation marks along the entire width of the base of the future pillow every 2-3 meters and draw up an as-built diagram.
- Depending on the required height of the backfill, we will use only sand or crushed stone backfill.
- If the project involves compacting the bottom of the pit, we proceed as follows: pour a layer of crushed stone or gravel. Its thickness should not exceed 1.5-2 times the size of the largest parts. Then, using a manual or mechanical tamper, we drive crushed stone particles into the soil surface.
- SNiP allows the thickness of the sand cushion layer without special compaction to be no more than 100 mm. If backfilling of a larger mass is necessary, it is compacted by pouring water or using a layer-by-layer tamper.
- For pillows of considerable thickness we use crushed stone. We lay it in layers, no more than 25 cm thick with manual compaction and no more than 40 cm with mechanical compaction. The final leveling is carried out with a thin layer of sand. When laying, we move from large to small fractions. For a thick layer, you may even need to fill it with a large rubble. We fill the gaps between its stones with a fine fraction, or as they also say - wedge it.
- We complete the work by checking the mark using a level. Construction standards require drawing an as-built diagram and drawing up an act for hidden work. In the act we indicate which drawings we were guided by and what materials were used.
Video: Sand backfill for the foundation
Which method should I choose?
When choosing the best technology for floor leveling, pay attention to the type of room, the cost of materials and work, time costs and complexity of the technological process. The choice is also influenced by the floor material and the maximum difference in levels of different surface areas. For example, dry expanded clay screeds are the best option for reducing work time in rooms with high ceilings - but only if financial costs do not matter.
Plywood is used when it is necessary to increase heat-insulating properties, and for laying communications, the sheets are laid on joists. Self-leveling floors are suitable for small differences, and cement screeds are suitable for laying laminate or linoleum already on the second day of work. Sanding is used only for wooden floor structures.
And in order to simplify the selection process, you should use the table below. Conclusion When deciding how to level the floor in an apartment with your own hands, you should take a responsible approach to the materials, methods, and performers of the work. The correctly chosen method will allow the apartment owner to reduce costs or time.
If laminate is placed on an uneven surface, the locks holding the panels together will soon become unusable. The boards will also quickly wear out and break. To prevent this from happening, a floor screed under the laminate is necessary. Its importance can hardly be overestimated, because the screed:
- levels the base;
- makes the floor surface hard;
- hides communications;
- promotes heat and sound insulation;
- distributes the load evenly.
Before leveling the base, any remaining construction debris is removed, and possible cracks are widened, cleaned, and covered with primer and mortar. To level the level of the finished floor, use a self-leveling composition (ready-mix), dry screed or cement-sand mortar.
Floor screed on granite screenings and chips
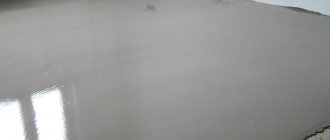
Semi-dry floor screed is ideal for any finishing coating and does not require the use of additional leveling mixtures.
Quite often it is necessary to make a reinforced screed of the M300 brand. It is impossible to achieve such brand strength using basic materials (sand, cement, fiberglass). In this case, our company lays a semi-dry screed with granite chips.
Making a floor screed with granite chips or granite screenings is used in rooms with increased load on the screed, or when a self-leveling polymer floor is used as a finishing coating.
Granite screening is a material obtained by crushing and sifting granite rock. In other words, screening is crushed granite, the fraction of which in our case ranges from 2 to 5 millimeters. Grain screenings are actively used in construction, including when constructing semi-dry screeds, because thanks to the crumbs, the cement-sand mortar has increased strength and density.
The technological process of installing a semi-dry screed with granite screenings has a number of differences from the traditional method of semi-dry floor screed. Materials used: cement M 500 D0, washed coarse sand, fineness modulus should be in the range from 2.5 to 3 millimeters, polypropylene fiber fiber 12 millimeters, granite chips from 2 to 5 millimeters. To achieve increased strength characteristics of the floor screed, cement is added in larger quantities than with a traditional semi-dry screed, for example, for one batch of cement-sand mortar, a bag of cement (50 kg) is added to the mixing hopper of the pneumatic blower; in the case of granite chips, its quantity must be increased up to 65 kilograms.
Sand with granite chips are added in a ratio of 50 to 50, while the total amount of sand, cement and granite chips remains the same as with the traditional method (0.2 m3). To further compact the solution, special plasticizers and strengthening additives are added. Water is added in the same quantity as with a standard screed device (20-23 liters per batch). At the end of the work, the screed must be sanded using a trowel. Caring for a semi-dry screed with granite chips is no different from caring for a traditional screed: at the initial stage of maturation of the screed in the room, it is necessary to ensure a temperature of at least +5 degrees, to prevent the formation of drafts; at high temperatures above zero, the screed must be generously moistened with water.
You can calculate the cost of a semi-dry floor screed with granite screenings or call a measurer by calling and (calls within Russia are free).
Puttying
To level the wooden base, you can use ready-made putty mixtures. They are sold dry, so before use they must be diluted with water according to the instructions. When adding liquid, you cannot overdo it - the finished composition should have the thickness of sour cream.
READ MORE: What should be the minimum thickness of a floor screed?
The diluted mixture is applied to the floor in a layer up to 2 cm thick. It is advisable to cover all the cracks between the boards before starting work. To get a flat surface, it is worth periodically checking the height of the floor with a level.
How to level a floor on a wooden base?
In order to properly level the base, it must be carefully prepared. If the wooden floor is well preserved (there are no wide cracks or gaps between the joists), it is left and prepared for laying the laminate using antiseptics, special sealants and primers. When the floor is heavily worn, the boards begin to rot and deform, it is easier to dismantle it and level the rough surface of the floor.
Before laying the laminate, the floor is sanded well or scraped. After removing dust and shavings, small defects are puttied with repair dry mixtures or polymer compounds. When the putty has dried, the surface of the base is primed with a moisture-resistant solution 2 times. After the primers have dried, plywood or cement-bonded particle boards are laid on the floor and secured with self-tapping screws. Then the laminate is installed.
If the screed has large flaws or obvious differences in height, a self-leveling, dry or cement-sand screed is used to level the base.
When leveling the floor surface under the laminate with your own hands, most often they use a solution of cement and sand, because this is the method that produces an excellent screed and perfectly corrects differences and unevenness of the rough foundation. But we must take into account that this option is very labor-intensive. It's better to work together.
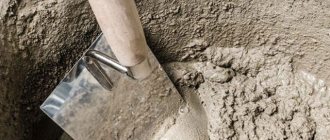
To create a cement-sand mixture, its components are taken in proportions of one to three. The mixture is poured with enough water to obtain a solution whose consistency resembles thick sour cream. This will give it strength. With this solution it is best to level a concrete base that has height differences of 3.5 – 5 cm. The work proceeds according to the following algorithm:
- The old coating is removed and the base is cleared of debris.
- Damper tape is glued around the perimeter.
- The floor is covered with thick cellophane film so that its edges extend approximately 5 cm from the walls. The strips are secured with tape.
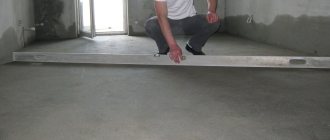
- Using a level, the highest point in the room is found as a starting point for establishing beacons and determining the thickness of the future screed.
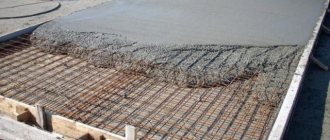
- A reinforced mesh is laid on the base, raising it by 20 mm using pads. The joints of the mesh are fixed with wire.
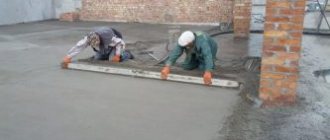
- The level of the highest point is raised by 50 mm using a metal profile and cement mortar. Beacons are installed at this height. The distance from the wall and between them depends on the size of the rule.
- When the beacons have hardened, you can make a screed by pouring a cement-sand mortar between the two beacons. The surface is leveled according to the beacons.
Having filled one strip in this way, move on to the strip located across the row. Then they return to the one they missed. They do this until the entire area is flooded. When the solution has completely hardened, the beacons are removed; the places where they stood are covered with mortar flush with the base.
The prepared floor using a cement-sand screed should “rest” for about four weeks. There should be no drafts or direct sunlight in the room. The surface of the screed is periodically moistened. Laying laminate can begin when the moisture content of the concrete coating is 4 - 5%.
A wide range of renovation materials significantly facilitates the process of home transformation. In construction stores you can buy ready-made self-leveling mixtures, with which you can quickly and easily prepare the base of the floor for laminate, if its unevenness does not exceed 30 mm. Work begins by cleaning the base.
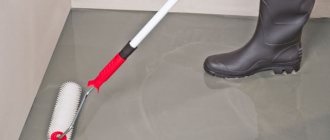
Laying a self-leveling screed
Determine its maximum point. The level is used to mark signs on the walls where the screed will be poured. The base is primed, after one layer has dried, it is primed again and left until completely dry. Polyethylene is laid on the floor so that its edges extend slightly onto the walls.
Prepare the mixture strictly according to the instructions on the package, diluting it with water. It is best to prepare the solution in parts: it hardens quickly. The base should be filled with the mixture sectionally, starting from the farthest corner, leveling the solution with a needle roller.
To make sure that the screed is dry, place a paper napkin on its surface and secure it with tape along the edges. If it remains dry the next day, you can lay laminate.
Dry screed
To prepare an uneven base for laminate flooring, use a dry screed. In this case, the base is leveled well, but the screed must be protected from moisture, otherwise it will quickly become unusable. Therefore, this type of screed is rarely used. The main option for dry screed is the bulk type.
READ MORE: How to lay plywood on a wooden floor
To lay a dry screed, cover a clean, dry surface of the base with thick polyethylene so that its edges are on the wall. The film strips are connected with tape. After this, using a level, distribute the beacons across the floor, securing them with a solution.
Screed granules are poured between the guides, leveling them with a rule. Crushed stone and expanded clay are used as granular materials. After you have finished laying the dry screed, plywood, gypsum fiber boards, OSB or chipboard are attached to the guides using self-tapping screws.
No final leveling is required. A backing is placed on the plywood or boards, and then the laminate is installed. There are other types of construction:
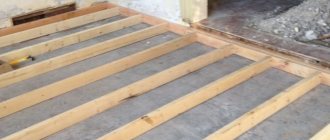
- Frame (floor on joists). Using a level, a metal profile or wooden slats are installed on the concrete after 30–40 cm. Insulation is placed in the spaces between them. Chipboard or plywood are mounted on the frame.
- Hard is the easiest method of leveling the base and increasing the level of thermal insulation. A clean, dry floor is primed. Plywood, chipboard or gypsum fiber board is attached to it using polymer glue or “liquid nails” in one or two layers. The optimal height of such a coating should be about 2 cm.
- Adjustable. The most labor-intensive design. Sheets of plywood or joists are supported by anchors or rods screwed into them - racks. The level of the rack is fixed using a stop or a dowel-nail. You can choose any option depending on the state of the draft basis and your financial capabilities.
Scheme for leveling the floor with plywood without joists.
It is often necessary to level old wooden floors. This operation is very similar to repairs on concrete bases, but in the case of the wood version there are some features that should be mentioned.
It is recommended to level the floor without a screed along an existing plane in cases where, in the presence of small potholes and chips, the difference between the lower and upper sections of these defects does not exceed 5 mm. If this condition is met, you should perform a little preparation, which boils down to puttying the dilapidated wooden base (of course, where required) with acrylic sealant or a mixture based on PVA glue.
To level the floor on a wooden base that has no serious flaws, sand is not needed as a bedding. Plywood sheets with a thickness of no more than 20 mm are simply laid out on the old puttied surface, and one layer will be enough (it is not recommended to use fiberboard boards for these purposes). They are fastened using self-tapping screws of appropriate length and diameter.
When planning to level floors without using cement screed, you should always remember that the technology described above is applicable in cases where height differences in potholes do not exceed 5 mm. If these defects are greater, you will have to turn to another technology.
How to level a floor without a screed
How can I level the floor without screed? This question arises in cases where it is impossible to significantly increase the weight of the floor, the height of the ceilings is already very low, or perhaps the unevenness of the surface of the subfloor is small and there is no need to make grandiose changes. Several useful tips will be indispensable for analyzing the situation and making the best decision on this issue.
We invite you to consider several practical tips and choose the option that will cause less hassle and inconvenience, help you save money and efficiently level the floor without pouring a concrete screed.
1. Thoroughly clean the surface of old coating, dust and debris.
2. Determine how uneven the floor surface actually is (for example, with a long rule, level, or laser level). Perhaps the situation is not so bad at all. Then to level the floor you can use:
- pouring a self-leveling mixture (for small differences, recesses and depressions),
— a machine for polishing mosaics (using cement gel and marble chips).
For wooden floors:
— Scraping a wooden floor (scraping machine and hand scraper). In this case, you need to “sink” all the nails into the floor using a hammer. You don’t even have to lay anything on the scraped floor; it is ideally prepared for painting or varnishing. You can also use floor covering.
- leveling the floor using a mixture of PVA glue and sawdust. Beacons are placed on the rough wooden floor - level bars and secured downwards. A mixture of sawdust and PVA is brought to the consistency of sour cream and poured into the openings. Due to the fact that this mixture shrinks, the pouring should be repeated two or three times. The dried surface should be covered with thin (up to 8 mm) plywood with minimal gaps at the joints. This method has a lot of advantages: low cost with good quality, low floor rise, the possibility of subsequent installation of linoleum, laminate, carpet or even tiles.
3. If it is possible to level the floor without a screed, without worrying about the height of the floor, then in case of significant unevenness, when the above methods do not work, use another way to solve the problem - a system of wooden logs. First, determine the height of the new floor. Using a level, draw a line for the new floor around the perimeter of the room. The result will be a contour of a perfectly horizontal surface. From corner to corner (in a cross), pull nylon guides along which wooden logs-beams (100 x 40 mm or others) will be installed as beacons. Let the distance between the logs be no more than 0.5 m. After installing and adjusting the logs in height (using wooden blocks), we fix them to the floor using metal anchors to the concrete through the support bars. It is worth putting a strip of roofing felt, perhaps linoleum, under the support bars for waterproofing. We get a perfectly flat and very rigid structure, onto which we fix plywood sheets with self-tapping screws (at a distance of 5-10 cm) with a gap of 0.3 - 0.4 mm. Plywood, in this case, is used with a thickness of 12 mm or more to ensure sufficient surface strength.
On a wooden surface, the joists can be strips of plywood, secured with PVA glue or self-tapping screws so that the sheets of plywood lying on top rest at the joints on the joists. Like brickwork, the top sheets are joined with staggered joints. The finished floor is secured with self-tapping screws with a countersunk head.
You can also watch a detailed video about how the floor is leveled along the joists without using a screed:
It is possible that someone will suggest other methods, but the methods we have proposed to level the floor without pouring a screed have already proven to be reliable, durable and not expensive.
Similar articles are available for you:
- How to insulate the floor in an apartment
- How to insulate a floor in a wooden house
- DIY semi-dry floor screed
- How to quickly wash off whitewash
Creating logs from bars
Leveling the floor in this way is only possible in rooms with high ceilings. To create a level base, marks are made on the walls for attaching joists. When the level is adjusted, the boards along the walls of the room are secured with self-tapping screws. To give the structure strength, transverse joists are laid.
A certain distance should be maintained between the boards, which depends on the sheet covering used in the future. For example, if, in order to save money, the flooring is made of plywood, then the distance between adjacent joists should be about 35 mm. For a more durable material, you can increase the distance between the boards to 55 mm.
When the logs are laid, they begin to install the flooring. Sheets of plywood need to be cut to the required sizes. Lay the workpieces so that the edge of the material falls in the middle of the log. The plywood is secured using self-tapping screws, recessing the fasteners into the sheets. Then it remains to lay the finishing coating.
How to make a self-leveling floor
Self-leveling flooring is applied to the following surfaces:
- Concrete base.
- Cement screed.
- Ceramic tiles (if they are old, without chips).
- Wood floors or wood flooring.
The basic rule when working with self-leveling flooring is to work with a flat surface. You can check this using levels; the permissible deviation is no more than 4 millimeters.
To make a self-leveling floor on an old wooden one, you need to prepare it:
- Remove old baseboards.
- Remove paint, varnish and putty with a spatula, scraper or sander.
- The humidity of a wooden floor should be no more than 10%. You can check this with a special device - a moisture meter.
- Using a sander or manually with an emery sheet, you need to open all the cracks.
- Remove dust and debris first with a broom, then use a vacuum cleaner.
- Clean the floor with a special degreasing powder.
- Fill all cracks with building mixture.
To prepare a concrete floor you need to do the following:
- Check the humidity (also no more than 4%).
- Remove the old covering (linoleum, laminate).
- Check compressive strength.
- If the concrete screed was done recently, then you need to pause for 28 days and only then begin installing the self-leveling floor.
- Clean the surface from stains and paint.
- Remove debris and dust.
- Fill the cracks with building mixture.
- Level the surface with a grinding machine.
- Check the horizontal level.
Before laying the floor, prime the surface with a special primer. The room temperature should be no higher than 25 degrees.
Dilute the mixture correctly
This is a very important rule when working with self-leveling floors. In order for the floor to spread well, you must follow the instructions. If the proportion is correct, then working with such material will be a pleasure. Due to the fact that dry self-leveling flooring has a high price, it is diluted exactly as indicated in the instructions.
First, pour water into a clean, dry container (bucket or bowl), and then slowly pour in the dry mixture and mix thoroughly with an electric drill. By the way, it is advisable to purchase a special attachment for the drill. Stirring is performed at intervals of a couple of minutes, several times. The consistency should be uniform, without lumps or air bubbles.
To check whether the mixture is well prepared or not, you need to take a plastic ring (diameter and height five centimeters). A deodorant cap will do; cut off the top of it. The ring is placed on the glass, and the solution is poured into the lid. The lid should rise slightly and the liquid should spread over the glass. If the diameter of the spot is 16-18 centimeters, then this is the optimal consistency for filling the floor. If not, chips and cracks are possible after drying, as well as a decrease in strength.
Noise and sound insulation technologies
Laminate occupies one of the first places among popular floor coverings. Modern technologies make it wear-resistant, durable, and can be easily mounted on any surface. But this material conducts well and sometimes even enhances sound.
Because of this, problems may arise with lower neighbors: few people would like to constantly listen to the stomping overhead. This problem can be solved in advance by installing soundproofing of the floor under the laminate. There are many types of substrate. All of them can not only absorb sounds, but also:
- level the surface of the rough base;
- reduce floor loads;
- enhance thermal insulation;
- provide good waterproofing.
READ MORE: What indoor plants bring love and family happiness to the house?
Laying the underlay is the final step before installing laminated panels.
Crushed stone or expanded clay for floor screed
Using concrete to construct a floor covering (base for it) is a common solution. Various materials can be used as coarse aggregate. The most popular are crushed stone and expanded clay. They differ significantly from each other, but provide the opportunity to make a high-quality screed, provided that the right type of material is chosen. Features of crushed stone Crushed stone is a bulk mineral. It can be crushed or formed naturally. It is distinguished by a dense structure, high frost resistance and a wide range of strengths (depending on the breed). Crushed stone weighs a lot. Therefore, its presence in the screed creates additional load on the supporting structure. There are 3 fractions of crushed stone: • fine. Grains size 5-20 mm. They are distinguished by high strength, density and low flakiness. This material is suitable for constructing thin screeds and foundations; • average. Grains size 20-40 mm. They have good strength characteristics, low or medium flakiness. This material is used for pouring concrete floors over large areas; • large. Grains size 40-70 mm. They are characterized by a wide range of flakiness levels and difficulty in compaction due to the large size of the granules. The formation of voids between grains has a negative impact on the strength of products. The most common material for screeding is granite crushed stone. It has high strength, frost resistance and the greatest weight. Limestone crushed stone remains in second place in demand. This is a cheaper, but less durable and frost-resistant material. Other types are less in demand. They are less commonly used in screeding and pouring floors. When choosing crushed stone for concrete mixtures, it is necessary to take into account its flakiness. The lower the percentage of needle-shaped and flat grains, the more dense and reliable the solution will be. Features of expanded clay This material is a certain type of clay that has undergone heat treatment. It has a dense crust and a porous structure that provides good thermal insulation. There are over 13 strength classes of expanded clay. For filling floors, material grade P75 and higher is recommended. Expanded clay is lightweight. This reduces the load on the supporting structure. When mixed with cement mortar, the material absorbs moisture and loses its thermal insulation characteristics.
Soundproofing materials
To enhance wear resistance and maintain the impressive appearance of a laminate floor for a long time, you need to carefully select building materials for its installation, paying attention to every single detail. For example, the thickness of the soundproofing material should be chosen correctly.
It should be from 0.2 – 0.7 cm. A material of this thickness insulates the room well from noise and cold, and evens out screed defects. When using it, there is no need to use expensive self-leveling mixtures or attach boards or plywood. Thicker material will cause the panels to bend and then cause the locks to break.
Isoflex and isolon
Basic principles of forming a concrete mixture
The main difficulty in preparing concrete from screening mixtures and cement is the accuracy of proportions. You must follow the instructions, since otherwise you cannot guarantee the high quality and strength of the resulting solution.
- When diluting a concrete mixture from screenings and cement, it is imperative to add a plasticizer.
- The plasticizer is taken at the rate of 1 liter per 20-40 kg of cement.
- A plasticizer is needed so that the concrete screed shrinks less and does not crack.
- The maximum fraction size is no more than 0.2-0.5 mm.
- Take the composition of the screenings clean, without organic and clay particles.
- The larger the chips, the stronger the concrete and the less susceptible it is to cracking. However, composition with a large fraction is difficult to lay and level. Therefore, this must be done with experience in such work.
- To obtain a solution of grade M-150, cement grade M400 is best suited.
- This composition can be used to make concrete floor screeds up to 10 cm high.
- The resulting mixture in the finished state should be elastic and not spread. The lump fashioned from it will be dense, not crumbly.
The concrete composition is mixed from cement and screenings in a ratio of 1:8. In this case, it is necessary to follow the norm according to which the percentage composition of water should not exceed 1/5 of the total amount of concrete produced.
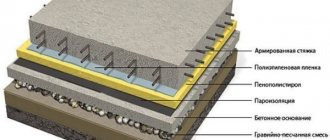
Floor reinforcement under screed