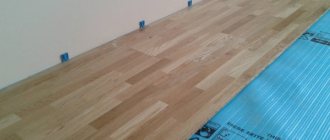
Dismantling a floor screed is difficult, but possible!
Among other dismantling works for the removal of various structural elements, one of the most popular types is the dismantling of floor screeds.
Removing an old floor screed is a rather labor-intensive process that requires not only the use of special equipment, but also some experience. If you are not confident in your abilities, then it is better to use the help of professionals: the cost of dismantling the floor screed will be higher, but this option is more reliable. In the case when “we see the goal - we don’t see the obstacles,” we dismantle the cement screed with our own hands, using our recommendations.
Dismantling the floor: definition, purpose of the screed
Most domestic standard apartments are designed with low ceilings, long narrow corridors, and cramped kitchens. Previously, no one even thought that they would have to demolish walls, partitions, and repair the floor of a Khrushchev-era building, the layout of which is far from ideal.
If a major renovation is planned, including ceiling repairs and wall finishing, then, most likely, a new floor will also have to be installed. Dismantling the cement screed is necessary if:
- the old floor screed was badly cracked and unevenness appeared
- floor level needs to be lowered
- it is necessary to repair the communications installed under the material
- it is in unsatisfactory condition for finishing with a new type of flooring
Sometimes it is strictly forbidden to pour a new screed on top of the old one, in order to avoid exceeding the permissible load on the floor. In this case, the floor screed is completely dismantled to make a new screed from a cement-sand mixture or using expanded clay.
What is a floor screed?
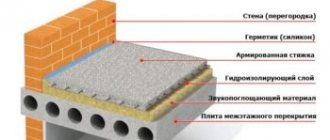
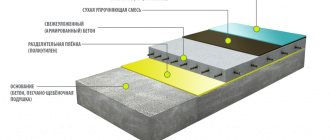
A floor screed is a small layer (at least 4-5 cm) of durable material placed on the main floor structure. This coating is an intermediate layer between the concrete base and the floor covering itself.
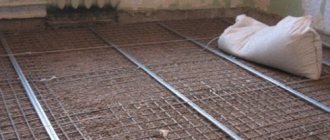
The screed can be monolithic (made from a cement-sand mixture) or composite (made from several layers of gypsum cement or expanded clay concrete). To obtain maximum strength, a monolithic screed can be reinforced with metal mesh. The qualitative composition of the floor screed affects its strength, load, hydro- and thermal insulation properties.
The screed performs many functions:
- levels the floor plane
- takes on the load on supporting structures
- serves to protect floors from external influences, abrasion, impacts
- represents the basis for further layers of sound and thermal insulation, flooring
- distributes heat in floors equipped with built-in heating
The screed is done directly on the concrete base to ensure maximum leveling of the surface, which will facilitate the subsequent application of the finishing floor covering: linoleum, parquet, laminate, etc.
Dismantling concrete screed, which is mainly used in the construction of courtyard buildings in country cottages, basements, and garages, is also a rather labor-intensive process. Due to the budget price and ease of installation, concrete floors are also created in residential premises with subsequent insulation. Modern dismantling of concrete screed, the price of which depends on the chosen method of its removal, can be carried out by “manual” and “machine” methods.
Concrete is a stone-like material with a complex structure, including aggregates of different shapes and sizes, which are held together with a binder. Appearing a couple of centuries ago, concrete is one of the most popular building materials in the construction of buildings and various structures. Not only the floor is made from it, but also the foundation, walls, panels, and blocks.
Dismantling of concrete can be complete or partial. Often, the dismantling of a concrete screed is carried out by diamond cutting of concrete. Then the dismantling of a concrete floor or wall is carried out, as the hero of the famous film said, “without noise and dust.”
Dismantling cement (concrete) screed: rules for proper removal
When starting to overhaul the floor surface, you will have to dismantle the floor screed, the price of which from construction companies is quite high. But we ourselves are able to remove baseboards, remove linoleum, dismantle laminate flooring, remove parquet or carpet.
Most often, floor screed is dismantled using the impact method using power tools: hammer drills, jackhammers, diamond cutting wheels. At home, you can use a regular crowbar, sledgehammer, hammer, chisel, if the thickness of the coating allows.
Dismantling the floor using electrical devices significantly increases labor productivity. But such dismantling of the floor screed will also have an increased price. Specialists using the impact method using powerful pneumatic concrete hammers, hammer drills, and diamond cutting equipment will quickly but expensively dismantle the floor screed. And in the case of a heavily metal-reinforced coating, the work is carried out using a special joint cutter.
Dismantling a cement (concrete) screed in any way is carried out by breaking the base into pieces. To remove cement-concrete residues, you should stock up in advance with bags made of durable material.
You need to be prepared not only for a huge amount of construction waste, dust, dirt, but also for increased noise generation, which is better to immediately discuss this with your neighbors. It is better to talk and agree on a schedule for noisy work in advance than to later receive “guests” from various authorities, invited by angry residents of nearby apartments.
Dismantling the floor screed will test not only your neighbor's patience, but also yours. All repairmen who have passed this difficult test will no longer be intimidated by anything! Good luck in your battle with the screed!
Features of the technology
A cement-sand or concrete mixture gains strength over time and in its properties approaches stone. The main task during the work is to break the screed into small pieces so as not to damage the floor slab.
The jackhammer can be used in non-residential premises and new houses with solid floors. If the house is old, then it is better to dismantle the concrete manually to reduce the likelihood of damage to the floors.
The best option for removing old screed is diamond drilling. In this case, the concrete is cut into square tiles, which makes it easier to dismantle the layer and remove debris. In addition, the diamond drilling and cutting method reduces the formation of dust, since water is supplied to the working part of the installation to cool and remove concrete chips.
Pieces of concrete and debris remaining after removing insulation and waterproofing are loaded into a container or truck and taken to a landfill. After cleaning and cleaning the floors, the dismantling work is considered completed. You can begin laying a new base under the flooring.
Kinds
Depending on the equipment used, concrete dismantling can be impact or non-impact.
- Impact dismantling of reinforced concrete structures is carried out with hydraulic jackhammers. In this case, reinforced concrete of various directions is dismantled. Hydrodemolition of concrete is a process that destroys concrete with relative noise and dust emissions. Such dismantling of concrete structures is characterized by reliability, safety, efficiency and economy. When dismantling this type, there is no need to interrupt it in order to strengthen or fence nearby buildings. Hydraulic hammers are light and small-sized, so they can be easily transported and are easy to use. This device can be easily operated by one person. Small fittings are subject to such dismantling. Hydraulic hammers are not capable of dismantling reinforced concrete with a large metal frame.
- Impact-free methods are determined by the use of diamond or wire cutting. These instruments produce virtually no noise, so they are used mainly in residential areas.
Diamond cutting
Diamond cutting of concrete is a modern, highly efficient method of dismantling.
It is the most popular dismantling method. This is done using a diamond-coated disc or drill. Allows you to dismantle the hardest types of concrete.
Diamond cutting has a number of advantages:
- maximum accuracy;
- minimum dust and noise;
- no vibration.
This method is used during complete and fragmentary dismantling of concrete structures.
Rope cutting
The positive features of this method are the increased level of safety and noiselessness. A diamond rope is used to dismantle a foundation of a certain thickness. By dismantling concrete walls in this way, you don’t have to invite many craftsmen. Here you can get by with just a couple of professional assistants.
Other methods of dismantling structures
Application of special mixtures
To destroy concrete structures, special compounds NRS-1M or NRV-80 are used. These materials embedded in concrete contribute to cracking and crumbling of the structure. After just two days, the debris can be removed.
Explosion
There are times when an explosion is used to dismantle a building. This method is suitable for massive structures that would take a lot of time to destroy manually. However, if there are other structures nearby, this method will not work. An explosive substance is placed on all sides of the building's foundation, destroying it during an explosion. As a result, the walls fall and collapse. This technology is quite effective and fast, but very expensive.
Electric arc
The use of an electric arc for dismantling concrete buildings is a very high-quality method. This mechanism, when heated, leads to melting of the composite.
Often, in order to destroy a building, various dismantling options are combined. However, it must be taken into account that if the task is only to partially disassemble the structure, then an explosion cannot be used in this case.
Stages of work
Initially, it is necessary to properly prepare for the destruction of an unnecessary structure. The preparation process is quite labor-intensive and consists of the following sequential actions:
- Installation of equipment and crumbling of concrete.
The first step is to study the site where dismantling is planned. - Next, you should discuss all the nuances of the work.
- All communications, if any, are turned off.
- The entrance to the facility is being prepared, as well as a free area for the delivered special equipment.
- Then this equipment is installed directly at the site of future work.
- Next comes the process of dismantling concrete structures. Various coverings are removed, the monolithic structure crumbles.
- Upon completion of work, the area should be cleaned. The dismantled pieces are calibrated, loaded into prepared transport, and taken away.
It is very important to consider issues such as safety. To do this, it is necessary to organize the stability of the structure during its collapse, so that there is no premature, unexpected collapse, due to which people may suffer. Based on this, only knowledgeable, experienced craftsmen should be involved in the work.
Dismantling of individual parts of the building
Concrete floors
Dismantling ceilings is a very complex and dangerous process. After all, this design is the basis for the walls of the second level or attic. As a rule, it is made of durable building material. Therefore, you need to be well prepared for this work and involve experienced specialists. It is also necessary to use special equipment: cranes, hydraulic cushions, diamond-coated electric cutters, jacks, pneumatic devices. Dismantling of this structure can be complete or partial, for example, to erect a staircase, you need to disassemble the ceiling to install the staircase.
Initially, the concrete floor is milled, all floor coverings are removed, then supports are installed. Only after this can you begin dismantling the ceiling. Here you should not resort to impact dismantling devices, since their work can destroy other parts of the building that need to be kept intact. The work may require jack stands.
Dismantling the floor screed
Dismantling the screed using a hammer drill.
Dismantling a concrete screed requires special skills and knowledge. As a rule, it is carried out with hand-held devices (hydraulic hammer, hammer drill, or using special machines). You also need to take care of the necessary protective equipment: gloves, mask. Dismantling of a concrete floor and its coverings can be carried out using a milling cutter. Milling a concrete floor is carried out when only part of the flooring needs to be dismantled.
Preparatory activities
Before you begin dismantling the floor, you should prepare the most necessary tools, the choice of which is determined by the type of floor covering. But in any case, special means of protecting the body and respiratory organs will be required, which are mandatory when carrying out work of this class (respirator, cotton gloves and headgear).
To avoid the spread of dust throughout the apartment, it is advisable to secure a piece of dampened cloth in the doorways, and lay mats soaked in water at the thresholds. In addition to this, you will definitely need:
- ordinary nail puller;
- assembly hammer or sledgehammer;
- screwdriver, pliers and pliers;
- electric jigsaw or saw for cutting long boards.
Please note that to dismantle a tiled (porcelain) floor, you will additionally need to prepare a chisel and a hammer drill. Floor coverings laid using carpet, as well as laminate or linoleum, are much easier to dismantle, especially if they are simply laid on a concrete base (without glue).
Advice from experienced professionals
- Carrying out dismantling work that requires the use of impact devices is a very expensive service, since these devices negatively affect human health.
- Dismantling work is always accompanied by the appearance of dust and debris. Therefore, you need to worry about transport for waste disposal in advance.
- It is not recommended to carry out dismantling work yourself without special skills and knowledge, as you can not only harm the entire structure of the structure, but also your health.
- During work, do not neglect protective equipment. Be sure to wear a helmet, respiratory mask, special glasses, and headphones. Because the work ahead is dusty, noisy, and quite dangerous.
A concrete or cement screed is used to level the surface of a concrete subfloor before laying the finishing floor covering. How to remove a screed from the floor when it becomes unusable or the time comes for major repairs, this question affects many during repairs. The choice of method and the overall complexity of the operation depend on the type of screed, its thickness and the area of the dismantled coating.
Tools and protective equipment
Floor construction with self-leveling screed.
For quality removal, you will need to choose the right tool. A seam cutter can remove screed up to 30 cm deep; reinforcement, as a rule, is not a hindrance for it. When using the impact method, hammer drills, jackhammers, and grinders are used. The impact method is the noisiest and most unsafe for floors.
The tools used to remove old grout from the floor can be divided into manual and electric. Power tools that are good at removing hardened mortar include a concrete hammer, a hammer drill, various tools for diamond cutting and drilling, and a seam cutter for reinforced coatings. As a rule, all these devices produce a lot of noise.
For those who are used to relying on their own strength, a crowbar, hammer, chisel and sledgehammer are offered. The question arises: why do everything manually when there are electrical appliances? This is necessary in places where there is no electricity or where the work is small. This is a slow and very noisy process, but these tools can always come in handy as auxiliaries.
Work that removes old flooring is harmful to health. Most often, a lot of additional cleaning is required, since the mortar and cement hide underneath additional layers of insulation: mineral wool, sand or chipboard. Masks, respirators, helmets and headphones are required for workers.
List of required tools:
- protective equipment: glasses, helmet, respirator, overalls;
- durable bags for garbage collection;
- a tool for carrying out basic work to choose from.
Types of ties and the possibility of removal
You can dismantle any screed; the only difference is the labor intensity.
- Wet floor screed. This classic method, proven over decades, is still widely used today due to the low cost per square meter of finished coating. Apply to a dust-free base, primed and dried. Requires the installation of a damping tape around the perimeter adjacent to the walls for waterproofing and suppression of the spread of structural noise. To increase strength, a reinforcing mesh - metal or plastic - is placed in the screed. Requires additional surface leveling. Dismantling such a screed is the most labor-intensive; it requires crushing, sawing or milling of a permanent structure firmly connected to the ceiling and walls. Professional equipment is required, and it is also difficult to remove residues after dismantling.
- Dry screed. This is a fast technology; the screed material is poured between the beacon lags, compacted and covered with sheets of plywood or OSB. It is also necessary to seal cracks and depressions in the base and waterproof it. It is important that the sheets rest not only on the logs, but also on the surface of the backfill material. This type of screed is more expensive than a wet one; it is more susceptible to moisture. Dismantling of such a structure is easy - just unscrew the screws, remove the sheets and joists, load the backfill material into bags and take them out.
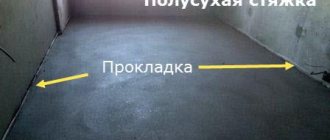
- Semi-dry screed. It is performed using a mechanized method; a large amount of fiber fiber is added to the cement mixture. A solution with a small proportion of water is supplied to the surface by a pneumatic blower, after which it is compacted. Fiber fiber increases internal adhesion, so mesh reinforcement is not necessary. The cost is also high, due to the high cost of equipment and the involvement of qualified specialists. It is easier to dismantle such a screed than a wet one and harder than a dry one.
Wet screed
Usually, when choosing a type, they do not think about how to subsequently remove the concrete screed, nor do they take into account the cost and complexity of its dismantling.
Removing skirting boards
It is customary to begin dismantling the flooring with the removal of baseboards, which can be plastic (with a cable channel built into them) or wooden. We begin disassembling plastic blanks by removing the decorative strip and removing the elements fastening the product to the wall. We remove wooden skirting boards sewn to the floor using a nail puller, and dismantling should begin from the corner of the room.
If the baseboard is thoroughly painted over with several layers of paint, you first need to find a place where it can be easily “pryed off” with a flat screwdriver, after which you can use a nail puller. To avoid damage to the wall decorative covering and to make it easier to fix the position of the tool, a small wooden plank (block) is usually placed under it.
Before removing old wooden floors, you should familiarize yourself with the order of their placement on joists laid on a concrete base. When carrying out this work, certain difficulties may arise with the removal of the first board, after dismantling which the process will go much faster. To facilitate this operation, you should clear the gap between the floor and the wall and use a nail puller to pry up the end board in this place.
All other floorboards are fairly easy to remove and can be removed using a hammer or large flathead screwdriver. To remove nails driven into boards, you can use previously prepared pliers.
If you have a circular saw, all operations for dismantling wooden floors are noticeably simplified. With its help, it will be possible to cut individual “floorboards” into smaller pieces, which will be much easier to remove from the disassembly site.
For cases where the floorboards are fastened with self-tapping screws, you need a screwdriver that allows you to quickly remove the fastening elements.
Relevance of dismantling
The strength of screeds is always lower than that of the main building structures, and the daily loads on it are no lower. In addition, these loads are not constant and occur in different places. Therefore, the screed wears out, and wears unevenly. After a few years, areas near doors stand out and weaken, where the flow of people passing is concentrated, near kitchen equipment, plumbing fixtures, etc. The least wear is observed in the corners, where there is practically no variable load. In addition, the condition of the screed is affected by periodic and permanent displacements of the base elements, especially if it is made up of several slabs.
During a major renovation, the project almost always includes dismantling the old screed and installing a new screed. This is often easier to do than carrying out defect detection, determining the degree of safety of individual sections and their suitability for further use. And a new screed will last longer than a partially corrected one.
If the defects are obvious, for example, settlement of the coating along the joint of the slabs or at the junction with the supporting wall or pillar, partial dismantling is carried out and a new screed is installed in the damaged area.
The old screed is dismantled if:
- base defects were found;
- numerous cracks are visible;
- installation errors were detected;
- level reduction required;
- it is planned to install (or replace) heated floor equipment;
- it is necessary to replace the communications embedded inside the screed.
The work of dismantling an old screed is physically difficult, labor-intensive, and the process generates a lot of waste and dust. They require professional equipment and specific skills.
There are cases when, if the condition of the old screed is acceptable, they decide to pour a new one directly on top of the existing one. This decision should be made with great caution, especially if the thickness of the old screed is large. The total load on the floors may be unacceptable. In each individual case, strict engineering calculations are required.
Features and methods of screed removal
Removing wet and semi-dry screed comes down to mechanically breaking it up by one method or another into separate pieces and removing these pieces.
The method by which an old screed can be removed from the floor is selected based on the thickness and material of the coating, the total area, thickness and material of the floor, the number and type of communications inside the screed and in the underlying floor.
For partial disassembly in a small area (corner of a room, toilet, etc.), you can get by with hand tools, such as a chisel and a small sledgehammer.
If the thickness of the screed is more than 3 cm, or it is reinforced with steel mesh, you cannot do without serious units. To destroy the coating the following are used:
- pneumatic jackhammer;
- a powerful hammer drill with a lance- or spade-shaped attachment;
- high-power circular saw equipped with a diamond blade for working on stone and iron.
To remove the screed you will need a pneumatic jackhammer.
There is another way in which you can also remove the screed layer. You can use a hammer drill or a circular saw to dismantle it in a limited area. On an apartment scale, you will have to use a jackhammer.
Before deciding to start working with a hammer drill or jackhammer, you should definitely obtain written consent from residents of nearby apartments to carry out work on certain days and hours.
Tools and protective equipment
The work will require a small amount of tools and equipment, but it must be professional and highly productive, and hand tools must be serviceable and reliable:
To destroy the screed you will need:
- jackhammer, compressor, hoses;
- if a compressor with an internal combustion engine is used, the length of the hoses should be sufficient from the place where it is installed on the street to the farthest corner of the apartment;
- hammer drill with replaceable attachments;
- an angle grinder with a diamond disc for destroying the reinforcing mesh;
To clean up construction waste you must:
- durable metal scoop;
- hard broom;
- savvy;
- construction vacuum cleaner;
- a large number of bags for collecting and disposing of waste or a construction hose secured under the window;
- trash container.
Personal protective equipment you will need:
- vibration-proof gloves for working with a jackhammer or hammer drill;
- a large number of construction gloves for loading debris into bags;
- construction helmet with integrated or separate vibration headphones;
- supply of respirators;
- construction shoes with steel toe cap.
For power tools, you should provide a supply of consumables - disks, tips, hammer oil.
Preparatory work
Before you start reading the work, you need to make sure that there is an accurate plan for all communications running both in the screed and in the floor underneath it. When using powerful routers, circular saws, or jackhammers, there is a significant risk of damage.
Therefore, ALL communications, even those that lie below the layer being removed, must be turned off for the duration of the work: electrical networks are de-energized, water or coolant must be drained from the pipelines.
During dismantling, a large amount of dust is generated, so all furniture, equipment, household appliances, windows and all horizontal surfaces remaining in the apartment must be securely covered with polyethylene sheets or special non-woven covering material.
Next, you need to completely clean the disassembled screed from all objects standing on it, and remove the old floor covering.
At this stage, the condition of the screed is assessed and the final decision is made - to repair it or replace it.
Stages of dismantling work
Actually, disassembling the screed is divided into several stages:
- Open a small piece of the covering, evaluate the actual thickness of the screed, the presence and quality of the reinforcing mesh, the presence and direction of communications (and the compliance of their location with the existing plans). The measurement will make it possible to estimate the volume and duration of work and the amount of construction waste generated.
- Bypassing the communication routes, destroy the screed in several places with a jackhammer. You should start removing the coating from the far corner of the room.
- Connect the starting points with strips of the removed screed; when the wall is clean, move towards the exit in the same way with stripes. Care must be taken not to destroy the floor instead of the screed.
- In order to notice in time and not damage communications, you should often put broken pieces in bags.
- Periodically remove bags of garbage so as not to clutter the room and not to overload individual overlap points. It is not recommended to stack bags in several rows.
- After removing the waste bags, sweep and vacuum the exposed floor.
Screed dismantling stage
Now you can begin preparing for the installation of a new screed.
Removing the screed
After you have prepared the room for noisy and dusty work, you need to dismantle the old flooring. At this stage, it is worth considering the features of dismantling a wooden floor:
- The most difficult thing to disassemble is piece parquet, and if it is glued, then you can’t even hope to preserve the coating.
- To remove parquet panels, just find the last board with an open groove (usually it is located near the door).
However, if the floor covering has been in use for quite a long time, then it may be damaged by fungus and mold. In this case, there is no point in trying to save it.
After removing the finishing layer of the floor, it is necessary to get rid of ventilation and any structures located in the base (if there is access to them).
At the next stage, the concrete slab is broken into pieces that are disposed of. After this, the entire room is wet cleaned.
Important! In private houses, wiring for the lower floor is most often located under the upper level screed. Usually the wires are hidden under corrugated insulation.
Nuances of partial dismantling
In a number of cases, there is no need to completely dismantle the old screed.
For example, if it is necessary to install a heated floor on a limited surface, or to reduce the overall level. Apply the following sequence of actions:
- A grinder or circular saw with a diamond wheel for stone work makes a large number of parallel cuts. It is more convenient to work with a saw because it has a mechanism for limiting the depth of cut, so they all come out the same.
- It is better to connect a construction vacuum cleaner to the saw to remove the resulting dust.
- Using a puncher with a spatula attachment, carefully chop off the cut strips.
- Remove the resulting waste with a dustpan and a hard plastic broom
- Vacuum the cleaned area of the floor.
- To level the surface, fill it with a solution like “Vetonit”
If it is necessary to remove a part of the screed that is very thick, you can use a construction router - a diamond-coated core drill. Holes are drilled across the entire area to be cleaned with a slight indentation, then the remaining partitions are broken using a hammer drill with a spatula attachment.
Dismantling an old screed is quite a labor-intensive and dusty undertaking. In order for it not to create problems, it must be agreed upon with neighbors and carefully planned. For complete dismantling, pneumatic jackhammers are used; for partial dismantling, you can use a circular saw and a hammer drill.
conclusions
If it is necessary to dismantle the old screed, you must have patience and personal protective equipment (working clothes, gloves, goggles, respirator), and also agree with your neighbors on the schedule for repair work. This is necessary in order not to receive unexpected guests from various authorities who were invited by neighbors.
Removing skirting boards
For the job you will need a nail puller, a hammer and a set of screwdrivers.
Start from the corner of the room. Otherwise, the baseboard will strain and most likely break. Insert the sharp end of the nail puller between the floor and the baseboard, and then, using the rule of leverage, separate them. Having pulled out the first nail halfway, do the same with all the others. After this, return to the starting nail. A plinth secured with screws is easier to remove - you just need to unscrew the screws. If the nails are hammered in properly, dismantle them in small steps.
During the initial inspection, it may turn out that the baseboard coating will have to be damaged. Remove the top layer using a chisel. This will free up the nails and make them easy to remove.
It is possible that the plinth is covered with paint, which is an additional adhesive material. Place a piece of wood under the fulcrum of the nail puller. Lightly hit the nail gun with a hammer to drive it in. If the nails are long and the stroke of the nail puller is not enough, you need to place a block.
When the paint layer is too thick, it is difficult to determine where the nails are located. To avoid breaking the plinth, go to the corner and step back 15 cm. Use the sharp end of a nail puller to find the first nail under the plinth. Having pulled it out, lift the plinth, and, guided by the bend, you will find the next one.
IMPORTANT: most often the baseboards are nailed, and the paint is applied in two or three layers. The attachment points in these cases are most likely located at a distance of 50 to 65-70 centimeters. When working, shake the nail puller so that the putty comes off the nails - this makes it easier to pull it out without damaging the material.
If the baseboard is attached to the wall, insert the nail puller between them. The procedure for removing nails is the same as for baseboards.
Removing the floor
Once you have removed all the baseboards, begin to disassemble the floorboards. The floor is laid from a board that faces the wall with a tenon, therefore, it must be removed starting from the reverse side. This way you can save the boards and use them in the future. If you have an already cut board, you need to start dismantling it from there.
Floorboards secured with screws make the task several times easier. Unscrew the screws with a screwdriver, and then look for a board with a groove, remove it and remove the floor. If the floorboards are nailed, the technology will be as follows:
- find which side the last floorboard is on;
- drive a nail puller under it using a hammer;
- lift it 2 centimeters;
- step on the board - it will fall into place, and the nails will stick out;
- remove nails with a nail puller.
IMPORTANT: to avoid pushing through the board, place a wooden block under the tool.
To remove the end board, remove the nails and insert a chisel between the two floorboards. By widening the gap, you will reduce the risk of damage.
If the top of the groove breaks for some reason, nail it in place with a small nail or use superglue. The appearance of the board will be ruined, but the functionality will be restored.
Sometimes the boards fit too tightly to the wall and the nail puller won’t fit. In this case, you will have to hammer it in with a hammer. Damaged areas can later be hidden under the baseboard. When you can’t get the nail puller through, even after knocking with a hammer, use a drill to drill through the floorboard, making room for the tool, or gouge out the wood near the nails, since the board is already damaged and there is no need to spare it.
Logs most often lie on substrates. There may be insulation between them, it needs to be pulled out. If glass wool was used as insulation, be careful. The logs can be pryed up with a crowbar or simply broken, since they have rotted over time and cannot be reused. After removing the joists, the dismantling of the wooden floor is completed.
