Composition of blocks, advantages and disadvantages of garages made from them
Cinder blocks are products that are made using concrete pressing technology. The key components of such blocks are most often ash and blast furnace slag. You can also find products with fillers of lower cost - with shell rock, gravel screenings, broken bricks, and construction sand. In addition, these blocks contain perlite, polystyrene, and expanded clay. These additives significantly increase the thermal conductivity of cinder block products.
The garage must be built from a cinder block with blast furnace slag, which consists of granular particles with geometric parameters of no more than 8 mm.
Products with larger granular components are characterized by low thermal conductivity. They are not suitable for building a motorhome.
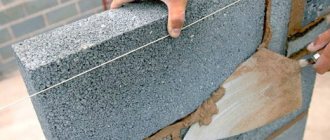
Cinder block with blast furnace slag
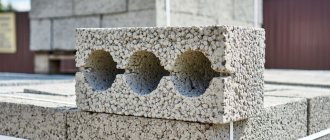
Visually, a cinder block looks like a large brick. It is porous inside and has holes (hollow). Solid products without holes are also sold. The density of the material varies between 500–2000 kg/sq. m. A cinder block garage has the following advantages:
- Long service life - the building can be used for 50 years without performing any major repairs.
- Fire resistance and excellent mechanical strength.
- Affordable price of material. It is inexpensive and at the same time characterized by excellent performance properties.
- You can install a car house made of cinder blocks yourself, without inviting expensive construction specialists. True, working with this material is quite labor-intensive, since the weight of individual blocks is 15–27 kg.
The “disadvantages” include low soundproofing potential and the presence of a certain amount of toxic elements in the composition.
Where to begin
To begin with, you need to decide on a construction project, draw the necessary drawings and strictly follow the written plan.
Construction work should be carried out in the warm season, no earlier than May, but no later than September. At this time, the snow will have melted and the groundwater level will drop, which will make it possible to freely dig a foundation pit for the foundation of the future garage.
So, the project has been approved, the time of year is ideal, it’s time to start preparing tools and building materials.
Types of reinforcement.
For work we will need:
- expanded clay concrete blocks;
- concrete or adhesive mortar;
- reinforcing bars;
- wood for mounting formwork;
- furrower;
- shovel;
- vertical and horizontal levels;
- hacksaw;
- solution reservoir;
- hammer.
Without having special construction skills, you can actually build a garage from expanded clay concrete blocks with your own hands in a few months.
Start of work - getting ready for construction
The first step of building a garage with your own hands requires a geodetic analysis of the site on which the structure for the car will stand. You will need to determine the depth of the groundwater and the type of soil. This is necessary in order to choose the type of foundation for construction.
Then you estimate the distance from the garage to utilities (plumbing, electricity) and begin developing a construction project. The latter is created so that you can immediately determine how much construction activities and the materials needed for them will cost.
Development of a garage construction project
The cost of work is calculated simply. You will need to determine the total amount of cinder block you will need. Don’t forget to include in the overall estimate the cost of all other necessary materials and the costs of obtaining various permits for the construction of a “caravan.” By summing up all these numbers, you will find out (approximately) how much it costs to build a cinder block building for a car with your own hands.
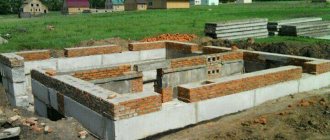
A cinder block garage is being built according to the following scheme:
- Laying the foundation.
- You equip the basement to ensure effective ventilation of the room and its high-quality thermal insulation.
- Build walls.
- Screeding the floor.
- Install gates and roof slabs.
- Provide communications to the garage and carry out finishing activities.
Let's consider all these stages of construction in more detail.
How to build your own garage from cinder blocks
Modern construction technology for garages or other outbuildings involves the use of other types of non-natural stone, for example, wall stone. What caused such interest in him? Firstly, the cost (slag concrete is more affordable than brick), secondly, the high speed of work - one block replaces 6-8 bricks and installation does not require excessive consumption of cement mortar. Third, light weight makes it possible to use an easy-to-use foundation.
But don't forget that:
1. the material is toxic and has low sound insulation;
2. cinder concrete blocks are fragile and require manual unloading (this is an extraordinary cost);
3. to achieve an aesthetic effect, the garage must be treated with plaster and siding;
4. The construction of a garage requires great physical effort due to the mass of wall stones. If you do the masonry not with your own hands, but with the help of strangers, you will need to spend extra money.
We are drawing up a project for the future garage
In order to build a car garage from wall stone without outside help, you first need to determine a rough construction plan. Projects for one or two cars are very popular. There is no significant difference in the course of their construction. In any case, when making calculations, it is worth taking into account the size of the existing car (cars) and the likelihood of purchasing a larger car in the future. Additional space may be required to organize shelving systems with shelves. Naturally, to build a garage for 2 cars, you need more material. You will also have to decide on the presence of a dividing partition.
For 2 “SUVs”, the best area is considered to be 7?7 or 7?8 m2. Small garages for middle-class cars with dimensions of 6×6 m are not significantly more expensive than garages for one car with average dimensions of 6×4 m. Convenient work indoors is possible with a ceiling height of at least 2.2 m. In the approximate calculations of the project you need to decide what kind of roof will be - single-pitch or gable.
Classification of wall stone is carried out in accordance with GOST No. 6433–99. According to the regulatory document, the voidness of the stone lies within the range of 30-40%; heat conductivity – from 0.27 to 0.65 W/m3; density varies from 750 to 1450 kg/m3. For wall masonry, hollow or solid (monolithic) blocks with dimensions of 399x199x188 mm are produced, for masonry of partitions - 390x190x90 mm.
Excavation and foundation pouring - creating a solid foundation for the garage
We take a nylon cord (40 meters), a construction tape measure, a sledgehammer, wooden stakes about 0.4 m long and transfer the construction plan that you have developed to the real area. We drive the first pegs into the ground at the corners of our future house for the car, the subsequent ones along its walls. Be sure to check the accuracy of the installation of the supports with a tape measure.
After this, we build the foundation with our own hands. It can be rubble concrete or strip. Most often, a rubble concrete foundation is laid. You can build it like this:
- We remove the top layer of soil and level the area for the garage.
- We dig a trench (its depth depends on the type of soil in the area; on normal soil it is recommended to deepen the ditch by 50–60 cm).
- We pour crushed stone and construction sand into the trench, pour a concrete solution on top (proportions with water - 1 to 3).
- We build the formwork and lay rubble stone and concrete mortar on it (a layer of stone, then a layer of concrete, and so on until the ditch is filled to a given level).
- We are waiting for the foundation to dry out.
Strip foundation
Please note that to build a foundation for a garage, you need to use cement grades 150, 200. Less quality material will not allow you to create a truly reliable and durable foundation. Another point is that layers of rubble stone should be moistened with water before pouring them with concrete. How much exactly you will need depends on the situation - the bottle must be wet enough to adhere well to the solution.
We waterproof the finished foundation using roofing felt, after which we move on to the next stages of construction.
Gas blocks
The lightest of concrete blocks and characterized by almost ideal geometry, so the installation of a garage can be carried out in record time. Aerated concrete blocks are produced exclusively in factory conditions, so you should not have any special problems with quality.
However, the loose structure of the blocks requires the use of special means for reliable fastening (for example, installing a reinforced belt and additional strapping for installing garage doors), and this increases the scope of work and adds costs. And even having reliably strengthened your garage, you must be prepared for significant shrinkage of the finished structure (shrinkage rates for aerated concrete blocks are twice as high as for foam blocks).
In terms of water absorption, gas blocks are also superior to foam blocks, therefore, to protect against fungus and dampness, the constructed garage will have to be protected from the outside with siding, plaster or other external finishing.
We build a motorhome with our own hands - no difficulties
We construct the basement using wooden formwork. We take boards 10 cm wide and install them around the perimeter of the ditch. We waterproof the horizontal sections of the base (we use the same roofing material folded in two layers). Then we mount the gate on the spacers. It is advisable to weld round rods with a cross section of 10–12 mm to them. They will subsequently fit into the seam of the masonry, due to which they will stand almost “forever”.
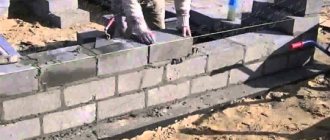
The walls are laid using standard technology - “brick”. She suggests that we lay out the corners first, after which we stretch the cords between them. The stretched strings will serve as a guide for laying the next cinder block products.
Laying cinder block walls
We make roofing ceilings from I-beams. We take the height to be 12 cm, and their length should be approximately 25 cm greater than the width of the garage being built. We lay I-beam metal products in increments of 0.8 m across the room. After this we sew up the overlap. We lay 4-centimeter-thick beams, and on them - roofing felt, on which we lay expanded clay or ordinary slag.
The garage roof is almost ready. All that remains is to screed it with your own hands, and then put a layer of rubemast or aquaizol, which will perfectly protect the roof of the building from moisture. Please note that the screed should be treated with a primer. It will ensure high-quality adhesion of the waterproofing layer.
The floor in the structure we erected must be done at the basement level. The screed for it is based on concrete, thickness is at least 0.1 m. It is recommended to take concrete grade M200. Moreover, the mixture for the screed is poured continuously, in successive layers. Do not forget to grout the floor base after the solution has hardened.
Using the same method, you need to make a blind area with a slope along which rain and melt water will drain. In this case, the concrete layer may have a smaller thickness - about 50 mm.
All you have to do is finish your cinder block garage - whitewash it, plaster or grout it with cement, and then insulate it with foam or fiberglass.
Source
(Visited 328 times, 1 visits today)
Technology
First, you should prepare the area for the start of work, clear it of debris, growth, grass, in general, make sure that nothing interferes with the work. And then you can proceed to the foundation.
Foundation
Along the perimeter of the finished site, you should dig a ditch for the future foundation, line its walls with polyethylene, fill the bottom with a cushion of sand and crushed stone and compact it well. It is necessary to pour water onto the compacted cushion so that the crushed stone, sand and water set, forming a strong slab - a guarantee of the durability of the structure.
The pillow is laid out in layers, on average 10 mm each. Next you need to wait for it to dry, pour concrete on top and also wait until the foundation is completely dry.
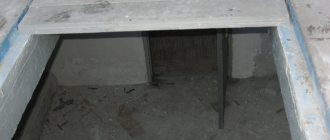
Inspection hole
The dimensions of the pit should be determined based on the size of the car. The width should be 70-80 cm less than the distance between the left and right wheels. The depth is calculated based on the owner’s height plus 10-20 cm for comfortable work.
A pit of the required size is dug and filled with a bed of gravel and clay. A film is placed on the cushion, and the concrete mixture is poured onto it. Clay waterproofs the foundation and is an environmentally friendly material.
Next, the wooden formwork is installed and filled with concrete. After time, the solution will dry and you will have a finished foundation with an inspection hole.
The principles of constructing a viewing hole remain the same when arranging a cellar. A cellar is made even faster than a pit, since it is shallower in depth and does not need such a powerful foundation.
Floor
The floor in the garage should be made powerful and durable, because the load on it will be much greater than on the floor in an ordinary residential building. First, you should compact the soil under the future floor well, cover it with polyethylene and fill it with several layers of sand and crushed stone cushion.
For a more powerful structure, we recommend placing reinforcement bars on the cushion, forming a grid along and across the space, and then filling it with a concrete mixture with crushed stone added to it.
When the solution hardens, you will get a beautiful, strong floor that can withstand shock and just heavy loads. Next, you can begin building the walls and roof of the future garage.
Walls
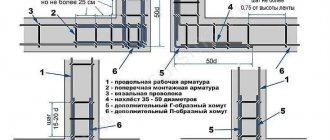
First, you need to lay reinforcing bars around the perimeter of the base and fill them with concrete. Then place two rows of expanded clay on top of each other.
The joints are always lubricated with concrete mixture and adhesive. The third row is laid in its middle at the junction of the blocks of the bottom row and so on, shifting each new row relative to the previous one by half a block.
Displacement is a very important point that should not be missed, because the correct distribution of the load on the base and the durability of the building as a whole depend on it.
Method of laying a wall from expanded clay concrete blocks.
The external appearance of expanded clay concrete blocks, of course, is not as attractive as that of brick, but you shouldn’t be upset here either, because it can be sheathed with any material you like. Very often, owners cover their facades with siding, which has an amazing choice of colors and structures and is quite low in cost.
Roof
The roof is no less important element of the building than all the others, and the fate of the entire building depends on its strength.
The configuration of the most commonly used roofs in construction is as follows:
- single-pitched;
- gable;
- hip;
- tent;
- dome;
- flat and many others.
Each type has its own advantages, but most often in construction they use a single slope or, the most economical, flat.
For the roof, you should mount a frame made of wood or metal and secure it to the walls of the garage. Afterwards, it is covered with roofing felt or other heat- and waterproofing material, and then the selected type of roofing material is laid on top. If the frame is wooden, then it should be impregnated with a special antifungal agent.
Warmth and waterproofing
Expanded clay concrete blocks need heat and waterproofing, and the modern market offers a variety of materials, among which I would like to note the following:
- Bitumen mastic. Plastic and viscous mastic penetrates deeply into the pores of expanded clay blocks and remains on them in the form of a waterproof film. This is a classic and frequently used material.
- PVC membrane. The material is quite young and is a film of elastic polyvinyl chloride. The seams between the sheets are sealed with hot air, which does not give a single chance for moisture to penetrate.
- Penetrating waterproofing. The substance enters the pores of expanded clay and crystallizes, forming a reliable shield against the penetration of moisture into the room.
As for wall insulation, the most acceptable option is a three-layer flooring made of polystyrene foam, polyethylene and plasterboard. Polystyrene foam retains heat, polyethylene does not allow moisture to pass through, and plasterboard is a comfortable, aesthetic material and an excellent basis for further finishing.
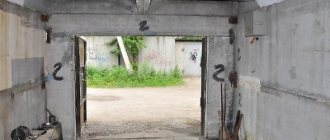
Gates
The choice of gate should be taken seriously, since this is a rather vulnerable element of the garage and it is they that attackers will break into when trying to rob the premises.
Quite a lot of types of gates are now known, but let’s focus on the most common ones:
- Swing gates. Simple and economical A classic option found in the vast majority of garages. The frame is welded from the corners, and a sheet of metal is welded on top. The work happens quite quickly.
- Sliding gates. The design consists of a sash on slats that moves along the wall. It’s possible to make it yourself, but it’s quite difficult. Moreover, this option is not cheap.
- Lift gates. It is extremely difficult to do it yourself, so it is better to order them from the manufacturer.
Interior decoration
Wall construction drawing.
Everyone is free to do whatever they want inside their garage, but the following interior decoration options are very often used:
- Lining. An aesthetic and inexpensive option.
- Plastic panels. Cute, inexpensive, but not environmentally friendly material.
- Ceramic tile. Expensive and chic option.
- Plaster. Will satisfy all wishes in terms of color and texture of the walls.
Network engineering
Those car enthusiasts who have not had to deal with the interior decoration of a garage very often believe that such decoration is only needed to make the room more spacious, comfortable or bright. However, in fact, interior decoration is also very practical. Building materials used by experienced builders can absorb dirt and odors. They are also unaffected by chemicals, moisture, temperature, and do not burn. There are many methods of interior decoration, but at this stage it is also worth thinking about how utility networks will be installed in the room.
Related article: How to properly make an electric heated floor with your own hands?
Such networks are a combination of equipment and communications that will provide the garage with heat, communications, electricity and even sewerage. It is the leading fragment of networks that is considered to be the sewerage system. It is most convenient to use a connection to a centralized system. If this is not possible, a borehole or well can be used. Lighting and power supply are very important - no garage can be imagined without light and electricity. The wiring should be planned in advance; after it is installed, you can begin finishing without fear that you missed or forgot something.
Heating and ventilation are very important - they guarantee comfort and convenience from living, both in the house and in the garage. A natural ventilation system may be the most convenient. You can install simple utility networks yourself. However, if the work turns out to be too complex, the source for the wiring is confusing or distant, just like for the sewerage system - construction, design plans, calculations and work on this issue can be left to specialists, engineers and professionals.