You can lay linoleum on plywood without much effort, but the floor surface must be flat so that the coating does not become damaged over time. You can level a wooden floor using putty or self-leveling mixtures, but this method will take a lot of time and will require certain skills to achieve a high-quality surface.
You can quickly and relatively inexpensively level a wooden floor using ordinary plywood. Plywood can be laid both on a cement screed and on joists. This method will allow you to obtain a perfectly smooth and high-quality surface, on which you can later easily lay linoleum or any other floor covering.
Basic properties of plywood
The thickness of plywood under linoleum must be at least 12 mm.
Plywood is several layers of thin wood glued together. With its help you can level not only the floor, but also any other surfaces. It is a durable environmentally friendly material that can last a long time. The surface of plywood is flat and smooth, able to withstand temperature changes in the room.
When using plywood for the floor, the load falls on the entire sheet, which prevents the surface from sagging. The plywood sheets fit closely together, preventing rodents or insects from getting underneath them. If necessary, sheets of plywood can be easily changed. Plywood under the linoleum will increase the heat and sound insulation of the floor.
Selection and preparation of plywood
Plywood for linoleum must be chosen responsibly so as not to get negative surprises in the future.
The thickness of the plywood must be at least 20 mm. It is desirable that the plywood be moisture resistant and treated with antifungal antiseptics. If you purchased untreated material, be sure to saturate the sheets yourself with drying oil or moisture-resistant stain.
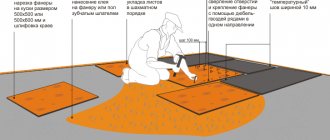
For ease of installation, plywood sheets are cut into squares based on the size of your room. This can be done using a special jigsaw or buying ready-made squares. Then the squares must be placed on the floor without fastening in order to adjust them to size and number them. Before this, we get rid of old baseboards and debris on the floor. The plywood is placed in a shear position, using the principle of laying a brick wall, to increase the strength of the covering. It is imperative to leave technical gaps under the walls up to 2 cm and between squares up to 0.5 cm, so that during expansion there is no friction between the sheets of plywood.
How to lay plywood on a concrete screed?
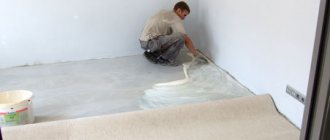
First you need to check the floor with a level. The maximum permissible discrepancy should not exceed 2 mm. Then the base is carefully prepared. Using a vacuum cleaner, all debris and dust are removed, the room is de-energized, and then the surface is washed with warm water. After drying, you need to cover the concrete screed with a thin layer of bitumen varnish or putty.
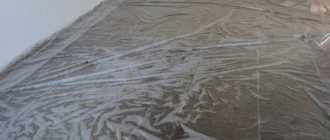
Ideally, after drying, it is necessary to lay a thin waterproofing film. It is laid with slight tension and fixed at the edges with special glue. After the glue has set, you can begin laying the plywood.
Figure 1. All fitted sheets are numbered according to their arrangement.
First, prepare identical squares. After this, you need to lay the plywood in a rough version. That is, do not attach it to the floor, but simply put it the way you want to see it in the future (Fig. 1). At the same time, do not forget that the squares must be laid with overlapping seams.
After numbering, final installation can be done. The best option is to fasten plywood using “liquid nails” or glue special for this purpose. Bustilate can also be used. But it is undesirable to use self-tapping screws in this case. After setting, the linoleum floor is ready!
Cement strainer
This method is suitable for rooms with extremely uneven surfaces. The cheapest way to make a screed is to use regular cement. With a thick layer, even in a small room, a lot of solution will be required. Therefore, you will most likely need a concrete mixer.
It is advisable to reinforce the layer with special welded cages, which are sold in any hardware store and are relatively inexpensive. But you will get a high-quality surface that will not crack in the future.
The solution is prepared in a ratio of one to three. Also, do not forget to stick damper tape around the perimeter, otherwise damage cannot be avoided even with reinforcement. And in order to protect yourself from making repairs to your neighbors in the event of a break in heating or other communications, we recommend waterproofing the floor before pouring. To remove air from the mixture, go over the surface with a needle roller, which will eliminate the future occurrence of small potholes left by air bubbles.
To make the screed perfectly level, before pouring it is necessary to set the beacons using a hydraulic level or laser level. The beacons are set using a mixture of putty and alabaster, at a rate of one to four - this way, the mixture will set very quickly, and the beacon will not have time to “story”.
The beacon is attached to the floor by means of a “slide” of the mixture, on the peak of which the beacon is placed and leveled according to the marks and the usual level. Two perpendicular beacons are also compared and adjusted. “Slides” should be made at a distance of 30–40 cm, so that you can safely drive as a rule and not be afraid that the lighthouse will bend. See how easy it is to do:
The disadvantage of this method is that a thick layer, 5–10 cm, takes a very long time to dry - sometimes about 10 days, with high humidity in the house. If you can’t wait that long and you can pay a little more, then a special leveling mixture is an excellent option. It dries within a day, has the most durable structure, mechanical strength is achieved in a smaller layer, compared to a conventional cement coating.
Most often, this method is used to prepare a cement floor for laying linoleum.
When we make a screed, most likely we are about to renovate the entire apartment - and a thousand questions inevitably arise. To get answers to them, we recommend taking a do-it-yourself apartment renovation course.
How to lay plywood on a wooden floor?
Laying plywood on the surface of a wooden floor under linoleum is very similar to the process of laying it on concrete. But at the same time, there are some subtleties that must be observed so that the coating does not deteriorate in the future and will serve you for a long time. Before work, be sure to de-energize the room.
First you need to replace those wooden boards that have become unusable. After this, the surface is checked with a level and knocked down with a hammer in places where it bulges. Using a vacuum cleaner, the floor is freed from dust and then thoroughly washed.
It is very important to wait until the floor is completely dry. Therefore, it is advisable to check the humidity level by applying film for a day. If there is no condensation after removal, you can proceed to the next stage of work, in which the surface is coated with a primer with the addition of an antiseptic. If there is condensation, you need to dry the floor some more. For this purpose, you can use a regular hairdryer or place a heater in the room. Just don’t leave the device on while you’re away from home! After all, dry wood ignites very well.
Approximately two days after the primer has completely absorbed and the surface has completely dried, you can begin attaching the plywood. To do this, the sheets are again cut into squares, as when laying them on a concrete screed, after which they are laid in rough form. Be careful to ensure that the gaps are maintained.
Fastening is done using bustilate or self-tapping screws. It is better to combine these two methods. The caps of the screws must be well recessed. After finishing the work, the plywood is cleaned of dust and covered with a thin layer of wood varnish. Now you can safely lay linoleum on plywood!
So, now you are familiar with the basic properties of plywood and the intricacies of its installation under linoleum, both on a concrete screed and on a wooden floor base.
If you follow these basic rules, then after laying linoleum the floor will not cause you any problems. And the room will have a noticeable feeling of warmth and comfort.
For those who have decided to choose linoleum as a floor covering, you need to know that the service life of the coating depends on the quality preparation of the base. Therefore, special attention should be paid to preparing the foundation. Plywood for linoleum as a leveling material is an ideal option. Let's consider its advantages and disadvantages and styling features.
To understand what kind of plywood is needed for a floor under linoleum, you need to understand what tasks are set for it. Typically, it helps solve the following problems:
- Leveling the base;
- Insulation and sound insulation;
- Raising the floor level.
But leveling with plywood is only possible with small differences in height (up to 5 mm). Otherwise, a concrete screed is used.
Before laying, we eliminate height differences
In addition to leveling, plywood retains heat well and protects against noise. In addition, installation costs are negligible.
Functions
This material perfectly copes with the tasks of leveling any base at a low cost. When laying plywood to level the floor, the load when moving across it is distributed evenly. This is due to the fact that human weight falls on a whole sheet of plywood, and not on one or two boards of a wooden floor when laid under linoleum.
By spending a little more on leveling, you can save a lot more money on future repairs.
This material does an excellent job of leveling any surface.
The advantages include:
- Low price;
- Load distribution on the floor;
- Hides all unevenness, defects and holes in the floor;
- Durable and wear-resistant material;
- Excellent heat and sound insulation;
- No squeaks.
It cannot be said that this building coating is problem-free and that working with it is a pleasure. It also has the disadvantages listed below.
Plywood, which is laid on the floor under linoleum, like other materials, has disadvantages:
- May become deformed when exposed to moisture and chemicals;
- There is a high probability of mold, fungi, and insects;
- The presence in some types of glue that releases toxic substances;
- High flammability of the material;
- Characteristic changes in characteristics (expansion, compression) with fluctuations in microclimate.
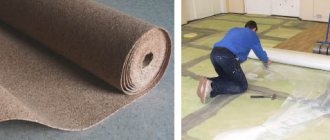
Special underlay for flat floors
Some deficiencies can be eliminated by applying special products to the coating, depending on the problem that needs to be solved. To avoid mold, you need to know how to treat plywood under linoleum. Typically, antifungal solutions are used for this, which are applied to the surface with a brush. Moisture-resistant material is used against exposure to moisture. To reduce flammability, wood material is treated with fire retardants.
When choosing plywood for leveling, you need to focus on parameters such as thickness, moisture resistance and formaldehyde content in the wood material.
A detailed encyclopedia about wood, all its types, classes and division by type of wood.
To level the floor under linoleum, plywood at least 12-16 mm thick is required. In terms of moisture resistance, preference should be given to medium moisture resistance (FC) and increased moisture resistance (FSF).
Before hammering in nails, the nails are inserted into place
Based on the presence of formaldehyde in the composition, it is divided into classes E1 (10 mg per 100 g of wood) and E2 (10-30 mg per 100 g of wood). For apartments and residential buildings choose E1.
For flooring under linoleum, the best option would be FC birch plywood with a layer thickness of 12-16 mm, class E1.
When laying flooring in an apartment, give preference to PVC linoleum. What parameters should you pay attention to when looking for linoleum for flooring? Depending on the type of room, semi-commercial material (kitchen, corridor) or household material (bedroom) is selected.
Choosing a coating for plywood is not so easy
Also pay attention to the softness and elasticity of the coating. Choose felt-based or foam linoleum. Such bases give it warmth and sound insulation properties. In addition, the foam base does not shrink and is moisture resistant, which means it can be laid in the kitchen.
This coating is amazing in color options. The layer with the pattern has a thickness of 2-6 mm, and the protective base, which gives the material durability, has a thickness of 0.15-0.7 mm.
A subfloor made of plywood under linoleum can be laid on a concrete or wooden floor. Before laying the material, clean the floor from dust and dirt, check for height differences.
Before laying plywood sheets, cover the concrete base with a waterproofing film to prevent moisture from getting on it.
Before laying the material, clean the floor from dust and dirt.
Since plywood is a wood material, changes in humidity and temperature can negatively affect it. To prevent cracks from appearing under the influence of microclimate changes, a primer is used for plywood.
Allow the material to acclimatize before starting leveling.
Read detailed instructions on how to perform and why this is a mandatory process.
For work, it is more convenient to cut the sheets into pieces to avoid deformation in the process. The sheets are first laid out on the floor to adjust the dimensions. When laying, keep the sheets of material offset relative to each other. Leave a gap of about 3 mm between the sheets so that the surface remains flat when deformed.
Plywood is fastened to a concrete floor using dowels, and to a wooden floor using self-tapping screws.
Often during repairs the question arises: Depending on the situation. If the floor is flat and there is no need to insulate it additionally, then there is no need to lay the underlay. If there are uneven floors and single-layer linoleum is used, laying a layer is mandatory.
At the last stage of the work, the seams are sealed using a sealant, which is low priced and easy to apply.
Leveling the floor with plywood
Leveling a wooden floor under linoleum using plywood or other sheet material is carried out when the condition of the working surface is assessed as poor. You cannot do without plywood sheets even when the coating needs to be transferred to a perfectly horizontal plane.
In addition to plywood, fiberboard and OSB sheets are suitable for leveling work. Which material to choose? The use of fiberboard is very limited, so this material is practically not used for leveling floors. Fiberboard sheets are distinguished by their small thickness, which allows them to be mounted on a flat surface, but without serious flaws. OSB sheets are presented in a wider range; you can choose a material with a thickness from 6 to 12 mm. It is perfect for leveling floors that have minor damage but are level. Using OSB for floors with plane differences is impractical, since it will still not be possible to achieve an excellent result: OSB sheets bend under the influence of fasteners.
Plywood is the most durable of the listed materials. Using plywood sheets, you can build a high-quality finishing base that will not sag. To level the base under linoleum, plywood with a thickness of 10 to 15 mm is suitable. The specific thickness of the material depends on the operating conditions of the future floor. The rule “the thicker the plywood, the better” does not always work; sheets that are too thin will not provide strength to the structure, and using thick material as a backing for linoleum is impractical. The best option is plywood sheets with average thickness.
How to prepare a floor under linoleum using plywood? Installation of plywood begins with cutting sheets of material into squares or rectangles: this way you can optimally use the sheets, taking into account the parameters of your room. It is more convenient to lay the resulting elements than to attach entire massive sheets. The finished plywood squares are first laid out according to the area of the room, then cut to the required sizes and numbered.
The plywood layout should look like brickwork: the sheets should be placed with a slight offset. This method of installing sheet materials is used to ensure that the finished structure is as strong as possible. A distance of several millimeters should be left between the sheets; these gaps will later play the role of damper zones when the material expands due to exposure to humidity or temperature. Similar gaps should be left between the plywood covering and the walls of the room.
Before leveling the floor under linoleum, you need to think about fastening the plywood sheets. They are usually attached to the base using glue and self-tapping screws. To do this, the holes for the screws are first countersunk. The plywood is laid out on the base according to the previously assigned numbers and glued with flooring adhesive. After fixing each of the fragments, screw in additional screws in increments of up to 25 cm.
When the floor is ready, it must be left for a couple of days until the adhesive has completely dried. If necessary, the resulting surface is puttied with a mixture of PVA and gypsum, and all holes for self-tapping screws are closed with it. As a result of all the above work, the floor surface in your apartment will not only be horizontal, but also perfectly flat. It is on such a base that you can lay high-quality linoleum without fear, which will serve you for many years.
Conclusion
Using plywood, you can easily eliminate the curvature of the floor and evenly distribute the load when walking. This material is the best option for old wooden floors. Laying plywood on a concrete floor under linoleum helps to insulate the base and also protect against noise.
Following basic flooring rules will help you avoid potential problems with your flooring. And the room will be cozy and warm.
Linoleum is one of the most common types of coating. It is practical and affordable, which is why it has gained mass popularity. If boards act as a subfloor, a problem such as unevenness of the base may arise. This occurs due to the prefabricated structure. Laying plywood over wood floors under linoleum can solve this issue without major effort.
Pros of using plywood as a subfloor
The structure of household linoleum
Linoleum is a soft covering; over time it takes on the shape of the base, so if you do not use a continuous solid flooring under it, the finished floor may become uneven with significant differences.
Laying plywood on a wooden floor in this case has the following advantages over other leveling methods:
- creating a continuous flooring that will not gain relief over time;
- no need to dismantle the old coating;
- reducing the cost and labor intensity of work (follows from the previous one);
- availability of material;
- the possibility of using moisture-resistant types of plywood, which allows additional protection of wooden floors in rooms such as bathrooms, toilets and kitchens;
- a minimum number of seams between elements, which are the weak point of any design.
How to level the floor in the house. The need to level a rough wooden floor
Leveling any floor is done to prepare it for the finishing coating. The main objectives of this operation:
- strengthening the foundation;
- making the surface horizontal and even;
- redistribution of loads acting on the floor;
- providing thermal insulation. waterproofing and sound insulation;
- camouflage of communication systems;
- creating the possibility of attaching an external covering.
Based on functional tasks, any leveling of the floor in a wooden house must meet the following requirements:
- high mechanical strength over the entire surface;
- stability under any operating conditions (exclusion of deformation, vibrations, squeaks, etc.);
- solidity and evenness of the surface;
- horizontal surface;
- manufacturability and the ability to manufacture on your own;
- high thermal resistance;
- moisture resistance.
Whatever method is chosen, before leveling the floor in a wooden house, work should begin with preparing the base (floor). First of all, all previous coverings are dismantled and the structure is inspected. The degree of aging and destruction of wooden elements is assessed. If necessary, the joists and cladding are repaired.
The wooden base of the floor is cleaned of dirt.
To increase service life, wood is impregnated with antiseptic and anti-rot compounds.
Using a level gauge, the horizontality of the ceiling is determined. Areas with the highest and minimum floor levels are determined.
Material selection
Plywood options for flooring
It is important to choose the right plywood for the job.
Laying under linoleum on a wooden floor yourself involves following the following recommendations:
The thickness of the sheets is in the range of 14-22 mm. The minimum acceptable value is 10 mm, but it is not recommended to use it, since the sheet will not be able to withstand a significant load. It is worth remembering the traffic flow of the room and what furniture is installed in it. The greater the load on the floor covering, the greater the thickness of the rough layer should be taken.
This is especially important for wet rooms, but it will not be superfluous in others, since there is always the possibility of flooding or spilling liquid on a wooden floor. Although the coating does not allow water to pass through, its base in most cases is not resistant to it, and the seams between the sheets or the joint between the floor and the wall remain weak points.
The second or third grade of plywood for linoleum is accepted. Laying on the floor as a rough covering does not require the use of the first grade. It can be used, but it is not economically profitable.
It is best if both sides of the sheets are sanded.
Technology of work execution
When laying plywood on the floor under linoleum, you will need to perform the steps in the order presented below. They begin work by assessing the condition of the old floor. There must be no elements damaged by mold or rot. If they are found, replacement with new ones is required. If high surface moisture is found, its source is identified and eliminated. The width of cracks and holes in the floor should not exceed 5 cm, otherwise restoration of the old floor covering will be required.
The procedure for laying plywood
Prefabricated elements of a wooden surface are deformed over time, which leads to the appearance of relief. To fix this problem, you should sand the floors.
. The work is performed in this order:
- A grinding machine is available for rent. When doing repairs yourself, it is not advisable to buy equipment, since it is expensive, but will be needed once.
- Fix loose elements. Floorboards must be secured using nails or wedges. This will also help prevent the floors from squeaking in the future. When using nails, their heads are recessed into the body of the board so as not to damage the tool during sanding.
- All metal elements, namely staples and screws, should be removed from the floor surface. If nails stick out, they are hammered in as in the previous paragraph.
- Sanding is performed diagonally across the room. At the same time, the processing strips overlap. The machine should not be kept in one area for a long time or driven with force, as this will create unevenness on the floor surface.
The next step is cutting out the sheets. It is necessary to lay out the sheets in the room and cut them with a jigsaw, if necessary. Each element is numbered so as not to confuse the order during the work. When laying out, it is important to take into account the distance between the sheets of 2-4 mm. A gap of 8-10 mm is provided between the wall and plywood. These seams will compensate for the expansion of the material under load and temperature changes.
As the starting point for the layout, choose the corner of the room that is closest to 90 degrees. You can check with a construction square or the Egyptian triangle method. When placing sheets, it is important to perform dressings. Each subsequent row is shifted relative to the previous one by at least 10 cm (preferably more).
Layout options for plywood sheets
Fixing plywood under linoleum is carried out in the following order:
- Before starting work, the leveling material is treated with an antiseptic or varnished
. These measures are not necessary, but will increase strength and resistance to rotting. - The surface is cleaned and degreased
(can be treated with white spirit). To improve the quality of adhesion, you can use a primer. After preparation, an adhesive layer is applied. Its thickness should be no more than 2-3 cm and the same over the entire surface. - A plywood sheet is attached to the adhesive layer
. Move to the next section, apply glue again and secure the flooring element. This is repeated with all the details. - When the glue dries, the plywood is additionally fixed with self-tapping screws
. The fasteners are placed at a distance of 20 mm from the edge of the part in increments of 150-200 mm. - We fill the cracks between the plywood sheets with wood putty.
- After the putty has dried, we level the surface - sand the joints manually with sandpaper or a sanding machine.
- We lay linoleum.
The method is suitable for laying not only linoleum, but also other floor coverings. It is important that it is applicable only for floor unevenness of no more than 1 cm. For large defects, more serious measures are taken using lags.
Currently, sheets of glued veneer are actively used not only in the manufacture of interior items, but also in finishing floors, walls and ceilings. This material is chosen for many reasons. It has an attractive appearance, is convenient and easy to install and has a low cost, unlike solid wood.
However, plywood needs protection from external influences. This is necessary in order to extend service life and prevent delamination due to moisture. Many people have repeatedly wondered how to treat plywood to extend its service life and protect it from moisture and temperature changes?
Plywood laid on the floor is ready for final coating with protective compounds
How to best protect plywood from mold
What is the best way to treat plywood to protect it from delamination from moisture and the formation of mold, mildew and microorganisms?
In order to protect the material from temperature changes and cracking, it is necessary to cover it with varnish, paint, drying oil or fiberglass.
Important point!
When processing plywood, special attention should be paid to the edges. However, before you start covering the edges of the sheets with a coloring composition or impregnation, it must be puttied, covered with a metal edging and primed. After all the above work, you can apply a layer of paint/varnish.
Processing the material with a soil mixture
Before choosing a processing method, you should familiarize yourself with the application technology of the selected composition, and you should also learn about its features and advantages.
Fiberglass. Features and application technology
The cost of such material is quite high. However, it can be replaced with ordinary gauze, which should be glued to the base sheet using varnish. When choosing such a solution, you should pay attention to the fact that the composition does not include polyester and epoxy components.
Fiberglass to protect wood panels
- First, the sanded and primed plywood is coated with varnish.
- In order for the varnish to be well absorbed, it is necessary to allow it to dry after applying it (about three hours).
- Then gauze/fiberglass is applied. The ends are treated with varnish.
Drying oil. Features and application technology
This processing method is considered the most popular. This is explained, first of all, by the availability of the material. To achieve a greater effect, drying oil should be applied hot to a sheet of glued veneer.
Often, subfloors made of plywood are treated with drying oil. Impregnation protects plywood from temperature changes, the formation of fungus and mold.
Advice for applying drying oil to a sheet of glued wood veneer
:
- Drying oil should be heated in a water bath.
- The hot substance is applied with a brush. Particular attention should be paid to the edges. They need to be coated thoroughly.
- Use a hairdryer to dry the material. If you don’t have a hair dryer, an iron will do.
- After the first layer of drying oil has completely dried, apply a second one. Apply until the substance is completely absorbed into the wood.
Advice!
It is more convenient to apply impregnation when the material is in a horizontal position.
How to treat plywood before laying it on the floor? This question probably arises among many who are planning to cover the floor with such sheets. Before processing them, you need to decide on the coloring composition. For interior work, experts advise choosing water-based compounds. These include latex and acrylic pigments. Such substances are excellent for coloring this material. However, they are not a good option for flooring. It is best to saturate the floor with drying oil and then apply a layer of varnish.
Varnished floor
If the question arises of how to treat plywood under linoleum, then in this case, latex and acrylic compounds are ideal. Why? The fact is that they best protect the material from moisture. Enamel compositions are suitable for walls and ceilings. They, just like acrylic ones, dry quickly and are easy to apply.
Latex composition will protect surfaces from moisture and fungus
If you are going to process plywood located on the street side, choose either acrylic compounds or varnishes.
Paint application technology:
- In order for the sheet of glued veneer to be reliably protected from moisture, it must be prepared. They start with sanding.
- An important step is the primer. They should not be neglected.
- Putty is also necessary. With its help, all microcracks are eliminated.
- All irregularities are eliminated by grinding.
- Apply a layer of primer.
- After complete drying, the surface begins to be painted.
Important!
Professional craftsmen advise not to neglect such steps as putty, sanding and primer.
What else to consider when processing?
When processing a sheet of glued veneer, a number of nuances should be taken into account:
- It must be dried before being coated with water protection.
- If you are going to install a sheet of glued veneer outdoors or in a room with high humidity, then in this case it must be painted on both sides. The edges should be processed more carefully.
- Hard-to-reach places should be painted with a brush.
Varnish is an excellent way to protect wood from moisture.
Nitro varnishes are most often chosen to coat plywood. This type of varnish dries quickly and has all the necessary protective functions. Alcohol formulations are no less popular. Polyurethane varnishes are suitable for coating materials exposed to natural conditions.
Tips for increasing the lifespan of wood panels
- To extend the service life of a plywood sheet (product) that will be located on the street side of the house, it must be placed under a canopy and not in the open air.
- If it is located outdoors, then it should be covered with some other finishing material, such as plastic.
- Fastening areas are the most vulnerable places. In order to protect them from moisture penetration, they must be especially carefully processed.
- If microcracks are seen on the surface of a sheet of glued veneer, they must be immediately treated (sanded and primed).
All of the above tips will help extend the life of plywood.
Linoleum is one of the most popular and inexpensive flooring materials. At the present stage of technology development, the quality of this coating has improved significantly, many different substances have appeared in the composition of linoleum, and the varieties of colors and textures are amazing. Treatment with special compounds makes this type of coating wear-resistant, hypoallergenic and easy to clean.
But in order to lay linoleum evenly on the floor surface, you need an even, solid base, even if your floor, at first glance, looks smooth. This is especially true for plank floor coverings, since the elastic linoleum material will follow all the indentations and protrusions of the boards, and over time will wear out in these places. You can make a backing for linoleum with your own hands from a fairly budget material - plywood.
Description of work technology for wooden floors
The main stages of attaching plywood to the base surface
The technology for leveling a wooden base for laying linoleum or other roll coverings greatly depends on the technical condition of the floor structure.
For height differences of up to 2-3 mm, mechanical scraping of the surface is performed. For this, special machines and tools are used. Without special equipment and skills, this method is difficult to implement and is not suitable for everyone.
For strong plank bases, with a slight distortion or blockage, you can use plywood or fiber board sheets, which will be fixed to the old coating.
In case of strong unevenness, evenly distributed over the entire area of the room, it is most preferable to use leveling with arranging a supporting structure in the form of wooden logs and filling the voids with putty.
For heavily skewed and sagging wooden floors, you will have to open up the entire structure, replace rotten and damaged areas, align the support logs and lay a rough foundation made of new materials.
As an example, we give a description of two methods. The first method is simpler and does not require special skills. The second, more complex, but quite feasible if you know the technology.
A mixture of sawdust and PVA of thick consistency
The work of leveling the floor under linoleum with your own hands using adhesive putty will consist of the following:
- The surface of the board and wooden base is checked for damage, rotten areas and panels. If found, the damaged area is cut out and replaced with a new board. To do this, you can use a hacksaw or jigsaw, a hammer, self-tapping screws and a screwdriver;
- On the base of the floor, every 30-40 cm, longitudinal slats of small thickness, thin timber, etc. are laid and fixed. Before fastening, check the level of the rail. In case of blockages and distortions, roll materials are placed under the rail;
- Mix a mixture of sawdust and PVA glue. For mixing, use a plastic or iron container. In terms of consistency, the mixture should resemble thick putty;
- The voids between the longitudinal slats are filled with prepared putty. In one approach, the layer thickness should not exceed 15-20 mm. The second and subsequent layers are applied only after the previous one has completely dried;
- After grouting the floor over the entire area, check using a level. On top of the leveled base, you can lay plywood or DSP sheets.
This leveling method is not particularly complicated, but requires a significant amount of time if you need to level a large area. If possible, instead of homemade putty, it is better to use self-leveling mixtures and solutions.
Sequence of work when pouring cement screed on a concrete base
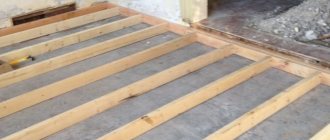
Consistency when leveling using plywood. will look like this:
- The load-bearing base, boards and other wooden parts are checked. In case of damage, rotten areas and severe blockages, the structure is replaced and adjusted;
- Sheets of plywood are laid out on the base of the floor. The canvases can be moved in any order to achieve a more convenient arrangement on the surface. After laying, a line is drawn along the contour of the sheets lying against the wall. For ease of installation, the sheets are numbered and set aside;
- The wooden guides are installed according to the markings. To make logs, you can use 50x60 mm timber. After laying the logs around the perimeter, every 30-40 cm, longitudinal and transverse guides are installed;
- The supporting structure is checked according to the level. If necessary, thinner bars or boards are placed under the logs. After checking, the structure is fastened with metal corners and screws;
- Plywood sheets are laid on the support beams. A gap of 8-10 mm is maintained between the sheets, and 10-12 mm between the plywood and the wall.
If necessary, after installing the sheets, you can scrape the plywood to create an even more even surface. No additional leveling or sanding is required for laying linoleum.
As a complement to the described technologies, we recommend watching a video showing the process of leveling the base for linoleum in more detail.
Advantages of plywood over other materials
You can create a suitable base for linoleum by installing a subfloor using materials such as plywood, OSB sheets, chipboard, fiberboard:
- Consider the option with plywood
. It is made from veneer sheets glued together using certain resins. Veneer is strips of natural wood of various species of small thickness 1-10 mm. It is assembled perpendicular to the direction of the fibers into sheets of certain sizes, most often 2.44 x 1.22 m. The thickness of the sheets depends on the thickness of the veneer used and the number of layers, at least three layers. It can range from 3 to 30 millimeters. It differs in grade, moisture resistance and quality of finishing.
Plywood is a lightweight, environmentally friendly material, has sufficient strength, but is easy to saw with a jigsaw.
- There are other options. Using fiberboard sheets,
you can level a worn wooden floor only if there are no large flaws. They are thin and all defects become visible over time. In addition, when moisture gets on the fiberboard, bubbles form, and when dry, the sheets do not restore their shape. Chipboard sheets are destroyed by moisture, turning into dust, and may contain harmful toxic substances. - Domestic OSB boards
have synthetic additives necessary to improve strength and moisture resistance. Environmentally friendly and moisture-resistant analogues of chipboard for flooring are too expensive, just like the Canadian version of OSB board. For flooring, the optimal choice would be third-category OSB board and FSF construction grade plywood. And from the environmental and financial side - plywood of the FBA and FK brands.
Subtleties of laying linoleum on plywood
Linoleum is an elastic material that exhibits all base defects. It can be laid on both concrete and wooden floors. To preserve the appearance and increase the service life, the surface must strive to be ideal, be durable and even. When you need to insulate or level the floor, plywood is used as one of the options:
- If we have a concrete base, then it is enough to visually check the condition of the floor.
It should be smooth and clean. Drops of mortar on the screed after repairs are knocked down or sanded, maybe even with bricks. Mark the perimeter with a laser, water or simple level. Using a tape measure, check the plane. If the difference is more than 3-4 cm, level the floor with a screed.
The same method is used when the floor is made of reinforced concrete slabs.
- This is followed by the waterproofing process.
There are several types of it. But in this case, it is enough to put roofing felt, gluing the sheets together with mastic, or euroroofing felt, welding with a blowtorch. The easiest way is to lay a thick plastic film, fastening it together with tape. - Plywood is placed on top
, the sheets of which are sawn into four parts. They do this because a solid sheet is subject to greater deformation due to temperature changes. For the same reasons, a distance of up to one centimeter is left between the wall and the plywood, and three to four millimeters between the pieces themselves. First, drill the plywood with a 2-3 mm drill.
- The next step is to lay out the sheets on the floor and mark the location of the fastener based on them
. After that, the plywood is removed and holes for the dowels are drilled with a 6 mm drill using a hammer drill. Attach the sheets to the base in a checkerboard pattern using 5x60 mm dowels. The hats are recessed. Plywood can be placed on a frame made of boards one centimeter thick. It is assembled in the form of square honeycombs with steps of 30-60 cm. It is attached to the floor with the same dowels and with self-tapping screws. Honeycombs can be filled with insulation. The joints of the plywood sheets are placed on the frame in a checkerboard pattern and secured with nails or self-tapping screws. The joints should not have more than two seams. You can use parquet mastic or liquid nails as fasteners.
- If the room has a wooden floor, then it is also subjected to visual and technical inspection.
Damp and rotten boards are dismantled. If mold or mildew is present, the possible cause of the deficiency is determined. It is eliminated, and the damaged area is treated with antifungal agents. Loose and creaking boards are nailed or pulled to the joists with self-tapping screws. The length of the screws should not exceed the width of the joists, so as not to rest against the concrete. When the logs themselves sag, the floor is completely rebuilt. To do this, dismantle the flooring and strengthen the logs or, if necessary, replace them with new ones.
They are fastened to the wall using brackets, and then screwed level to the concrete with anchor bolts, using pads (for example, made of fiberboard) or wedges. Then the floor is put back together.
- Old paint from the boards must be removed
by heating it with a hair dryer and scraping it off with a spatula. Bent boards are trimmed with a plane. For large cracks, special slats are prepared, hammered in and sanded. Small cracks are foamed or filled with mastic and puttied. You can glue plywood onto the prepared floor or screw it with self-tapping screws. - The distance between fasteners must be at least 15 cm
. When the floor looks very bad, but is strong, then a wooden frame is assembled in the same way as in the case of a concrete floor. It must be remembered that when installing plywood and linoleum on a wooden floor, it is necessary to leave a ventilation hole that prevents condensation from accumulating in the subfloor. It is covered at the end of the work with a decorative element.
Which one is better to lay on?
As a rule, two types of plywood are used for flooring:
- construction plywood of the FK brand, the veneer of which is glued together using urea resin;
- plywood of the FKM brand, made on the basis of melamine resins.
These are the most environmentally friendly options with average moisture resistance. The higher the moisture resistance, the more harmful chemicals they contain. Plywood comes in four grades A, B, C and D. Since the external beauty will be hidden by linoleum, there is no need to spend money on it.
But when using low-quality varieties, problems may arise that will have to be further corrected.
For unsanded (NS) plywood, when using glue as a means of fastening, its consumption increases. Ш2 (polished on both sides) is a bit expensive for a floor, but Ш1 (polished on one side) is what you need. Before installation, plywood should be dried indoors for several days in a vertical position. To increase density, you can apply several layers of furniture varnish or soak it with an antiseptic. The thickness of the sheets should be 8 mm or more. If necessary, you can put two layers if the height from floor to ceiling allows this to be done without a large loss of free space.
When laying plywood on joists, it is better to take 18 mm.
Preparation
Linoleum needs to be spread in a free room of a larger area a few days before installation, to level it. If this is not possible, then you must first prepare the floor:
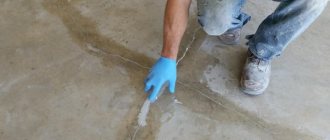
- Using a spatula, the joints between the plates are puttied with a special wood putty.
- After it dries (the drying time is indicated on the packaging by the manufacturer), it is rubbed down with fine sandpaper or a paint mesh. You cannot use cement or gypsum-based solutions to putty plywood floors, because they will crack.
- There is no need to cover the entire surface with mortar, as is done for the ceiling or walls.
- After this, carefully remove the debris using a vacuum cleaner.
- And lastly, you can soak the plywood with hot drying oil or a special wood primer.
- All work is carried out in a room with an air temperature of no lower than 18 degrees and a humidity of no higher than 50-80%. After this, they carefully remove the garbage, bring in the linoleum, unroll it around the perimeter and give it time to rest.
How to put it?
A simple technology for laying linoleum on a substrate allows you to easily cope with this work:
- The resting (straightened) linoleum is brought into the room and laid on a previously prepared floor.
- Level the surface from the center to the edges, allowing the material to be correctly distributed around the perimeter of the room.
- Using a sharp knife, trim the edges along the walls, taking into account that some types of linoleum may shrink. Trimming for door frames is done especially carefully, since the edges are not covered with anything. Technical holes are cut to bypass pipes or other obstacles.
- Skirting boards are installed. If there is no threshold in the doorway, then special thresholds made of soft metal are installed at the end of the covering, which can be purchased in advance, along with the linoleum.
How to attach?
Attach linoleum to the plywood base using glue, double-sided tape or special double-sided adhesive tape:
Option with glue
Prepare linoleum in the manner described above. Then roll half of it towards the center of the room or bend it in half. Apply glue evenly to the freed area using a notched spatula.
Carefully unfold the linoleum into place, helping with a wooden scraper. Do the same with the other half. After this, roll the entire surface area with a roller from the center to the periphery to remove air bubbles that may arise during operation. They let it dry for a day, after which the installation of the baseboards is completed and you can move in.
It is advisable to cover the entire area with one piece of canvas. If this is not possible, then the two pieces are joined together. To do this, throw one segment over another over a short distance, joining according to the pattern. The joint location is selected taking into account the future load on the linoleum - the joint will rub less where it will be stepped on less.
If possible, it is done where the furniture will be, away from the center of the room.
How to level the floor under linoleum. How to level a concrete floor under linoleum
Leveling a concrete floor is quite simple and inexpensive.
To do this, you will need a concrete screed mixture, levels, plasterboard guides, spatulas, as well as a standard set of repair and cleaning tools. You can make your own concrete by mixing 3 parts sand with 1 part cement and water.
You can make your own concrete by mixing 3 parts sand with 1 part cement and water. Lime glass, gravel or expanded clay are often added to the composition. Construction stores offer a wide range of cement with different properties. For preparation you need a concrete mixer, containers for measuring and mixing.
The amount of concrete screed that will be required for repairs depends on the condition of the floor in the apartment or house. To level a surface with a slope of no more than 3 cm, a layer of 7-8 cm will be needed, while to correct more serious distortions, additional laying of concrete will be required.
First of all, you should empty the room, get rid of dust, construction debris and remnants of the previous screed. Then you need to find the highest point and place the laser level on it. It will help you make height marks around the entire perimeter of the room and set the guides at the desired height.
In order not to harm residents from the lower floors, waterproofing of the room is necessary. Suitable materials for this purpose are thick polyethylene film, roofing felt, polymer membranes or bitumen paper. The waterproofing coating should be laid overlapping, connecting the sheets with tape. By laying two layers of hydroglass insulation as an insulator, you will not only protect your neighbors from excess moisture, but also provide warm floors in the apartment.
Reinforced mesh, which is laid before pouring concrete, will help increase the strength of the floor. Grids with cells 10x10 cm or 15x15 cm are perfect for this purpose. You can connect the sheets together with wire.
Then you need to place guide beacons around the room, installing them on bars or screws. After this, you can proceed directly to pouring concrete. First, the concrete is placed inside the guides using a shovel, and then the surface is leveled with a scraper.
The mixture is allowed to harden for 12 hours and then sprinkled with water daily for 2-3 weeks to ensure drying as evenly as possible. The result is a durable monolithic coating, which must be sanded, after which linoleum can be laid.