A cellar is an important element of any suburban area; it is indispensable for storing vegetables, fruits and canning. The article contains information on how to build a cellar in a country house with your own hands: a step-by-step description will help you take into account a lot of nuances, from the correct choice of location to the installation of waterproofing and electrical wiring. The external arrangement of the building is also of great importance, and the construction of shelving and drawers will help to effectively use the space.
The process of constructing red brick cellar walls
Methods for insulating the floor above the basement
There are two ways: treat the basement with heat-insulating material and insulate the ceiling on the side of the house. In the first case, the choice of insulation is small: either sheet/plate materials, which are fixed with mushroom-type dowel-nails, or spraying liquid polyurethane foam.
When insulating the ceiling from above, various bulk substances are also used.
In addition to installing thermal insulation in the house, you can install a “warm floor” system, water or electric. The design of a heated floor pie also includes waterproofing and insulation - otherwise, most of the heat from the cable or pipes will go into the basement.
What material can be used to insulate the floor?
Here is a list of materials that can be used to insulate the floor above an unheated basement on the side of the house:
1. On a flat base, the insulation boards are laid out end-to-end on the floor and connected to each other with tape.
2. When laying on wooden joists, the slabs are placed between the joists face to face; fixation is not necessary.
3. When pouring the screed, another layer of waterproofing is laid on top.
A basement in a garage is convenient, practical and allows you to do professional car repairs. How to cover a cellar in a garage and make a reliable reinforced concrete floor yourself.
The choice of floor slab depends on the size of the garage, the properties of the soil and the characteristics of the foundation of the building. The number and weight of the cars that are planned to be stored in the garage are important. The ceiling must withstand the expected loads (with a margin).
You can make two options for the ceiling in the garage cellar:
- flooring of hollow-core reinforced concrete slabs - for such slabs the foundation is the walls of the garage, which must be strong, since they are subject to loads both from above and from the ground on the sides;
- if the garage has already been built and there is a foundation, then the cellar ceiling is poured separately - this is a more labor-intensive process.
To build a cellar in any garage, you need to carry out certain preliminary work.
What you need to do before you start digging a cellar inside the garage:
- you need to find out what kind of soil is on the site - on weak and clayey soils, which are characterized by high heaving, the walls of the cellar need to be additionally reinforced to prevent soil pressure;
- it is necessary to find out whether there are deep communications (electricity, plumbing) at the site of the cellar;
- if the site has high humidity and the garage is in the way of seasonal wastewater, then before laying heavy floor slabs you need to make a reliable circular drainage system to prevent sagging of the slabs and large shrinkage of the foundation;
- it is necessary to find out at what height the groundwater lies, since in spring and autumn there may be knee-deep water in the cellar. If the groundwater flow is high, it is necessary to arrange internal and external drainage.
When all the preliminary work on drainage of groundwater and seasonal waters has been completed and the walls and floor of the cellar are reliably waterproofed, you can begin installing the ceiling, which will also be the floor of our garage.
Moisture in the cellar
It is not uncommon, after building a cellar, that many owners of an underground structure are faced with a problem such as high humidity. As a rule, moisture in the cellar is formed as a result of:
- Manifestation through external walls and floors due to poor quality waterproofing;
- Condensation, during temperature changes, from different sides of enclosing structures;
- Moisture release from fresh vegetables and fruits stored for storage.
High-quality removal of moist air from a cellar or basement is important not only from the point of view of the practical use of the room, but also to ensure proper safety of the building materials that are present in the walls, ceilings and floors. The negative impact of moist air on wood, brick and concrete creates a threat to the integrity, underground and not only, of the building structure.
Therefore, it is worth paying special attention, when building an underground storage facility, to the correct arrangement of ventilation in the cellar. This approach will definitely help to avoid many common, frequent problems of any basement, in a private building and not only in a building.
Cellar
Floor slab - how to choose the right size and install it
The garage floor slab can be made of concrete or reinforced concrete. Reinforced concrete slabs are produced solid and hollow. The mass of a solid slab is much higher, so the loads on the cellar walls are very high. For garage floors, it is better to choose hollow reinforced concrete slabs; they are cheaper than monolithic ones.
Hollow slabs, due to the air that is inside the slab, provide better thermal insulation for the floor in the garage and basement.
Reinforced concrete beams can also be used as garage floors, but in this case you will need to carefully seal and strengthen the joints (concreting) - a floor slab above the basement is more reliable.
There is no need to choose ribbed slabs for the garage, since, firstly, all these products are of standard length and it is difficult to choose the material according to size, as well as the ribs along the edges will cause problems with finishing the floor in the garage.
The rigidity and resistance to high loads of the floor slab depends on the reinforcement used and the type of concrete mixture. When choosing a material, you must remember that for a brick basement wall the width of the floor support must be at least 15 cm, and for a concrete wall - 10 cm.
The weight of the reinforced concrete slab is large, so you immediately need to find out the capabilities of the hired lifting equipment. Will the hired crane be able to withstand the given weight of the load with the boom lowered?
It is mandatory to calculate the loads on the basement walls. Since the total loads on the slab are up to 3 tons (walls, car, coating, roofing), it is additionally necessary to install welded I-beams or rails as a holding frame for the heavy slab.
Installation of reinforced concrete slabs
Rules for laying reinforced concrete floors:
- floor slabs are laid on the already erected basement walls using a truck crane;
- installation is carried out using medium-thick cement mortar. The setting time for this solution is approximately 20 minutes. It is possible to level the slab and install it evenly and correctly;
- The floor slab must extend onto the walls by at least 15 cm.
Important. After installing the slabs on the walls, you need to seal the ends to prevent the wall from freezing.
How to insulate and isolate the ends of slabs from moisture:
- fill all the voids at the ends of the reinforced concrete panels with a layer of mineral wool - the thickness of such a layer inward is 30 cm;
- cemented with concrete mortar - the depth of laying the mortar is 20 - 30 cm;
- You can additionally insulate the voids at the ends with broken bricks and cement them.
The ends of the slabs are a weak point through which the ceiling can constantly freeze and become icy. When the garage is heated, the dew point in the uninsulated joint moves inward, and the floor slab begins to “sweat”—the humidity in the basement and in the garage increases.
If such a problem with the floor slab already exists, then it can be corrected. It is necessary to drill holes in places where condensation forms in the slab, as close to the wall as possible. Now you need to insert tubes directed outward into these holes and pump polyurethane foam into them. This creates a plug that protects the slab from freezing.
The ends of the floor slab must be insulated both inside and outside - this will eliminate moisture in the cellar and garage. Often, garage owners are faced with the problem of humidity in the basement precisely because of the end joints of the slabs, which were not insulated and insulated, hence the constant humidity in the cellar.
How to cut a hole in a reinforced concrete slab
Standard hollow core slabs made from the M200 cement grade have a strength of 800 kg/m2, but the dimensions of the hatch hole must correspond to the length and width of the slab so as not to reduce its strength.
For slabs 1.2 m wide - a hatch measuring 90 x 90 cm, no more.
How to punch a hole in a reinforced concrete panel for a cellar hatch:
- We cut the slabs only at the joints, calculating so that the two slabs have the same dimensions in width and length. For example, with a hole size of 90 x 90 cm, 45 x 90 cm for one slab and 45 x 90 cm for the other. Thus, we evenly distribute the load on each floor;
- horizontally you need to make a cut along the line of voids;
- It is impossible to cut reinforcement vertically with a grinder. Since the reinforcement rod is firmly fixed in the concrete, the grinder circle may simply jam. First, the rod needs to be sawed, and then broken with a crowbar or hammer.
After installing the slabs, you can make a beautiful metal frame from the corner, hiding all the unevenness of the trim.
The joints between the slabs (rusts) must be concreted in order to give rigidity to the entire structure and securely fasten the slabs together.
Slabs for garage floors significantly speed up all construction processes, but such materials are not cheap, plus you need to rent lifting equipment. Therefore, many people pour the floor slab themselves - it is much cheaper.
Prefabricated/prefabricated monolithic slab
Diagram of a cellar with insulation and water drainage.
If you decide to cover your basement with a prefabricated slab, you should consider that you will have to use a crane. This method has both pros and cons. The advantage is the speed of work completion. The downside is that such slabs have a standard size. The largest is 9 m long. Therefore, if your future home has a distance of more than 9 m in any place, these slabs will not be suitable for your home. If you intend to use them to cover the cellar, it is better after the installation along the remaining perimeter is completed. Conduct the masonry according to the height of the ceiling, then be sure to lay the waterproofing, and fill the remaining space between the waterproofing and the slabs with concrete or mortar. Seal the joints between the slabs in the same way.
It should be noted that prefabricated monolithic slabs are blocks that are laid between steel beams and then filled with a small layer of concrete so that in the end it all forms a single structure. The advantage is the high speed of work. It is best to take a step between the beams of about 60 cm. You can use expanded clay concrete blocks. Polystyrene concrete blocks may also be suitable. It is necessary to make reinforcement before starting pouring. Thin reinforcement with a diameter of 5-6 mm is suitable.
Another advantage of this method is that there is no need to spend money and time on thermal insulation. In addition, this type of cellar ceiling has very good fire resistance and is environmentally safe. Such a floor will not even creak due to the lack of wooden parts.
Tools for work:
- Screwdriver (for securing formwork boards).
- Hacksaw.
- Hammer.
- Sledgehammer.
- Bulgarian.
- Hydraulic level.
How to make a floor slab in a garage
How to fill a monolithic base above a basement in a garage:
- According to the size of the basement, we make formwork from old boards or plywood. We fasten such formwork from below with vertical posts or from the side with horizontal rails or a channel, in steps of a meter, one and a half;
- the slab of such a floor should be 20 cm wider than the perimeter of the basement on each side;
- We seal the formwork joints so that the concrete sets securely and the laitance does not leak out.
- We place the reinforcement cage on the laid formwork (reinforcement diameter 10-12 mm). Frame mesh pitch – 15 cm;
- All reinforcement connections must be tied with wire;
- along the perimeter of the hatch, you must immediately weld a frame from a corner (45x45 mm);
- for such an overlap it is more reliable to use concrete grade M500;
- concrete layer thickness – not less than 20 cm;
- When installing such a floor over a basement in a garage, when pouring concrete, it is necessary to pour the screed with vibration so that the mixture is distributed as evenly as possible and fills all the voids.
Important. Such a screed can be loaded only after the concrete has completely hardened - no earlier than after 20 days.
If you use ready-made concrete with anti-frost and strengthening additives, you can be confident in the reliability and strength of the floor slab.
Floor slab repair
Most often, deformation of floors occurs due to soil shrinkage. Therefore, it is necessary to determine the location of the soil subsidence and raise the slab using the technology of lifting and repairing reinforced concrete foundations.
Small cracks and chips in the slabs simply need to be cleaned and cemented. If the crack is large, then horizontal reinforcement is performed and a concrete screed is poured over it.
Types of overlap
When the pit is equipped and the walls of the cellar are made, it is worth thinking about how to make the ceiling of the cellar with your own hands. The materials and cost of such a structure are very important for the overall estimate for the work, therefore it is necessary to understand each type of ceiling and the features of the work on arranging the ceiling.
As a rule, the ceiling of the cellar is made with a flat ceiling, but in some cases it can be made domed. Such a vaulted ceiling will provide a comfortable microclimate in the room, since the air masses in it mix differently than in other arrangement options.
Some scientists claim that the arched ceiling gives a special aura and energy to the room, which contributes to better preservation of vegetables fresh than in a building with a flat roof.
Concrete ceiling
How to fill the ceiling in a cellar with concrete to avoid collapse and damage to the base of the structure? It is important to calculate the loads in advance, figure out how to fill the cellar with the mixture, determine the sequence of work and the features of concreting buildings of any configuration.
Monolithic slab
Covering the cellar with your own hands in the form of a monolithic slab is done using a frame made of reinforcing rods, filled with concrete mortar. With this design, there is no need to use special equipment or cranes, which will significantly save time and construction costs.
To begin work, you need to prepare plywood (15-20 mm thick), beams for the frame, beams and racks for support, concrete mortar, reinforcement and wire for strapping.
Sequence of work on how to make a ceiling in a cellar made of concrete:
- The ceiling must be made so that it is located on the walls of the structure, which themselves will serve as its support. It is necessary to make special support beams on which the formwork will be located. This design will help maintain the integrity of the concrete slab being poured, even when it hardens;
- The boards from which the formwork is made must be sealed so that the solution does not leak out during pouring. It is also important to saturate all parts with antiseptics. The weight of reinforced concrete will reach 500 kg per square meter if a layer of 20 centimeters is poured. The formwork is placed around the perimeter of the building;
- After the installation of the formwork is completed, a frame is erected from the reinforcement inside, it can be either rods or mesh. When installing it, you need to maintain the correct uniform distance between the rods, usually about 20 centimeters. The lower ends of the rods should rest on the beams as a supporting structure. Such an iron frame protrudes beyond the edges of the slab by 4 centimeters on each side;
- As soon as the rows of reinforcement are laid horizontally and vertically, all elements of their connections must be tied with wire, keeping the mesh size of 15-20 mm. After installation is completed, the frame is checked for the strength of all joints;
- After installing the mesh, concreting begins. The process is carried out extremely quickly from cement mortar as a binder, sand and crushed stone. The height of the slab being poured should be about 20 centimeters;
- The concrete mass must be poured into the formwork evenly, without interruptions, to the very end of the slab. It is important to maintain a uniform pouring direction, avoiding voids. To avoid this, the solution is subjected to vibration. You can use a special vibrating screed, or you can use ordinary wooden blocks;
- At the end of the work, the concrete mass is closed from exposure to the sun, rain or wind. Protect the stove from mechanical damage. After 3 weeks, the formwork is removed.
A layer of reinforcement will be sufficient, but to increase the strength of the structure, repeated, additional reinforcement can be done. As soon as the pouring is completed, the concrete is left to harden, waiting for about a month, during which time it acquires the necessary strength.
Experts recommend using monolithic slabs for cellar floor slabs, since this solution is the most durable, reliable and practical. The surface formed by a slab of concrete can be the foundation for another building built above the structure.
Flooring on wooden beams is done very easily, using railway rails. They can be bought at scrap metal collection points, or they can be ordered at industrial workshops. In order for the installation of beams to be correct, special beds are made for them, which securely fix the steel structure.
The beams are fixed in the walls of the storage facility, and henceforth they will not pop out under any load. The walls in this case are the foundation relative to the beams.
The sequence of work on arranging the floor on beams is as follows:
- Rows of reinforcement are placed between the beams, which are secured together with tying wire;
- After arranging the reinforcing mesh between the beams, they begin to make wooden formwork, on which layers of waterproofing are laid;
- Frames are placed under the formwork, which will hold the mass of concrete solution;
- As soon as the frame is completed, concrete mixtures are poured, prepared independently or purchased in the form of a ready-made solution;
- Concrete is poured evenly and slowly;
- The ceiling is insulated as soon as the concrete reaches the required strength. You can use any insulation, even roofing felt.
Prefabricated monolithic slabs
Prefabricated monolithic slabs can create a durable floor; you just need to take into account in the estimate the involvement of construction equipment, a construction crane with loading, for example. This process is quite long. There are other disadvantages, in particular, the size of the slab - standard sizes are not always suitable.
The longest prefabricated monolithic type floor slab ranges from 9 to 12 meters. Before you begin installation, you need to make sure that these dimensions fit the structure. It is important to note that the area occupied by the basement should not be larger than the slab itself.
- The slabs are connected to each other by steel beams;
- All hollow parts of the connections are filled with a heat insulator, which will retain warm air indoors;
- After insulation work, layers of waterproofing in the form of sheets of roofing felt and bitumen mastic are placed on the slab.
Slabs are the optimal material to build a cellar ceiling in a garage. This design is quick and easy to erect, and the price is not too high.
Making a cellar in the garage seems convenient in many respects, in particular, the floor in the garage will be the ceiling for the underground room. The warmth of the upper room will not allow cold and heat to enter the storage room.
Wooden floor
A wooden ceiling for a cellar can be made with your own hands from wood - beams of suitable size. To do this you need:
- Install beams on the walls;
- Bars are attached to the side parts of each beam to provide supports for the rolling boards;
- The homemade roll is laid using self-tapping screws;
- A vapor barrier layer is made, which is covered with thermal insulation material
- The structure is sheathed with plywood treated with special antiseptic solutions;
- The entire resulting structure is coated with bitumen-based mastic and covered with layers of roofing felt, laid overlapping. Soil is poured on top if it is not planned to build an above-ground part.
In the case of such arrangement, the floor slab will act as the floor for the next floor. Such floors can be insulated inside the upper room. Installing a wooden floor is as simple as pouring concrete into a cellar ceiling, but it only takes less time to arrange.
Wood is not the best choice for flooring, as it is vulnerable to moisture and will rot over time!
Wooden floors - advantages and disadvantages
This is the most inexpensive option for installing a ceiling in a garage cellar, which you can do yourself. If the load on the floor in the garage is small, then you can use a floor frame made of wooden beams.
Sequence of work:
- We place the beams on the basement walls, step 70 cm - 1 meter, depending on the selected beam diameter. The load-bearing beams of the wooden floor should be aligned not along the length of the room, but across it. The smaller the step between the wooden beams, the more reliable the foundation of the garage floor;
- Before installation, be sure to treat wooden beams with antiseptic and moisture-proof impregnation, and wrap the ends of the wooden beams with two layers of roofing material or tar them.
Compared to a reinforced concrete screed, such a ceiling in a cellar, if it is installed in a garage, is less reliable and durable, since the load-bearing capacity of the coating is much lower.
Wooden slabs
A sawdust concrete slab for thermal insulation of the basement floor (a) and a wooden mold for its manufacture (b).
If the house is built of wood, then a floor made of wooden beams should be used. Between them you need to lay a bead, then the insulation is laid, and then the floor itself is laid. You need to know that before laying the beams, they must be treated with an antiseptic. It is also necessary to wrap the ends of the beams on both sides with roofing felt and only then they need to be laid on the basement walls. Wrapping roofing felt with your own hands does not seem to be as complicated a process as it might seem at first glance.
If you plan to build a basement first, and only then begin laying the wood covering, openings for the floor beams must be made in the walls of the basement. Then you need to lay insulation first in these openings, and then beams. In this case, it is better to make sure that the beam does not reach close to the end of the wall, otherwise there will simply be no room left for the seal. After the beams are installed on the bottom side, thin bars should be attached to their sidewalls; they will serve as support for the rolling boards. These boards are attached to the bars using self-tapping screws. After the beading has been laid, it is recommended to make a vapor barrier layer, and then another layer of thermal insulation on top (its thickness is approximately 10 cm).
The basement of a house can be used or unused, warm or cold. A heated basement usually does not create problems for residents. Cold is drawn into the house from the unheated room. How to insulate a floor above a cold basement?
Insulation and waterproofing
Insulation of the ceiling in the basement is carried out from below along a wooden or metal sheathing or from above, on top of a cement screed. Mineral wool or foam boards are suitable as insulation made from budget materials.
In addition to insulation, it is imperative to pay attention to reliable waterproofing of the basement. The most common options for waterproofing a cellar:
- coating with resin in two layers of the upper floor slabs;
- covering with several layers of roofing material;
- applying water-repellent mastic to all floor joints.
It is important not to forget about insulating the floor in the cellar. Such insulation can be done using quite accessible materials:
- a cushion of sand and gravel, followed by a layer of expanded clay or broken red brick, then a cement screed;
- insulation with a layer of clay mixed with sawdust (layer thickness at least 20 cm), but only on soils where there is no high humidity;
- insulation with ordinary sheet polyurethane foam or polystyrene foam.
Mineral wool should not be used as insulation for cellar floors - when wet, this material completely loses all its thermal insulation characteristics, so high-quality, expensive waterproofing will be necessary.
The most reliable option for insulation + waterproofing is sprayed polyurethane foam. The material creates a reliable and durable waterproof film that maintains an ideal microclimate in the cellar.
The simplest option is annual lime whitewashing.
No amount of insulation or waterproofing will help get rid of dampness in the basement if high-quality ventilation of the room is not provided.
Stages of work with a brief description
How to fill a basement floor with your own hands? This is not a difficult job, the main thing is to strictly follow the sequence of actions and take your time. The stages are as follows:
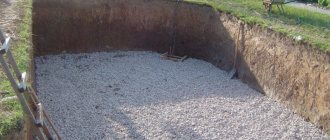
- Preparatory. Remove all debris, remove the fertile layer of soil, thus getting rid of stones. Then we compact the soil. The tighter the better. The floor should be 30 centimeters lower in order to fill the clay and sand-gravel cushion. Each layer is compacted. Clay – 10 cm. Sand with gravel – 10 cm. The layers need to be wetted, so it compacts better.
- Waterproofing. An excellent material for reliable waterproofing is roofing felt. You will need two layers. Rolls in different layers are rolled out perpendicular to each other. In addition, polyethylene film is perfect, and for a basement where there was already a concrete floor, waterproofing can be done with bitumen.
- Reinforcement. For this stage it is necessary to have either a mesh or reinforcement. It is necessary to fasten it not too rigidly, so that in the future the soil will not be able to influence the rigid reinforcement. The mesh cells should be about 5 cm. The reinforcement is tied using knitting wire. Distance to ground – 3cm. It is necessary to lift it above the ground with stones or wooden supports.
- Formwork and beacons. In order for the filling to occur as smoothly as possible, it is necessary to set the beacons. They are set in meter increments, per horizontal line. After this, a damper tape is attached to the wall, which will absorb the expansion of the screed over time and protect the walls from additional load. If there is a waterproofing film on the wall, then the tape must be glued to the wall. The formwork in the basement is made of boards and plywood, but is used only in large rooms. A small volume of flooring is poured immediately, without formwork.
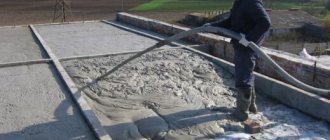
- Pouring concrete. First of all, it is necessary to produce a concrete solution. The ratio is as follows: for one part of cement you need three parts of sand, five parts of gravel. After preparation, we begin pouring. Concrete is poured with a reference to the lighthouses. It is immediately leveled, then plywood is laid, and the beacons are pulled out. Then all possible voids are eliminated. This stage must be approached very carefully. Hardening occurs within a month. The floor must be covered with film. At high room temperatures, you can periodically wet the screed.
- Grout. The final stage, which is carried out when the concrete has almost hardened and pressure on it leaves a small imprint.
If everything is done correctly, then in a month you will have reliable, high-quality floors in your basement that will protect against the formation of excess moisture, will be able to keep the room dry and clean, and will also withstand the installation of complex equipment, for example, a boiler.
Ventilation of the basement in the garage
Natural ventilation is inexpensive, but depends on many weather factors, so it is not reliable. If you plan to store vegetables in the garage cellar, it is better to use forced ventilation.
Important rules for installing ventilation in the garage basement:
- one end of the natural ventilation supply pipe is mounted 20 - 50 cm from the cellar floor level, and the second - 30 cm above the ground level;
- be sure to close the outer opening of the pipe with a protective mesh and top cover to prevent water from entering the cellar;
- the second outlet pipe is installed half a meter above the garage roof and at a level of 10 cm from the cellar ceiling level;
- Forced ventilation is not difficult to do - just install a household fan in the outlet pipe, which can be turned on as needed.
Basement ventilation is mainly necessary in the summer, when the sharpest temperature changes are observed.
Strength, high thermal insulation, and the ability to resist the loads of higher floors are the main tasks of the installed floor. What methods and techniques, with what materials, knowledge of what construction tricks will be needed by the owner who does the work with his own hands will be discussed in this article.
How to deal with dampness under the house?
Having completed the installation of a cellar in the house and begun its operation, many are faced with the problem of dampness. How to prevent condensation from accumulating on the walls of the storage facility, and moisture from penetrating into the living space?
You need to understand that water will definitely seep into the cellar under the house due to groundwater and high water. No waterproofing can give a 100% guarantee. In addition, during storage, vegetables will release moisture, which will accumulate in the air.
The optimal solution in this case seems to be a do-it-yourself effective ventilation device. The ventilation system for the cellar should consist of two pipes. Through one pipe, fresh air will flow inside, and through the other, on the contrary, it will go outside. You can use any pipes: special ventilation pipes or ordinary ones made of polyvinyl chloride (which are usually used for sewage).
If your house has a small cellar, then you can make ventilation with just one pipe, which will be responsible for both air flow and exhaust. When the size of the cellar is significant, it is recommended to install special devices inside the ventilation pipes that will forcefully pump air out of the storage facility, preventing it from stagnating, leading to the formation of condensation.
We invite you to read: How to build a bathhouse from foam blocks
The insect can enter the cellar through the ventilation.
The exhaust pipe must be brought to the roof of the house. The lower part of the exhaust pipe must be installed under the ceiling of the cellar (in accordance with the laws of physics). The lower part of the supply pipe is installed at a height of 20-30 from the cellar floor. and the upper part can be displayed through any window. The supply pipe must be equipped with a metal filter, which will protect the cellar from debris and pests. In turn, a deflector can be installed in the exhaust pipe, which will increase draft from the cellar in windy weather.
With the help of a high-quality ventilation system, the cellar under the house can be used without problems for decades. Even a novice builder can make a storage facility correctly with his own hands.
Author » Ilya Avdeev
Website editor-in-chief, civil engineer. He graduated from SibSTRIN in 1994, since then he worked for more than 14 years in construction companies, after which he started his own business. Owner of a company engaged in suburban construction.
What do you need to know before starting floor construction?
The basement floor must have a stable load-bearing capacity so that deflections do not occur under its own weight and the load of the upper floors (partitions, furniture, people, equipment).
It should give the entire structure of the building the necessary rigidity, both vertical and horizontal. An important function of the ceiling above the basement is sufficient sound insulation and thermal protection of the entire building. The design of the floor structure must correspond to the design of the basement walls, ensuring uniform distribution of the load from higher buildings through the basement walls, onto the base of the foundation.
These fundamental points must be taken into account when constructing a basement floor with your own hands.
Preparatory work
Procuring the necessary building materials for the construction of a basement floor is not the only factor.
The upper plane of the wall of the basement to be covered must be in the same horizontal plane. Small irregularities are leveled with a solution. To eliminate large differences, brickwork is made from fired clay bricks or fine-grained concrete. To lay concrete, formwork is made to cover the entire width of the wall, leveling it horizontally.
No matter how the work on covering the basement is carried out, before it begins, it is necessary to backfill the pit sinuses. Backfilling is carried out after completion of waterproofing, insulation of basement walls, and completion of drainage work.
Backfilling is carried out layer by layer with mandatory compaction. For backfilling, it is necessary to use clay, thereby creating a “clay castle” that provides an additional waterproofing layer. Leveling the soil after filling the cavities is necessary to organize free access to the basement floor at any point in the perimeter of the building.
It is imperative to clear transport corridors for lifting and other equipment.
The installation of a staircase to descend to the basement is carried out before the installation of the ceiling begins.
Types of floors
Calculations show that each region has its own characteristics of the cost of a basement floor, which depend on many factors: proximity to construction industry facilities, in particular, enterprises that produce floor slabs, the availability of industrial wood or the possibility of producing concrete.
In construction practice, there are up to 10 methods of constructing floors. All of them are used in individual housing construction to cover the basement. The most common ones when covering a basement with your own hands:
- monolithic reinforced concrete;
- ceiling on beams;
- from prefabricated reinforced concrete slabs.
The choice of roofing option depends entirely on the financial capabilities of the owner and the type of structure located above the basement. Each of them has its own positive and negative aspects: labor intensity, cost of component materials, skills in performing construction work. Flooring device made from factory-made slabs.
The most popular method of constructing floors from factory-made slabs is hollow core slabs. They got their name because of the cylindrical voids along their entire length. Having minimal experience in construction, such coverings are performed quickly and efficiently. The industry produces floor slabs of certain sizes:
- in length - multiples of 600 mm, starting from 2,400 mm and ending with 7,200 mm, less often - 9,000 mm and very rarely - 12,000 mm;
- width - 800 mm, 900 mm, 1,000 mm, 1,200 mm, on special order - 2,000 mm.
All slabs are manufactured with a single standard size, thickness equal to 220 mm with a flat bottom surface.
Hollow core slabs are made from heavy grades of concrete with a reinforcement cage. The void inside the slab improves the soundproofing and thermal conductivity of the floor, reduces the weight of the product itself and the overall floor.
Such slabs are installed using a truck crane, having previously laid freshly prepared cement mortar on the place where the slab rests. Each installation unit is mounted so that the length of the supported section of the slab is no more than 15 cm, and the edge of the slab does not reach the front side of the basement wall by 12-25 cm.
After all installation work has been completed, the voids of each element on both sides must be sealed with concrete to a depth corresponding to the support. Fine-grained concrete or mortar is used to seal the gaps between the slabs. If a large gap forms, formwork is placed from below and filled with concrete, having previously cleaned the side surface of the slab from dirt.
To increase the rigidity of the entire floor of reinforced concrete slabs, adjacent slabs are tied together with reinforcement by welding using mounting loops, having previously bent them. The reinforcement must have a diameter of at least 12 mm.
The distance between the edge of the slab and the wall is either bricked or a monolithic belt of concrete is made.
Often, when installing floors from factory-made slabs, it becomes necessary to shorten or lengthen them. You need to understand that such products are made by prestressing the reinforcement, that is, it is stretched before concrete is placed in forms. This increases the ability to withstand negative loads, which affect the deflection of the slab.
By destroying the concrete and cutting the reinforcement cage, you reduce the load-bearing capacity of the slab. In case of extension, formwork is installed to the length of the extension, a frame is made from reinforcement and concrete is laid.
The presented video clearly shows the technology and nuances of installing factory-made reinforced concrete floor slabs in the basement under the entire house:
Monolithic reinforced concrete slab.
In the case of non-standard dimensions of the basement (non-compliance with the generally accepted construction step of 600 mm), they resort to installing a monolithic reinforced concrete basement floor. To do this, several operations are performed sequentially:
1. Formwork installation.
Formwork is made from boards, moisture-resistant plywood or metal sheets. A wooden formwork frame is installed along the perimeter of the poured floor area. Its bottom is the future ceiling of the basement. It is made of metal or plywood. Plywood or metal sheets are laid on boards made of boards with a thickness of at least 30 mm and a pitch of 500 mm.
The panel formwork is secured using racks. Racks can be telescopic, metal or wooden from timber. They must be secured in a strictly vertical position to prevent collapse when laying concrete. The shields are aligned horizontally.
2. Manufacturing of metal frame.
To make the frame, it is necessary to use reinforcement with a diameter of 12-16 mm for the bottom layer and 10-12 mm for the top layer. The pitch of horizontal and vertical rods is 150-200 mm. The reinforcement can be fastened together by welding or tying with soft steel wire.
3. Laying the concrete mixture.
The technology for laying concrete mixture is not much different from laying it into a foundation structure. The mixture can be supplied either manually or with a concrete pump. The main feature of this process is the uniform placement and good compaction of concrete. Surface vibrators must be used for compaction.
It is advisable not to interrupt the installation process for a long time, thereby ensuring the solidity of the structure. The concrete must cover the reinforcement frame both below and above by at least 25 mm.
When performing concrete work in winter, special additives are added to the concrete mixture to prevent the water in the mixture from freezing.
It is necessary to understand that the laid concrete mixture gains its strength 28 days after laying. Therefore, it is not recommended to remove the formwork earlier. Walking on the pour is allowed after 3 days; masonry work should be performed no earlier than 14 days. However, storing building materials on a monolithic concrete site is not recommended.
Flooring on wooden beams.
The use of wooden beams to construct a basement floor in a residential building is extremely rare. More often they are used in frame or completely wooden houses, where the use of reinforced concrete is not rational.
At the same time, wooden floors have their own peculiarity:
- the lightness of the structure gives a unique aesthetic perception to the ceiling, the ability to perform various methods of wood processing;
- avoiding the use of expensive mechanisms for the installation of overlap;
- ease of installation;
- light weight of the floor structure, reducing the load on the foundation;
- simplicity of repair work, allowing you to simply replace an unusable part;
- low cost of overlapping.
For beams, both solid coniferous timber and multi-layer, laminated timber are used.
The pitch of their installation should not exceed 600 mm with a span of up to 5 m. The filling between the basement ceiling lining and the finished floor of the first floor is made with non-combustible mineral wool. Along with the positive characteristics, there are also negative qualities of a wooden basement floor:
- high fire danger;
- low sound absorption, mechanical strength of wood, instability to fluctuations in humidity and temperature;
- requires additional treatment against fungus, mold, insects;
- installation of additional supports for large spans;
- mandatory installation of a vapor barrier layer.
The choice of wooden basement flooring largely depends on the intended form of use of the basement.
When using a basement with a swimming pool, it is better not to use a wooden floor. The presented video clearly shows how to correctly install wooden beams to cover a basement, the nuances of fastening and leveling:
Basement ceiling insulation
The humidity and temperature indicators of the cellar completely depend on the correct insulation of the ceiling. Only favorable atmosphere and air can create the most comfortable conditions for storing vegetable products and preparations for the winter.
Various materials are used for thermal insulation. This could be mineral wool, polystyrene foam. A high level of insulation is provided by modern, but expensive polystyrene foam and polyurethane foam coatings. Such insulation has a number of advantages. Laying and installation are completely effortless. The materials practically do not increase the thickness of the surface of the walls and ceiling.
The thermal insulation device can be formed the old fashioned way. To do this, cement mortar is mixed with sawdust. The thickness of such insulation material for the ceiling should be 4 cm.
Basic safety rules
In order for the result of the work on installing a basement floor to please you for many years, you must adhere to certain rules and methods for its safe implementation:
1. When installing floor slabs with factory-made slabs.
This method cannot be performed without the involvement of a truck crane, so safety depends on strict compliance with basic regulatory rules:
- The crane operator, slinger, and installer must first agree on simple conventional signs and signals during the installation of floor slabs;
- The slinger and installer must have their own installation tools; throwing them to each other is unacceptable;
- cleaning the slabs from dirt and snow must be carried out before lifting the mounted element;
- installation of floor slabs without mounting loops is prohibited;
- It is not allowed for people to be on the transported load or under the boom of a truck crane;
- Each worker involved in the installation of slabs must have personal protective equipment;
- The load is unslinged only after its final installation and stability check.
2. When installing formwork:
- the presence of people and the presence of tools on an unsecured formwork flooring is strictly prohibited;
- installation of inventory formwork is carried out only with the use of telescopic racks, which are adjusted using threaded connections and special locks;
- It is prohibited to secure inventory formwork with improvised materials;
- dismantling of the formwork is carried out in the reverse order of assembly.
3. When installing a reinforcement cage:
- welding machines must be protected from possible precipitation and accidental mechanical damage;
- storing stock of reinforcement on the formwork is not permitted;
- walking on the manufactured frame is allowed only on the panel flooring;
- electric welding work cannot be performed in the rain, snow, or with damaged insulation of the current-carrying cable;
- when performing welding work, prevent the occurrence of fire by removing flammable substances from the welder’s work area.
4. When working with concrete mixture:
- when using concrete pumps, when concrete is supplied using hoses, the serviceability of the latter is checked before the mixture is supplied;
- the use of the bunker involves its movement in a closed state, opening is made no higher than 1 m from the place where the mixture is laid;
- when using various chemical additives (plasticizers, modifiers), workers must have personal protective equipment;
- The use of surface vibrators operating from the electrical network without grounding is strictly prohibited.
5. When installing a wooden floor:
- strict compliance with fire safety measures;
- hammers, axes, saws and other hand tools must be securely fastened to the handles;
- it is necessary to raise the beams to a height using at least 2 slings;
- after installing the beam element, secure it rigidly;
- There should be no unauthorized people in the area where the wooden floor is installed.
Compliance with these basic rules for the safe performance of work is the key to preserving the lives of all participants in the construction process when constructing a basement floor.
In order to carry out high-quality work on covering the basement with your own hands, it is necessary to decide on the methodology and decide on the type and materials used even before the start of construction. Advance preparation is a guarantee of high quality and saving the family budget.
3.7
/
5
(
3
votes)
A cellar is an indispensable building for owners of private houses, ensuring the preservation of food for a long time. It is a room located below the zero level and does not take up additional space on the site. The ceiling of the cellar, made in accordance with building codes, will ensure the strength of the structure, maintain a stable temperature throughout the year and will not allow the formation of dampness.
Storage for food, canned goods, and vegetables, despite its apparent simplicity, will serve its purpose if you approach the work responsibly and properly seal the cellar.
Work on covering the basement and cellar with your own hands can be done on your own
How to properly ventilate a cellar - Air exchange organization diagram
How to make ventilation in the cellar with your own hands? The effective operation of a cellar ventilation system can be built on the physical principles of natural circulation, forced exhaust, or both. To organize natural inflow and exhaust in the underground storage, two openings are provided. In the upper part of the cellar, to remove moist air, and in the lower part, to supply fresh air from the street.
The principle of natural air circulation
General principle of ventilation
Air exchange in the cellar occurs according to the laws of physics, as a result of the ability of warmer air to rise upward. Warm air, collecting under the ceiling, continues its movement through the existing exhaust hole and then through the exhaust pipe to the outside.
In short, the hood creates the necessary vacuum in the cellar, which ensures an influx of fresh air from the street into the lower part of the storage.
The simplest design of a natural ventilation system for a basement structure consists of two pipes, the edge of one of which, as a rule, is located at a height of 10-15 cm from the floor, and the second, at the same distance, from the ceiling.
The operation of the natural ventilation system is characterized by a high level of reliability and efficiency. Does not require any control or power consumption. However, the lower the temperature outside, the more air exchange increases, and therefore the influx of cold air. Therefore, in the cold season, in order to prevent the cellar from freezing and spoilage of the products stored there, the exhaust vent must be partially closed.
Ventilation diagram
How to properly ventilate a cellar - Ventilation in the summer
One of the main disadvantages of natural circulation ventilation systems is the severe deterioration or complete disruption of air exchange when the outside air temperature is much higher than in the cellar storage. The heated air mass from the street is not able to descend down the inflow into the cold room, and the cool air from the basement rises very poorly.
On such summer days, to ventilate the room, it is recommended to use mechanical circulation, with periodic activation of the axial fan. In this case, it is important that the fan is installed exactly at the exhaust vent. In this case, the required power of the electric motor and mechanical circulator can be significantly less.
It is also worth knowing that constant operation of the fan is not required. In order not to turn the ventilated device off and on manually, it is recommended to install an opening time relay in the circuit. It is also worth understanding that when the outside air temperature is below 10-15°C, you can completely abandon the use of the mechanism, forced ventilation.
Ventilation system calculation
Stable, high-quality operation of ventilation in the cellar depends on the correct arrangement of the system. The main, most important, constructive data includes the following indicators:
- The height of the holes for the influx and exhaust of air mass;
- cross-sectional area of ventilation ducts;
- size of supply and exhaust grilles;
- the height of the end of the exhaust and air intake pipe above the ground level.
To properly organize forced air exchange in the cellar, it is necessary to determine the performance of the fan.
Fan
Forced ventilation
Calculation of the cross-section of ventilation ducts
The cross-sectional size of ventilation ducts, as a rule, affects the volume of air exchange. This is especially true for natural ventilation systems. Therefore, the question of determining the optimal diameter of pipes or the size of brick channels is the most important.
The reduced ventilation cross-section in a cellar with two pipes does not create the required amount of air. If it is too high, it will lead to a strong cold influx in winter and a sharp decrease in the temperature in the storage. Food in such an underground room can freeze and disappear.
Professional, high-quality calculation of ventilation systems and basements is a complex engineering task that requires special knowledge and skills. However, there is a simplified method of calculation, which is based on numerous practical studies. It is believed that for one m² of basement floor, with a ceiling height of no more than 2.2 m, 26 cm² of ventilation duct cross-section is required.
For example, the calculation for a cellar measuring 3 by 3 m will be as follows:
- Floor area is 9 m²;
- the minimum possible cross-sectional area of the ventilation duct will be 9 x 26 = 234 cm²;
- the size of the channel in a brick wall will be equal to 234: 12 = 19.5 cm (assumed 60 by 200 mm), where 60 is the optimal width of the butt side of a standard clay brick;
- the diameter of the ventilation pipes will be equal to twice the square root, with a ratio of 234/3.14 and will be 17.26 cm.
The optimal size of round ventilation pipes is taken according to one standard size. If the diameter is large and the cost of the building material is sufficiently high, it is possible to install two smaller pipes, the total cross-section of which corresponds to the calculated value.
Calculation of fan performance for forced exhaust
The amount of air to ensure the necessary ventilation of cellars is determined by their volume and is called the multiplicity. For basements and cellars, such parameters should not be at least 1.0-1.5. That is, every hour fresh air should be supplied in an amount equal to the volume of the cellar or 1.5 times more.
To select a fan, it is necessary to take measurements and determine the volume of the cellar. For example, for a room 3 by 3 meters and with a ceiling height of 2.1 m, you will need an axial fan capable of supplying air in a volume of 18.9 to 28.3 m³ per hour. With lower aggregator productivity, ventilation will not be provided properly. If it is larger, you will have to install a diffuser and use part of the engine power idle.
When using a time relay, it is possible to organize short-term activations of the ventilation system, based on the calculation of the required hourly air exchange. After removing the required volume of air, the installed fan will turn off automatically.
Preparatory activities
To ensure that the room fully performs its assigned functions, before you start building a cellar with your own hands, pay attention to the following points:
- Excavation work is preceded by the development of a room layout, which should be thought through to the smallest detail. This will help avoid unforeseen situations in the future.
- Assess the groundwater level at the construction site. Ideal if they are located low. When the storage floor is located below a water-saturated layer, take care that water does not penetrate the floor and walls.
Only after reliable protection from moisture can you install a ceiling for the cellar. The task of waterproofing a building is one of the main ones, as it determines the comfortable conditions of the room. How to do it correctly?
Covering a cellar in a garage: we tell you in detail
Owners of private houses use the basement to ensure the safety of crops and conservation. The construction does not require additional space, since the cellar is located below the soil level in the foundation part of the building. It is important to cover the cellar in compliance with construction rules. This will ensure the reliability of the structure and allow maintaining favorable humidity and temperature. Let's look at how to make a cellar ceiling on your own.
Moisture protection
Reliable waterproofing in the cellar makes it difficult for moisture to penetrate and is carried out as follows:
- Apply a layer of plaster with the addition of liquid glass to the side surfaces of the basement structure;
- stick 2-3 layers of roofing felt onto the wet cement mortar;
- build brickwork, with the help of which you press the waterproofing to the walls.
Before pouring concrete to create a basement, you need to install reinforcement and formwork
Floor protection is carried out in a similar way, involving the preparation of a “cushion” 20 cm thick from a mixture of crushed stone and sand.
When the box is prepared (the walls and floor are concreted and waterproofed), a ceiling for the basement is constructed. It is necessary to determine what is best to make the ceiling from? After answering this serious question, you can calculate the need for materials and begin work.
It is convenient when the basement is located in the room where the vehicle is stored. By doing all the work in the garage yourself, you can save financial resources, since you will not involve professional builders. To reduce costs, determine the necessary materials in advance and find out the prices at which they can be purchased. This will allow you to assess the overall level of expenses.
What types of ceilings can be installed in a cellar?
Options for covering the basement
Waterproofing diagram from the cellar side: 1- ceiling of the cellar; 2- wooden frame; 3- brick wall of the cellar; 4- coating with bitumen mastic; 5- backfilling of the sinuses; 6- concrete base; 7- preparation from compacted crushed stone; 8- adhesive anti-pressure waterproofing; 9- protective wall; 10-cement plaster.
After the pit is filled to ground level, the next stage of construction follows - covering the cellar. As a rule, for this purpose, a kind of cornice is constructed along the entire perimeter of the pit from ceramic red brick. It should be taken into account that the laying of each row of bricks should protrude outward by about 3 cm more in comparison with the previous row. Then the cornice is covered with roofing felt, on top of which any of the loose insulation materials should be laid. After this, you need to make a cement screed, the thickness of which is at least 2 cm, and cover it with roofing felt.
Various materials can be used to build a vault, it all depends on the type of structure and the availability of funds for this, but in any case, the structure must be durable, since it will be subject to a large load. In addition, close attention should be paid to the work on waterproofing the basement floor.
You can also make a basement ceiling from wood. For this purpose, beams are initially made, and after that they are covered with beams or boards. It should be noted that when using wood to construct a basement floor, it must be treated with an antiseptic.
After installing the floorboards, thermal insulation material is applied. As an option, you can use ordinary clay, which is subsequently covered with dry soil. The thermal insulation layer must be at least 0.5 m thick.
There is one very significant drawback to using wood to build a basement floor - wood is susceptible to rotting.
The cellar ceiling design is made from a slab insulated with clay lubricant and earth.
Therefore, wooden floors often have to be repaired.
According to experts, the best material for covering a basement is a reinforced concrete slab or concrete mixture. Of course, due to the presence of reinforcement in a reinforced concrete slab, it is much stronger than concrete. With this design of the ceiling, special attention should be paid to sealing the seams. For this purpose, you need to use cement mortar. Often you have to make concrete, and even mortar, at home, and it is best to give preference to cement grade M 200 or M 300.
Return to contents
Features of installing a monolithic block
If you are thinking about how to make a cellar ceiling so that it is practical and reliable, then we recommend a common option - a monolithic reinforced concrete block, which is a reinforcement frame filled with concrete.
The process of creating a solid reinforced base requires following the recommendations:
What is a basement? In simple terms, a room under the house. Basement construction has its own special technologies, which include waterproofing the basement, waterproofing the outer wall of the basement and the foundation. Waterproofing protects the basement, and therefore the house, from moisture and water getting under the house. However, the technology for building basements does not provide for mandatory insulation of basements and, even more so, does not provide for heating wiring in the basement, and especially in the underground.
But not only the basement, a room in the house for storing separate household belongings, but also the underground is a source of cold air penetrating into the house. The underground of the first floor is formed between the walls of the strip foundation, as well as all other foundations other than the monolithic foundations of USHP and RPP. By definition, a crawl space is a cold, well-ventilated space under the house. Ventilation is provided by special ventilation holes in the foundation (vents). Mandatory backfilling of soil and layers of crushed stone and sand in the underground do not save you from the cold.
All these features impose the main requirement on the floor of the first floor of a private house - its insulation. Floor insulation is standardized by SNiP 02/23/2003 “Thermal protection of buildings”. More about architectural design in.
Pouring a monolithic concrete ceiling
Upon completion of the work related to the construction of walls and waterproofing of the room, the moment comes when it is necessary to resolve the issue of covering the cellar. In some cases, a conventional monolithic concrete slab, which is made of concrete and a reinforcement frame, is used for this.
All the work can be done with your own hands. It is very important to construct timber formwork before pouring concrete.
- The size of the ceiling must exceed the dimensions of the room, because the walls of the cellar will serve as its supports.
- Before pouring the floor, special supports should be installed, which should hold the wooden formwork structure while it is filled with concrete and when it dries. In this case, the formwork must be pre-sealed so that the solution does not leak during the pouring process.
- The next step after creating the formwork is knitting the frame of the concrete slab. The frame, as already noted, is made of reinforcement. The distance between the individual rods should be approximately 20–25 cm. If your cellar is small in size, then one reinforcement frame will be enough, but when the dimensions of the storage are significant, for greater reliability it is better to use paired reinforcement of the slab. The reinforcement network should extend beyond the cellar walls by several centimeters from different sides.
As soon as the work on creating the formwork and reinforcing mesh is completed, you can begin the process of pouring the concrete solution, which will form the future slab. As a rule, the height of the slab does not exceed 30 cm. This is a reliable, monolithic and high-quality ceiling that will serve you for decades.
Concrete should be poured as evenly as possible, without interruptions, until the entire slab is formed. To prevent cavities from forming inside the structure, the solution must be subjected to vibration before pouring, which is done using a regular board or special devices.
After pouring the concrete slab, you need to wait some time (about 3-4 weeks) for it to completely harden and take on its final form. According to experts, such an overlap is the most durable and effective. In addition, if desired, you can even use it as the foundation of a small outbuilding above.
Construction of a concrete floor above a basement
It is optional to use beams for the floor of the first floor. With a good foundation, the subfloor of the first floor can be a concrete floor slab. In this case, the design of the floor itself changes, but the principle remains the same: the floor must be insulated and protected from condensation due to temperature differences.
If a concrete slab serves as the base of the first floor, then any floor structure is appropriate:
- The floor is made of wooden joists laid on a slab, with insulation between the joists;
- Warm water or electric floor;
- Semi-dry screed on a layer of rigid insulation followed by the installation of a thin electric floor.
Option on load-bearing beams
To make a high-quality ceiling for your cellar, you can use load-bearing beams. Metal beams are best for this. If possible, you can even use ordinary rails, which can often be purchased at construction warehouses or scrap metal collection sites. Often the beams from which the ceiling of the structure is supposed to be made are ordered individually at factories.
Even ordinary rails are suitable as load-bearing beams.
When choosing this method of creating a cellar ceiling, at the stage of its construction it is necessary to provide for the presence of special holes in the walls that are required for attaching load-bearing beams. The ceiling of your cellar will experience significant stress. That is why the walls must also be as strong as possible, capable of supporting the weight of the beams and soil poured on top. By and large, the walls will be the “foundation” for the ceiling.
Special holes are provided in the walls for laying beams.
The order of work is as follows:
- Load-bearing beams are laid in pre-prepared holes in the wall. By and large, this work can be done independently, but with several assistants, because even the rails have significant weight.
- In the space that will be formed after laying the load-bearing beams, it is necessary to mount reinforcing bars and then secure them with special wire. Next, the reliability of the connection and the durability of the beams are checked. If all is well, then wooden formwork is made and a waterproofing layer is applied to it.
- After installing the formwork, it is necessary to install supports that will be designed to take the load of the cement mortar.
- You can mix the cement mortar yourself or order it ready-made from any construction company. The solution must be poured as evenly as possible and without long breaks into the metal frame. All compartments of the frame must be filled with concrete; nothing should be left out. Upon completion of pouring, distribute the solution throughout the entire thickness of the structure.
- The ceiling that is obtained after using this method requires high-quality thermal insulation. In principle, any thermal insulation material is suitable for this.
As a result, you get a reliable floor slab that can withstand serious loads. In this case, the ceiling of the cellar will be perfectly strengthened, insulated and will not cause problems during operation. After all insulation work, the resulting floor must be covered with soil, making a small mound. In some cases, a gable roof is additionally installed, which will protect the cellar from precipitation.
Loadable floor design (floating floor)
A loaded floor, the base of which is a floor slab, is made as follows:
Expanded polystyrene insulation is laid on the floor slab, and a film is overlapped on it, which will serve as a waterproofing insulator. A screed is made on top of the film. The floating floor screed is separated from the walls by a thin layer of insulation (damper). The dry screed is covered with a vapor barrier and a base is laid for the finished floor.
Note
Typically, a wooden heated floor is not used to insulate the floor of the first floor. Let me remind you that a wooden floor heating system is made between joists or on a special wooden flooring and reflective elements laid on it.
However, it is quite acceptable to install a heated floor on the ground floor if it is a floor slab. The main thing is not to forget that the insulation for concrete made of extruded polypropylene should be thicker than 25-30 mm. And also under the insulation, a waterproofing material is laid on the slab, and a heat-reflecting material is laid on the insulation.
Storage floor
After the reinforcing mesh is assembled, concrete can be poured.
- Anaerobic bacteria can emit gases that are potentially dangerous to humans, which will never enter the cellar through the concrete floor.
- A variety of pests will also not be able to enter the storage facility through the concrete surface, so installing such a floor is the right solution if you are concerned about this problem.
- Even large rodents cannot destroy a concrete floor.
- During high water, when the dirt floors simply begin to slip away from under your feet, the concrete surface will remain in place.
The construction of a concrete floor in a cellar in a private house involves the following steps:
- The first step is to dig a pit, decide on the size of the cellar and level the bottom of the hole.
- Next, you need to make a sand cushion, the thickness of which should not exceed 20 cm. It is compacted using available tools and water. The cushion must be firm and level, otherwise the concrete floor will undergo deformation in the future.
- Then it is recommended to lay a layer of gravel, which also needs to be thoroughly compacted and made as even as possible. The arrangement of this layer will ensure high reliability of the surface and the cellar under the house will not be subject to deformation.
- Waterproofing material is laid overlapping on the gravel-sand cushion (special polyethylene or roofing felt can be used). This is necessary not only as a barrier from groundwater, but so that the cement laitance does not go into the lower layers after pouring the solution. Thanks to this approach, concrete gains maximum strength. Of course, this will not provide an absolute guarantee against moisture penetration into the premises, but at least it will reduce the risks as much as possible.
- A stack of reinforcement is placed on the waterproofing layer. The thickness of the reinforcement bars should be 5 mm or more. Reinforcement of the floor surface ensures the resistance of the surface and its durability during operation.
- Finally, the floor is poured with cement mortar about 10-15 cm thick. You need to understand that the coating will gain working strength only after a few weeks. For the first days after completion of work, walking on such a floor is prohibited.
We invite you to familiarize yourself with: Installing a stove in a bathhouse with an external firebox