Requirements for garage flooring
When choosing a material to create a garage floor, you must consider the following requirements for it:
- Abrasion resistance and compressive strength. The weight of the car is quite large and is distributed over four wheels; in addition, the tire tread has an abrasive effect on the surface, wearing it out.
- Inert to chemicals, resistant to mechanical stress and shock. Often a garage is used not only for storing cars, but also as a workshop.
- Frost resistance and weather resistance. Significant temperature changes can cause cracks to appear and destroy the foundation. It is important to choose compounds that will be resistant to low temperatures.
- It is easy to clean from dirt, since there are many substances in the garage that leave marks on the floor.
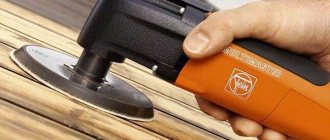
The self-leveling floor is resistant to abrasion and is easy to clean Source mauro-gianvanni.ru
To create a self-leveling floor for the garage, various options on the market are suitable. It is important to understand their varieties and features.
Causes of irregularities and types of damage
Leveling the floor in the garage is a responsible task that requires accuracy and patience. When pouring the base yourself, mistakes are often made, which later become the causes of uneven floors. For example, while working you could:
- incorrectly calculate the load exerted by the car on the surface;
- failure to maintain the correct proportions when preparing the concrete solution;
- level the floor to the level of one wall, which is why the surface is sloped;
- lay reinforced concrete floor slabs (when installing an inspection hole) on a porous base, as a result of which they swelled and cracks formed.
Most often, the concrete base has to be leveled due to the following defects:
- cracks and chips;
- small “waves”, also called plows, formed after the use of the rule;
- wave changes - smooth, repeating changes in floor level;
- increasing the (local) floor level - sagging;
- local lowering of the floor level – cavities and lenses.
Depending on the type of damage, it is necessary to choose the best alignment method.
A variety of self-leveling floors that can be used in the garage
Any of the types of floor coverings proposed below has a monolithic appearance without seams or joints, as well as a long service life, so it is difficult to say which is the best self-leveling floor for a garage:
- Epoxy self-leveling floors. They tolerate exposure to temperature and moisture very well. Available in both one- and two-component versions. In addition, they are chemically inert.
- Polyurethane floors. Their characteristics are similar to the previous version, but are more resistant to mechanical stress. Used in automotive companies.
- Methyl methacrylate coatings. They should be used in rooms with good ventilation. They have low cost. However, it is necessary to select the thickness of the coating correctly so that it does not peel off or wear out in a short period of time.
- Acrylic-cement mixtures for floors. They allow you to protect concrete foundations from destruction and seal cracks in old floors.
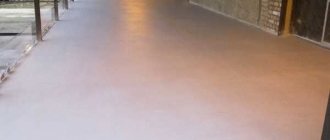
Acrylic-cement self-leveling floor will protect the concrete base from destruction Source pagesjaunes.ca
How to level a concrete floor in a garage - cracks, holes, height differences
Nothing lasts forever, so garage floors warp over time. Before leveling the concrete floor in the garage, find out the reasons that caused the deformation. Sometimes, before installing a new cement screed or repairing, it is necessary to carry out an additional set of works.
Finding out the reasons for the destruction of concrete screed
Typically, garages are installed on a shallow strip foundation, and the floor screed is made along the ground.
Why deep cracks and sudden changes in floor height appear in a concrete screed:
- the soil shrinks under the weight of the building and the foundation strip becomes deformed - you need to check the perimeter of the foundation and find the cause of the problem;
- groundwater has risen and is eroding the base of the garage, the flow of storm water has changed and it is eroding the foundation - waterproofing and drainage are needed;
- A large-scale construction project is taking place nearby, and the ground has subsided - it is necessary to add earth and level the foundation.
If several deep and wide cracks appear along the concrete screed, then the problem is in the foundation. It is also necessary to repair the foundation if a sharp difference in floor height is noticed.
Why do irregularities and small cracks appear:
- the proportions of sand and cement were not initially observed;
- the load from the weight of the car is higher than the thickness of the concrete screed;
- the slope of the floor is more than two degrees - as a result, small cracks and chips in the screed;
- When constructing the inspection pit, the slabs were installed incorrectly - as a result, swelling of the screed and deformation of the floor occurred.
If the screed is poorly leveled, then small waves or sagging are observed across the entire surface of the floor.
Repairing a concrete floor screed in a garage
Concreting a garage floor solves several important problems at once:
- eliminates dampness;
- keeps warm;
- reduces the risk of rapid metal corrosion;
- provides good ventilation of the room - it is easier to make natural ventilation;
- makes it possible to organize comfortable heating.
If the garage has a concrete floor screed, then it is much easier to build an inspection hole than on open ground compacted with crushed stone and sand.
Partial garage floor repair – cracks, bumps and holes
Cracks always appear from wear in the old screed and very quickly cover the floor, which was not poured according to technology.
Crack repair
How to fix cracks:
- Use a chisel and hammer to widen the crack so that all voids are found and all chips are knocked off. When concreting, it is necessary that no voids or cavities remain;
- clean it of dirt, old cement and debris;
- for deep faults, reinforcement is installed from several short metal rods laid horizontally along the crack;
- After cleaning, rinse the cleaned crack with a stream of water from a hose;
- when the water is completely dry, apply a concrete primer to improve adhesion;
- prepare a cement mortar - M400 cement and water, it should have the consistency of thick sour cream. Then add PVA glue or liquid glass, the proportions are one to one, mix thoroughly;
- fill the crack with mortar so that it forms a small bump. Over time, the solution will settle, completely filling all the voids.
When the solution is completely dry, grout with coarse sandpaper or a grinder with an abrasive stone.
Lumps and irregularities
Small holes, bumps and irregularities can be removed by sanding. What to pay attention to during the alignment process:
- check the slope with the level, it should be no more than two degrees;
- protruding reinforcement must be cut off, and large crushed stone must be beaten with a hammer and chisel.
It is not necessary to buy a grinder for this; renting such a tool will cost a maximum of 600 rubles.
Pothole repair
If there are one or two holes in the floor, then there is no need to make an expensive screed; you can simply level the surface:
- clean the pit from old cracked cement;
- remove debris, dust and dirt;
- then fill in a layer of crushed stone (middle fraction), thickness 2 - 3 cm, depending on the depth of the pit;
- then fill the recess over the crushed stone with two-component epoxy concrete. After pouring, there should be two millimeters left to the bottom level;
- When the layer is dry, level the screed with putty and sand it.
A small wave from the rule can be easily eliminated using a self-spreading solution, a layer of 1 - 2 mm or a cement-sand screed (proportions 1 to 1).
Repairing a concrete floor in a garage - cement screed
How to level a concrete garage floor if the height difference is more than five centimeters? Only a cement screed around the entire perimeter will solve the problem. Only ordinary cement mortar can be poured in parts, eliminating height differences.
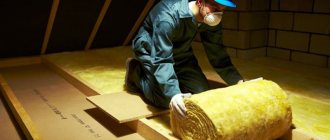
Another advantage of leveling is that you can additionally lay a layer of hydro- and thermal insulation if this work has not yet been completed.
Operating procedure:
- we clean the old screed and remove all the destroyed pieces of cement, remove dirt and debris, wash the floor from the sludge under pressure, let it dry;
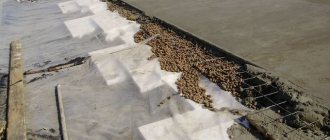
- we set up the reinforcing mesh;
- install beacons, floor slope 2 degrees;
- We install the formwork at the entrance to the garage. Formwork is not placed along the walls, because it is impossible to remove it later;
- We prepare a solution in the proportion of one part cement (M300 or M400) and three parts clean sand. For a kilo of mixture you need a liter of water;
- fill the screed, thickness from 6 cm and no more than 10 cm;
- When the cement has set, after 30 minutes you need to level the surface. To do this, apply a leveling cement screed - a layer of no more than 6 mm.
Concrete hardens for a month, depending on the weather. To prevent the screed from cracking, cover it with polyethylene. In hot weather, you need to wet the concrete every two days with a spray bottle.
For large uneven surfaces, you will need a screed with crushed stone if the concrete layer is more than 10 centimeters.
You can check the quality of the repair by the color of the concrete; if somewhere the floor is darker, then voids have formed during pouring. You can check by tapping it with a wooden board; a ringing sound will indicate a cavity, which means the work will have to be redone.
https://ok.ru/video/9591719309
garazhov.ru
Advantages and disadvantages of self-leveling floors
Like any building materials, these also have a number of advantages and disadvantages. Polymer floors for garages have the following advantages:
- High strength and long service life (about 20-40 years). Not afraid of mechanical damage and shock.
- Good adhesion to the base. When applied, the coating adheres firmly to the base and does not peel off.
- Fire resistance. They do not burn upon contact with fire and do not emit toxic substances into the atmosphere.
- Good protection against moisture. Protects against water penetration onto the concrete base.
- Attractive appearance. The composition is produced in various colors, you can add flocks and glitters and get intricate designs and unexpected effects.
- Seamless. This option prevents the entry of moisture and dirt, which destroys the coating.
The disadvantages of polymer self-leveling floors for garages include the complexity of preparation and installation, the inability to dismantle them without damage, and high cost.
Installation work
You can lay a self-leveling garage floor consisting of a thin layer with your own hands. In this case, there is no need for special tools. You also won't need anyone's help. Before you begin installation, you should clean the screed as much as possible from dust and debris. It is recommended to repair all defects. It may be necessary to sand the base coat, but this is only done for thin-layer coatings.
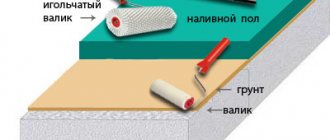
It is recommended to apply the primer 24 hours in advance. The self-leveling coating is poured using the puddle method. So, first the surface is leveled with a special roller, which will remove air bubbles. Second phase -
Technology for applying self-leveling floors in the garage
You can make a self-leveling floor in a garage in several stages: preparing the base, preparing the mixture, pouring the composition, applying the finishing layer.
Before applying the self-leveling floor, you need to prepare the base and prepare the mixtures Source bredmozga.ru
Preparatory stage of work
The basis for pouring the polymer floor is a concrete screed. To begin with, it is cleaned of dust and residues of glue, varnish or paint, since they will impair the adhesion of the solution to the base. Protruding areas are sanded, cracks are expanded, and then filled with repair compounds. The surface, cleared of dust and dirt, is primed.
If you need to fill a thick layer or create a slope, you need to make marks on the walls with a marker using a laser level. When pouring the floor in a room that will not be heated, it is worth using damper tape or foamed polyethylene around the perimeter.
On our website you can get acquainted with the most popular plots in the Moscow region for the construction of a country house. In the filters you can set the desired direction, the presence of gas, water, electricity and other communications.
Preparing the potting mixture
Water is poured into the prepared container in an amount that corresponds to the instructions on the packaging of the material. The dry mixture is gradually introduced and mixed with a construction mixer. After 10 minutes, stirring is repeated, after which the mixture is ready for use. It needs to be worked out within half an hour, otherwise it will lose its elasticity and will not spread evenly in the plane.
You need to prepare the mixture according to the instructions Source waystocap.com
The process of pouring the prepared composition
The main feature of installing a floor in a garage is that it is necessary to make a certain slope. In this regard, the composition must be mixed thicker than when pouring a conventional self-leveling floor. You need to start work from the far corner and move towards the exit. The resulting mixture is poured and leveled, then rolled with a needle roller to compact it. The next portion is applied overlapping with the previous one. It is imperative to deaerate the entire coating.
If the room is large, more than 18 square meters. area, then expansion joints will need to be made. After a week or two, the floor is ready for the finishing coat and the final stage of processing.
Laying the final decorative and protective layer
To begin with, the surface is examined, all irregularities are eliminated with sandpaper and dust is removed well. A hardener is added to the epoxy paint, mixed and allowed to stand for 30-60 minutes. This is necessary for all chemical reactions to finish. You need to start painting from the corners, coating them thoroughly, then use a roller to paint the entire perimeter of the floor. To reduce surface slipping, scatter decorative chips over the entire area. After 3-6 days the floor can be used.
Laying the finishing layer Source do.nn.ru
A wide variety of materials allows you to get different surface options and create a unique pattern or choose a suitable color. There are options when several colors are mixed or additional additives are used to reduce slipping or create a specific design.
This might be interesting! In the article at the following link, read about how to insulate the floor in a private house: the secrets of thermal insulation.
A guide on how to make a self-leveling floor for a garage
It is currently very difficult to make a choice among the variety of building materials. For example, today they produce flooring that is not spread, but poured. That's what it's called, a self-leveling floor. What this type of flooring is, and whether it can be used in a garage, will be described below. An overview of types of rubber floors for garages here:.
The photo shows a self-leveling floor for a garage
Can it be used in a garage?
Self-leveling flooring is also called liquid linoleum; its surface is smooth, without seams or gaps, and feels smooth to the touch like a monolithic tile. This material is presented in 12 color shades, plus additional colored “chips” are offered, which are sprinkled on the newly poured floor, creating an original decorative effect. Chemists call this floor a special seamless polymer coating.
This type of flooring is used in rooms where special requirements are imposed on the flooring: high strength, abrasion resistance and sanitary and hygienic requirements. Most often, production areas, including garages, fall under these requirements. Read the guide to choosing the type of cellar for your garage.
Self-leveling flooring in the garage - pros and cons. If we compare the self-leveling floor with other floor coverings, only with linoleum, laminate and ceramic tiles. When we consider organizing a good, durable garage floor, linoleum and laminate are not even considered. What remains is tile, which has the main disadvantage in comparison with self-leveling flooring; it is a large number of seams.
You can also consider the positive and negative characteristics of this flooring. Advantages:
- External – a variety of colors, solidity, good appearance, gloss;
- Service life can reach 40 years;
- Resistant to moisture and chemicals;
- It is easy to care for; it is enough to wash it with plain water without special products;
- Hygienic;
- Features good adhesion to any surface;
- No seams;
- Simplicity and ease of installation, which you can do yourself without any help in 12 hours.
Colored self-leveling floor in the parking lot
Flaws:
- No variety in design compared to other surfaces;
- Very long service life, mentally annoying, although you can renew the coating or use a different shade;
- There are types of self-leveling floors that can turn yellow when exposed to ultraviolet radiation. Not very pleasant given the high cost of the material;
- Before applying the self-leveling floor, the surface should be thoroughly prepared, leveled and puttied; this takes a lot of time and effort;
- If it is necessary to remove this coating, difficulties will arise; it is difficult to remove;
- The material is completely artificial;
- High price.
There are several types of self-leveling floors for garages on the domestic market:
- Methyl methacrylate (from methyl methacrylic resins) is used quite rarely, since drying such a floor requires a chemical reaction where the solvent evaporates, releasing a pungent odor;
- Epoxy (from epoxy resins) – have high chemical resistance;
- Cement-acrylic (prepared on the basis of a dry construction mixture and an additional “liquid component”) is the most affordable option, which helps to even out all the unevenness errors of the original floor.
- Polyurethane - used mainly in residential buildings.
Kinds
Before applying a self-leveling floor in a garage over old concrete, it is necessary to prepare the surface. Any oil or oil stains should be removed using a commercial degreaser. You should also remove marks from rubber wheels, which are removed by sanding, and then the dust is removed with a vacuum cleaner.
If the floors were previously covered with paint, it must also be removed by sanding. The self-leveling floor will fit well only on a similar coating previously. At the very end, the floor is tested with a hydrochloric acid solution to determine if there are any other stains or coatings that need to be removed. Afterwards you can apply the coating. Read the instructions on how to decorate the walls in the garage.
The use of polymer self-leveling floors in garages has long proven itself. The polyurethane base of such floors belongs to the elastic group and can withstand heavy loads and the negative impact of external factors. This type of material is applied in several layers, which makes it possible to level out concrete defects, such as large porosity.
A self-leveling self-leveling floor in a garage is a cement or gypsum screed that contains a large amount of polymers. This material spreads well on its own and is distributed over the entire surface of the main floor and creates a perfectly flat and highly durable surface. In addition, the self-leveling self-leveling floor is absolutely safe for human health and fire-resistant.
Self-leveling rubber flooring for garages is made from crumb rubber obtained from used car tires. After several stages of rubber processing, the necessary mixture is obtained, which is diluted with water. As a result, the self-leveling rubber coating in the garage is soft and elastic, and at the same time quite durable. The floor surface has a perfectly smooth coating that does not slip. Read the instructions on how to cover the walls in the garage on this page.
A cement-based self-leveling floor is the most affordable way to make self-leveling floors in a garage. This material is applied to a flat and clean surface; it will take about 20 days for the coating to dry completely. Such floors are susceptible to mechanical stress and also do not like water. These factors quickly render the self-leveling cement floor unusable.
Photo
Special colored chips will allow you to diversify the monochromatic floor surface, giving it originality, resulting in an imitation of natural materials.
The photo shows an epoxy self-leveling floor in a garage with chips
Any self-leveling floor requires preparation of the floor surface. One of the main requirements for a concrete base is an almost perfectly flat surface.
The picture shows an example of an excellent concrete screed for self-leveling flooring
Despite the fact that polymer-based self-leveling floors are recommended for use in residential buildings, they are also successfully used in garages and parking lots.
Polymer self-leveling floors are often used to organize covered parking lots, as in the photo
Installation
The installation of self-leveling floors in a garage requires the presence of a smooth concrete screed. It must be cleaned before direct installation of the self-leveling floor, and also primed. The surface may need to be sanded, depending on the quality of the primer. The self-leveling floor solution is poured in parts onto the floor and leveled using a toothed roller. Depending on the type of self-leveling floor, the floor will dry in a period of 2 hours to a month. You can find a guide on how to make a vegetable pit in your garage here.
A visual example of installing a self-leveling floor can be seen in the video:
Cost of self-leveling floor in garage
The cost of a self-leveling floor is influenced by the manufacturer and the country where it is manufactured. Thus, imported self-leveling flooring costs from 2,000 rubles per sq. m. m, and Russian-made self-leveling floors cost from 500 to 800 rubles per sq. m. m.
Where to buy a self-leveling floor for a garage?
Where to buy in Moscow:
- , st. Suvorovskaya, house 10, office 15, Contact phone;
- , Moscow region, Mytishchi, Olimpiysky prospect, up to 38, Contact phone number;
- , st. Privolnaya, house 70, Contact phone.
Where to buy in St. Petersburg:
- , email: [email protected] , Contact phone number;
- , Obukhovskaya Oborona Ave., building 38, office 314, Contact phone number;
- , st. Vozrozhdeniye, building 42, 2nd floor, Contact phone.
Video
Watch the video for an example of visual self-leveling floors in a garage:
Of course, the cost of a self-leveling floor will cost a pretty penny, but it’s worth it. High-strength, reliable and perfectly smooth floors will last for decades.
What materials can be used to create a self-leveling floor?
If we talk about a self-leveling floor for a garage, which one is better to choose, then you need to take into account the following characteristics. The coating must be durable and resistant to moisture and temperature changes, as well as inert to chemical environments. Such surfaces are created in two layers.
Tools for creating a self-leveling floor Source kak-sdelat-remont.ru
The first layer is cement-based mixtures for exterior use. Among the world's famous brands are Ceresit and Bergauf. It is worth paying attention to products such as Ceresit CN76, Bergauf Boden Street and so on. These compounds are recommended for use in basements, industrial workshops, garages and terraces. Using self-leveling compounds, you can level the concrete base and prepare the floor for pouring the next layer. Sometimes the surface is left in this form, however, to increase its strength, a second layer is applied, which is called the finishing layer.
The second layer is performed using an epoxy coating. These compositions are produced by manufacturers specializing in this type of coating: Epoxy Shield, Eneklad SFS. The surface is durable and able to withstand significant loads. The choice is up to the consumer. It is worth paying attention to the characteristics of the material and the requirements that it must meet, based on the operating conditions of the room.
Ready-made self-leveling floor Source pinterest.com