general information
Construction of a brick cellar
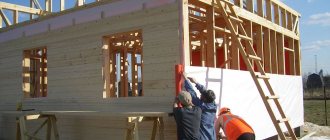
Despite the fact that cellars are made from reinforced concrete, wood materials, as well as metal and even plastic, red brick is often used in construction. This material is environmentally friendly and heat-saving properties; it is strong and durable, and therefore brick has become very popular when creating cellars. As a result of its use, canned or fresh fruits, vegetables, and berries always retain their freshness and beneficial properties. And even if there is no professional education, the basic fundamentals of construction and ordinary skills are quite enough to build a brick cellar yourself.
The process of building a brick cellar
Brick cellars can be built both under the house and in open areas. As for groundwater, the lower boundary of the cellar should be 50 cm above the groundwater level to prevent possible flooding. It is also worth paying attention to where the cellar will be located. If you place it close to other buildings on the site, you can provoke their collapse during the construction process.
- In the pit, the bottom and walls are leveled (roots and mounds are removed).
- Creating a floor: Cover with crushed stone or gravel 20 cm high to drain moisture. Place a layer of oily clay mixed with water on top.
- It is recommended to pour a third layer of concrete and reinforce it. This will better protect the cellar from dampness, mold, fungi, and rodents.
The process of building a brick cellar
The ceiling is usually created from channels, a metal U-shaped profile or wooden beams.
The brick cellar is ready, and all that remains is to equip it with additional components and finish the interior.
Comment from user onozdrachoff : A cellar with concrete or brick walls is a capital, rather labor-intensive structure that requires large material costs. If someone decides to create such a need in damp soils with a high groundwater level, then it is necessary to carefully carry out both waterproofing of the walls and floor, as well as a clay castle around the walls of the cellar. However, even after performing all these measures, there is no complete guarantee that there will be no constant dampness and mold in the cellar.
Therefore, when deciding to build a capital cellar for yourself, you need to know exactly the type of soil and the maximum groundwater level at the construction site. It is not recommended to build a cellar with the floor located below or at the groundwater level.
Thus, a capital cellar can be carried out in all soils, even damp ones, but with one condition: the maximum groundwater level should not reach the base of the cellar by about 0.5-0.7 m.
Experiments with the construction of a cellar, the floor of which will be at or below the maximum groundwater level, can lead to a waste of effort and money...
Ceilings in the cellar - constructing a ceiling
The ceilings in a brick cellar serve as the ceiling, as well as the floor for the room located above, if there is one. Floors must be reliable and durable, like the rest of the structure.
To build floors with your own hands, you can use strong wooden beams or a metal U-shaped profile or channels. We will consider the second option.
To lay the channels, the top row of brickwork must be additionally compacted. To do this, you can make reinforcement and fill the top row of the wall with concrete. After the concrete has dried, the channels can be laid. The distance between the channels should be 0.5 meters. If there is a door in the cellar wall, then the direction of laying the channels should be perpendicular to it. In this case, the doorway is strengthened with stronger reinforcement.
Metal channels for ceilings.
Next, reinforcement should be laid on top of the channels. Reinforced rods with a centimeter diameter are placed perpendicular to the channels at a distance of 20 centimeters from each other. This entire metal structure is fastened together using hot welding. On top of the first layer of reinforcement and perpendicular to it, lay out the second exactly the same layer and weld it.
Reinforcement is placed on top of the channels.
If you plan to locate the door or hatch to the cellar from above, provide a corresponding opening in the reinforced structure. Also note that you will have two ventilation pipes.
Now it is necessary to concrete the metal frame of the floor. To do this we make formwork. We construct a bottom from chipboard sheets, which we properly support from below, from the inside of the cellar. The supports must be strong enough to support the weight of the concrete you pour on top. Use wooden planks to make external formwork and enclose the doorway if it is on top. The height of the formwork should be higher than the level of the metal frame.
The metal frame is concreted.
The ingredients for preparing the concrete solution are taken in the same proportions as were used to fill the cellar floor. The concrete layer should completely cover the metal frame. The thickness of the ceiling will be approximately twenty centimeters. This will be enough to provide good surface moisture and heat insulation in winter in the case of a separately constructed cellar. If you are making a cellar under a house or garage, such a floor will serve as a durable and reliable floor.
It will take several days for the concrete to dry completely. After the ceiling has firmly set and hardened, the supports installed below, as well as the chipboard slabs, are removed along with the formwork. Congratulations – the cellar ceiling is ready.
To protect a free-standing cellar from the cold in winter, it is worth providing additional thermal insulation for the ceiling. If the cellar is built under a house or cottage, thermal insulation, on the contrary, is designed to protect your supplies from excess heat.
You can fill the cellar on top with a layer of expanded clay or earth, or insulate it with mineral wool or fiberglass. Thermal insulation methods may vary depending on the area in which you live and its climatic conditions. After completing work on the ceiling, it’s time to arrange the entrance to the cellar and build a staircase. If the cellar is located under a garage, consider sealing the hatch well to prevent automobile gases and industrial odors from penetrating your products.
If you are confused by the amount of work involved in reinforcing and concreting the ceiling, you can do something simpler. When designing a cellar, consider the length of its walls to be a multiple of the dimensions of the reinforced concrete slab. In fact, such a slab is a ready-made floor. Simply lay the required number of slabs on the brick walls and support columns. The gaps between the slabs will need to be concreted or sealed with sealant.
If the entrance to the cellar is provided in the side wall (this is important when the cellar is located on a hillside or is not completely buried in the ground), you can form concrete steps with your own hands. Marking the space for the steps should be done at the stage of pouring the floor, but their manufacture should begin only after the walls and ceilings have been erected. The height of the steps, of course, must be the same, otherwise it will be uncomfortable for you to walk on them. The formwork is made of boards and filled with concrete. After a few days, the concrete dries and the formwork is removed. Please note that concrete is poured into the formwork starting from the bottom step.
Ventilation and interior fittings
Ventilation of a brick cellar
Ventilation is usually done in the simplest way - supply and exhaust using two plastic pipes. Plastic does not rust, unlike metal, and is not affected by temperature and moisture, which is why it is more convenient than metal.
The supply pipe is placed so that the lower end is at a height of 50 cm from the cellar floor. The exhaust pipe should be located under the ceiling at the other end of the cellar. Both pipes are raised above the ground by at least 1 meter. Pipes are equipped with caps that protect them from moisture, control valves, filter meshes, and felt (during frost).
After building a brick cellar, the walls inside are whitewashed with lime, electricity and light are installed, shelves and racks are placed, compartments are created for different types of products, or even the interior is decorated in some thematic style.
Internal equipment of underground storage
The final stage is the shelves. They can be homemade or store-bought. The main thing is that there are shelves, because in addition to saving space when placing cans and boxes, shelves placed higher will prevent the stored products from getting wet in the event of flooding. It is better not to attach wooden shelves “tightly” to the racks. Usually, in the summer, when the weather is good, they are taken out and dried from moisture, significantly prolonging their life.
Plastic racks are not subject to destruction, but they cannot always withstand the weight of boxes and a large number of cans. Whatever material the shelves are made of, it is better not to exceed a length of 70 cm to avoid sagging. The weight must be distributed evenly and their general condition monitored; in case of damage to the wood or corrosion of metal elements, treat them with special solutions.
Cellar Kuzmich
Building a brick cellar with your own hands is not at all difficult, but it is painstaking and time-consuming. In addition, there will be a lot of construction dust, noise, various equipment and other things on the site for quite a long time. It is much easier and often more convenient to install a ready-made monolithic cellar Kuzmich .
These massive, 9-ton cellars made of M-500 hydroconcrete provide reliable protection, safety and freshness of products. Our cellars have additional waterproofing, mandatory insulation of the upper part, and supply and exhaust ventilation. All work on creating a cellar is carried out in the factory, which makes it possible to take into account all the nuances of waterproofing, thermally insulate and vibrate the concrete during the pouring process.
Monolithic cellars are not subject to corrosion or rotting, are installed in 4 hours and have a 100-year guarantee on the product body. The inside of the cellar is finished, painted, shelving and a convenient staircase are installed.
Ventilation in the cellar
Ventilation must be provided for in advance and its location must be planned at the stage of drawing development. Without ventilation, a person will not be able to stay even a few minutes in such a cellar. In the absence of oxygen and excess carbon monoxide, which will be released by vegetables, a person may lose consciousness. In addition, the quality of stored vegetables will be poor due to constant high humidity. To avoid all this, arrange natural supply and exhaust ventilation without force. To do this, two plastic pipes are prepared - they are able to survive longer in the soil under the influence of destructive environmental factors, and they will not be subject to strong impact forces that could cause them to break or crack.
The exhaust pipe will collect gases under the ceiling, so it is placed in one of the corners at the top, and the influx of fresh air should fall on the lower layers of the cellar, so the supply pipe will come out half a meter from the floor. Ventilation pipes are laid at the stage of laying the walls and are brought out through the ceilings to a height of up to a meter; in cold weather they are covered with felt.
Comparison of brick and monolithic cellar
Monolithic (hydraulic concrete M500) factory cellar with several additional layers of waterproofing, insulation, ventilation, and interior design.
| Brick cellar | Monolith | Volzhanin | |
| Floor | Drainage with crushed stone, waterproofing with clay, concrete pouring and reinforcement to prevent groundwater penetration | Laying layers of sand and crushed stone, waterproofing, pouring concrete, reinforcement | |
| Ceiling | Channels, metal U-shaped profiles or wooden beams. Creation of screed, formwork, pouring concrete. | Factory-made concrete floor slab | |
| Walls | Laying bricks with a solution of greasy clay filling the niche between the brick and the pit wall | Creating formwork, pouring concrete, waterproofing layer | |
| Waterproofing | Necessarily | Necessarily | |
| Rodents | Dangerous if laying and layers of clay are done “hastily” | Not dangerous | Not dangerous |
| Environmental friendliness | Harmless | Harmless | Harmless |
Brick cellar
Many owners of private houses and garages equip a brick cellar. It is necessary for storing vegetables, fruits, and canning. There are several ways to set up storage. It can be done either under the house or as an individual building. Different materials are used for construction, but brick has always been and remains the best.
Red brick walls last a long time. In addition, they provide thermal insulation for the basement and create a favorable microclimate for storing vegetables and fruits.
Arrangement of the floor in a brick cellar
Ventilation system design.
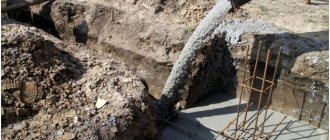
After arranging a foundation pit for a brick cellar, it is worth tackling the floor. The floor will serve as a reliable base and storage place for a scattering of fresh vegetables, so it is made durable, dry and level. After heavy equipment work, you should level the floor manually using a shovel and remove excess soil outside. To form a drainage system, the floor is usually sprinkled with an even layer of medium-sized crushed stone; it can be replaced with gravel or large pebbles. This layer does not have to be made too thick, it should be no more than 20 cm - depending on the density of the existing earthen covering and the floor area. For the next layer, prepare fatty clay and mix a viscous solution with water. Then the stone floor is evenly covered with a clay layer.
If the surface is sufficiently dry, work on the floor is stopped, but concrete will serve as a more durable basis for brick walls. In addition, if there is a possibility of flooding, the soil in the cellar is too loose or the cellar serves as a basement, then the floor is additionally filled with a concrete layer in which a reinforced grating or simple metal tubes are embedded. The solution is prepared by adding five parts of stone or sand aggregate to one part of the concrete base.
Cellar layout diagram.
You can make the solution yourself in a concrete mixer; additional information on preparation is indicated by the manufacturer on the cement packaging. If the cellar is arranged as a basement, then the floor can be decorated with other coverings - tiles or boards, but this is done only after finishing the finishing work on the walls.
To lay brick walls on the floor, it is necessary to provide a simple strip foundation made of the same concrete mortar with which the floor was poured. You can add a little more filler for strength. The foundation is laid along the entire perimeter along the walls, pouring it into prepared wooden formwork to the width of one brick and to a height of no more than 20 cm. Wait for the foundation and floor to dry completely from a week to two and only then proceed to work with the walls.
Where is the best place to make a cellar?
When building a room, several factors are taken into account:
- The wall thickness is made larger so that the storage is strong and does not subsequently settle.
- Choose a place where the bottom will not be flooded with water.
- The air temperature must be suitable for storing vegetables. The room must be kept fresh and dry at all times.
- Make a floor, taking care to protect products from rodents.
It is worth taking into account that all the brickwork of the cellar is underground. Therefore, they place it in the basement of a house or garage. You can lay a brick floor in it or pour concrete, on top of which you can lay a floor covering (boards, plywood). The cellar must have an individual entrance in the yard. If the basement is located on the north side, the entrance door is insulated and a canopy is made over it.
Brickwork of cellar walls and columns
Before starting work, prepare a cement-sand mortar to hold the bricks together. The ratio of composition elements depends on the quality of cement, of which there are several types. For example, for grade M400 it is required to take 4 times less cement than sand (1:4). The mixture of cement and sand should be sifted so that the mass is homogeneous. Add water gradually until you create a solution that is convenient for use. To give the composition water-repellent properties, it is advisable to add waterproofing additives to it, which nowadays can be bought in specialized stores. Lay brick walls in this order:
- Start the row of brickwork from the corner (or from the door).
- The bricks should be laid on the cement mortar in a simple checkerboard pattern, pressing tightly against each other, tapping with a trowel to compact and level. Let's assume that you start the first row with a whole brick, then the second - with a half, the third - again with a whole. That is, you lay them in a checkerboard pattern.
- The brickwork of a cellar made in this way should be strong and even.
- At the same time, as the wall is being built, the outer side (in the space between the earthen wall and the masonry) should be covered with a solution of rich clay. When the distance between the masonry and the wall is large, you need to add broken bricks to the clay. This not only strengthens the wall, but also provides additional waterproofing.
- Check each row with a building level. Make sure that there are no distortions and that the row is laid out absolutely evenly.
- The new line starts on the same side as the previous one.
- In the center of the cellar (large in size) it is necessary to lay out the columns with a masonry of three bricks. Their height should be equal to the height of the walls.
- After the walls and columns are erected, wait until the masonry dries and gets stronger. Only after this proceed to the construction of the ceiling.
Types and design features
When building a basement, the walls and floor are built according to the same pattern. The only difference is the entrance, which is equipped depending on the main room. To build an individual cellar, red or sand-lime brick is used. When choosing a place to build a cellar, consider the following points:
- Elevation. A storage facility for vegetables is built on a hill, since when working in a lowland there is a chance of getting into groundwater, and subsequently there will be problems with flooding of the cellar. In addition, it should be located away from other rooms.
- Depth of the pit. The height of the storage from floor to ceiling must be at least 2 meters. In addition, the flooring is selected depending on the type of soil. Work is carried out only in summer. During this period, groundwater is as low as possible, which must be taken into account during construction.
- Cellar waterproofing. It is necessary to seal the floor in the cellar to protect it from groundwater. This will prevent damage to the products. In addition, high humidity has a detrimental effect on building materials.
Before digging a pit, they draw up a plan according to which shelving for preservation and compartments for vegetables and fruits will be placed. In addition, they take into account the amount of grown products and ensure comfortable movement of people around the storage facility. Don't forget about the stairs. As a result of this planning, the calculation of the building material is carried out.
Basement construction is divided into the following types:
The structure may be located under the building.
- basement, which is located under the building;
- a cellar completely buried in the ground, built outdoors;
- storage, only half located in the soil;
- a storage room for vegetables located on the ground.
Return to contents
General rules for building a cellar
Scheme of a semi-buried cellar.
When choosing a place for a brick cellar and carrying out construction work, you should consider some features:
- For a free-standing cellar, an elevated area with deep groundwater is selected. If the water is shallow and the flood situation is unstable, it is necessary to carefully isolate the walls and bottom of the cellar from water penetration. The depth of the cellar should not be more than 2 m (except in special cases), and it is necessary take into account the type of soil. The optimal period for work is the summer months. When constructing particularly deep basements, the walls are made with a slope (15-20 cm per meter). An above-ground basement should be built on its own foundation. A good ventilation system must be provided in the basement.
Materials and tools used to make masonry
To dig a hole for storage, it would be more advisable to use an excavator. But more often this work is done manually, since the area of the yard does not allow for normal passage of equipment. To build a brick cellar with your own hands, you will need the following tools:
- shovel and bayonet shovel;
- concrete mixer;
- chainsaw;
- welding machine;
- hammer;
- pick;
- scrap;
- Master OK;
- level;
- roulette;
- square;
- screwdriver
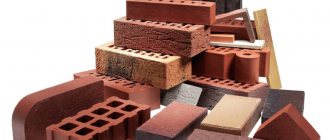
In the process of work, bricks of the M-100 brand are required.
It is best to build a basement from red brick, since it has a number of advantages, among which the main thing is quality. It should also be noted that for the construction of a storage facility you need a brick, the grade of which is M-100. They also prepare materials such as:
- brick for the cellar in the required quantity;
- cement;
- crushed stone;
- sand;
- clay;
- boards;
- 2 pipes made of asbestos or plastic;
- channels;
- fittings
The walls in the cellar are erected in one row of bricks, but it would be better if the masonry is done in two bricks. This way there is a greater chance of protecting the room from water penetration.
Features of masonry
The construction of walls in the cellar begins with mixing the mortar. When carrying out work, take into account the following points:
- The construction of a storage facility begins with pouring a foundation, the width of which corresponds to the thickness of the walls, the height is 30-40 cm. The foundation is strengthened from the inside with reinforcement.
- The first row of bricks is laid starting from the corner. The brickwork is made in the form of a chessboard. If the first row is laid out with a whole brick, then the second row starts with half.
- During the construction process, inside the gap between the outside of the wall and the foundation pit, clay is poured. As the distance increases, broken bricks are added to the clay. In this case, the storage wall is strengthened and waterproofed.
- We should not forget about the level, which is used to check how even the masonry is.
- Each row of masonry is made from the same angle as the first row.
- If the cellar is 2x2, then no additional structures are needed inside. If a large room is planned, then in this case columns are built in the center corresponding to the height of the walls. They will serve as a support for the ceiling.
- The ceiling arch is done after the walls have completely dried.
The ceiling is done step by step. First, the reinforcement is laid on the upper rows of walls along the perimeter, poured and allowed to dry. Then the channels are laid perpendicular to the doorway at a distance of 50 cm from each other. They are reinforced with reinforcement, making the shape of a mesh, and welded together. Boards are attached to the inside. They are supported with reliable supports and the top is filled with concrete. When the fill dries, the boards are removed. Such vaults allow you to make a round cellar. The vaults are also laid from the finished floor with reinforced concrete slabs.
Features of the masonry and fastening mortar of the cellar
Cellar diagram and list of building materials
The construction of the brickwork of the cellar begins at the moment the strip foundation finally dries. Its bottom is cleared of crumbled earth, and the earthen walls are smoothed as smoothly as possible with a trowel. This condition should especially be met when digging a pit with an excavator.
The owner had to purchase bricks for the cellar in advance. How to choose the best one? As mentioned above, red brick is best suited for lining a cellar. It is heat-resistant and resistant to all climatic conditions. Red brick masonry will create all the optimal conditions for storing food in the cellar.
In order for the bricks to adhere to each other as strongly as possible, it is necessary to make a binding solution in which the ratio of cement and sand would be 1:4. In addition to preparing the solution. Care should be taken to have a level or plumb line to control the stable height of the masonry rows.
How to properly brick a cellar? The bricks are laid out as closely as possible to each other, following a checkerboard pattern. The space between the wall and the bricks must be covered with a solution based on fatty clay and water. Clay is laid as the wall is built. The brick row should start from the corner; as the bricks are laid out, they are tapped and moved closer to each other with a trowel as tightly as possible. After completing each row, the space between the bricks and the earthen wall is covered with clay mortar and must be measured with a level.
Requirements for a brick cellar
Waterproofing
Protection from water in the cellar is done using several layers of roofing felt, fixed to the wall with bitumen mastic. To lay a moisture-resistant floor, they also use crushed stone or broken brick, on which they spread greasy clay diluted with water. Then a concrete screed is made and, if desired, flooring or tiles are laid.
Thermal insulation
To protect the brick cellar from temperature changes on frosty and hot days, it is insulated using a special coating. For this, a layer of expanded clay is used and covered with earth on top. Mineral wool or fiberglass is used as insulation. If the cellar still freezes, the walls should be lined with polystyrene slabs. To strengthen it, bitumen or dowels are used.
Ventilation
It is made using two pipes, one of which is fixed so that the hole is under the ceiling. This pipe serves as a drain for vapors from the storage facility. The second one originates from the floor itself and serves to fill the cellar with fresh air. The top of both products is covered with nets to prevent rodents and insects. In winter, they are wrapped in felt material.
We build a brick cellar with our own hands
Summer resident with 20 years of experience
In a large and well-kept garden plot there is always something to collect. The harvest of potatoes, onions, carrots, all kinds of preserves, lovingly prepared for the winter, needs to be stored somewhere. But where should we put it all so that it doesn’t spoil and lasts until the cold weather sets in? In this case, a refrigerator alone is not enough; something more is needed.
A brick cellar under or next to the house is the best solution to the problem. Products can be stored in it for years. The materials for construction are reinforced concrete slabs and blocks, logs, but ordinary brick is considered the most practical. Many readers are interested in how to build a brick cellar with their own hands.
Create a brick cellar in your home
Correct location of the cellar
The first step to building a basement is to determine the location. You need to clearly understand where the storage facility will be located and how convenient it is to approach it, especially in inclement weather. The cellar is installed under the house, garage or made free-standing. The most practical is considered to be a basement in a residential building: it doesn’t take up much space, you don’t have to get dressed and go outside.
If you want to build a cellar on your plot of land, you must choose the driest place with a slight elevation so that rainwater leaves the site and does not fall into the cellar.
Before constructing a new building from scratch, it is still better to provide for a large cellar under the house in advance. To do this, you need to know the groundwater level on the site, the degree of protection against it and the amount of expected costs. To carry out construction work, you should study the quality of the soil on the land plot and draw up a plan for the future structure, indicating the shape, location of doors, shelves, steps.
Important! Do not plan to build a free-standing basement next to existing structures to avoid accidental collapse.
In this video we will look at laying a brick cellar:
Materials and tools for building a cellar
To build a brick cellar, you need a simple construction tool: a bayonet shovel, a trowel with a hammer, a square with a plumb line, pliers, self-tapping screws and screws, nails, a tape measure, a rope, and wooden pegs. From electrical equipment you need to prepare a welding machine, drill and screwdriver. It is very convenient if you have a concrete mixer at hand. It will help make work easier and speed up the construction process.
There shouldn't be any problems with the materials. All of them are publicly available, and you can purchase them at any construction market or in a specialized store. To build a cellar, metal corners, pipes, fittings, sand, clay, small crushed stone and red brick are used.
The amount of building bricks is calculated in advance, with a reserve for defects or damage.
Technology and stages of construction
The construction of a basement in a residential building occurs in several stages:
- Excavation work is being carried out with digging a pit for a building, the overall dimensions of which must exceed the dimensions of the building by 1.5 meters. The depth of the hole is determined depending on the availability of groundwater in the area. It must be taken into account that the future cellar should allow you to move freely in it at full height. If groundwater does not allow it to sink low into the ground, then it is possible to install a massive base in which the basement will be built.
- The base of the pit is backfilled with crushed stone mixed with sand. After compacting the first layer a little, a concrete screed is made over the entire base area. After the concrete has completely dried, waterproofing work is carried out with roofing felt. A thermal insulation layer is applied to the insulating layer and the floor is poured with concrete on top.
- After the base has dried, they begin laying the walls of the future building. The height is adjusted based on the purpose of the building; for a basement this figure is 2 meters.
Digging a pit
It doesn't take much intelligence to dig a trench in the ground. Same with the pit. If you have a good team, the work can be done in 20-30 days. If you don’t want to waste your energy, you can use the services of an excavator. But before you start work, you should perform some steps:
- determine the location for the cellar;
- transfer the dimensions of the pit from the project to the site;
- think over the design of the future structure.
When placing the cellar separately on the site, the entrance door should be on the north side. We must not forget about groundwater; always choose elevated places with sandy soil.
Advice. The floor of the cellar should be just below the freezing point of the soil. Under this condition, in winter, the heat emanating from the ground will heat the floor, and in summer it will cool it. Thus, the temperature in the basement will be stable (from two to five degrees).
Basic rules when excavating a pit:
- Dry and warm weather is better for such work. July is the most suitable month. During this period, groundwater flows lower than usual.
- It is recommended to adhere to the following dimensions: depth - 2 meters, width of the base reaches 2.5 meters, and width at the top - 3 meters. This is done to prevent the earth from crumbling into the pit.
- If the soil turns out to be wet, then the dimensions of the pit are larger than those recommended above.
- Work during the construction of a cellar in an existing building is accompanied by a large amount of earth in the house, as a result - dirt and inconvenience. Therefore, the shortest route for removing soil to the outside should be provided. The edges of the pit should not reach the walls of the main building at a distance of 1 meter, so as not to damage the strip foundation and the entire structure of the house.
Brick is an excellent option for laying a basement
Foundation structure
There are two types of foundation construction.
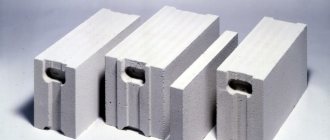
Used in hard soils with no groundwater in the area. First, a trench is dug around the perimeter, sand is poured into the bottom. After compaction, fine crushed stone is laid on a layer of sand, and everything is compacted tightly again. A cushion is created that will prevent moisture from penetrating inside the cellar. The foundation frame is prepared from steel rods to give strength to the future structure.
After the work has been done, formwork is made along the frame, in the case of wet soil. For dry soil, formwork is not necessary. Concrete is poured inside evenly, avoiding individual dry areas, so the solution is prepared liquid. In this form, the structure can be maintained for a month, or even more. After complete hardening, you can safely lay out brick walls.
Performed in wet soil and inside existing structures. This method is much more expensive due to the amount of material. All stages are similar to a strip foundation, only the frame is made of horizontal rods connected to each other by vertical metal pieces, the distance between which should be 20 centimeters. The formation of small pores and voids is not allowed, otherwise the foundation may crack.
To achieve better strength when pouring the foundation with concrete mortar, you can put stones and pieces of bricks inside.
Brickwork of cellar walls and columns
The brick for the cellar is red, but not silicate. According to its characteristics, it allows you to create an indoor microclimate suitable for long-term storage of products. How to line a cellar with bricks? For the work, prepare a cement mortar with sand in a ratio of 1:4 and a clay mixture to connect the cellar masonry of brick and soil.
Begin laying the first row from the corner. Each brick is placed on the foundation and tapped to ensure a stronger grip on the surface. After the first row is completed, all the voids formed between the bricks are examined and greased.
Then they begin laying the second row, from the same corner, only shifting the row by half a brick. The checkerboard order allows you to achieve increased strength of the future wall. Using a level, the verticality of the masonry is checked.
In spacious cellars, brick columns are additionally built, which will help securely hold the ceiling. Columns are erected in the center of the room, their height is equal to the height of the walls.
After laying out 3-4 rows, you need to give them time to stand and dry. Only then can work continue.
Cellar ceiling installation
Considering that a brick cellar is located underground, its covering must ensure the strength characteristics of the structure of the entire house, as well as the humidity and temperature inside the basement necessary for storing food. The ceiling of the cellar must be covered with heat-insulating material. If the cellar is built on a site separate from the main building, then its surface is covered with waterproofing, and a sloping roof is installed on top, protecting the structure from precipitation.
There are several types of floors:
- Wooden beams. A frame is prepared from support beams, beams for fastening the rolling boards, and the boards themselves. All elements of the durable wooden structure are carefully treated with an antiseptic. Next, the beams and beams are wrapped with roofing felt, and the frame is fixed to the ceiling of the cellar. Using self-tapping screws, you need to fix the roll of the boards. A layer of waterproofing is laid on top and pressed against the roll with beams.
- Using corrugated sheets. Support bars are installed on the ceiling of the cellar. The entire roof surface is covered with a thermal insulation layer. Then the corrugated sheeting is laid and secured with anchors on the sides of the basement structure. The thermal insulation layer can be cement mortar mixed with sawdust.
Waterproofing and thermal insulation of a brick cellar
After digging a pit, it is recommended to lay soft clay at its bottom, the layer thickness of which should be 10 centimeters. This way the floor is waterproofed. A similar method is used on the outside of the basement walls. Crumpled clay will prevent groundwater from approaching the walls and bottom of the basement and causing damage to the structure.
For better protection and drainage of groundwater to the side, drainage and blind area are constructed along the entire perimeter of the cellar. Bitumen acts as a waterproofing layer, which is heated and applied in a thin layer over the surface of the walls. The thermal insulation of the structure is a solution of cement, sand and sawdust. The mixture is evenly coated on the walls outside the cellar, similar to the thermal insulation layer of the ceiling.
Ventilation equipment
The length of time vegetables are stored in the basement is influenced by properly organized ventilation. The supply and exhaust ventilation system for a room can be natural or forced. The structural elements of the two options are the same: two pipes of the same section. The principle of operation differs only in that in a forced ventilation system an additional fan is installed on the inlet.
How it works? In the lower corner, on the side of the entrance to the cellar, a supply pipe is installed, the end of which is brought out to a height of 30 centimeters from ground level. An exhaust pipe is installed on the opposite wall, which is installed at a height of 2 meters from the cellar floor level, and the second end is brought to the roof, to a height of 50 centimeters. Both ends of the pipes on the street are covered with a fine mesh and a cap so that birds and rodents cannot get into the basement.
Arrangement of the cellar
To ensure high-quality storage of food, the entrance to the basement is equipped with a door lined with wood on the inside and a metal sheet on the outside. In some cellars, the owners install two separate doors (oak wood and metal). Currant bushes can be planted around a free-standing cellar, but not trees, the roots of which can damage the cellar structure.
The main element in the cellar is the staircase, which leads down to the basement. The flight of stairs is quite steep, so it is supplemented with handrails. Be sure to arrange interior lighting of the room. All electrical wiring and switches are routed outside the structure.
Foundation and drainage system
You need to start building a cellar with your own hands by digging a hole. Depending on the soil (this was discussed a little earlier), you need to choose a place. If the cellar is not built close to the house, then it is best to choose the most elevated place nearby, this will help protect the room from flooding. Experts advise digging a hole with your own hands, using a shovel, and not using special equipment. This can lead to a violation of the integrity of the soil, its crumbling, which will complicate the work due to the looseness of the soil. After the excavation work has been completed, work on laying the floor must begin.
This stage is very important, because it is a poor-quality drainage system or its absence that will lead to dampness, freezing and flooding.
The technology for creating a drainage system is a long process that can be done with your own hands. It is best to start building a cellar in the spring, when the ground has already thawed and there is enough time to do the job efficiently.
After the pit is ready, a deep ditch (at least half a meter) is dug along its perimeter. The width should be no less than the thickness of the future wall. The brickwork is not made thick, usually a quarter or half of a brick. The bottom of the ditch is alternately covered with a layer of sand and crushed stone, compacting each layer. On top, the pillow must be covered with a waterproofing layer of film and filled with a solution mixed with gravel. The film should extend beyond the edge of the trench. To reinforce the drainage system, metal rods are laid on the dried layer of rough screed. On the sides of the entire structure you need to build formwork, on the edges of which the film laid earlier is laid out. Before pouring concrete into the formwork, it is necessary to connect a pipe and a container to collect liquid. Filling occurs in several layers, each of which must dry. The screed dries for several days, after which it is time to create a clay belt around the foundation; it will absorb excess moisture and provide optimal conditions in the cellar.
To complete the creation of the drainage system, you need to pour a sand cushion with a thickness of 15 cm along the walls of the foundation, tripled with your own hands, and make recesses for the pipes running from the foundation to the tank collecting liquid. For this it is better to use thin pipes. A special geofiber is spread over the sand in the places where the grooves for the pipes are located; it is also necessary to cover it, laying the material in them. To give rigidity to the entire system, you need to lay a layer of crushed stone, also taking into account the need to lay pipes for drainage, which must already be connected and then covered with another layer of crushed stone on top. This design will provide reliable protection against moisture in a brick storage facility created by yourself.
The last step is to fill the floor with screed, smoothing it to the level of the foundation. But it is done by first laying the following layers:
- geotextiles;
- expanded clay;
- waterproofing;
- reinforcing mesh.
Many people leave the floor like this. But it is quite possible to lay it out with tiles, or fill it with a finishing screed. Some create a natural covering by laying a mixed mixture of soil and sand, carefully compacting it.
It often happens that the walls of the pit and foundation, and therefore the walls of the cellar themselves, are not located close to the pit. This gap must be filled with clay.
The masonry that creates the walls is laid on the foundation. The junction of the floor and the wall needs to be additionally insulated from the outside by 15-20 cm. Different materials are used for this. Most often, roll insulators are used, but special putties can also be used. Before laying waterproof material at the joints of the floor and wall, you need to clean the area from dirt, debris and dust, and then prime it well.