Self-leveling floors appeared on the building materials market relatively recently. Despite this, they have already gained popularity among consumers.
Thanks to proven methods and types of pouring and rolling out the self-leveling mixture, there is a clear technological process that any owner can carry out in his home.
To fill the floor, you need to prepare the surface, purchase material and purchase the necessary tools. When pouring floors, you must be guided by the relevant rules , observing the stages of the technological process.
How to pour self-leveling floors correctly?
Before pouring self-leveling floors, you need to thoroughly stir the solution . To do this, you need a construction mixer or drill with an appropriate attachment.
The mixing process should be carried out with slow movements at low speeds to avoid the appearance of air bubbles in the solution.
Mostly for residential premises, a polyurethane type of flooring is used. The fill must be laid in a thin layer up to 3 mm. There is no need to place beacons for this. The solution spreads and levels out on its own. This creates a smooth, even surface.
It is best recommended that two people , since it is difficult for one person to perform the functions of a helper and a master.
The functions of the helper include mixing and delivering the mixture to the rolling site.
The main function of the master is to roll the mixture over the surface . To do this, he arms himself with a special spatula with a long handle, and puts special pads with spikes on his shoes.
After rolling the mixture over the surface for forty minutes, you need to walk with an aeration roller .
This process is necessary in order to expel excess air.
Self-leveling floors - design and types
The new flooring system consists of several layers. A special mixture is poured onto the prepared surface , which hardens in air, similar to cement mortar.
For the finishing layer, polyurethane varnish or materials like polyvinyl chloride or melamine are used. They create a transparent film and are characterized by increased wear resistance and strength.
As a result of such a screed an ideal surface without seams is formed. The service life of the coating is about forty years.
Main types of flooring
- Cement self-leveling flooring is most often poured as a rough floor and is used on surfaces with severe defects and unevenness. It contains plasticizers that simplify the pouring process and protect against cracking. The thickness of the screed can be up to ten centimeters.
- Gypsum-based screeds are quite popular. They have a low price, do not require surface preparation and are quite easy to use. Gypsum components quickly set and harden, thereby significantly speeding up repair work. This screed can be made in several layers.
- Polyurethane self-leveling floors are an ideal option for kitchens, bathrooms and medical facilities. They are hygienic and highly wear-resistant. In addition, they do not burn and do not emit toxins. However, the price of these materials is quite high.
- Epoxy resins are included in polymer compositions that are used for residential premises. With their help you can make glossy floors with different textures and colors.
- The polymer base of self-leveling floors includes epoxy and polyurethane binders. Due to this, the surface becomes moisture-resistant and durable. She is not afraid of any mechanical damage. The polymer base is an excellent finishing coating.
- Methyl methacrylate resins dry in a very short time and can be used at low temperatures. However, compared to other types, they are less durable and wear-resistant.
- 3D flooring will look impressive in any interior. There is a wide variety of floor paintings on sale with the effect of three-dimensional space.
How to fill a self-leveling self-leveling floor?
In modern conditions, the best brands of self-leveling self-leveling floors are Bergauf, ThomsitDD, Vetonit. Their distinctive characteristics allow them to maintain a leading position in the modern market of building materials for flooring.
The use of such self-leveling floors and the quality of the filling depend on the skill, attention, effort and scrupulousness of the owner. You need to start pouring the floor from the farthest corner.
To fill a self-leveling self-leveling floor, you must :
- Mix the solution with an electric mixer to the desired consistency, not thick and not liquid. It should flow out of the mixer attachment in a slow stream. To do this, you need dishes with a volume of at least 30 liters and cold water;
- Then the finished mixture is poured onto the floor of the room;
- Next you need to use a wide spatula . They use it to smooth the finished mixture over the entire area of the room;
- Cat pads . They are used for walking on poured, not frozen solution. Instead of protectors, their soles have durable metal spikes;
- To remove residual air from the filling cavity, you must use a roller with a needle-shaped plastic nozzle.
- After this, you need to wait until the self-leveling mixture hardens.
Self-leveling mixture consumption. Self-leveling floor mixtures - instructions, consumption
Self-leveling floor mixtures require performing all actions in accordance with the instructions and correct calculation of consumption. Despite the prefix “itself,” the mixture still requires laying and human effort, since it is not capable of spreading in an even layer on the floor.
Correctly level the floor using self-leveling mixtures
It should be noted the pitfalls and mistakes that are often encountered when installing a self-leveling self-leveling floor. Often the need to level the floor arises even when redecorating the apartment, you just have to look under the carpet. In this case, it is not the appearance of the subfloor that is important, but how smooth the surface is. If the outlines of unevenness, bulges and cracks have formed through the carpet or linoleum, or if your furniture requires pads under the legs, the base of the floor definitely needs to be leveled.
Creating a concrete screed is a difficult method, which is used only under certain conditions and with developed skills. If you are renovating an apartment yourself, then self-leveling mixtures are the easiest way to level the floor.
It is worth using the floor leveling method using a floor leveler under the following conditions:
- the height of floor unevenness or height difference is 1-2 cm;
- the surface of the base of the subfloor is well primed;
- there are no cracks on the surface, and if there are any, they must first be repaired;
- All procedures have been carried out to prevent the mixture from leaking into other rooms, through thresholds and through holes.
Consumption of self-leveling mixture
The first thing you should do is read the instructions carefully and do it right away, before you start figuring out how everything should be. The manufacturer's instructions specifically indicate the amount of dry mixture and water per 1 square meter, as well as all other nuances of installing the self-leveling floor. Typically, the mixture consumption is about 1.5 kg per square meter, with a layer thickness of 1 mm.
The amount of water usually depends on the composition of the mixture. Some people think that making a thinner solution will make the job easier. But professionals do not recommend overfilling the water. Therefore, if the instructions indicate 6 - 6.5 liters per bag of mixture, pour 6.5 liters and everything will be fine. For some formulations, excessive dilution with water is unacceptable.
Before you start pouring the floor with a self-leveling solution, the base must be primed. A primer is required for stronger adhesion of the pouring to the concrete screed. There are special primer compositions that prevent the development of mold and mildew, and also form a protective polymer film.
If you do not have the necessary primer mixture on hand, as a last resort and provided that the room does not have any special problems, it is small and dry, then at home you can use a highly diluted dry mixture for concrete screed as a primer or take it for these for purposes, the self-leveling mixture is also in a highly diluted form.
Tools
Tool for installing self-leveling floor
- Needle roller with long handle;
- A stirrer is an attachment for a drill, as well as the drill itself;
- Scraper or spatula for manually moving the mixture;
- A container for combining the mixture with water, a bucket with a volume of at least 20 liters.
How long does it take to fill?
Not too much time is allocated for laying a self-leveling floor. The drying process ends after 30-40 minutes. That's basically all the time we have. In this regard, there are strict requirements for organizing all participants in the pouring process: one does the mixing, the second pours, the third uses a needle roller to expel the bubbles.
When the solution is poured onto the floor, take a roller and a spatula, using which you will help the solution level out. Use a spatula to spread the spreading solution over the surface of the subfloor, and use a needle roller to spread the mixture over the floor and remove air, which impairs the strength of the floor. Gradually roll the roller over the entire room and the floor will be ready.
Area per batch
Using this method of leveling the floor, the area will depend on the topography of the floor, the thickness of the fill, the container for stirring the mixture and the size of the package. Often one batch requires one bag of mixture. If you take into account the volume of water, the volume of the bag and the non-spill reserve, you get one 20-liter construction bucket. If you have a larger container and you are able to mix it, it is better to prepare the mixture for the entire area of the room. For example, for an 18-meter room with a mixture poured in a layer up to 5 mm thick, 4 batches of 25 kg of mixture are needed. Since the solution is quite liquid, no joints will be visible. The most limiting factor is time.
How long does it take for a self-leveling floor to dry?
The question of the drying period of self-leveling floors interests every owner. The time of completion of the repair and the hour of the long-awaited move to a new home depends on this.
Single-layer self-leveling floors do not take long to dry. It takes about 2 days for complete crystallization and hardening. If the floor is multi-layered, the floor can dry from 4 to 7 days. Drying the surface takes approximately 2-3 times longer than pouring it.
The drying process can be speeded up a little. There are some conditions under which the polymer dries faster . The following conditions need to be created:
- The first parameter is the air humidity in the room . It should not exceed 60%. These are ideal conditions for drying the self-leveling floor. Having created the appropriate humidity, the floor can harden within a few hours, and you can walk on it freely after 12 hours. Complete drying in such conditions occurs within one day;
- windows must be curtained . Direct sunlight may prolong the drying period. They will lead to surface drying, and the floor inside will be unstable;
We also recommend watching:
Expert advice on what to do if the self-leveling floor is cracked.
How to calculate a self-leveling floor - see expert advice here https://domkrat.org/kak-rasschitat-nalivnoy-pol/
- the temperature in the room should be maintained around 22 0 C. If it is lower, you can use a fireplace or a thermal convector to heat the air.
Also watch a useful video lesson on how to fill self-leveling floors
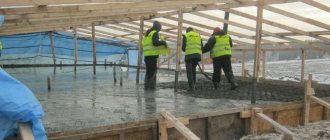
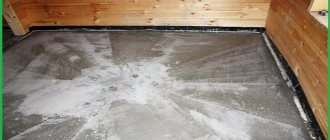
Stage 6. Pouring the solution
Filling on a flat prepared surface
Filling on a flat prepared surface
Before you start pouring, you need to make sure that all the windows are closed and there is no draft in the room. If direct sunlight falls from a window onto the floor, then it is advisable to cover the frames, even just with newspaper.
You can prepare concrete mortar for pouring yourself, or you can buy ready-made mixtures; fortunately, the choice in stores is large and varied.
Mixtures will cost more, but if you strictly follow the instructions, the risk of making a mistake is minimal. Mistakes in this matter are extremely undesirable, so you should only undertake the preparation of the solution yourself if you have experience and confidence that everything will be correct.
To prepare the solution, you will need a container and a construction mixer or a drill with a special attachment.
The finished potting mixture is laid in strips along the beacons, smoothing with a rule or spatula. The movements should be vibrating, shaking, so that the vibrations evenly distribute the solution and squeeze out air from it, leading to the appearance of voids, and then unevenness. After filling and leveling one strip, they proceed to the next, and so on until the end, leaving the area at the threshold for last.
A floor poured in this way dries in about 3 days, depending on the temperature and humidity in the room, and gains full strength in about a month.
Laying screed on expanded clay
Laying screed on expanded clay
As mentioned above, the use of expanded clay cushion can reduce the cost of materials, as well as reduce the load on the floor. In addition, expanded clay is a good insulation and sound insulator.
When pouring a floor using a dry expanded clay cushion, you will need to make two marks on the beacons - one for the level of expanded clay, and the other for the level of the screed. First fill the expanded clay with so-called cement laitance, that is, a liquid mixture of water and cement, and let it dry so that the foot does not fall through when stepped on. This will take about a day. You can spread the filling solution onto the finished, dried pillow.
The second way to use expanded clay is to prepare a mixture of sand, cement and expanded clay. Its granules will need to be filled with water and allowed to soak, then add sand and cement and mix until smooth. The finished mass must be laid in strips along the beacons, compacted and leveled.
How to properly fill a self-leveling floor
Filling the floor with a self-leveling mixture is not a very complicated procedure, but it requires care and strict adherence to technology. We will tell you in detail how to properly fill a self-leveling floor using the example of a bathroom.
In the article “Self-leveling self-leveling floor: speed and quality in one pass,” we have already talked about the features of a screed made from a self-leveling mixture. Let us briefly recall its main advantages and features:
- A smooth floor suitable for tiling is obtained without the use of beacons.
- Quick-hardening mixtures allow you to walk on the screed within three hours.
- Fast maturation: you can start laying tiles after just 5 days.
How to level a floor with a self-leveling mixture
During the renovation process, many people encounter problems such as uneven floors. In this matter, very often they choose the option of leveling the floor with a self-leveling mixture. This material helps to get rid of many possible flaws and imperfections of the surface on which the finishing material is planned to be laid.
Naturally, a self-leveling mixture does not mean that it needs to be poured onto the surface and no further measures taken. Overall, the process is quite simple, but to make it perfect, you need to take some steps to use it.
What tools are required for pouring?
After removing the old ceramic tiles, our bathroom was left with a chipped surface; There was a hole in the screed near the sewer pipe. Using a rule and a level, we determined that a self-leveling floor approximately 10 mm thick would hide unevenness and even out slight “undulations” in the base.
To complete the work, we need to prepare a tool for pouring self-leveling floors and materials:
- Dry mixture for leveling self-leveling floors. For an area of 4.5 sq.m. with a layer thickness of 10 mm, approximately 90 kg are needed, or 5 bags of 20 kg each.
- Alabaster or gypsum plaster for filling cracks and large holes.
- Acrylic primer. 1 liter is enough.
- Construction bucket with a capacity of 20 liters, two pieces. In such a bucket it is convenient to dilute a twenty-kilogram bag of the mixture entirely.
- Mixer, long-handled toothed roller, wide primer brush, spatula.
Step-by-step instructions - stages
The answer to the question of how to properly fill a self-leveling floor with your own hands can only be done by breaking down the entire process into separate steps, or stages.
Surface preparation
Carefully sweep away all debris and dust. The bathroom area is small, so it is convenient to do this work with a wide brush, for example, a brush.
We generously treat the surface with primer. Let it dry.
The working solution of the self-leveling floor is very fluid. Therefore, we spread alabaster and cover all the cracks along the walls and the hole near the sewer pipe. We do this responsibly: a crack 2-3 mm wide may be sufficient for the solution to begin to leak into it.
From the same material we make a small roller in the door opening so that the solution does not spill out. Once cured, it can be removed.
Preparing the mixture
To prepare the mixture for properly pouring a self-leveling floor, you will need the following materials:
- Basin, trough or bucket for mixing;
- Water;
- Special mixture for self-leveling floors;
- Stirrer (hand or drill with attachment).
Operating procedure
If you want to be sure to fill the self-leveling floor correctly , then it is better to work together: one prepares the solution, the other distributes it over the floor.
If the only source of water is in the bathroom and access to it is impossible during work, you should stock up on water. One 20 kg bag requires 4.5 liters of water; To knead 5 bags we store approximately 25 liters.
- The correct proportion of liquid is very important, so we measure the required volume of water (4.5 liters) into a construction bucket, pour the entire bag of mixture (20 kg) into it and stir with a mixer until the lumps disappear. We pause for 2-3 minutes to dissolve the components of the mixture and mix it again.
- Immediately (!) after kneading, pour the mixture onto the floor. We start pouring from the wall farthest from the door. Try to immediately distribute it over the desired area. In our case - approximately 1 square. m. surface.
- Using a toothed roller, roll the solution in different directions, trying to help it spread evenly.
- We prepare a new portion of the mixture and pour it similarly to the first onto the next area.
- rolling it with a roller for a while . This “stirring” will help the self-leveling floor to spread more evenly.
- Leave the screed for at least three hours to cure.
The whole job of filling the self-leveling floor with a self-leveling mixture took about an hour.
Leveling a wooden floor
To level a wooden floor, you will need a special self-leveling mixture for wooden floors, which is based on cement, various polymer additives and fibers. The addition of fiberglass gives such mixtures high quality. It gives the mixture the ability to adhere well to the base and prevents the screed from becoming cracked.
Before you start pouring screed on a wooden floor, it needs to be repaired: check the boards and joists, replace damaged ones and strengthen “walking” and sagging elements. The floor must be cleaned of paint or varnish and its surface must be sanded.
Next, the floor is thoroughly cleaned of dust and primed with two layers of primer, each of which must be completely dry. Thanks to the primer, you can protect the wooden floor from rotting and ensure reliable adhesion of the screed.
After this, you can begin to fill the wooden floor with screed. The operating technology is similar to pouring screed on a concrete base.
Now you know how to level a floor with a self-leveling mixture, and, as you can see, this technology is not as complicated as it seems at first glance. The main thing is to follow the instructions, and you can make a flat floor with your own hands.
Nuances of technology
The technology for laying a poured floor involves several features that will be useful for everyone to know:
- Surface preparation. Since self-leveling floor screed always turns out to be thin, for a high-quality result it is critical that it has good adhesion to the base. Therefore, surface preparation cannot be underestimated. There are two common difficult cases for which we can suggest proven solutions:
- In the kitchen, the old linoleum was torn off and jute fluff was left behind. You need to remove the most shaggy residues, sweep everything thoroughly with a damp hard broom, and then treat the surface with “concrete contact”, carefully rubbing it into the pile. Fill the screed after the primer has completely dried.
- The linoleum lay on hardboard sheets glued to the base onto bitumen. If you intend to lay tiles in the future, then the hardboard and bitumen layer must be removed. This is very long and hard work; A light, sharply sharpened ax can handle it well. Finally, we prime the surface with “concrete contact”.
- Water proportion. Sometimes, in order for the composition to spread better, performers increase the amount of water in the solution. This should not be allowed for the following reasons:
- Firstly , excess water sharply reduces the strength of the screed. If this is not important for laying linoleum and laminate, then when tiling this “trick” can ruin everything and the tile will fall off along with pieces of the self-leveling floor.
- Secondly , the solution consists of a mixture of many components - binder, surfactants, filler (fine sand), etc. In a liquid solution, they begin to separate into layers - the sand settles down, the smallest components float to the top and, when dry, form a layer of unfastened dust, similar to silt. The quality of the screed becomes even worse.
The key to success in pouring a self-leveling floor with your own hands is accuracy and thoroughness. To properly fill the self-leveling floor, just follow our “recipe”.
After the floor has dried, you can proceed to calculating the required number of tiles and then to laying the tiles on the floor.
How to fill a self-leveling floor: tools, preparation, technology
Self-leveling floors appeared on the market of construction and finishing materials relatively recently, but have already gained popularity among those who are renovating their apartments on their own. This is explained primarily by the fact that when the floor mixture hardens, it forms a perfectly flat surface, which is suitable both for laying any finishing coating on it (linoleum, carpet, tiles, etc.) and for use without coating. Additional decorativeness can be added to the self-leveling floor by volumetric (3D) technologies, applying a pattern under the 2nd layer of the mixture, or using various fillers and dyes for the mixture.
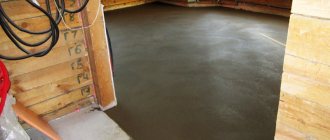
Self-leveling floor installation.
How to level a floor with a self-leveling mixture?
Leveling the floor with a self-leveling mixture allows you to quickly and easily obtain an even and smooth floor surface. And unlike classic concrete mixtures, self-leveling mixtures allow you to make a thin screed with small differences in base heights. This screed quickly hardens, and then you can lay the finishing floor covering: linoleum, laminate, carpet, parquet, etc.
Diagram of a finishing floor screed.
Preparing the base and necessary tools
To obtain a good result, a necessary condition is the correct preparation of the surface on which the self-leveling mixture of the self-leveling floor will be applied. If the room already has a concrete screed, then care must be taken to level its surface so that the height difference is no more than 2 cm over the entire area of the room.
It will be necessary to seal cracks and potholes, remove formations protruding above the general surface (concrete sagging, protruding pieces of crushed stone, etc.).
To do this, the surface of the base is treated with a grinder or an additional layer of screed is applied.
The next step in preparing the base is priming. For this purpose, the soil composition recommended by the manufacturer of the selected brand of self-leveling floor mixture or “Betonokontakt” is suitable. The main requirement should be the formation of a rough surface of the base, which will facilitate the adhesion of the mixture to the concrete. The primer is applied with a paint brush or roller.
Thin slats are laid along the perimeter of the room near the walls, which will need to be removed after the composition for the self-leveling floor has hardened.
Materials for the installation of polymer floors.
The resulting recesses (damper joints) will prevent deformation of the coating due to temperature changes in the volume of the monolith. The same seams need to be made on large areas and at the junction of floor slabs.
Tools and materials that will be required during the work:
- composition for self-leveling self-leveling floors (epoxy, methyl methacrylate, polyurethane or cement-acrylic);
- spatula, rule or squeegee - to level the composition poured onto the base;
- needle roller - to remove air bubbles from the mixture;
- a drill with a mixer attachment and a container for mixing the composition.
If you are planning a floor with a pattern or volumetric inclusions in the form of coins, beads or stones, then you will need a banner printed in the workshop with the desired pattern or the desired decorative elements.
Composition of self-leveling mixtures
In addition to the type and method of application, emphasis should also be placed on such a factor as the composition of the mixture. As a rule, the method of its use and its functional characteristics depend on the composition of the active substance. The question of which floor leveler to choose directly depends on the degree of surface unevenness in the room where the flooring repair is planned (read: “Choosing a mixture for floor leveling - which is better”).
Contains cement
It is clear that the main active component in such a mixture is cement. It is correct to use such a solution where the degree of error in unevenness is no more than half a centimeter. The self-leveling surface lasts a long time if the area of application is acceptable and correct.
Contains gypsum
This product is often used if there are quite large unevennesses on the floor surface in the room. Thanks to this composition, unevenness of more than three centimeters can be easily eliminated.
The question of which floor leveler is best must be decided depending on how imperfect the surface is. In any case, before choosing a mixture for leveling the surface, you need to make sure the current condition of the starting surface. If, for example, the coating is an old and dry wooden floor, then the smartest thing to do would be to simply get rid of this coating and fully prepare the base for leveling. If you neglect these tips, you may end up with a not very good and high-quality material for applying the finishing coating.
Depending on how ready the starting surface is for work, and on what material is chosen for leveling, it directly depends on how long the floor leveler takes to dry. The materials are different, some completely harden on the surface in a few hours, and others in two weeks. You should definitely read the instructions so that the alignment process is as effective and correct as possible.
Self-leveling floor manufacturing technology
The work begins with mixing the composition that will be applied to the base. When using a dry cement-acrylic mixture, you will need to mix the contents of the bag with the amount of water specified in the instructions. Two-component liquid mixtures are mixed according to the instructions, adding the required amount of the other to the container with one component.
To mix the composition, it is convenient to use a drill with a mixer, which allows you to achieve maximum homogeneity. You need to mix quickly, spending no more than 2-5 minutes. The prepared solution is applied to the primed base.
- Pour the mixture in a strip along one of the walls of the room. Level the entire surface using a long rule, which is used when plastering or making concrete screeds. A special tool (squeegee) will significantly reduce labor costs.
- Using a needle roller, roll the mixture layer several times, removing air bubbles from it. Proceed to applying the next strip, gradually covering the entire surface of the floor.
- The first layer hardens within a few hours, and you can begin applying the finishing layer after 5-7 days. Decor is applied underneath, a banner with a pattern is pasted on, or a mosaic is made by hand. At this stage, the slats are removed from the damping joints and the recesses are filled with sealant.
The rather labor-intensive work of applying the mixture for a self-leveling floor will have a brilliant result if you carefully prepare the base and pour the self-leveling floor correctly. The resulting coating will be beautiful and durable during use for many years.
Types of self-leveling mixtures
Of course, mixtures that do not require much effort to use have various variations and application patterns. For the base and top coats, you should use different products, because the effect of their use is fundamentally different.
Rough coating
This mixture is mainly used to level surfaces with a fairly high degree of damage. A floor covering that has noticeable flaws in the form of cracks, holes, or cracks. This composition can be applied in a layer of more than six centimeters. This will also help hide the overall unevenness of the floor.
Peculiarities
This composition should be applied in several layers, and each layer should be completely dry.
Finish coating
This mixture is used in rooms where the level of unevenness does not exceed one centimeter. This solution is ideal for rooms where this coating will be the main one, without subsequent coating with another material. This solution is laid out on the surface no more than ten millimeters above the zero floor level. The answer to the question of how long it takes for a self-leveling floor to dry in this application option can sometimes vary. It all depends on the temperature conditions and humidity in the room.
Peculiarities
Since this is a basic coating, it is necessary to carefully and thoughtfully prepare the surface before applying it. Namely, to carry out priming, cleaning and grouting.
Durable coating
This version of the self-leveling mixture is quite thick, quickly adheres to the base of the material and is durable. Therefore, it is not used to completely cover the surface, but only partially. This solution can eliminate deep damage to the starting surface. Namely, to seal large holes, cracks, cracks.
Peculiarities
Before you begin applying the base coating, you need to read the instructions for information about how long it takes for the self-leveling floor mixture you used to fill cracks and holes to dry. Only after complete drying can you begin to apply the next layers of coating.
Preparing the floor for pouring
Before pouring the floor, it must be properly prepared. Preparation begins with cleaning the concrete base. For this:
- Concrete is cleaned of dirt;
- Clean the seams on it;
- Seal the existing cracks and joints.
It is important that the floors are dry. If it is wet, it needs to be dried
— the future strength of the self-leveling floor depends on this.
Then the floor surface is treated with a primer. For these purposes, it is convenient to use penetrating primer for interior work. For the best effect, it is applied in 2 layers. It is important that the base is sealed, that is, it does not absorb or release moisture. If the surface is not sealed, the new coating may begin to lag behind the base or delaminate.
Preparing the mixture
To prepare the solution you will need:
- Container in the form of a basin, trough or bucket;
- Water;
- Mixture for self-leveling floors;
- Electric stirrer (or drill with appropriate attachment).
The mixture is mixed with water in the proportions indicated on the package and kneaded until smooth. The presence of clots and lumps is unacceptable. The water temperature should not be lower than 15 degrees, but not higher than 20. After obtaining a homogeneous mass, let the solution “rest” for 3-4 minutes, and then mix again.
Wooden surface
You can save the situation even if it is necessary to level the floor with a self-leveling mixture with a wooden base. The boards are covered with a ready-made mortar and subsequently allow for a high-quality finishing layer. The main thing is to prepare the base well.
The boards must be attached to the beams, and any existing seams must be sealed with acrylic. The floor is covered with a moisture-proof primer. After this, it would not be a bad idea to lay down a reinforcement mesh fixed to the wood with a stapler. There is no difficulty here, but in the end you will get not only a smooth, but also a high-quality floor base.
It is a good idea to remove several floor elements yourself and make sure that there is no mold or mildew underneath them. You can putty the damaged areas with sawdust together with liquid nails.
Video:
Video:
How much solution will be needed?
To determine when the solution is “enough,” apply special markings to the wall. When the mixture reaches the marking, it means that you no longer need to prepare a new portion of the mixture. But if the room is very wide, then you will need to place beacons with the same height throughout its entire area. They are long yards. As soon as they disappear under the solution, it means “enough.”
How to properly fill a self-leveling floor?
The floor begins to be poured from the recesses available on the concrete base. The layer of mortar should not be less than 5 millimeters - otherwise the floor will crack when drying. But it is not recommended to pour too much in order to preserve the usable space of the apartment due to high ceilings - this is especially important to consider in low apartments.
The solution is poured into “puddles” so that one puddle touches the other. But you can pour the solution in strips 40 centimeters wide. The strips should then be leveled using a large metal spatula. This can be done by small ones, but they will have to work for a very long time. Find out more about how to fill a self-leveling floor here.
The mixture must be poured as soon as possible, as it quickly begins to set and harden. To get an ideal, uniform and even surface, you need to fill the room in one go. It’s not for nothing that the mixture is called self-leveling - there’s no need to run around with a ruler and take measurements. The solution just needs to be helped to spread in the right directions.
Filling a large room
If the room is very large, then it is not possible to fill it in one go. In this case, there is a way out: you need to fill the floors in stripes to create a kind of “zebra”. Zebra - because such stripes will need to be filled one at a time. Each strip should be no more than 5-7 meters wide. The thickness should also not be large. Otherwise, the solution will harden on top but remain liquid inside.
When the strips are spilled, they need to be treated with something spiky. A roller with spikes is suitable for this - they need to roll out the surface. This is necessary in order to eliminate small air bubbles inside the solution, which rob your surface of reliability and durability. It is necessary to walk with a roller both along and across. After treating the surface with a spiked roller, it is leveled using a spatula.
The drying speed of the solution depends on several factors:
- Brand of self-leveling mixture;
- Thickness of self-leveling floor;
- Indoor microclimate.
You cannot walk on a recently poured floor, as its surface will deform, leaving marks and other irregularities. As soon as the solution has completely hardened, you can begin laying the finishing coating - tiles, porcelain stoneware and other materials.
Advantages and disadvantages
Leveling the floor with a self-leveling mixture is very easy and simple. It is enough to mix with the addition of water, then pour the prepared solution onto the base. The result is a truly smooth surface, in addition to many other main positive qualities:
- Instant drying of the finished solution after pouring.
- After a few hours you can safely move on the surface.
- Even an inexperienced person can fill it without any work experience.
- Laying any type of flooring can begin within a day.
- No shrinkage of the solution occurs. At the same time, it becomes very hard and able to withstand wear and mechanical stress.
- They are perfect for low rooms, with a small distance between the floor and ceiling. The minimum layer of screed can be 5 mm.
At this point, one cannot ignore the disadvantages that can be encountered when pouring the floor with a self-leveling mixture. The foundation itself must be carefully prepared before work begins. There should be no dirt or dust. Otherwise, you can forget about the quality of the dried base. In this case, it is necessary to have at least an idea of the procedure for installing the screed, so as not to encounter dismantling.
Costs go not only to the work of pouring, but also to purchasing the mixture itself. It is worth noting that the price is not exactly low. It is necessary to take personal safety precautions when pouring, since even small drops that come into contact with human skin cause burns. In addition, before complete drying, a huge amount of harmful substances are released, and the mixture itself has a high level of flammability.
Having looked at the existing disadvantages, we can conclude that with the right approach and equipment they can be easily avoided. The main thing is to do everything wisely and you will get an excellent result.
How to fill a liquid floor without extra effort?
From the author: Hello, our beloved readers! Today we will tell you how to pour liquid flooring. By doing this work step by step, you will be able to create a perfectly level base for the subsequent installation of the finishing layer. In addition, self-leveling floors can themselves act as a decorative covering, becoming a kind of “highlight” of the entire interior. Do you want to quickly find out how to make your home an island of comfort in the flow of gray everyday life? Follow our recommendations and you will succeed!
TOP 3 popular manufacturers of self-leveling floors
| Photo | Name | Rating | Price | |
| #1 | Prospectors | ⭐ 98 / 100 | More details | |
| #2 | Unis-Horizon | ⭐ 97 / 100 | More details | |
| #3 | Volma | ⭐ 95 / 100 | More details |
The most famous manufacturers of self-leveling mixtures for floors are well-known global and domestic companies specializing in the production of building materials, namely:
Knauf is a German company with a long history. Engaged in the production of a wide range of building materials, including dry building mixtures;
Bergauf is an actively developing modern company for the production of building mixtures, one of the ten largest participants in the Russian market;
Weber is part of the international Saint-Gobain group. The company is one of the recognized world leaders in the industry of dry mixes for construction and finishing. Floor levelers from this company are represented by the Vetonit brand;
Unis is a group of companies operating in the Russian market of dry construction mixtures for more than 25 years. Floor levels are represented by the Horizon brand;
Henkel is a well-known and popular company on the international market, operating in a variety of industries. Since 1986, it has mastered the production of hydro- and thermal insulation materials by acquiring the Ceresit company, which also produces dry mixtures for self-leveling floors;
Vomla is a Russian company with more than 70 years of history. Specialization – production of construction and finishing materials;
"Starateli" is a Russian company that has been producing dry construction mixtures for more than 25 years.
Self-leveling mixtures, which are supplied to the market by these companies, have all the necessary certificates and comply with safety standards, which ensures high quality of the floor leveling process. Therefore, reviews of these products are in most cases positive.
Consumers note the ease of pouring the floor and how quickly it dries. In addition, to perform such a screed, no special equipment or tools are required. At the same time, consumers are usually very satisfied with the result - a smooth and almost perfectly level floor, which in some cases can be used without additional floor covering.
Negative reviews about self-leveling compounds most often arise due to non-compliance with the technology for pouring floors, incorrectly diluted solution, incorrect preparation of the base, the use of a primer and leveler from different manufacturers, and non-compliance with the work conditions.
To learn how to fill the floor with a self-leveling mixture yourself, see the following video.
What does it mean to “pour” floors?
Self-leveling (liquid) floors are one of the types of screed, for the preparation of which self-leveling mixtures are used. The main distinguishing feature of such a surface is its minimum thickness, which is only 3.5 mm. Among the self-leveling mixtures that you can choose to create an even base with your own hands, you may come across the following varieties:
- dry cement compositions, ready for use;
- cement-acrylic mixtures - originally developed for flooring in food industry enterprises due to their strength and resistance to household chemicals (detergents, cleaning agents, disinfectants). If desired, they can also be used for ordinary premises;
- based on epoxy resins - a good choice for pouring onto concrete, wood, and metal substrates;
- methyl methacrylate - withstand unfavorable conditions and can be used for outdoor flooring;
- polyurethane - the best option for use in residential premises, they are characterized by maximum wear resistance and strength among all polymers.
By adding liquid glass for the floor to any of the listed mixtures, you can get a more durable and moisture-resistant composition. They are easy to prepare: add water to the dry mixture in the amount specified in the instructions. Then you can distribute the resulting solution over a wooden or other previously prepared surface.
The resulting layer is leveled due to the action of gravity, so there is no need to install beacons. All minor unevenness in the base will be smoothed out, and in a few days you will have beautiful heated floors ready. As you can see, there is nothing too complicated in this technology. So where to start? Read on to find out.
Types of self-leveling mixtures
According to their properties, self-leveling mixtures are divided into:
- Basic, used for rough leveling the floor. With their help, you can seal up bumps, cracks and potholes in the base. The layer of such screed can be up to 6 cm.
- Finishing, used for the final leveling of an already prepared base that does not have major defects. The thickness of the screed with this mixture is from 2 to 5 mm. It dries within a few hours and has a flat and smooth surface.
There are special mixtures on sale:
- Quick-drying, allowing you to minimize the waiting time for the screed to dry - only 2-3 hours. However, such a screed requires reinforcement to avoid cracking.
- Mixtures with increased strength, used for leveling individual sections of the floor. Good adhesion to the base and high strength allow this mixture to be used for leveling wooden floors.
Based on materials, the following types of self-leveling mixtures can be distinguished:
Technical characteristics of leveling mixtures for floors.
- Cement based. Advantages of cement-acrylic mixtures: good adhesion, strength, frost resistance, the ability to use even on damp substrates, resistance to cracking, quick drying. Disadvantages: ability to absorb moisture, inability to use as a finishing coating due to its unattractive appearance, expensive dyes for tinting the mixture, long drying period (the final strength of the cement screed is acquired only after 3 weeks), high material consumption (layer thickness must be at least 5 mm).
- Based on gypsum. This type of mixture is environmentally friendly and least demanding on the evenness of the base. It has good thermal conductivity, is suitable for underfloor heating systems, does not shrink, dries quickly and is more durable than a cement mixture. However, such a screed should only be carried out on an absolutely dry and clean base. The thickness of such a screed can be any. Gypsum mixture is cheaper than cement mixture, but it can only be used in dry rooms.
- Based on epoxy resins. These mixtures can be used to level floors both in residential and public buildings, and in industrial premises with heavy loads: in warehouses, garages, parking lots, and production workshops. Even a thin layer of such screed can provide an even and smooth surface with high strength. However, this screed also has disadvantages: it is susceptible to abrasion, can crack if a heavy object falls, and its surface becomes slippery when liquid is spilled on it.
- Based on polyurethane fillers. This screed hardens quickly; it is enough to apply it in a thin layer 0.5-2.5 mm thick, and it will have good strength. It is also resistant to chemicals. This coating must be applied in two layers: the first primer layer (0.2 mm thick) and the second finishing layer (about 0.3 mm). Such a floor can be strengthened using an intermediate layer containing quartz sand. The screed dries within 24 hours. The disadvantages of such a screed are the high requirements for dryness of the base and the cost of the material.
Preparatory work
Before pouring the floor in the kitchen or in another room, you will need to do some preliminary work. These include:
- Purchase a self-leveling mixture. Self-leveling floors can be produced for use both as a rough base and finishing. Carefully study the information indicated on the packaging and choose a product with those characteristics (purpose of the mixture, time to gain strength, maximum layer thickness, “viability” of the solution) that suit you best.
- Selecting the necessary tools and materials, which include: spatula, 2 rollers (needle and regular), brush, bucket for mixture, drill with attachment, tape measure, level, small and large rule, primer, selected self-leveling mixture.
- Preparing the base. You need to do the following:
- clean the surface of paint residues and other old coatings, fill the recesses with putty;
- remove dust and the slightest dirt. To do this, you will need to carry out wet cleaning or thoroughly vacuum the base;
- if there are greasy stains on the surface, they must be removed with special degreasing compounds;
- Using a regular roller, apply a layer of primer necessary for better adhesion of the base to the solution.
- Prepare the room. To do this, create a temperature in it from +10 to +25°C. Also, it should be remembered that when working with the self-leveling mixture and during its hardening, drafts are not allowed, so all windows and doors will have to be kept closed.
- Prepare the solution, strictly following the instructions on the package. Pour water into the container, then add the dry mixture in the specified proportion. Mix with a drill and attachment, let sit for a few minutes, then mix again. The resulting plastic solution is ready for use within an average of 20 minutes, after which it begins to lose its properties.