Popular questions:
Which expanded clay is better for the floor, which fraction to choose? There is an answer from an expert
Which floor is better, concrete or wood? There is an answer from an expert
Which self-leveling floor is better, which brand to choose? There is an answer from an expert
All questions
Features of wooden houses and advantages of concrete screed
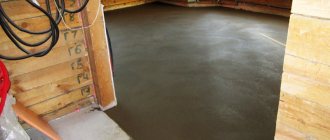
When deciding to build a concrete floor in a wooden house, the owner of the building must understand that this is extremely difficult to do, which is explained by serious differences in the characteristics of the materials used. Wood is characterized by constant temperature and humidity deformations. At the same time, a concrete screed after gaining strength is an almost static material.
It is obvious that the contact of elements of the same structure with such different parameters will lead to rapid cracking of the concrete floor. That is why special technologies are used to create the so-called floating screed, which allows each material to coexist autonomously.
A completely reasonable question arises as to whether a concrete floor screed is really necessary in a wooden house, given the large number of problems associated with its construction. The answer is obvious. Concrete subfloors are the optimal preparation for laying tiles, and this type of flooring is often used in some areas of wooden houses, for example, in the kitchen, bathroom or toilet. In addition, pouring screed is often used for laying pipes or other heating elements. The result is a warm concrete floor, the design of which has become widespread recently.
In addition, we should not forget that the installation of a concrete floor allows us to obtain a durable and very strong structure, which in many respects is superior to its wood counterpart. Moreover, if we are talking about the first floor, when it is possible to carry out the work in question on the ground. This eliminates many of the problems associated with the complex interaction of concrete and wood.
Comparative analysis
Of course, a wooden floor is more environmentally friendly, its price is often lower than concrete, it is warm and reliable, but short-lived. And there is a possibility that your descendants, having decided to change their gender, will remember you “with a not evil, quiet word.”
In our opinion, it is more reasonable to make a combined version of the covering, in other words, the base is poured from reliable, durable concrete, and then you make a slab flooring on the joists. If necessary, you can tear it down and install an economical heated water floor or other covering to suit your taste in its place.
The comfort of the residents and the durability of the structure largely depend on the material from which the floor in a private house is made. When searching for a suitable option, you cannot focus only on its cost. It is necessary to take into account the purpose of use of the building (summer cottage or permanent housing), the capabilities of the work performer, and the characteristics of the materials.
Wooden floor
The logs can be based on brick or concrete pillars, laid on a foundation or attached to walls. Read more about each method below.
Installation of logs
- Logs in buildings with large square footage are laid on the columns
. The step between the columns is from 70 cm to 1 m. Leave about 60 cm between rows. - Before erecting the columns, a layer of soil should be removed
; as a rule, the fertile layer is removed, or the soil is simply removed 20–30 cm below the soil level around the house. - Next, we mark the places for the columns and make a small foundation for each column
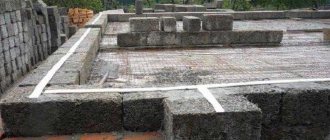
, fill it with gravel and sand as a blind area and lay brick columns 1.5 or 2 bricks wide on the mortar. It should be laid in a well, the internal space is reinforced and filled with concrete. You can simply make a formwork for a post measuring 50x50 cm, install a reinforcement grid and fill it with concrete.
- All columns are aligned horizontally
. Waterproofing consisting of 2–3 layers of roofing felt is laid on top of them. - After this, you should make a blind area
. It can be made from gravel, crushed stone or sand; in some areas of our country, where there are metallurgical plants, it is cheaper to fill in waste slag. The blind area is covered in layers and compacted; it should rise above the ground by 200 mm. - Next, we lay the logs at the level with a 100 mm overlap on the foundation
; be sure to leave a gap of 20 mm between the logs and the wall. - If the structure is small, then you can do without installing columns
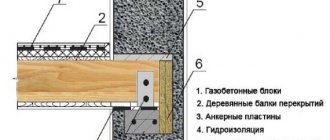
, but in this case the logs are taken with a larger cross-section or logs are used as load-bearing beams. - The supporting load-bearing beams must be laid at least 100 mm on the foundation checks or piping, plus 20 mm for the damper gap. If the foundation is narrow and there is not enough support, then the beam cuts into the wall to the missing depth, but no more than half the wall. You can attach special metal supporting structures to the wall and lay beams on them.
Floor installation
When the logs are laid, we begin to install the floor. The coating can be single or double.
We will consider a more capital double, since a single coating is an unfinished double.
Important: all wood that goes onto the floor must be treated with protective solutions. For a finished floor, they should be colorless; the cheapest way is to treat them with waste machine oil.
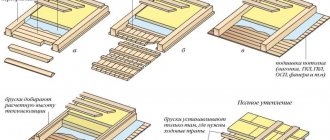
- Initially, you need to fill the bottom of the log with a 40x40 mm cranial beam. The planks of the first level of the rough coating are laid on it; it is not necessary to nail them, since only the insulation will lie on them. As a rule, a slab or unedged board is used.
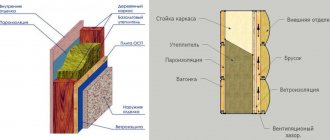
- Next, polyethylene is covered as waterproofing and secured with a stapler. Insulation is placed on it in the openings between the joists; the best option is mineral or glass wool. The level of insulation should be 15 mm below the level of the final coating.
- The insulation is covered with a vapor barrier and a finished floor is mounted on top.
- For interfloor ceilings, where the floor of the upper floor is the ceiling of the lower one, initially an edged board is attached to the joists from below with self-tapping screws; clapboard or other finishing material can be stuffed onto it.
- Next, a vapor barrier is laid on top, insulation is laid on it and covered with another layer of vapor barrier. After that, you need to lay a 5.5 mm soundproofing pad on the joists, it can be cork or polyethylene foam, and a clean, wooden covering is already laid on it.
Reinforcement
Established guidelines for screed alignment.
Floor reinforcement is an important stage in its construction. Reinforcement in the form of a road mesh allows the floor not to sag, distributes the load correctly, and prevents the concrete from cracking. The cross-section of the mesh rods should be five centimeters. The length of the cells is fifteen centimeters. If you lay the reinforcement correctly - at a distance from the insulation of less than two centimeters, a reinforcing frame is formed.
The reinforced rigid mesh does not lie on the ground - it is raised by at least a third of the thickness of the screed and fixed on a stand. Soft - attached to pins. For very high loads, a reinforcement cage with rod thicknesses from 0.8 cm to 1.6 cm is used.
Finished floor installation
To obtain an aesthetically attractive and durable finished floor, it is recommended to use a milled board with a tongue-and-groove fastening.
tongue and groove board
Table 1. Instructions for laying finished floorboards
| Illustration | Description |
| The first board is laid with a groove against the wall, leaving an expansion gap. | |
| It must be secured with self-tapping screws so that you can later cover the attachment point with a plinth. There are 2 options for further fastening the boards. | |
| The first option uses self-tapping screws that are twice as long as the floorboard. | |
| Self-tapping screws are screwed into each joist in the center of the board. Subsequently, the caps can be masked using wood putty. | |
| Then take the next board and align the tenon with the groove. | |
| If necessary, the boards are adjusted by hitting them with a mallet through a block. | |
| Or they press it with a chisel. | |
| The second fastening option involves screwing self-tapping screws at an angle of 45 degrees into the tenon. To prevent the board from bursting, you must first drill a hole for the screw. | |
| With this option, the boards fit closer to each other, and the fastening elements are invisible. |
After all the boards are laid, their surface is sanded and coated with wear-resistant varnish in several layers.
The final stage of installation
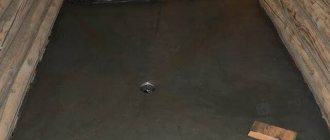
After the final stage of laying the concrete floor, you should definitely try to cover each individual strip with a special film and then leave it to harden for about three or four weeks, while it is worth periodically moistening the entire surface of the concrete from time to time.
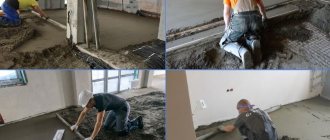
To complete all work performed, it is necessary to apply a certain layer of screed in an even layer to a high-quality and densely laid concrete floor base. This excellent process begins directly with the application of a certain special cement mortar, liquid in consistency, to the concrete, into which the necessary high-quality and durable special concrete binders are added immediately before laying. After everything is ready, it is worth installing small wooden slats directly on the cement surface itself, the height of which should correspond to the immediate height of the entire completed future floor.
The screed is laid in stages, as in the case of concrete. After directly laying a high-quality and reliable screed, which will be slightly higher than a certain level of the laid slats, it must be carefully leveled, and then immediately remove the laid slats themselves. After completing all the work, the surface of the screed is very carefully and well smoothed with a special trowel. After the entire screed is completely ready, it should be left to dry overnight, and then periodically sprayed with water over the course of several days.
Before proceeding with further work, it is recommended to let the screed stand for exactly two weeks.
Pouring concrete and screed
Leveling concrete as a rule.
For a large room you will need a concrete mixer. It will be more economical to prepare the solution yourself. The sand must be clean, the cement must be high class: M400-M500. Proportions:
- cement - 1 hour;
- sand - 2 hours;
- crushed stones - 4 hours;
- water - 0.4 tsp.
https://www.youtube.com/watch?v=
The solution must be poured into the prepared card and evenly distributed using bayonet movements of a shovel or a deep vibrator until cement laitance appears. Leveling occurs with a three-meter rule and a half-grater, performing semicircular movements. Three days after completing the screed, it must be wetted with water.
Single layer floor
The single floor structure can be placed on poles, as described above. Only on top of the supports are beams placed, on top of which the flooring is made of tongue-and-groove boards.
The second option is to install the floor along beams embedded in the body of the load-bearing enclosing structures of the building. Beams serve as the basis for the floor, and brick supports are no longer required.
Logs for single-layer flooring
Due to the large free distance between the beams, the fastening of the flooring from the boards is carried out along the sheathing:
- The sheathing is made of timber with a square section of 5-6 cm.
- The pitch of the timber in the sheathing depends on the thickness of the floor board. The thinner the board, the smaller the distance between the lags.
- During the installation of the sheathing, it is important to control its horizontal position so that the end result is an even plank covering.
- Fastening the boards begins after all the logs are installed in their places and securely fixed with nails.
- If it is not planned to lay additional decorative covering on top of the flooring - laminate, tile, linoleum, then it is finished.
- After the single decking is installed, it is covered with two layers of protective varnish.
Instructions for attaching plank flooring
When making a single floor, no serious professional skills or significant time and financial costs are required. But its disadvantage is its low thermal insulation properties.
We suggest you familiarize yourself with How to attach door panels
Laminate, tile and other types of flooring
Flooring is the exterior finish of a floor. They are needed to give the room an attractive look and additional insulation of the premises. Applying a topcoat to a wooden surface makes it more durable. As you can see in the photo, there are many options for flooring, available in different colors and textures. The table provides a brief description of the most popular of them.
| Name | Description | pros | Minuses |
| Laminate | Coating that imitates wooden boards. Consists of several layers: paper impregnated with resin or paraffin, HDF, decorative and protective film. Thickness – from 6 to 12 mm. |
|
|
| Linoleum | Flexible fabric produced in the form of rolls. Made from natural materials or polymers. |
|
|
| Ceramic tile | Plates based on baked clay. |
|
|
| Cork | It is made from cork tree bark in the form of slabs. |
|
|
| Wooden parquet | It has the form of plates that fit into the canvas. |
|
|
| Carpet covering | Rolled material with a fleecy surface. |
|
|
| Stone | Stone slabs of various shapes and sizes. |
|
|
Floor level markings
Marking the concrete floor level.
To make the work easier, preliminary markings are made to allow for proper pouring and pouring of the solution. The entire site is divided into equal intervals 1.5 - 2 m wide. The beacons must be fixed on guides, the upper edge of which is aligned with the zero level of the entire marking. You need to start laying from the far corner, moving forward.
Installation using glue
The wooden floor is laid on a concrete base, which must comply with SNiP 3.04.01-87. When the subfloor has a loose structure or there are cracks on it, a substrate should be placed on the base or coated with a primer to strengthen it.
A subfloor when installing plank flooring is necessary for several reasons:
- To increase the operational life of the structure due to the presence of high-quality floor ventilation.
- It serves as a solid base for laying insulation and finishing flooring.
- Makes the frame of the building more rigid.
Before starting work on the installation of the rough structure, check the following:
- The wood chosen as the material for the construction of the subfloor must have an optimal level of humidity - this will eliminate possible deformation of the structure during its subsequent use.
- The boards should not have obvious defects.
- If an inexpensive board can be used for the subfloor, then for the finished floor it is purchased with a reserve, so that later you do not have to look for material of the same shade.
Double floor
Preparation
Installation of the subfloor can be carried out both on the ground and on the floors. In any case, it is necessary to carry out a set of preparatory measures:
- The walls of the building must be equipped with ventilation windows, closed from the outside with special grilles.
- All wooden parts are treated with antiseptic compounds to increase the service life of the structure.
- Taking into account the size of the room in which the floor will be installed, calculate the required amount of material.
- Throughout all work, it is important to monitor the horizontal position of the floor structure to prevent the formation of a slope.
- Timber and logs are subject to processing, in which they are cut to eliminate slopes and bevels.
Treating boards with an antiseptic
To ensure that the floor does not creak, does not vibrate, is smooth and warm, it is necessary to pay special attention to the laying of the subfloor and, first of all, to the joists.
Attaching the log
The logs should be suspended on the beam supports in increments of 60 cm - insulation will be laid in the gap formed. It is not worth saving on beams in order to avoid sagging and vibration of the floor during operation.
The step can be reduced if the load on the coating is to increase
Where heavy equipment, such as a stove or fireplace, will subsequently be installed, the floor is reinforced by placing beams in 30 cm increments.
Additional lag fixation
Fastenings in such places are also further reinforced.
The process of attaching slats
At the bottom, beams are nailed across the beams. Between floors, beams are nailed along the beams - this will save the height of the room and, if necessary, use the upper beams as a decorative element in the interior after their additional finishing.
Fastening bars along beams
In the gap, an OSB sheet is laid on the beams.
Laying OSB sheet
After this, mineral wool slabs are laid in a checkerboard pattern, and on top there is a continuous layer of vapor barrier, which covers the logs and is fixed with a construction stapler. The vapor barrier seam is taped.
Laying vapor barrier
The second layer of vapor barrier is laid overlapping, and a ventilation gap is formed on top. To do this, use a 40 x 100 mm block, screwed to the floor joists. The finishing floor will be installed on top of these bars.
Bar for organizing ventilation

