Reinforcement of aerated concrete
Having decided to build a house from aerated concrete blocks, it is important to correctly calculate all the loads and choose the optimally strong and dense aerated concrete material. Even under these conditions, it will not be possible to avoid cracking and shrinkage of the walls, but such a nuisance can be avoided if additional reinforcement of the aerated concrete masonry is done correctly. Therefore, you also need to know how to reinforce aerated blocks so that you don’t encounter this in the future.
Places that need strengthening
There is no need to reinforce solid aerated concrete walls; it is enough to reinforce the following areas subject to intense load:
- The first floor, especially the first row above the foundation.
- Places under window openings and supporting lintels and ceilings.
- If there is a gap of more than 3 meters between the floor slabs, then the wall must be reinforced in at least 2 places.
- If this distance between floors is less than 3 meters, then only the window sill opening is reinforced, but if the wall is solid, then it is reinforced exactly in the middle.
- Walls exposed to intense wind and work loads.
Aerated concrete walls can be reinforced with either reinforcement or masonry mesh with a wire diameter of at least 4 mm. Mesh reinforcement is a more labor-intensive process. Such a mesh is placed only on high-quality masonry mortar, and the thickness of the joining seam should not be less than 1 cm. The best option for strengthening such walls is class A-III reinforcement with a diameter of at least 6 mm. It is not only easier to install, but allows the blocks to be laid on a special adhesive cement, which qualitatively improves the performance characteristics of aerated concrete walls.
Reinforcement technology
To make a reliable reinforced seam, you must first groove the blocks in 2 places, at a distance of 6 cm from their edges, the dimensions of the grooves must correspond to the diameter of the selected reinforcement. These preparatory works can be carried out either with a manual wall chaser or with its electric counterpart; in any case, this process will not take much time, since the gas block is a good material for processing. It will be necessary to rid the resulting grooves of dust.
After which the grooves are filled with adhesive compounds or ordinary masonry mortar, this is done not only to better strengthen the reinforcement in the body of the block, but also to protect the rolled metal from destructive corrosion. After which the finished reinforcing bars are drowned in mortar or glue, the excess is removed immediately. If the wall thickness is 20 cm, then the masonry is strengthened with only one reinforcing rod in the middle.
A good alternative to conventional reinforcement is galvanized perforated strip; its minimum size should be no less than 15 * 1 mm. To lay it, you do not need to pre-drill the walls; it is enough to apply a layer of glue-cement on it, the thickness of which should not exceed 3 mm. To ensure reinforced concrete that there are no cracks, reinforcement alone is not enough; it is also important to install expansion joints and armored belts.
Such seams are determined purely individually depending on the project of the house. As a rule, they are installed at the intersection of load-bearing walls, between the warm and cold enclosing structure, where aerated concrete blocks come into contact with other materials and, of course, in places where the thickness of the walls changes.
As for armored belts, they can be poured directly onto the walls or installed purchased ones. As an option for installing an armored belt for aerated concrete walls, 10 cm thick blocks are laid along the edges of the walls, and a metal frame consisting of 4 reinforcement bars connected by a mesh is mounted in the resulting gap between them. After which, all this is filled with masonry mortar, which must be compacted well with a portable vibrator. By the way, the price of such a structure is slightly lower than a reinforced concrete monolith.
Reinforcement tips, video
Conclusion
Remember that additional reinforcement of aerated concrete walls does not increase their load-bearing capacity, but only takes on tensile loads, which are fraught with numerous cracks and shrinkage for aerated concrete blocks.
Happy construction!
oblokax.ru
Construction of walls from sibit
Laying walls from sibit is much easier than from brick, since the blocks are larger and their number will be smaller. The only difference is that sibit masonry must be reinforced with reinforcement. So, to build walls, you will need:
- manual or electric wall chaser;
- Master OK;
- notched spatula or trowel;
- rubber mallet;
- special plane for gas blocks;
- a brush to remove dust from the grooves;
- hand drank;
- iron corner;
- lace or fishing line;
- building level;
- reinforcement bars O10 mm.
Before you start laying the first row, it is fundamentally important to take care of waterproofing. Based on this, it is possible to cover the base with bitumen or lay a couple of layers of roofing felt.
The first row must be laid using a cement-sand mortar. To make it, stick to a 1:3 ratio - cement and sand. Add water until the solution reaches the desired consistency. The layer of mortar on the base can be about 1 cm, which will hide all the irregularities.
The main task when laying the first row is to make it perfectly level. A rope, a building level and a mallet will help you cope with the task. So, it is necessary to start laying walls from the corners. Install corner blocks and level them strictly. To adjust the blocks, use a rubber mallet. After this, stretch a fishing line or string between the blocks, which will serve as a guide for laying the remaining blocks. Its horizontalness must also be checked with a level. Make sure there is no sagging. If the walls are more than ten meters long, install an additional block in the middle. The string should be stretched across the top of the block. Now start installing other blocks. The length of the walls will not always be equal to the number of whole blocks, so some of them will need to be adjusted to size. It is possible to cut them with a saw, checking the correct cutting with a corner. Using this method, you need to lay the first row around the entire perimeter. After you have done this, you need to wait a couple of hours until the solution sets.
The remaining rows are done exactly except this one: the corners are set, the cord is pulled and the process is repeated. Only here there are some differences. The surface of the sibit can be treated with a special plane, giving it roughness. Then the binding material will lie much smoother. In addition, remember about the connection; the blocks of the second row should be laid with an offset of 8 cm. Another point - now it is possible to use special glue to connect the blocks. It is applied in an even layer with a trowel or notched trowel. Then the gap between the blocks will be uniform, which will simplify the laying process. Another advantage of the glue is that it dries much faster, so you won’t have to wait long.
Please note that any 3rd or 4th row of blocks must be reinforced. To do this, parallel grooves for reinforcement are cut into the blocks around the perimeter. The grooves are cleaned with a brush, and Ø10 mm reinforcement is placed in them.
The connection of two pieces of reinforcement should not be at the corners and joints of blocks.
All that remains is to apply the solution or glue. Such an event must be carried out not only for the wall, but also for the areas above and below the windows, and under the floors of the floors.
reinforcement of aerated concrete blocks
Why is aerated concrete block popular in construction? To obtain the thermal conductivity coefficient, which is inherent in a 0.5 m thick wall made of aerated concrete blocks, it is necessary to build a brick wall whose thickness reaches 1.5 m. Among all cellular concretes, none has such geometric accuracy.
General information
Two types of structural reinforcement for masonry walls have been developed. They do not increase the load-bearing capacity, but reduce the risk of formation of shrinkage cracks, temperature cracks, and defects that occur during movements and deformations of the base. There will be no harm from excess reinforcement, but at the design stage it is advisable to carry out all the calculations.
Horizontal reinforcement
First type:
- prevents the formation of cracks around all openings;
- recommended for all types of buildings made on the basis of small aerated concrete blocks;
- the exception is floor-by-floor supported walls on objects with a load-bearing reinforced concrete monolithic frame.
Some sources contain recommendations for vertical reinforcement. The system connects the upper monolithic belt and the foundation
Second type:
- prevents the occurrence of temperature-shrinkage cracks;
- this is relevant when constructing from newly produced aerated concrete blocks, which are obviously subject to shrinkage when the material is sold “hot” from an autoclave;
- such work is necessary if the house is located in a region with significant fluctuations in annual temperatures, strong wind loads, and potential deformations of the foundations.
Vertical reinforcement is relevant for earthquake-prone and hurricane-prone areas, when constructing houses on slopes, when reinforcing fences and free-standing walls, and when working with large-format modules. It allows you to strengthen the junctions of walls and corners of the house, and internal vertical reinforcement increases the load-bearing capacity.
Reinforcement of aerated concrete blocks - technology
When a material is selected, it is recommended to study the technology of its use. If you ignore this stage, you may, through your own fault, become disappointed in aerated concrete and the manufacturers who sell it so effectively. One of the important stages is the reinforcement of the gas block.
The essence of the work is as follows:
- Two strips of steel reinforcement (8.0) mm are glued into the external blocks. When increasing the thickness of the wall, you will need either more frequent reinforcement or an increase in the diameter of the rod;
- one tape is introduced into the partition blocks;
- I and every IV row are reinforced (every 100 cm). If the block height is 30-35 cm - every third row;
- the reinforcement is laid in oblique wall structures under mansard and sloping roofs and a row at the level of the mauerlat underneath them;
- The modules above which the lintels are mounted and those located under the window reinforcing belt are also reinforced.
Such manipulations help reduce potential cracking and neutralize low resistance to bending loads and fragility.
According to the technology, the reinforcement bars must be enveloped in an adhesive solution on all sides. For this purpose, grooves - grooves - 25x25 mm (width and depth) are made in the masonry of walls made of aerated concrete blocks. The distance from the outer and inner edges of the block should not be less than 60 mm. Wall chasers are used for work. Before filling, dust is removed from the recesses and they are moistened until they change color.
Excess glue during reinforcement is removed with a trowel or spatula - this is important, otherwise when laying the next row the master will not be able to get a thin seam, thereby worsening the thermal engineering of the structure
Implementation of work
Reinforcement of aerated concrete blocks is carried out after the grooves are ready, but before the glue is prepared. At this stage, the ends are joined, all corners are bent, while the laying is done overlapping, without getting into the joints of the modules. External walls are connected with partitions.
When all the work is completed, the fitted fittings are removed and you can begin preparing the adhesive solution. All grooves are filled with it (2/3 of the height), then the rods are recessed so as to be completely covered with the solution.
On walls with a thickness of 25 cm or more, a second row is installed, maintaining a 60 mm distance from the outer edge. If the thickness is below 20 cm, one rod (8.0 mm) is used, placed in the center. Anchoring is mandatory, otherwise there can be no question of structural integrity.
Reinforcement of door and window lintels
At this stage, U-shaped modules are used. The blocks on which the lintel will rest are reinforced by at least 90 cm in each direction (the figure may vary depending on the width of the opening). A supporting wooden structure is installed in the window opening on which the block will rest.
Sequencing:
- modules are laid with the thick side facing out;
- the groove is insulated, for which you can use 30-50 mm polystyrene foam boards;
- the side walls of the external blocks are closed;
- the frame is laid;
- the lintel is filled with concrete;
- when the material is mature, the wooden structure can be dismantled.
In an identical way, only around the entire perimeter, you can build an armored belt. As an alternative, you can use partition blocks, insulating them and exposing the formwork from the inside. The reinforced belt cannot be poured over the entire thickness of the wall - concrete is many times colder than blocks and this section will reduce all efforts to obtain an energy-efficient house to a minimum.
Rows of reinforcement are placed above and below the row of masonry in the plane of the floor, if the wall structure does not provide monolithic strapping belts, for example, as in prefabricated wooden floors.
The ends of the rods, which are not combined into a complete strapping circuit, are bent at an angle of 90 degrees and deepened into recesses for reliable anchoring in the wall.
In the presented technology, reinforcement mesh is never used when reinforcing external walls.
Recommendations for reinforcing sloping walls under attics
The master, working in this area, must take into account the following:
- when a light roof is being erected, it is optimal to implement row reinforcement of gas silicate blocks in two rods;
- for better load distribution, the pitch between the rafters should be reduced;
- for heavy roofing, it is recommended to provide an additional row of u-shaped blocks;
- this row is laid on already reinforced, oblique modules sawn at a given angle;
- Grooves are filled using thicker concrete than when working on horizontal surfaces.
Alternative options
Steel rod is a universal material suitable for any block size and all wall structures. However, the master can consider the entire range of possibilities.
Reinforcement of aerated concrete blocks with mesh
Reinforcement of walls of aerated concrete blocks with a metal mesh is implemented only if the construction of internal walls is carried out on the basis of large-format modules. This is the most economical type of work, but it requires the use of masonry mortar.
The use of glue is not justified - the result is a thick seam, which provokes the formation of cold bridges. Metal becomes unusable under the influence of negative factors. Therefore, reinforcement of aerated concrete blocks with metal-based masonry mesh is not carried out on external walls.
Mesh for reinforcing gas silicate blocks based on fiberglass or composite is an expensive material. Manufacturers recommend using it for working with external walls, but the master must evaluate the rationality of such a step. On the one hand, the base does not react to the influence of negative factors, which metal is susceptible to. On the other hand, the thickness of the seam will still increase, which will negatively affect the thermal characteristics, although with a professional approach this can be avoided. The mesh is laid every three rows. This material fits perfectly into facing layers.
Reinforcement of aerated concrete blocks with fiberglass reinforcement
Compared to standard technology, this type of work is less labor intensive. Fiberglass reinforcement is not yet popular among domestic builders, although in the West it is mainly used.
General recommendations are as follows:
- when working with fiberglass with a diameter of 4 mm, the first floor of 2-3 storey buildings, long walls, the first row of modules, every third row, rows under openings, places where lintels are supported, fragments with a large structural load are reinforced;
- the reinforcement may break if the turns at the corners are less than 10 cm in radius, which should be taken into account, the corners are made with rounding;
- when the width of the masonry is less than 25 mm, laying is done in one groove.
The tensile strength of fiberglass with a diameter of 4 mm is not inferior to a steel rod of 8 mm
Reinforcement of monolithic walls and block structures is an integral part of construction, which must be implemented with all responsibility.
The technology for reinforcing aerated concrete blocks is clear from the video:
Books on the topic:
obetone.com
Structural reinforcement along the height of the wall
Figure 410.2 . Structural reinforcement of masonry along the height of a blank wall made of GSB, according to STO NAAG 3.1–2013 (p. 74)
I’ll say right away that such reinforcement is recommended for blank walls, i.e. having no door or window openings, while the walls themselves are quite long.
In general, the need for such reinforcement of masonry is determined based on the provisions of section 6.4 of the specified STO:
6.4.1. Temperature-shrinkage joints in walls are installed in places where temperature and shrinkage stresses may be concentrated, which can lead to masonry ruptures (cracks) that are unacceptable under operating conditions.
6.4.2. If operating conditions allow the presence of cracks with an opening width of up to 2 mm, then the distance between expansion joints is taken in accordance with SP 15.13330.2012, Table 33, as for sand-lime bricks and concrete stones.
In this case, the distance between temperature-shrinkable joints accepted without calculation should not exceed 50 m.
I will give this table here:
Table 33
From this table it follows that, for example, for Moscow, for which the average temperature of the coldest five-day period is about -29 ° C, the maximum permissible distance between temperature-shrinkage joints can be up to 50 m with a crack opening width tolerance of up to 2 mm.
6.4.3. In other cases, calculations are performed for the formation of through cracks in accordance with Appendix 11 to the Manual on the design of masonry and reinforced masonry structures to SNiP II-22-81. In this case, the distance between the temperature-shrinkage joints, the cross-section and location of the reinforcement are determined based on the calculation results.
I will not present here the specified application and the calculation option according to this application (this is a separate, very large topic). I will only say that if such a calculation causes you certain difficulties, then it is better to immediately accept the recommended masonry reinforcement scheme, as for blank walls.
6.4.4. Reinforcement that prevents the opening of temperature-shrinkage cracks should be placed in horizontal joints of the masonry (as shown in Fig. 410.2) or in concrete belts parallel to the horizontal joints of the masonry.
Often such a concrete belt is called a strapping belt or armored belt. In Figure 410.2, the reinforcement of the strapping belt is not shown.
In this case, the rows of masonry adjacent to the horizontal expansion joints are reinforced in increments of no more than 1 m along the height of the wall section (see Fig. 410.2). The cross-sectional area of the reinforcement must be at least 0.02% of the cross-sectional area of the masonry.
For example, for walls 30 cm wide with reinforcement every meter, the cross-sectional area of the masonry is 30·100 = 3000 cm2. Accordingly, 1% = 3000/100 = 30 cm2, and 0.02% = 30·0.02 = 0.6 cm2. In this case, 2 rods with a diameter of at least 8 mm should be used for reinforcement.
Note : If the calculation of the foundation of the house was done not on the basis of geological surveys, but by eye or like a neighbor (which is unacceptable according to regulatory documents, but in the modern realities of private low-rise construction - a common thing), then I recommend using concrete for reinforcement belts (reinforced belts) reinforcement of larger diameter. How much more is up to you. Here I’ll just add that the minimum width of the harness should be at least 5 cm.
Reinforcement during the construction of a house made of aerated concrete
The construction of country houses is sensitive to the emergence of new technologies and building materials. And if wooden houses can be classified as traditional buildings, then building your own house from cellular concrete is a kind of trend. The disputes do not subside, and houses grow like mushrooms after rain. Cellular concrete includes both foam concrete and aerated concrete. Many technical characteristics of these materials are similar.
If building codes and regulations are observed during the construction and operation of houses made of cellular concrete - aerated concrete and foam concrete - they are not inferior to many traditional buildings.
Construction regulations, state standards for cellular concrete
Recommendations for the construction of houses from aerated concrete, the installation of engineering and communication elements, components, requirements for the production of aerated concrete blocks, hollow-core slabs can be found in the following regulatory documents:
- GOST 9561-91 – standard for reinforced concrete hollow-core slabs for floors;
- GOST 10884-94 - standards for steel for reinforcement of reinforced concrete structures;
- GOST 31359-2007 – for cellular concrete;
- GOST 31360-2007 - standards for wall products made of cellular concrete;
- SP 22.13330.2011 – set of basic rules “Foundation of buildings and structures”.
Here we will consider the general requirements and types of materials used for reinforcement
Why reinforce aerated concrete masonry?
Temperature-shrinkage cracks will almost inevitably appear if reinforcement is not carried out when laying aerated concrete blocks. Since aerated concrete does not (practically) bend or stretch, reinforcement is an indispensable condition when building a house from aerated concrete. Reinforcement does not increase the load-bearing capacity of walls, it protects them from deformation.
Initially, cellular concrete began to be produced as an insulating material, but over time it found application in load-bearing structures, but only if the masonry was reinforced. The reinforcement is not afraid of tensile load. Reinforcement includes: horizontal and vertical reinforcement of the masonry (to reduce the load on the masonry) and installation of a reinforcing belt (increasing the overall strength of the entire structure), which must be monolithic along the entire perimeter of the structure.
Reinforcement of aerated concrete masonry
Correct reinforcement of the masonry is carried out every four rows with a block height of 250 mm or in increments of three rows if blocks with a height of 300-350 mm are used. That is, a step is maintained, approximately 1 meter. The first row above the foundation must be reinforced. In addition, areas where additional load on the structure is provided are reinforced:
- Above and below the window opening (with an overlap of up to 1 meter on both sides),
- row corresponding to the level of the Mauerlat,
- area (min. 1 meter) where the lintels will be supported.
How and with what is reinforced a wall made of aerated concrete blocks?
Masonry mesh made of wire with a diameter of 3 mm or a little more often causes criticism, since it serves as a kind of cold bridge located between the blocks, but with additional insulation, its use simplifies the masonry, since it does not require gating of the blocks. But mesh enlarges the joint and is often used when using mortar rather than adhesive. There is an alternative to steel mesh - reinforcing mesh made of composite materials with fiberglass.
Reinforcing tape - perforated strips of galvanized steel are also used for inter-row reinforcement of walls. Thickness 4-8 mm, width 25-100 mm. There is no need for cold weather and there is no need for dusty gating work. The reinforcing strip is sold in sections of 3 and 6 m or in rolls. The tape is pressed into the adhesive seam and covered on top with the same special glue that is recommended for laying aerated block walls.
The reinforcing rod is laid directly into the gas blocks so as not to affect the thickness of the seam between the rows and not to interfere with the geometry of the masonry. To do this, the blocks are grooved. The optimal diameter for reinforcing rods is 6-8 mm (A400-A500). This method is considered the most reliable among builders and manufacturers of cellular concrete blocks.
Punching of blocks and reinforcement with steel and composite rods
Recesses - grooves, are made with a wall chaser, grinder and jigsaw. Depth and width within 25 mm. Any tool that is capable of forming a recess/groove for the reinforcing rod can participate in the process. To enhance the effect, the reinforcement technology provides two recesses no closer than 5 cm to the edge of the block. If the block thickness is more than 500 mm, a third rod will be required. Connections are not allowed at corners. The rod must be curved.
If the reinforcement is made with one rod, then the groove is located in the center. The connection of the reinforcing rod is carried out by any of the acceptable methods (welding, coupling, overlap).
In places of overlap (which is recommended approximately 4 cm), the groove should be much wider. Before laying the reinforcing rod, the recess should be cleaned. For higher adhesion, you can moisten the groove, then fill it with glue used for laying the blocks, and lay the reinforcement, not forgetting about the overlap.
Russian building codes do not include fiberglass reinforcement, but its use is not prohibited. In the West this is an everyday practice. There are certain advantages inherent to composite materials:
- Deformation stability;
- a light weight;
- low thermal conductivity;
- corrosion resistance.
The main disadvantage is that connecting sleeves are required, since welding cannot be used, nor can such a rod be bent before installation.
Reinforced belt for buildings made of aerated concrete blocks
The reinforcing monolithic belt in the area of interfloor or roofing floors is in many ways similar to the foundation. Its thickness is 10-12 cm around the entire perimeter. The frame made of reinforcement with installed formwork is filled with concrete. The entire perimeter is poured strictly at one time, this will ensure the solidity of the armored belt. For better pairing, nails and wire rod are stuffed into the top row of blocks. To ensure that such reinforcement does not cause heat loss and does not serve as a cold bridge, attention should be paid to insulating the outer edge of the reinforced belt and the formwork should be shifted inward, leaving room for further insulation of the perimeter.
An armored belt is required if the floors are prefabricated. Floor supports should not exert point loads on the blocks - only on the belt. Therefore, some developers ignore the installation of reinforced belts when using monolithic lightweight floors. The issue is controversial, since the tasks of such reinforcement are broader than just distributing the load of the floors. However, the technology for building houses from aerated concrete allows the implementation of a simplified format of a monolithic belt if lightweight floors are installed.
Why is it necessary to reinforce aerated concrete?
Aerated concrete is reinforced so that it has high resistance to compressive loads as a material, but at the same time it cannot work in bending or tension. Such stretching and bending can cause cracks to appear on the walls if the load at a specific point in the masonry is greater than the deformation strength of the aerated concrete block.
Reinforcement of aerated concrete walls involves the implementation of two different methods:
- Strengthening masonry rows with reinforcement or mesh;
- Installation of a monolithic belt.
These methods are aimed at increasing the deformation resistance of the masonry, but they do not affect the load-bearing properties of the walls. Zones in which reinforcement is carried out with reinforcement:
- The first row of masonry above the foundation (reinforcement and calculations of reinforcement for the foundation can be found in separate articles).
- Support points on the wall for partitions (doors or windows), as well as ceilings.
- Every fourth row of masonry, if the walls exceed 6 m.
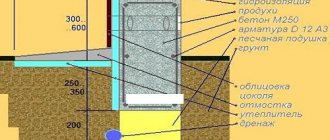
Stages of construction of shallow strip foundations made of reinforced concrete
When arranging shallow monolithic foundations for small and light sibit houses, you should focus on the following indicators:
When building on highly heaving soils:
- the thickness of the anti-frizz pillow must be at least 40 cm;
- trench depth – 70 cm;
- trench width – from 80 to 120 cm.
When building on medium heaving soils:
- anti-heave cushion thickness – 20 cm;
- trench depth – 50 cm;
- trench width – from 70 to 120 cm.
When building on slightly heaving soils:
- anti-heave cushion thickness – 10 cm;
- trench depth – 40 cm;
- trench width – from 70 to 100 cm.
Preparation of materials and tools
Tools for constructing formwork: Shovel, pliers, screwdriver, crowbar, sledgehammer, hammer.
To arrange a strip monolithic shallow foundation you will need:
- Shovel.
- Tamper or vibrating plate.
- Hammer and nails.
- Special hook for tying reinforcement.
- Construction level and square.
- Sand.
- Gravel.
- Geotextiles.
- Ruberoid.
- Boards 10x2 cm.
- Beam 50x50.
- Glassine.
- Reinforcing rods with a diameter of 12 mm and 20 mm.
- Knitting wire.
- Concrete not less than M200, depending on the type of soil.
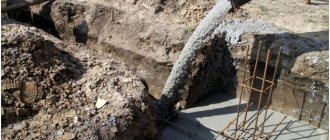
Foundation construction algorithm Construction of the foundation begins with marking the area and digging a trench of the established size. The uniformity of the angles of the trench, its verticality and horizontality must be checked using a level and a square. The difference in the horizontal level of the trench day should not exceed 1-2 cm. The walls should be as smooth and straight as possible.
An example of horizontal foundation insulation.
After the trench is prepared, the bottom must be compacted using a tamper and spilled with water. On heaving soils it is better to use a vibrating plate. If the soil in the area is sandy and dusty, it is recommended to lay a layer of geotextile material on the bottom, which will protect the base from silting and water penetration.
The width of the cushion for a shallow foundation should be 30 cm wider than the foundation itself. A layer of sand about 10 cm thick is poured into the bottom of the trench, then a layer of gravel 10 cm thick. The pillow is covered with roofing felt (if possible, it is recommended to lay a layer of geotextile material under the roofing felt). It is strictly forbidden to add regular soil to the pillow. The pillow must be thoroughly compacted. Even a small subsidence can lead to dire consequences: for example, a 5 mm subsidence of the pillow will lead to a displacement of the wall of a sibit house by almost 7.5 cm.
Then the formwork is installed. It is assembled from boards and timber. Beams are used as support posts, placed every 60 cm. Glassine must be laid in the finished formwork to protect the concrete solution from moisture leakage. The formwork must rise above the soil level by at least 30 cm. For additional thermal insulation of the base of a Sibit house, you can use permanent polystyrene foam formwork.
Arrangement of reinforcement frame.
The reinforcement cage is placed in the finished formwork. It is made as follows:
- for the lower and upper belts, 5 metal rods are taken;
- rods with a diameter of 12 mm are used as longitudinal reinforcement, rods with a diameter of 20 mm are used as transverse reinforcement;
- the distance between the longitudinal rods is at least 15 cm;
- the cell pitch should be 20 cm;
- The corners of the reinforcement are secured overlapping with tying wire.
Concrete is poured onto the installed reinforcement in layers. Each layer must be pinned to eliminate voids that may have arisen during pouring. Work on building a house from sibit can only be continued after the concrete mixture has dried. This usually takes about 28 days.