A stove or fireplace in a home becomes a key decorative element and helps create a feeling of warmth and comfort in the home. Stove facing tiles allow you to create different finishing options and organically fit the stove into an interior made in any style, from classic to high-tech.
But in order for the created beauty not to be destroyed for as long as possible, it is important to choose the right facing material and solution for the stove tiles.
When choosing a mixture, you should take into account the special operating conditions of the stove or fireplace (the surface gets very hot). This means that not only the tile, but also the glue that fixes it must have special fixing properties.
What solution do you use to lay the tiles on the stove? This is the question that will primarily interest the owner who has decided to make the lining of the stove with his own hands.
Solutions and mixtures for tiling stoves
The construction market offers many compositions for lining heated surfaces. But, we can distinguish three fundamental approaches to obtaining a solution, which have additional options.
1. Mortar for lining the stove with hand-mixed tiles
The advantage of a homemade solution from its constituent components: environmental friendliness, low cost, good reviews, time-tested. Disadvantages: difficulty maintaining proportions, dustiness and time-consuming preparation.
However, most tilers and stove makers advise using “natural” mortar for lining the stove and offer several varieties.
1.1 Clay mortar for tiling the stove
Clay mortar for tiling the stove. Recommended for laying tiles and ceramic tiles.
Let us immediately focus on the fact that clay mortar, consisting of clay, water and fillers, is used for laying stoves, and very rarely for tiling. This is due to the fact that high temperature gives clay such a property as strength. Which in turn affects the ability of the cladding to play under the influence of temperature and leads to its cracking.
Fillers, which can be sand, sawdust, sawdust, or wood shavings, are designed to neutralize this property of clay. The most effective filler is sifted river sand.
Clay mortar composition
The composition of the solution depends on the fat content of the clay.
Fat content of clay: with a minimum (no more than 15%) sand content in clay, it is considered fat. If the sand content is in the range of 15-25% - normal, more than 25% - lean.
How to determine the fat content of clay
You can determine the type of clay without laboratory tests in several ways:
- rub the clay with your fingers; in oily clay, the admixture of sand is not felt.
- crumple it into a ball, flatten it slightly and dry. Cracking of the ball will indicate that the clay is oily, and vice versa, if the ball maintains its shape, the clay is skinny.
Determination of fat content of clay - balls
- knead the clay well and roll it into a sausage 20-30 mm thick. Then gradually stretch it, observing the behavior of the mass. The figure shows how fatty (a), normal (b) and lean (c) clay behaves.
Accordingly, the quality of the clay affects the proportions of the solution for lining the furnace.
Proportions of clay solution
For oily clay, the ratio of clay to filler will be 1:4, for normal clay 1:3, for lean clay 1:2.5.
As a general rule, the lower the clay content, the higher the ability of the solution to withstand high temperatures without cracking. However, the more sand, the less adhesive ability of the solution. Therefore, it is important to maintain a middle ground and strictly adhere to the recommendations.
How to make tile mortar for a stove without experience in stove work?
Professionals recommend a technique: adding salt to a clay solution. 1 cup table salt per 1 bucket of prepared clay solution. Salt gives the solution the ability to retain moisture and not crack. You can also mix fireclay powder into the solution; it will give the solution the ability to withstand high temperatures. This recommendation is especially relevant for those who heat the stove not with wood, but with coal.
Water is added in a proportion of 25% of the volume of clay. The readiness of the solution is determined by its plasticity.
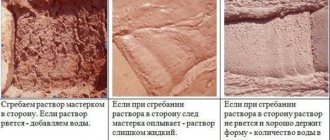
The consistency of the clay solution in the photo below:
1. dry clay solution - add water; 2. liquid – add clay; 3. normal.
Dry clay mortar Liquid clay mortar Normal clay mortar
How to properly mix a clay solution?
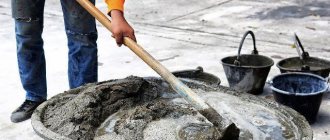
Mixing the clay solution is done with your feet or a trowel. It is unacceptable to use a mixer, because it agitates the clay and reduces the quality of the solution.
How to make a solution from clay - video
1.2 Cement-clay mortar for masonry
Or clay-cement-sand mortar.
To give the clay mortar strength, you can add cement and chalk to it.
Proportions of cement-clay mortar (1:1:1:3)
- 1 part cement
- 1 part clay
- 1 part chalk
- 3 parts sand
Such a solution will have increased adhesion to the surface. The peculiarity of the mixture is that it is prepared in dry form. Cement is mixed with sand and chalk. Then clay pulp, which is clay diluted with water, is added to this dry mixture.
After bringing the mixture to the desired consistency, you can add one part of liquid glass to it. This solution is used for covering surfaces with heavy large-format tiles or tiles on the finished surface.
For gluing ceramic tiles of standard sizes, craftsmen recommend using a solution with a simpler composition:
- 1 part clay
- 1 part cement
- 3 parts sand
- 1 cup salt
Do-it-yourself oven cladding with ceramic tiles
The history of the construction of stoves goes back hundreds of years, at first the stoves were heated in black, that is, there was no chimney and the smoke came out through vents and doorways, but with the development of humanity they came up with a chimney and began to fire stoves in white.
Then people began to whitewash the stoves, decorate them with designs and ornaments, and the rich Princes lined the stoves with ceramic tiles, with Russian painting and Gzhel. Today there are a lot of facing materials available, which you can use to decorate the stove yourself if you wish, how to do this? see below. Materials
1. ceramic tiles 2. clay 3. cement 4. sand 5. special tile adhesive 6. mesh 7. beacons 8. grout
Tools
1. trowel 2. drill 3. spatula 4. mortar container 5. tile cutter
The process of lining a stove with ceramic tiles with your own hands.
The red brick stove itself looks stately and very beautiful, the brickwork itself is mesmerizing, but it would be doubly beautiful if this masonry was lined with ceramic tiles with a pattern, or one color.
In ancient times, it was considered chic to have a beautifully decorated Russian stove in your mansion, or palace. It looked fabulous in the house, filling the house with warmth and the aroma of pies and bread baked in it. And what rich cabbage soup and borscht are cooked in the oven, the taste is mind-blowing.
Folklore includes dozens of fairy tales, songs and poems where the Russian stove is mentioned, just remember Emelya cutting along a country road.
And so, in order to finish a brick oven, the author will first need a brush to clean the surface from excess mortar residue and accumulated dust. Then the master attaches a reinforcing mesh to the surface of the furnace.
A solution consisting of clay, cement and sand is applied to the resulting surface.
Apply to the entire area and level.
After finishing leveling, you should wait until the surface dries.
Next, the author proceeds to laying ceramic tiles; a single color was chosen to save the budget.
When working with tiles, you should install plastic crosses - this is necessary so that the distance between the tiles is strictly the same, and after the tiles are laid, they are simply removed.
Then grout is applied - this is necessary to fill the gap between the seams.
And then simply wipe the entire surface with a cloth, removing excess grout.
And now the author’s oven is ready, look how beautiful it is.
That's actually all I wanted to say.
Thank you for your attention! We also present to your attention a video from professional tilers. Enjoy watching. Come visit more often, don't miss out on new items in the world of homemade products! Source Become the author of the site, publish your own articles, descriptions of homemade products with payment for the text. Read more here.
Ready-made dry mixture for tiling stoves
Professional stove makers and amateur craftsmen for the most part preferred not to prepare solutions with their own hands, but to use ready-made mixtures. Fortunately, there is plenty to choose from on the construction market.
When choosing a dry mixture for tiling a stove, you need to know that universal glue is not suitable for this. The solution for laying tiles on the stove must have special properties:
- high temperature resistance
. The packaging must be marked “heat-resistant” or “for lining stoves and fireplaces.” If the temperature at which the glue is used exceeds 200°C, it can be used for stoves and fireplaces;
- elasticity of glue
. Gives the adhesive the ability to withstand temperature changes;
- surface for which the adhesive is intended
. All surfaces are divided into two types. Simple surfaces – resistant to deformation (concrete, brick, cement screed). Difficult surfaces – not resistant to deformation (for example, drywall, metal, wood, MDF);
- tiles for which the adhesive is intended
. For example, terracotta tiles or porcelain stoneware require the use of a special adhesive composition;
- adhesion to the surface and fixation force
. A primer applied to the base can enhance these properties of the adhesive;
- hardening period
. Important if work needs to be done urgently. Varies within 1-7 days;
- period of use of the mixed solution
. Stove tile adhesive has a short shelf life after mixing, which increases the speed of work. This creates difficulties for beginners in laying tiles and leads to the fact that a significant part of the finished mortar goes to waste. The shelf life of the finished solution is 20 minutes - 1 hour for installation and 5-15 minutes. to adjust the tiles.
- glue packaging
. Dry adhesive solutions are sold in 25 kg bags. The shelf life of an open bag is limited, which is due to its ability to absorb moisture, so for a small amount of work it is better to use 10 and 5 kg packaging.
Preparing the solution for use is very simple and consists of mixing the solution with water in the required proportion in a clean container. To increase the plasticity of the mixture, you can add PVA glue at the rate of 250 ml. for 10 l. solution. Mixing is done using a construction mixer, which avoids lumps. Foaming of the solution is not allowed (the rotation speed of the drill attachment must be adjusted).
Adhesive for tiling stoves - manufacturers
Mari (brands) are popular among professionals and ordinary users:
Ceresit CM 16 Ceresit CM 16 Elastic tile adhesive “Flex” (Ukraine, under German license, 600 rub./pack). Ceresit Flex is designed for installation on complex deformable substrates, as well as using the tile-on-tile method.
Glue “Terracotta” Reinforced heat-resistant glue “Terracotta” (Russia, 550 RUR/pack). Used for cladding with natural stone and terracotta ceramic tiles. Chamotte kaolin dust added to the adhesive solution makes it possible to perform cladding without lining the furnace and obtain an identical result. Operating temperature up to 250 °C.
SCANMIX Fire adhesive SCANMIX Fire (Finland, 600 RUR/pack) has a high softening temperature of 1,200 °C. Scanmix is indispensable for lining furnace outlets and solid fuel stoves. The solution is intended for laying and repairing stoves, as well as for laying tiles on simple surfaces.
Plitonit SuperFireplace Plitonit SuperFireplace (Russia, 455 RUR/pack) allows you to lay the mortar in a thin layer due to the presence of fine-grained fillers. Permissible temperature of use is up to 1,200 °C.
Tile adhesive Ivsil Termix Ivsil Termix (Russia, 460 RUR/pack). Highly elastic adhesive. Operating temperature up to 250 °C, which allows it to be used on stove surfaces away from the firebox and on fireplaces with a closed firebox. Ivsil Thermix adhesive is intended for durable substrates.
Glue for tiles “Pechnik” Glue “Pechnik” (Belarus, 260 RUR/20 kg). Maximum operating temperature up to 250 degrees Celsius.
Adhesive for stove tiles Bergauf KERAMIK TERMO Bergauf KERAMIK TERMO (Yunis, Russia, 450 RUR/pack). Bergauf Ceramic Thermo glue is used for simple surfaces with heating temperatures up to + 180 °C.
Glue SILTEK T-84 SILTEK T-84 (Ukraine, 360 RUR/pack). Siltek adhesive is used for cladding surfaces exposed to temperature changes within the range of – 30°C – +150°C.
Special ready-made adhesive solutions or mastics
The line of these mixtures is represented by a smaller number of brands. This is due to the fact that the adhesive ability of the finished solution is lower than that obtained from a dry mixture. Nevertheless, the following gained the favor of the masters:
Adhesive mixture “Parade K-77” “Parade K-77” (Belarus, 300 rub./15 kg.). It is used on surfaces with a heating temperature of no higher than 800 °C, and is characterized by increased fixing properties. Not intended for use on plastered surfaces.
A brief analysis of adhesive mixtures and solutions for laying tiles on stoves and fireplaces allows us to conclude that there is a significant variety of them, and the choice depends on many factors, taking into account which will make it possible to perform the cladding with high quality and for a long time.
Tiles for lining a stove perform not only a decorative function, but also a protective one, since if there are cracks or crevices in the stove masonry, the tile will protect against the penetration of flue gases into the house. Various mixtures and solutions are used for tiling stoves. Everyone probably knows what a solution is, but they differ from each other in their composition. Grout for joints in the E-centre online store
Scheme of the furnace.
Various mortar mixtures are used for lining the furnace, which will be discussed today.
Recipes for various mixtures
Recipe No. 1. Sand-cement mortar
This type of cement mixture is used to eliminate uneven surfaces and to lay glass, ceramic, gypsum tiles, mosaics, and natural stone. Moreover, this mixture is used for sealing joints. The solution consists of construction sand, Portland cement and water.
Scheme of the furnace lining.
When making cement-sand mortar, Portland cement M500 and M400 is used as a binding material. For masonry, gray cement is used, and for sealing joints, white or other material is used that is required for the work. The filler of the cement mixture is construction sand; it is better to use mountain sand, as it has better adhesion. The mortar mixture is made in the proportions of cement to sand 1:2.
Preparation of mastics
Diagram of a brick kiln.
Bitumen-latex mastic. Construction bitumen must be melted to a temperature of 160°C, then limestone flour is added to it and mixed. The resulting mass must be cooled to 70°C and a solution of latex and gasoline must be added to it and mixed thoroughly. You can use the mastic after it reaches room temperature. The percentage composition of the mastic is: construction bitumen - 49%, limestone flour - 24%, latex - 6%, gasoline - 21%.
Bitumen-turpentine mastic. The bitumen needs to be melted and Portland cement M500 added to it, mixed thoroughly until a homogeneous consistency is obtained. Cool to 70°C and add a mixture of latex, white spirit and turpentine, stirring carefully. The mastic is ready. Percentage composition of ingredients: construction bitumen - 65%, Portland cement - 5%, white spirit - 17%, turpentine - 8%, latex - 5%.
Casein based mastics
You can also tile a stove using casein mastic prepared at home.
Scheme of the furnace lining.
Simple casein mastic. Pour dry casein glue with the required amount of water and leave to swell for 25-30 minutes. Then, with constant stirring, add fillers, limestone flour, fluff lime, and sodium fluoride. Mix the solution until a homogeneous consistency is obtained.
Ingredients: dry casein glue – 1 kg, sodium fluoride – 0.1 kg, fluff lime – 0.5 kg, limestone flour – 2.5 kg, water – 2 liters. All volumes can be either increased or decreased, but in direct proportion to each other.
Casein-cement mastic is prepared in a similar way. Composition: dry casein glue – 1 kg, Portland cement – 3 kg, fine-grained construction sand – 1 kg, water – 2.5 l.
Tiling the stove is also possible using gypsum mastic. The gypsum solution for cladding is prepared in 2 stages, initially you need to prepare a 10% solution of CMC glue, for this you need to dilute 0.1 kg of CMC glue in 1 liter of water and wait for the time specified in the instructions. After which, constantly stirring the resulting emulsion, you need to add gypsum and water into it. Composition: 5 kg of gypsum, 0.4 l of CMC glue emulsion, 0.23 l of water.
The preparation of polymer-based mastics in most cases is carried out in factories, but some of them can be made at home. In order to tile a stove, the following recipe is used: 1 liter of PVA dispersion should be thoroughly mixed with 1.5-2 kg of Portland cement. Glue-based mastic is prepared in this way: CMC glue is diluted with hot water, a cement-sand mixture is added to the resulting emulsion until the mastic reaches the required consistency. Glue composition: 0.1 kg of dry CMC glue, 5 l of water. Composition of the cement-sand mass: 1 bucket of Portland cement and 3 buckets of river sand.
Various adhesives are also used for lining stoves with ceramic tiles, which can also be purchased either ready-made or made at home.
In other words, there are a huge number of recipes for preparing solutions for tiling stoves; you just need to choose the one that is more convenient for you personally!
Technology of oven cladding with ceramic tiles
Now you should consider the entire process of covering the stove with ceramic tiles with your own hands in more detail. To do this, first of all, on the prepared and well-dried surface of the stove, in its lower part, you need to fasten a wooden strip so that it is at a distance of the width of the tile from the floor level. Be sure to measure the evenness of the slats with a building level.
The first row of tiles to be laid on the wooden slats is the second row from the floor, starting from the corner of the stove. This is done to ensure that there are no distortions in the rows in the future. Hot melt adhesive is applied to each tile using a flat spatula, which is leveled with a notched trowel. When using hot melt adhesive, you should follow all the recommendations specified in its instructions. The tile with glue is applied to the surface and pressed with your hand.
For a good fit, you need to lightly tap it with a rubber hammer. Remains of glue are immediately removed with a prepared damp cloth. To obtain even seams, plastic crosses are used, which are then removed before grouting. Distortions and unevenness must be corrected immediately, before the glue dries. Last, after removing the wooden slats, the very bottom row is laid; if necessary, the tiles are trimmed with a tile cutter.
3-4 days after tiling, after the glue has dried, using a rubber spatula, fill the seams between the tiles with a special grouting solution. Excess solution is immediately removed. After the solution has dried, perform a final cleaning of the oven lining using a damp and dry cloth. In a few days the lined stove will be ready for use.
Thus, tiling a stove is not such a complicated process. The main thing is to prepare well for it and correctly perform the technology of laying ceramic tiles, taking into account all its features.
Link to article
To transform the interior of a country house and add new style solutions, it is not at all necessary to get rid of the previous elements in the design. If the old stove seems out of place, ugly and outdated to you, do not rush to disassemble it. The design can be transformed using colorful ceramic tiles. This approach will allow you to turn an old stove into an integral element of the interior of a country house with your own hands. Yes, you will need to make an effort and try to lay the tiles beautifully and neatly, but nothing should stop you on the path to realizing your own ideas.
Preparing the necessary tools
To carefully tile the stove, prepare a tile cutter and several spatulas - flat, angled and notched for applying the mortar. You will also need a building level, a plumb line for marking and checking the accuracy of the measurements taken. You also cannot do without a metal ruler, a simple pencil and a ruler. To lay the tiles, you will use a wide brush, a trowel and a rubber hammer, and to mix the mortar, you will use a construction polyethylene bucket. It is convenient to stir the solution with a mixer or a low-speed drill with an attachment.
Preparing the laying of the furnace for cladding
Prepare the walls of the stove for work - remove a layer of old plaster from them. If the stove was lined with clay, the coating will be easier to remove if you first moisten it with water. It is also worth removing the clay coating from the masonry joints so that the new cladding will stick more firmly. When the primer is completely dry, check the evenness of the surfaces using a plumb line and level. If single protrusions are visible on the surface, they can be leveled using a grinder with a diamond blade. If there are a lot of protrusions, install metal beacons for leveling with mortar.
Materials and tools for lining the stove with ceramic tiles
Installing tiles is considered not so much labor-intensive as it is technologically sound. Knowledge and skills of the installation process will be required, as well as compliance with recommendations regarding working with surfaces exposed to heat.
The list of required materials for oven cladding may differ depending on the chosen method of fixing the ceramic tiles. Masters mainly use 2 options:
- using special heat-resistant glue;
- by installing each individual fragment into grooves mounted over the entire surface of the profiles.
To complete the work you will need the following materials:
• ceramic tiles (when calculating, add 5-10% for cutting complex architectural elements);
Plastering the surface of the oven
In the old days, the composition of clay plaster mortars was the subject of secret discussions among experienced stove makers. It was important to maintain certain proportions of sand and clay with the addition of salt and something else very necessary for beauty and strength. This craft mystery disappeared with the advent of ready-made dry mixtures for stove masonry and surface plastering on sale. Their composition is perfectly balanced in all components - you just need to add water. The main condition for finishing work remains relevant - the accuracy and precision of its implementation. When applying plaster, observe the optimal layer thickness: it should not exceed 10 mm. To level the walls of the oven, you will have to apply a layer of plaster in several stages, periodically drying it. We level the solution using the rule until the ideal geometry of the plane.
The walls of the furnace need to be strengthened: to do this, install a fiberglass reinforcing mesh on the mortar that has not yet hardened. To do this, use a wide spatula to make it easier to press the mesh into the plaster. When the reinforced layer is ready and dried, complete the finishing by applying the finishing solution. While the plaster layer is drying, prepare everything you need for laying ceramic tiles.
Grouting joints
Jointing is carried out when the lining is completed and the glued material has had time to dry for 24-72 hours. At this stage you will need a rubber spatula and a special grout mixture. You can buy it ready-made or make it yourself from sand and clay (3:1, respectively). The jointing mixture can be tinted with colors if you want to make the seam less noticeable or highlight it with even more contrast.
The plastic composition must be rubbed into the gaps between the tiles with a rubber spatula, carefully filling all cavities. Clean the surface with a sponge or damp cloth, being careful not to damage the seams. After the solution has set (after 1-2 hours), the tiles can be cleaned again using a grout film remover. This will make it shiny and completely clean.
Having completed the finishing of the Russian stove or Dutch oven, you need to wait 3-4 weeks until the solution dries completely. Only after this can the brick kilns be heated without allowing the walls to heat up too much. As soon as the tiled heater becomes warm, the fire should be extinguished and the heater should be allowed to cool completely. After this, the finishing material placed on the stove will be ready for use.
We take accurate measurements
Calculated measurements of the surface will help you lay the tiles taking into account the uniform width of the joints, without narrow side trims. Mark the cut lines on the tiles with a thin marker, and remove unevenness and burrs with an abrasive wheel. In order for the tiling to be smooth, you need to accurately draw the horizontal line of its first row, otherwise even minor deviations in the bottom row will create noticeable distortions above. Use a building level to control geometric lines. For the long side of the oven, you can use a cord beater or a laser level.
Let's start tiling
Finishing the walls of the stove with large-format tiles without seams makes it possible to create a beautiful and impressive design. But you should refrain from this decision, since when heated, the ceramic expands - the tiles can crack and even break off from the walls during the first fire. It is important to choose the right adhesive composition, which must have special heat resistance. To do this, choose a special dry ready-made construction mixture - regular tile adhesive is not suitable for this. The quality of the cladding will also depend on the correct cutting of the material. It is convenient to use a tile cutter or a regular roller glass cutter. To cut complex corner shapes, you can use a grinder with a diamond blade marked “for dry cutting.”
Start finishing from the corner of the masonry. If the tile set includes ready-made corner elements, then the formation of corners is simplified - possible irregularities will be neatly hidden. Place the finished elements at both corners of the structure, and then install row tiles, filling the space between them. If necessary, make even cuts based on the width of the seams. The use of suture crosses will help make the cladding neat and beautiful in the geometric precision of the lines. To grout joints, you can use a heat-resistant wide-joint mixture for ovens, which you can easily prepare by adding water immediately before starting work.
Preparing tiles for oven cladding
Preparatory work for finishing the stove with tiles consists of several main points:
- surface preparation for cladding;
- selection of tiles and necessary tools;
- choice of glue.
Work should begin by preparing the surface of the oven. For this you will need:
- metal brush;
- grinder with abrasive wheel;
- brush;
- building level;
- plumb line;
- water;
- cement;
- sand;
- container for mixing the solution;
- putty knife;
- metal mesh with cells 15 (cm) x 15 (cm);
- hammer, nails, washers for nails.
Table of characteristics of types of ceramic tiles.
The entire surface of the stove must be cleaned from dust, dirt, and old plaster with a stiff wire brush. Then, using a grinder with an abrasive wheel, you should make a shallow jointing of the masonry joints. If there is old paint on the stove, it must be completely removed with a wire brush.
The next stage of the preparatory work is plastering the entire surface of the stove, which is to be finished with tiles. To do this, you need to mix a special solution of sand and cement in a container in a ratio of 3 to 1 and mix it well.
For greater strength and reliability, the required surface is covered with a metal mesh, which is fastened with nails into the embroidered stove seams. Place washers on the nail heads. Then, using a brush, the surface is generously moistened with water, and the prepared solution is applied with a spatula. It is important to make the surface perfectly flat; for this, a building level and plumb line are used.
Heat-resistant ceramic tiles for finishing are selected and purchased in advance. The surface area on which the tiles will be laid is calculated, and the required number of tiles is calculated.
An important point in preparing for finishing the stove surface is the choice of hot melt adhesive. You can buy an adhesive mortar in a store, for example, “Plitonit-SuperKamin” or “Skanfixsuper”, or you can use a clay mortar or a home-made sand-cement mixture.
To line the furnace you will need the following materials and tools:
- ceramic tile;
- hot melt adhesive (or other adhesive, at your discretion);
- tile cutter;
- rubber hammer;
- plastic crosses;
- grouting solution;
- wet and dry cloth;
- wooden slats;
- building level;
- flat and notched spatula;
- rubber spatula.
We make a combined cladding option
If you decide to make a combined finish for the stove, such work will not take much extra time. After laying the tiles, you can begin finishing the plastered surface within a few hours. To do this, use heat-resistant putty for stoves and fireplaces. It is sold ready-made and can be applied with a flat spatula. A very thin layer of plaster is enough to make the surface perfectly smooth and ready for painting. In order not to stain the tiles, you can first cover all ceramic coatings with masking tape, and the painting itself must be carried out carefully, without touching adjacent surfaces. Stoves are usually painted with radiator enamel; it is quite suitable in terms of temperature indicators. You can add a color of a suitable shade to the white composition - this solution will harmoniously combine with the tiled covering of the stove.
Furnace cladding provides an opportunity to unleash your creativity and talents. Don't be afraid to do this type of work yourself. A little patience, diligence, attention to detail - and you can beautifully and efficiently cover the stove with ceramics, creating a unique element of the interior in a country house.
Do-it-yourself tiling of the stove: preparatory work
The working surface must be prepared before attaching the tiles, otherwise the ceramics will fall off after the first use of the stove. To do this, first of all, you need to clean the walls of old finishing and flaking parts. It will be easier to remove them if you first moisten the surface several times with a spray bottle. Wet layers will yield more easily to the tip of the spatula. Ideally, the old plaster should be completely removed. After this, you need to thoroughly moisten the wall and clean it of any remaining solution with a wire brush.
