From this article you will learn:
- What does subfloor on the ground mean?
- What are the advantages of a subfloor on the ground?
- What layers should the subfloor consist of?
- How to make a subfloor on the ground with your own hands
- What do professionals advise regarding subflooring on the ground?
Building a house in Moscow is a long and multi-stage process, including work of a completely different nature and complexity: laying a foundation, erecting walls, installing a roof, finishing and a host of other processes. The main stages of construction include rough finishing, in particular, pouring screed. Its essence is to create a base on which a finishing coating with finishing materials will subsequently be installed. Despite the fact that a subfloor on the ground is often within the power of a builder of any qualification, it has a number of nuances and requires different types of work. This article will talk about them.
What does subfloor on the ground mean?
We apply this method to any type of soil, regardless of the degree of proximity to groundwater. High-quality and reliable rough screed on the ground is provided with concrete grade M300 and higher. In particular, it is necessary to use a higher class of concrete for floors that are expected to bear a large load or if the soil properties are unsatisfactory. In this case, it is also necessary to install a reinforcing mesh.
All recommended parameters of the required materials are indicated in the design and estimate documents. If there are none, you need to make the appropriate calculations yourself, taking into account all the conditions for the further use of the floors.
Take the test
Reinforcement
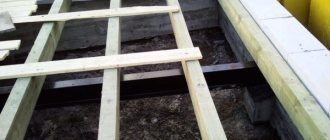
Reinforcement is an additional strengthening of the rough screed by laying a reinforcing mesh in it. This material, created from metal rods or plastic, can significantly strengthen the base and allow it to withstand maximum loads. The mesh is laid on top of the previously installed layers on small supports, so that when pouring the screed, it appears to be inside the cement-sand mixture, and not under it.
If the mesh has not been raised, it will not perform its functions of strengthening the base. The approximate height of raising the mesh level is about 2-3 cm. It is recommended to use a mesh with a cell size of no more than 10x10 cm. The smaller the cell size, the stronger the base will be, this is especially true for plastic mesh, which is also often used in construction.
Reinforcement and laying of damper tape around the perimeter of the floor
How to reinforce a floor screed
Fiber fiber for concrete screed - replaces metal mesh reinforcement
Advantages of a subfloor on the ground
Among the advantages of screeding on the ground are the following:
- Easy to do the job. If you follow all the rules and technologies, work on the ground screed will take several hours in total.
- High-strength and deformation-resistant material contributes to a long service life of the floor.
- The concrete subfloor on the ground has excellent thermal, sound, and waterproofing characteristics. A floor with such a base will not freeze even in the winter months, providing warmth and comfort to your home.
- An important point is the cost-effectiveness of the rough screed, both in terms of the cost of materials and the prices for construction services.
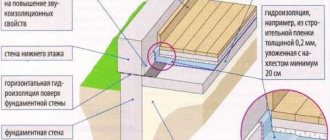
Layers of subfloor on the ground
In order for the subfloor to be poured on the ground to be of high quality, it is necessary to take into account all of the following layers:
- compacted base;
- a mixture of purified and sifted river sand with gravel;
- rough concrete screed;
- vapor barrier membrane or other insulating material;
- insulation made of polystyrene foam or other similar material;
- polyethylene film;
- reinforced concrete screed;
- floor covering, which, if necessary, can be laid on a special substrate.
This scheme is not the final version. The stages may vary depending on the characteristics of the soil, types of flooring and other nuances.
Do-it-yourself subfloor on the ground: step-by-step instructions
Step 1. Prepare the base.
First of all, the zero point is searched using a level (and correction for the relief and surface level). This will make it possible to objectively assess the volume of upcoming work with the soil. The ground surface is carefully compacted to reduce the risk of soil subsidence and cracking of the finished floor.
Next, a sand cushion is laid over the compacted base:
- the first layer should be 25% higher than necessary;
- the poured layer is moistened and compacted, due to which the thickness comes into accordance with the initial calculation;
- compaction is carried out using a vibrating machine or roller.
A layer of gravel or expanded clay is poured on top of the sand, which will make the sand layer denser and become a solid base for the next layers.
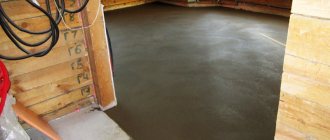
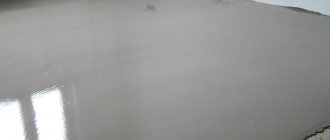
Step 2. We make the sub-floor concrete.
The first layer of the subfloor is thin concrete. It performs technical functions, being the basis for vapor and waterproofing. For the rough screed, lean concrete (class B 7.5-10) with crushed stone filler (fraction: 5-20 mm) is used. When using gravel backfill, the screed can be filled with concrete of class 50-75.
Pouring the first screed is not troublesome and does not require precise technology. The thickness of the rough layer should vary between 40-50 mm and not exceed 4 mm horizontally in accordance with the level.
Step 3. We waterproof the rough base.
To eliminate capillary suction of moisture from the soil, the floor should be waterproofed.
- The most suitable for waterproofing would be bitumen in rolls or a polymer membrane. Sometimes a gasket made from a single piece of thick plastic film is allowed. If the material is joined, it should be overlapped, followed by sealing the seams with construction tape. It is necessary to inspect the surface of the materials for damage to integrity or manufacturing defects.
- The insulating sheet is placed on the walls by approximately 15-20 cm. After laying the finishing screed, excess fragments of material are removed.
- Sometimes it is impossible to lay waterproofing before the rough screed. In this case, a concrete base is poured, onto which a coating waterproofing layer of bitumen or polymer is applied.
Step 4. Insulation of the subfloor along the ground.
The next stage is the installation of a vapor barrier layer. The most suitable material for this is a polymer-bitumen membrane, which is based on fiberglass or polyester. Despite the high quality and durability, the price of such material will pleasantly surprise you. A more expensive analogue of this material is a polyvinyl chloride membrane. However, in this case, a high price is by no means an indicator of durability. In practice, such material is susceptible to rotting and other damage.
Recommended articles on this topic:
- Arrangement of a small apartment
- Stages of renovation in an apartment
- Turnkey cosmetic repairs
A vapor barrier layer will help save a lot of money on space heating, because the level of heat loss when using it is reduced by 20%. Laying this layer is key to creating warmth and comfort in the home.
Insulation is carried out using materials such as:
- Extruded polystyrene foam is one of the best insulation options, protecting the floor from frequent deformations during compression and withstanding heavy loads.
- A type of expanded polystyrene is polystyrene foam class PSB50 and PSB35. The first option is intended for garages, warehouses or industrial premises, the second - for homes. To avoid damage to the foam with cement mortar, the foam sheets are sheathed on both sides with plastic film. Such insulation will be quite reliable.
- Another common insulation option is mineral wool. However, such material is able to quickly absorb moisture from the cement layer and screed. Therefore, as in the case of polystyrene foam, mineral wool must be insulated on both sides using plastic film.
Step 5. Reinforcement.
It is important not to confuse a rough floor screed on the ground with a foundation that is subject to loads from heaving forces. In this regard, single-layer reinforcement with welded mesh made of rods with a diameter of 3-5 mm will be sufficient.
It is important to take into account some nuances:
- The mesh should be laid as close as possible to the base of the structure (in the concrete tensile zone).
- The thickness of the protective layer should be from 1.5 to 2 cm, so the mesh is mounted on polymer or concrete pads placed on polystyrene foam.
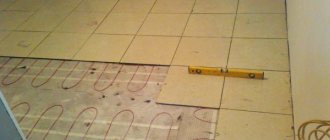
The perimeter of the structure must be protected with a similar layer. Most often, cards with cells from 10x10 to 15x15 cm are used. In this case, the overlap must affect at least one cell. The heated floor contour is placed on the mesh and secured with nylon clamps.
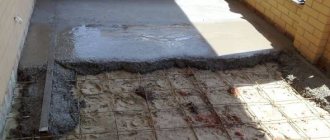
Step 6. Damper layer and filling.
The screed is separated from the walls, grillage, plinth and foundation by means of a damper layer. It is formed from edge-mounted polystyrene foam strips, which are placed along the perimeter of the enclosing structures. Another option is to stick a special tape on the walls, also around the entire perimeter. The height of such a damper must exceed the thickness of the subfloor along the ground. The excess parts will be cut off during the installation of the plinth.
It is worth noting that screeding the subfloor on the ground is done in one step to ensure the longest service life of the structure. For large areas (over 50 m2), expansion joints are created from a special profile.
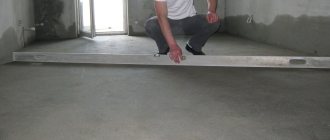
To make it easier to level the layers, plaster beacons are often used, which are attached to a quick-hardening solution of gypsum or starting putty.
Then a mixture is applied between the beacons, which is leveled by the rule. The beacons can be left embedded in the floor or removed after the mixture has set a little. The resulting gutters can be filled with concrete and leveled again. To prevent cracking, the surface must be periodically moistened during the first 3 days.
Waterproofing the rough base
In order to avoid soil moisture, it is necessary to carry out waterproofing work.
For waterproofing, it would be ideal to use bitumen roll material or a suitable polymer membrane. Sometimes it is allowed to use a sheet of thick polyethylene, which is laid in one piece without seams.
The material must be laid overlapping, and the joints must be glued with construction tape. At this stage, you should pay attention to ensure that the waterproofing layer does not show any signs of damage or deformation: surface defects, cuts.
Tip: install insulating material on walls up to 15-20 centimeters high. All excess material can be cut off after the finishing screed.
It also happens that it is not possible to lay waterproofing before the rough screed. In this case, a concrete base is poured and polymer or bitumen, a waterproofing coating material, is applied to its surface.
Professional answers to popular questions about finishing screed
To save money in general and ensure better operation in particular, some builders sometimes try to replace the recommended materials for rough floor screed on the ground with others.
- Is it advisable to replace crushed stone with expanded clay for adding screed?
Such an original solution can provide additional thermal insulation. However, professionals do not recommend using expanded clay for soil with close groundwater, which can lead to this material getting wet.
- Can crushed bricks or other construction waste be used instead of gravel?
The use of such materials is strictly not recommended. Brick is not a water-resistant material; it absorbs water and quickly collapses. Consequently, such a subfloor on the ground will lose its strength and integrity. In addition, waste and broken bricks have different fractions, so it will not be possible to compact them tightly.
- Is it possible to install waterproofing only under the rough screed and not use it in the future?
The answer is negative. Firstly, the polyethylene film is responsible for other functions: it prevents cement laitance from leaving the solution. Secondly, after some time, the waterproofing loses its tightness and breaks under the influence of uneven point loads on the floor.
- Is it possible to replace a rough screed by pouring the floor over the ground?
Pouring involves pouring a special layer of liquid solution onto the bedding under the rough screed. Its height depends both on the thickness of the backfill layers and on the intensity of compaction. If the backfill is very dense, the liquid solution will not be able to penetrate more than 4-6 cm. As a result, the load-bearing properties of the floor base will be reduced. Thus, the answer to this question must be given taking into account the possible loads on the floor surface.
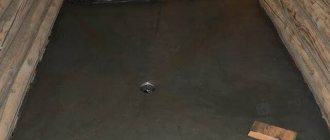
Subfloor on the ground for heated floors
The design of a heated floor on the ground will be optimal if the following steps are followed:
- Fertile soil is removed and debris and large stones are removed. The rest of the soil is carefully leveled and compacted with alignment to the level. This is the base for laying subsequent layers.
- Sand is poured (any kind can be used), followed by high-quality compaction and leveling.
- Next is a layer of crushed stone or expanded clay of a small or medium fraction, which should also be compacted carefully and for a long time until an almost monolithic surface is achieved. By the way, crushed stone has lower thermal conductivity, therefore it is more recommended for use.
- Pre-screed. You can use one of two options:
- A layer of crushed stone and sand is spilled with a liquid solution (sand and cement in a ratio of 2:1).
- A rough screed is poured under the heated floor on the ground. The recommended layer thickness is 5-7 cm. To achieve a stronger and more durable coating, you should install a reinforcing mesh of metal rods with a diameter of 3 mm, a cell of 10x10 cm. The design will allow the future floor to withstand heavy loads.
- After all layers and concrete have hardened, a waterproofing layer is laid. For dry soil, PET film is suitable.
- Laying polystyrene foam boards. To prevent the solution from flowing into the joints, they should be glued with tape.
- Metallized (not foil) waterproofing.
- The fastening system for heated floors and the heating elements themselves (cable, mat, tubes, etc.).
- Heated floor screed, which is best done with reinforcement.
Installation process
All work on arranging a rough screed begins with careful preparation of the soil base. To begin with, it is important to identify the highest and lowest points, taking into account the level of the soil and the evenness of its surface. A laser level will help determine their values. This procedure is necessary in order to evaluate for yourself the entire scope of work, as well as determine how much building materials may be required.
It is also important to pay attention to thoroughly compacting the soil. To do this, you can use special construction equipment - for example, a roller or vibrator. The procedure is necessary so that in the future the soil does not sag significantly and this does not lead to cracking of the rough screed, which will undoubtedly negatively affect the finishing floor covering.
Pneumatic rammer for soil compaction
After the soil has been thoroughly compacted, a sand and gravel cushion is laid. It can also be made of clean, washed and river sand. The thickness of this layer should not be more than 60 cm. In the latter case, a layer of gravel or expanded clay is also poured on top, which will make it possible to create a more durable base.
It is also recommended to fill the pillow not all at once, but in layers - for example, 20 cm each. In this case, each layer is well compacted separately. The procedure will make the base as dense as possible. Before compacting, the pillow is moistened with water. The thickness of the expanded clay layer can be at least 10 cm. This layer is also compacted separately.
Expanded clay backfill
electric vibrating rammer
When the concrete floor has been embedded into the pie along the ground, the process of laying the heating circuit can begin.
There are a number of rules:
- In order to prevent excessive heating of the coating, proper placement of pipes should be carried out throughout the entire area of the room. More dense installation is carried out around the perimeter, and in the center the contour should be thinner, and the distance from the walls of the room should be at least 15 centimeters;
- regardless of the installation scheme chosen, it is necessary to maintain an interval between adjacent pipes of 0.3 meters;
- if the pipe is located at the junction of the slab and the ceiling, it should be separated with a special metal sleeve;
- The length of the heating circuit should not be allowed to exceed 100 meters, since in such a system the main parameters of coolant circulation will be reduced (read: “How to make a heated floor with your own hands in a private house”).
We suggest you familiarize yourself with Soil for tomato seedlings: what is the best way to choose soil for growing good tomatoes, what kind of soil do seedlings need for picking?
Laying is done in two main ways:
- bifilar - in a spiral. In this case, uniform heating of the pipes is characteristic due to the alternation of supply and return sections. A low-power pump is used to supply liquid, and laying pipes is very simple by maintaining a 90-degree angle between adjacent sections;
- meander - zigzag. The coolant in such a system cools down as it passes through the circuit, and the surface heats up unevenly. Pipes can turn in the absolutely opposite direction along the way, which affects the complexity of installation. This method is more suitable for rooms with a linear slope, since the coolant will circulate faster and will not have time to cool down. The cabinet with the equipment is installed at the top point of the circuit. Also, this installation method allows you to heat the most spacious rooms.
How much does a subfloor on the ground cost?
The detailed cost of work on a subfloor on the ground is displayed in the price lists of various construction and repair organizations. They can be found on the websites of these companies. You can also find out the price and get additional advice by phone. In addition, many companies offer a free visit of a measuring consultant to your site in order to calculate the price as accurately as possible, taking into account all possible nuances and wishes.
Cooperating with is reliable and prestigious. The specialists working here are professionals of the highest level. operates throughout Moscow and the Moscow region.
Effective thermal insulation material
| Photo | Name | Rating | Price | |
| #1 | Extruded polystyrene foam | ⭐ 99 / 100 | More details | |
| #2 | Penolast | ⭐ 97 / 100 | More details | |
| #3 | Expanded clay | ⭐ 96 / 100 | More details | |
| #4 | Basalt wool | ⭐ 80 / 100 | More details |