Installing a monument at the burial site of a loved one is one way to show your respect after death. An open-air grave is subject to constant destructive environmental influences; backfilling with crushed stone and paving gives a temporary effect, quickly becoming unusable and overgrown with grass.
These types of coverings were replaced by more reliable and functional materials - ritual concrete slabs. The products are reinforced structures of a rectangular shape or with recesses for installing flower beds.
Site preparation
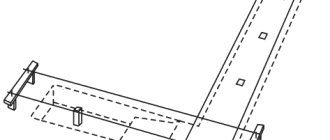
The construction of a foundation for a monument begins with clearing and preparing the site. If an old monument is erected, the location of the foundation and beams is determined. After clearing, marking is carried out. Using a crowbar, the edges of the burial are determined.
The length of the beams is calculated. A trench is dug under the ends of the beams and the frame is immersed. Reinforced concrete beams are laid taking into account that the cabinet and. Using a level will save a lot of time.
It is important at all stages to check the dimensions as often as possible.
Bottom line
To sum it up we can summarize. With limited financial resources typical for the newly opened production of concrete tombstones, it makes sense to use inexpensive forms made of PVC or ABC plastic. After the production “gets stronger and gets back on its feet,” preference should be given to fiberglass products that meet the following requirements:
- The steel frame of the fiberglass mold should be attached to it not with resin, but with steel bolts:
- The thickness of the mold wall should be at least 6-8 mm;
- The relief of the matrix must necessarily provide a place for attaching a standard metal-ceramic plate with information about the identity of the deceased.
Fiberglass forms that meet the listed requirements are more durable, and the monument made with their help is not destroyed under the influence of harmful atmospheric factors.
Installation of formwork
Formwork is installed on the frame. The formwork is mounted from wooden material or metal panels. Temporary spacers are made under the tree, and the inside is covered with roofing felt insulation.
Ready-made formwork panels have great strength. The panels are connected with bolts. The design is easy to use. The formwork can be quickly removed from the foundation. After metal formwork, a smooth and level area remains.
For professional builders, metal panels become an indispensable assistant. If you build the foundation yourself, wooden formwork will cost less. The material is selected to be reliable to maintain concrete pressure.
Figured tombstones made of granite and marble
Custom projects require more time and money than standard ones. But they are much better suited to express tribute to an extraordinary person. Our granite workshop produces monuments in Domodedovo using granite, marble and granite polymer. You can buy a monument in the form of a complex figure with original sculptural carvings:
- Military monuments usually have laconic forms, but they can be supplemented by the creation of sculptural compositions related to professional activities. These could be rockets, airplanes, parachutes. You can also use military insignia, coat of arms, and military branch emblems in the design.
- Monument trees have symbolic meaning. The willow is an image of sadness, the birch bark is an image of righteousness, the birch tree is an image of innocence, and the oak tree is a symbolic image of Christ.
- Double monuments symbolize the preservation of fidelity and love, which are not subject to time. The decoration uses sculptural silhouettes, candles, and angel wings. One of the most beautiful and expressive ways to convey the warm relationship between spouses is a heart monument.
- Monuments to children are traditionally made in the form of small angels: sculptures or individual elements on a stele. Compositions in the shape of a flower, a toy, or an open book will also help to express grief and love.
These are just some examples. Our website presents many samples of grave monuments with photographs and prices.
Foundation reinforcement
Reinforcement increases the strength of the monument's base. Auxiliary fasteners reliably maintain the stability of the ritual complex. The frame is knitted from special wire or welded.
To install the stand, cement and water are diluted to a pasty state. Laitance of cement is fed into the lower opening of the pipe. The reinforcement pin is coated with the same solution. The pin is dipped in dry cement and inserted into the prepared hole at the bottom of the cabinet.
The beams are immersed in a trench filled with mortar. The beams must be recessed into the concrete itself. Excess mortar must be removed and wait until the structure “sets.” Next, a pillow is formed, and a stand is installed on it with a pin into the ground.
A large rubber mallet is used to compact the material evenly, and at the same time the stand is leveled.
Important! There must be connecting holes between the stand and the monument. Cement mortar is first poured into them and metal reinforcement is inserted.
DIY foundation for a monument in a cemetery
Since the resulting material will be quite strong, it can only be processed with a diamond tool; in particular, in addition to the above-mentioned grinding, an effective method is cutting reinforced concrete with diamond wheels, as well as diamond drilling of holes in concrete.
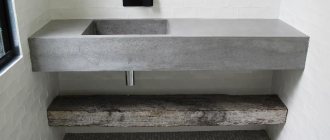
In the photo - artificial marble in the bathroom
Options for using artificial marble
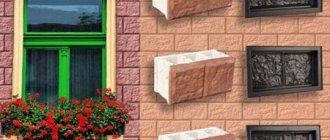
Most often, artificial marble is used to decorate outdoor fencing. However, such material can be an excellent alternative to ceramic tiles, for example, in the bathroom. Additionally, “concrete marble” can be used as countertops in the kitchen.
It can also be an excellent decoration for fireplaces, which are not only a source of home comfort, but also a sign of luxury. If the interior of the room is made in a classic style, then the material can be used as a floor covering.
In any case, wherever you use marble, its use will be a sign of good taste and luxury!
Pouring concrete
For installation of the cabinet, a sand-cement mortar of high rigidity is made. Humidity should be low. Sand should not be allowed to spill. A weak solution is not suitable for such work.
Cement laitance is applied completely over the entire area of the reinforcement. Concrete is poured into the trench so that the beam is supported and located in the concrete. The structure is sprinkled with dry soil on top. The distance between the gaps is two mm or less.
After pouring, the joints are grouted. Cement is mixed with water until it reaches the consistency of sour cream. First, the long part of the flower bed is carefully removed and a concrete solution is laid. The middle remains empty to drain water during rain.
A slight downward deviation is allowed so that rainwater does not collect near the monument. The seams are sprinkled with cement and deep cleaning is done. The remaining parts are also installed. The solution quickly sets and hardens.
To correctly place the monument without disturbing the structure, small planks are used on the stand. Check the alignment of the holes. After which the planks are removed. Having removed the last devices, the monument is carefully moved to release the free solution. A control check is made based on the level.
After sprinkling the seam, you must not:
- Move and loosen;
- Check the strength of the connection;
- Fill the flower bed with soil. This can be done in two weeks.
If no auxiliary work is expected, all that remains is to prime the visible solution near the monument.
How to make a concrete monument with your own hands
If it is impossible to purchase a concrete monument, you can make it yourself. The task is not difficult, anyone can make such a product. You will need:
- Forms for concrete monuments. Without a mold, nothing will come of it; the solution will have to be poured into it. The best option is plastic smooth layouts. After production, the stele does not have to be polished.
- Reinforcing elements. To ensure that the monument lasts a long time and does not fall apart into small pieces in the process, reinforcing elements are purchased. Use reinforcement with a diameter of 10 mm, a metal circle.
- Cement. They use a high-quality composition of the M500 brand. It is worth making sure that there are no additives in the mixture - there is a D0 mark on the bag. The higher quality the cement, the stronger the future product; it is better to purchase a more expensive option.
- Marble chips filler. A certain proportion is maintained, but marble chips are expensive. An option with a special dye for concrete is purchased.
- Plasticizer. An element that makes the mixture plastic allows for high-quality compaction. This makes it easier to remove air, which is important in the absence of a vibrating table.
Need expert advice?
Get expert advice online. Ask your question right now!
Ask a free question View all questions
Start making concrete mortar for the monument:
- Sand and cement are mixed. For the front layer, the composition is made in a 1:1 ratio. A plasticizer with a dye is dissolved in water, the dry base is diluted to the state of sour cream.
- Cement and sand are mixed on the inside in a ratio of 1:3, and thoroughly washed crushed stone is added.
The monument is given the necessary shape. Manufacturing stages:
- Layout processing. When pouring the solution, the concrete will not stick to it. There is a lubricant; silicone grease is used as a replacement.
- The initial, front layer is applied. The thickness should not exceed 2 cm. Make sure that the form is filled with solution. The front layer is important; the more carefully the work is done, the more ideal the monument will be.
- The structure is reinforced - reinforcement bars are laid on the initial layer. They protrude from below in order to later install the tombstone at the desired mounting location.
- After compacting the concrete, additional rods are installed and the outer layer is poured. It should be carefully leveled and then sanded.
- At the last stage, the form with the almost finished monument inside is transferred to a dry room, where the temperature should be maintained at 15-20 degrees. The products are removed from the mold after 2 days, the finished version dries for about a month.
Cladding works
There are many ways to cladding monuments: from modern to classic options. Granite tile cladding is strong, durable, looks beautiful, but is more expensive than paving slabs.
Dirt and dust are first removed from the concrete base. Fat is removed from the surface with special glue. Markings are made on the foundation. With a special circle, notches are applied where the glue will be poured. The tiles are laid according to the markings and pressed tightly. Within 24 hours the glue sets to the surface. Excess glue from the surface is removed with a solvent.
Recommends watching the video:
Instead of concrete slabs, you can put a special slab made of heavy-duty reinforced concrete on the grave. A minimum of time is spent on installation - maximum aesthetics and reliability. Conventional cladding is an old proven installation method without glue, without cement, without a monolith. All work is carried out using a hammer and loose clinching.
The memory of a loved one who has left us has material expression in the form of a tombstone. There are many specialized companies involved in their production and installation. And if the first part of the process is in principle impossible without special equipment, then the second is not particularly difficult. Installing monuments with your own hands can be done with a minimum of skills and without any special tools.
Before performing this procedure, you need to wait a period of time for the soil to shrink. In the middle zone it is at least one year. Granite monuments are installed on a concrete base, which is cast on site from a mixture prepared in advance. To work, we will need some building materials, tools and instruments for determining the level.
How to paint a tombstone
The best paint for concrete monuments is considered to be façade paint. If painting has to be done at temperatures below zero, it is worth using polymer compounds. Polymer paints have increased heat resistance, which allows them to be applied at any temperature.
Organosilicon paints are considered an acceptable option. When using these compositions, moisture evaporates without damaging the coating.
You can make a monument with your own hands from concrete, but you will need to comply with all the conditions. It is not enough to simply choose the type, design and decor; you need to study the production technique so that the monument acquires a beautiful appearance and durability.
The article has been verified by the site editors
Preparatory activities
The installation of monuments in the cemetery is carried out in agreement with the administration. When carrying out work, you must be extremely careful not to damage neighboring burial grounds. To install a tombstone, we will need 500, sifted and washed quarry sand, fine crushed stone or expanded clay and process water. The tools you will need are a shovel, a cord, pegs, a tape measure and a hammer.
Do-it-yourself installation of monuments begins with planning the site and digging trenches for the foundation beams. We use pegs and a cord to mark the position of the recesses, making sure to check the diagonals. Removable wooden formwork is installed along the perimeter, which is made from and connected using nails and spacers. The top edge should protrude above the ground and be strictly horizontal.
Installation of a monument in a cemetery: preliminary work
Before starting work on the construction of a monument in a cemetery, a special permit for the construction of a monument must be obtained.
It should be noted that installation of the monument can only begin in warm weather, no earlier than one year after the burial. During this period, the soil will be thoroughly compacted, reducing the risk of soil subsidence during work.
The next stage of work will be to study the soil in the cemetery (usually clay soils predominate in burial places, but sometimes others are found). A complete description of the soil will help you choose the most optimal foundation that can support the weight of a heavy tombstone.
When installing heavy structures on clay soils, it is best to choose a deep strip foundation; small monuments can be installed on a columnar base with a metal box.
If sandy soils predominate in the cemetery, it is enough to erect a strip foundation with a shallow recess for the monument. Such a base will support the weight of tombstones of any weight.
Pouring the base
Ideally, a concrete mixer is used to prepare the solution. If it is not available, this action can be performed manually in a suitable container or on a sheet of metal. Pour one part cement into three parts sand and six parts filler and start mixing everything with a shovel. Add water in small portions until the mixture has a consistency close to medium-thick sour cream.
Installing monuments with your own hands must be done carefully, especially when pouring the base. We move the finished solution using a shovel or bucket into the formwork prepared in advance. During the pouring process, we make a seal using any available means: cutting reinforcement or a metal rod. This action is necessary in order to avoid the formation of voids in the base.
Instructions for creating a monument with your own hands
Making a tombstone yourself is a complex, long process. Not everyone can take on all stages of the work; without a clear understanding of the process, it is better to abandon this idea.
Anyone who is seriously ready to make a stele with their own hands should:
- Develop a monument design.
- Determine the size of the composition.
- Select material.
- Purchase tools and equipment.
- Make a monument.
- Place the slab on the grave.
Often the reason for deciding to do the work yourself is a lack of funds to purchase. Savings when making a monument with your own hands can result in costs in the future: structures are destroyed faster than purchased ones. The reason is the wrong material and careless installation.
Choice of shape and material
It will not be possible to make a monument for a grave with your own hands from any raw materials. To process natural stone you need professional equipment. At home, you can make a stele from concrete, polymer, or stone chips. Another option is to install an untreated piece of granite or marble in the cemetery.
In the past, inexpensive monuments were made of galvanized iron, but metal headstones are now rare.
A do-it-yourself slab made of pure concrete, with the addition of marble or granite chips, is cheaper than a monument made of solid stone, but will last less and will quickly lose its appearance.
To create you will need:
- forms for concrete;
- filler or dye;
- fittings for the monument;
- cement;
- plasticizer;
- sand;
- water.
Forms for concrete are made of polystyrene, plastic, fiberglass. The latter are considered easy to use. They allow you to create smooth, clear surfaces that do not require polishing. They are easy to restore after damage - using a hacksaw, chips and cracks on the monument can be quickly removed. You can make a low tide mold with your own hands.
Need expert advice?
Get expert advice online. Ask your question right now!
Ask a free question View all questions
The container must have clear boundaries, even corners, a smooth surface without flaws, chips, or cracks. Any defect in the template will be reflected on the monument. The minimum wall thickness is 3 mm. Fiberglass does not require additional formwork.
Installation of a tombstone
Concrete is made at the feet of the grave, which, in fact, serves as the basis for the pedestal. Its surface must be strictly horizontal and have sufficient thickness. This will not only allow you to correctly install the monument in a vertical position, but also ensure its stability for many years.
Do-it-yourself installation of monuments is done using a cement-sand mixture with the introduction of steel reinforcing rods. Their number varies, but not less than three units. After completion of the work and hardening of the solution, the formwork is disassembled. Prepared and fertilized soil is poured into the flower garden. The installation of the tombstone is completed, and the memory of the deceased will remain for a long time.
It is believed that providing funeral services is a very profitable business. Its integral part is the production and installation of monuments and tombstones. Some of the most common materials for them are concrete and polymer concrete. To start production, you need simple equipment: a concrete mixer, a vibrating table and molds of different sizes for concrete monuments. But technology and sales have their own subtleties that an entrepreneur who decides to start this business needs to know.
- Where to start your own monument production business
- Necessary equipment for the production of concrete monuments
- Monument production technology
- How much can you earn on concrete monuments?
- How much money do you need to start a business?
- Which OKVED code must be indicated when opening a business for the production of monuments
- What documents are needed to open
- Which taxation system to choose for a monument manufacturing business?
- Do I need permission to open a business making monuments?
Stages of work
The main work should be preceded by preparation of the burial site in the form of cleaning.
After deciding on concreting the base and installing the monument, you need to determine the soil - clay or sand. The depth of pouring concrete and the type of blind area depend on this. Next, proceed to the step-by-step implementation of work:
- Preparing the area.
- Installation of formwork.
- Base reinforcement.
- Pouring the solution.
- Facing.
Preparing the area
The work stage includes:
- cleaning the area from debris, vegetation, removing roots;
- site planning;
- digging a foundation pit.
The base for concreting is located at least 0.2 m further from the grave pit, where the ground has not been dug up. Then the foundation will be durable and strong. The walls and bottom of the trench must be smooth and smooth. Gravel and sand are poured onto the bottom, then it is all compacted. Excavation work in the cemetery is carried out manually.
Installation of formwork
To complete the main stage of work, you need to tinker with arranging the formwork.
A critical stage of work that requires strictly vertical installation of the panels. As a rule, wooden boards are used. They are strengthened with pegs, slopes and spacers so that there is a minimum gap between them. When using substandard material, roofing felt is placed inside. The formwork is removed after 3-4 days, preferably after a week.
Base reinforcement
To increase the strength of the foundation and strengthen the concrete pour, it is necessary to lay reinforcement (on average 0.12-0.14 m). This will reliably connect the base around the perimeter, and the laid paving slabs will not creep at the seams, and the marble chips will not sink into the ground along the passages. If a monument is being installed (weighs approximately 300-400 kg), then the reinforcement must be of a larger cross-section with the additional installation of metal parts so that the monument is stable. The frame is tied using reinforcing wire or welding metal rods.
Pouring the solution
It is necessary to prepare the material and pour it in one go so that it turns out to be of the required quality.
For this purpose, it is recommended to use the M300 brand. Concrete must be poured immediately, so the solution is prepared on site. Take 1 part concrete to 3 parts sand, mix it and pour it into pre-prepared formwork. This must be done very quickly, trying not to leave voids in the body of the base. Then the surface is smoothed and covered from sunlight. To ensure even drying, it is better to moisten the top part first.
It is recommended to pour concrete at least a year after the funeral, during the warm and dry season.
Facing
The stage begins when the fill has dried completely. The foundation has become solid, finishing can begin. The slab cladding gives the tombstone a beautiful and neat appearance. This applies to both the concrete base itself and the blind area. Plates are used:
You can cover the burial site with tiles.
- made of natural stone (granite, marble);
- granite or marble chips;
- ceramic tiles for external use;
- paving slabs.
Cladding work should be carried out in dry times, so it is not recommended to plan this stage for the winter. The air temperature should reach at least +5 degrees. Concreting graves can be done with your own hands, but it is better to entrust this to specialists. They will study the soil, select high-quality material, coordinate with the administration, obtain permission and completely complete all the work.
Necessary equipment for the production of concrete monuments
The main thing you will need to purchase is equipment. The key element of the entire production line is the forming vibrating table. It is designed for compacting the working mixture and molding products. Forms for the production of concrete monuments are placed on a table and liquid material is poured into them. The tabletop makes movements, as a result of which the contents of the form are compacted. This method allows you to obtain a strong and durable product. This is the only machine that cannot be replaced by manual labor. The remaining devices are purchased for the mechanization of manual labor and production efficiency. You can buy it from 50 thousand rubles.
A vibrating sieve must be present on the site. Sometimes cement is of poor quality. It may contain foreign objects, large hardened pieces, paper, polyethylene, etc. It is unacceptable for all this to get into the working mixture. Foreign inclusions can significantly spoil the appearance of concrete products and affect their uniformity. As a result, the monument may not be suitable for sale at all or may crack during installation or operation.
Any of these events will result in losses. Manual sieving of cement will significantly slow down the technological process, and sooner or later it will become economically unprofitable. The cost of this equipment is from 10 thousand rubles.
A concrete mixer or concrete mixer allows you to make the concrete solution homogeneous and also significantly reduces production time. The optimal model will be with a capacity of 130-165 liters, and its cost is in the range of 11.5-16 thousand rubles.
CONCRETE MONUMENT – Discount up to 20%
Concrete headstones are a type of inexpensive memorial product for marking a burial site.
Concrete is an artificial stone obtained by hardening a special solution. The Dymovsky granite workshop uses only proven and high-quality components to prepare the mixture, so that the concrete monument turns out to be strong, reliable and can stand on the grave for quite a long time.
The main components of the solution are cement, water and aggregates of different fractions (sand, crushed stone, crumbs). We use plasticizer and dyes as additional components. The plasticizer makes concrete monuments resistant to environmental influences, and dyes make it possible to give tombstones absolutely any color.
Since concrete is a composite material, products made from it require constant care, otherwise the monument may begin to deteriorate ahead of schedule. With proper care, the headstone will remain on the grave for several decades. In addition, the production of concrete monuments is a fully automated process, so their cost is low and they are in good demand.
Monuments for the grave
Features of tombstones
Concrete tombstones do not have such a wide range of models as granite or marble. This is due to the fact that in the production of such monuments special shaped containers are used, in which the tombstone freezes and takes shape. Basically, these are steles in the form of a rectangle, trapezoid or cross with slight curves along the edges and various bas-reliefs.
The advantages that ritual monuments made of concrete have are the light weight of the structure, which will not allow the tombstone to sag on the grave, a fully automated production process, and the ability to choose the color of the product. One of the disadvantages of such monuments is that they cannot be engraved and restored.
As a decoration, gilding is applied to concrete tombstones, which is used to decorate individual elements of the bas-relief - domes, foliage, crosses and others. The portrait of the deceased, as a rule, is made on a ceramic oval, the full name and years of life are on a metal plate.
Product categories
Manufacturing and ordering
The Dymovsky granite workshop has its own production facility, where it produces concrete monuments. We use the latest modern equipment to make high-quality tombstones. During the creation process, the monument is strengthened with a reinforced frame.
You can buy a concrete monument directly at the workshop office, through a website on the Internet or by phone. We have favorable prices for all models of tombstones, which, thanks to various one-time and seasonal promotions, become even more accessible. In addition to the monument, you can also purchase other memorial products - a table, a bench, a fence, a vase.
We will help deliver the finished product and install it on the grave in all cemeteries in the capital and region without exception. In addition to installation, we provide other services that you can also order - replacement and repair of monuments, grave cleaning, garbage removal, restoration of inscriptions and engravings, and others.
A specialist will visit you for consultation and ordering!
The service is provided absolutely FREE - within the Moscow Ring Road + 3 km. The specialist travels to any place convenient for YOU: home, work or a cemetery.
dymovskiy.ru
Monument production technology
The largest portion of the initial investment is always spent on purchasing templates for concrete monuments. One or two are not enough here; at least ten of them are purchased. This quantity is optimal for creating a sufficient range of products, but this is also at the first stage. In the process of work, you will need to observe new trends in the design of monuments and purchase new models. The cost of one form is from 10 to 20 thousand rubles. They are usually made from:
- Polystyrene;
- Fiberglass.
The wall thickness usually does not exceed 2-3 mm, and the strength resource allows 300 pours per day. Modern forms for concrete monuments are lightweight and easy to transport and store. Fiberglass products can be easily restored if damaged. Any scratch or cut can be cleaned with fine sandpaper. They do not require additional formwork and retain their shape well.
The advantages that the correct selection of shape gives to the product:
- Obtaining glossy, smooth concrete surfaces that are resistant to moisture, temperature changes and other natural phenomena.
- Possibility of imitation of natural stone.
- The metal frame structure increases the service life of plastic molds. They can be used for many years.
- The working surface retains its original appearance and properties. It does not require cleaning, washing or additional processing.
- For lubrication before filling, you can use a mixture of regular diesel fuel and oil and do not purchase expensive factory mixtures.
- After removal from the mold, the product does not require additional drying, sanding, painting or adjustment.
- You can coat the monument with a special varnish for stone.
- After three days, the product is completely ready for sale and installation.
An important point when choosing a form for concrete monuments is the presence in it of space for metal-ceramic plaques of standard shapes. If these elements are not made to standard sizes, further sales of the product may be difficult.
The concrete mixture is usually prepared at the rate of 1 part cement and 3 parts filler. To better combine concrete particles, plasticizers are added to the mixture. It is possible to paint the product in different colors: burgundy, black, brown and even white. Iron oxides are used as pigments. Today there are methods that allow you to use several colors to imitate natural stone. Unusual solutions make products competitive.
Why is it important to choose the right forms for the production of concrete monuments?
If entrepreneurs can choose the right molds for making concrete monuments, they will reap the following benefits:
- the finished product will acquire a perfectly even and smooth shape (even minor defects will be absent on the surface), requiring neither grinding nor adjustment;
- each monument will undergo a drying process while in the mold;
- after removal from the mold, the product will be ready for sale and subsequent installation within three days;
- the forms can be used for many years provided they are handled with care and stored correctly;
- Before pouring the solution, the molds can be lubricated with a mixture of oil and diesel fuel, thanks to which entrepreneurs can save on expensive products, etc.
Which taxation system to choose for a monument manufacturing business?
The best option when choosing a taxation system is the Simplified Taxation System (STS), which involves paying 6 percent of revenue, or 15 percent of profit (the balance between income received and costs incurred), the interest rate is chosen by the entrepreneur himself. As an option, you can indicate when filling out an application for UTII (single tax). In this case, the individual entrepreneur will pay a fixed amount to the budget, which will be determined for him. It does not depend on the volume of business, but it is not applicable to a specific business in all regions of the country.
Do I need permission to open a business making monuments?
This type of activity is not subject to licensing and does not require special permits or permits.
Workflow stages
Preparation of the solution
Shaping the product
| 1st stage | The mold for concrete monuments is processed so that the solution does not stick to it and the surface is perfectly smooth. It is best to use a special compound or silicone grease for this, which is sold in car dealerships. The instructions on the package will tell you how to use the composition. |
| 2nd stage | The first layer 1-2 centimeters thick is applied, and the solution must be thoroughly compacted so that it fills all fragments of the mold. The appearance of the monument depends on this, so the work should be carried out very carefully. |
| 3rd stage | Several bars of reinforcement are placed on the first layer to reinforce the structure, and one should not forget that the lower ends must protrude for further fastening; it is better to do this right away, since both diamond drilling of holes in concrete and cutting reinforced concrete with diamond wheels are labor-intensive activities , and it is better to avoid them. |
| 4th stage | After compacting the concrete, a few more reinforcement bars are placed and the outer layer is laid, which should be carefully leveled with a trowel. It will most likely need to be sanded, so the better the alignment is done, the less work there will be in the future. |
| The final stage | And finally, the filled form must be left in a dry room at a temperature of 15-20 degrees; the product can be removed after two days and left for 4 weeks, constantly moistening the surface for maximum strength gain. |
Conclusion
masterabetona.ru
Workflow stages
As you know, concrete grave monuments are subject to many unfavorable factors, so the technological process must be followed very scrupulously. Let's consider its main features (read also the article “Caring for concrete - how to make the material as durable as possible”).
Preparation of the solution
The mixture is prepared as follows:
- If the work will be carried out manually, then a large, convenient container is needed, but it is better to use a concrete mixer, this way you can ensure a higher quality of the mixture.
A concrete mixer makes the job much easier
- First, sand and cement should be mixed, most often the ratio of components is 1:1 for the front layer, after which the plasticizer and dye are diluted in water, so the additives are guaranteed to be distributed throughout the entire volume of the solution, so much water is added so that the composition has the consistency of thick sour cream.
- For the interior, the solution is prepared in a 1:3 ratio of cement to sand; in addition, you will need well-washed crushed stone, the amount of which is determined experimentally during the preparation of the mixture.
Advice! The amount of solution depends on the dimensions of the product; it is worth remembering that the thickness of the top layer should be at least 1 centimeter, the rest is internal filler with crushed stone.
Shaping the product
This process can be divided into several stages:
| 1st stage | The mold for concrete monuments is processed so that the solution does not stick to it and the surface is perfectly smooth. It is best to use a special compound or silicone grease for this, which is sold in car dealerships. The instructions on the package will tell you how to use the composition. |
| 2nd stage | The first layer 1-2 centimeters thick is applied, and the solution must be thoroughly compacted so that it fills all fragments of the mold. The appearance of the monument depends on this, so the work should be carried out very carefully. |
| 3rd stage | Several bars of reinforcement are placed on the first layer to reinforce the structure, and one should not forget that the lower ends must protrude for further fastening; it is better to do this right away, since both diamond drilling of holes in concrete and cutting reinforced concrete with diamond wheels are labor-intensive activities , and it is better to avoid them. |
| 4th stage | After compacting the concrete, a few more reinforcement bars are placed and the outer layer is laid, which should be carefully leveled with a trowel. It will most likely need to be sanded, so the better the alignment is done, the less work there will be in the future. |
| The final stage | And finally, the filled form must be left in a dry room at a temperature of 15-20 degrees; the product can be removed after two days and left for 4 weeks, constantly moistening the surface for maximum strength gain. |
Silicone grease is convenient to use - it is sold in spray form
Concrete monuments made in this way will serve for decades, on par with their artificial marble counterparts.
Monuments made of concrete - features of self-production
As you know, there are a lot of options for monuments on the market. For this, a variety of materials are used, from very simple and common to rare and even outlandish. And if it is almost impossible to process granite without special equipment and stone-cutting skills, then almost anyone can make monuments from concrete, the main thing is to know the features of the technology and carry out all of them, since strength and durability are very, very important.
In the photo: the forms for making concrete monuments are varied, it is important to choose the option that suits you best
Features of the preparatory stage
At this stage, you should prepare everything you will need for work.
Let's consider what should be on hand so as not to be distracted during the manufacturing process:
- First you need to find forms for concrete; for monuments, modern plastic options are best suited. Its smooth surface will provide excellent appearance without polishing. You can purchase only a mold for the slab, and make the base yourself, or cast it in a special design, it all depends on personal preferences and capabilities.
There are many different forms on the market for making monuments with your own hands.
- To increase the strength and durability of the structure, reinforcing elements are also needed, which are most often used as reinforcement 10-12 millimeters thick or a metal circle. The size of the elements depends on the configuration and mass of the monument and is calculated individually in each individual case.
- You also need high-quality cement; it is best to purchase the M500 brand without additives (the bag should be marked D0). The strength of the resulting product directly depends on cement, so you should never skimp on it.
The presence of GOST standards on the packaging is an additional evidence of product quality
- You can use marble chips as a filler, then you need to purchase this material in the required quantity. It is worth considering that the price of high-quality crumbs is quite high, so many people use a variant with a special dye for concrete; it is added either to the entire solution or to the part of it that will be used for the outer layer.
- Another important component is a plasticizer, with its help the mixture becomes plastic and air is removed from it much better, which is especially important if you do not have a vibrating table and compaction will be carried out manually.
The plasticizer allows air to freely escape from the solution
Important! Don’t forget that the purer the sand, the stronger the artificial stone. It is best to rinse it, this is very simple: pour it into a container, add water and stir, the sand will settle. And particles of clay and other impurities will remain on top, the dirty water is drained, and the procedure is repeated 2-3 more times.
Workflow stages
As you know, concrete grave monuments are subject to many unfavorable factors, so the technological process must be followed very scrupulously. Let's look at its main features (
Features of the preparatory stage
At this stage, you should prepare everything you will need for work.
Let's consider what should be on hand so as not to be distracted during the manufacturing process:
- First you need to find forms for concrete - modern plastic options are best suited for monuments . Its smooth surface will provide excellent appearance without polishing. You can purchase only a mold for the slab, and make the base yourself, or cast it in a special design, it all depends on personal preferences and capabilities.
There are many different forms on the market for making monuments with your own hands.
- To increase the strength and durability of the structure, reinforcing elements are also needed, which are most often used reinforcement 10-12 millimeters thick or a metal circle . The size of the elements depends on the configuration and mass of the monument and is calculated individually in each individual case.
- High-quality cement is also needed; it is best to purchase the M500 brand without additives (the bag should be marked D0) . The strength of the resulting product directly depends on cement, so you should never skimp on it.
The presence of GOST standards on the packaging is an additional evidence of product quality
- You can use marble chips as a filler, then you need to purchase this material in the required quantity. It is worth considering that the price of high-quality crumbs is quite high, so many people use a variant with a special dye for concrete; it is added either to the entire solution or to the part of it that will be used for the outer layer.
- Another important component is a plasticizer, with its help the mixture becomes plastic and air is removed from it much better, which is especially important if you do not have a vibrating table and compaction will be carried out manually.
The plasticizer allows air to freely escape from the solution
Important! Don’t forget that the purer the sand, the stronger the artificial stone. It is best to rinse it, this is very simple: pour it into a container, add water and stir, the sand will settle. And particles of clay and other impurities will remain on top, the dirty water is drained, and the procedure is repeated 2-3 more times.
Making tombstones
Providing funeral services - not only organizing funerals, but also installing monuments. Funeral companies most often buy, rather than produce, monuments and tombstones. The production of monuments and tombstones can become quite a profitable business if you study the level of competition in a particular region in advance and choose a production that potential competitors do not engage in. For example, if there is a company in the city that produces stone monuments, then it would be advisable to open a concrete production facility.
Types of monuments
The monument can be:
- standard - a rectangular gravestone and monument, on the monument there is a photograph, full name and dates of birth and death;
- in the form of a cross - a rectangular tombstone and a stone or concrete cross with or without a photograph;
- in the form of a sculpture made according to an individual sketch;
- memorial (complex) - a composition of several elements (except for the monument and tombstone - benches, table, fence).
Monuments in the cemetery are produced by:
- made of metal (most often galvanized steel) - production is simple and low-cost, but low-profit, therefore it is most often organized as an additional one in enterprises that produce other products made of tin or steel (buckets, gutters, profiles);
- made of stone (from granite, marble or other rocks) - expensive equipment is required, raw materials must be brought from remote regions of Russia (Leningrad region or Karelia) or Ukraine, Kazakhstan, so it makes sense to open such a production only in a very large city (for example, a regional center), where there are many residents with high incomes. In addition, it is most often not possible to organize additional production (commemorative plaques, bas-reliefs or other decorative elements);
- made of artificial stone - cast from natural stone granules and polyester resin, most often these are products from polymer granite or marble chips. These materials are much lighter than stone, and the production time is shorter, since the artificial material is easier to grind and polish. In appearance, the finished product is practically no different from natural stone;
- made of concrete or polymer concrete - production is not complicated, the quality is quite high, the prices are affordable, you can add elements from stone, you can make not only a tombstone, but also a sculpture, a crypt, a sarcophagus, the technology for making monuments from concrete is no different from the production of any other concrete product.
Business plan for making monuments
Opening a business consists of several stages:
- enterprise registration;
- organization of order points;
- mastering technology;
- organization of production;
- mastering the technology of installing monuments and gravestones.
The production of monuments is classified as household services, okved 26.70.2 (cutting, processing and finishing of stone for monuments) or 26.66 (production of concrete, gypsum and cement products). Type of taxation – UTII.
It is best to open a point(s) for accepting orders in a crowded place or in a cemetery. If the point is located in a cemetery, then some simple products can be produced there. Any reception center should have office furniture, office equipment, and catalogs. A sign and a plate showing the work schedule are required.
Production space (70-200 m2) can be rented at a factory or garage (it all depends on the planned production volumes). There should be enough space both for installing equipment and for storing materials (stone, granite or marble chips, cement, fittings). Download - a sample business plan for opening a funeral agency in Moscow.
The process of making concrete monuments
In order to make a high-quality monument in a cemetery, strict adherence to technology is necessary . In this case, the ritual item will stand for a long time without damaging its appearance. And, importantly, such a monument will look very presentable.
When producing concrete monuments, it is important to strictly follow production technology and use the highest quality materials
Preparation stage
At this stage, it is necessary to prepare everything that will later be needed during the work process. To make and install a monument, not much is required, but everything should be “at hand.” To make a monument you will need:
- Shapes of various types and sizes . Modern forms made of plastic are suitable for ritual products. The advantage of such forms is that their smooth surface provides an ideal surface for the product and you can do without additional polishing.
- To increase the strength and durability of the product, reinforcement elements are needed. As a rule, a steel rod (10-12 mm thick) or a metal circle is used as reinforcement for a monument. The dimensions of these elements will depend on the shape and weight of the product and are calculated individually for each monument.
- The key consumable material in the production of concrete monuments is, of course, cement. You should not skimp on its quality, because the quality of the final result directly depends on it, i.e. finished monument. Therefore, it is better to prefer M500 cement marked D0, which does not contain impurities.
- To give “gray” cement a noble appearance, filler is added to the mixture at the production stage. It could be marble chips. Although you can do without it, since the cost of the crumbs is quite high, which increases the cost of production, and therefore the price of the finished product. And the use of a special dye for concrete allows you to achieve the ideal look of a ritual product without a significant increase in cost. Therefore, here the choice remains with the manufacturer, who is guided by his own desires and financial capabilities.
- A plasticizer is a component that will simplify the work. This component makes the concrete mixture more plastic, air is better removed from it, and this is extremely important, especially if a vibrating table is not used in the work, and compaction is done manually.
Note! To obtain concrete, sand is needed and the purer this component is, the higher the quality of the finished monument will be. Therefore, it is advisable to wash the sand several times before adding it to the cement.
Preparation of the solution
To produce a monument, a certain volume of working mixture will be required . The mixture is prepared in the sequence given below.
If during the work you do not use a mixer to prepare the mixture, then you will need a large and convenient container in which it will be diluted. But, in fairness, it must be said that a better solution is obtained in a mixer .
Having prepared the container, you need to mix cement and sand in a 1:1 ratio . Separately, you need to dilute the coloring component and plasticizer in water (so they will be evenly distributed throughout the entire mass of the solution). Then, adding water to obtain a working solution, everything is thoroughly mixed. You need to take enough water so that the mixture has the consistency of thick sour cream.
The solution for making the inner part is prepared separately . Here the proportion of sand to cement is 3:1. In addition, clean crushed stone is added to the mixture. The required amount of crushed stone is determined experimentally during mixing.
Note! The volume of the mixture will depend on the size of the monument. We should not forget that the top layer must have a thickness of at least 10mm - filler with crushed stone will be poured inside the monument.
Product molding
This stage also includes several steps.
The stage of forming the finished product consists of several steps
Step 1. It is necessary to carefully process the form that will be used in the work. The working mixture should not stick to it, and its surface should be perfectly smooth. To do this, use a special composition or silicone grease from a car store. The lubricant is applied in accordance with the instructions.
Step 2. The 1st layer is poured. Its thickness is 1-2 cm. Here you need to compact the working mixture well so that all parts of the mold are filled with it. The work should be carried out carefully, since this will be the outside of the product.
Step 3. Reinforcement is laid on the outer layer to strengthen the structure. A few rods are enough and, most importantly, do not forget to leave the lower ones for the subsequent installation of the monument. Then the “internal” solution with crushed stone is poured.
Step 4. Having compacted the concrete, lay a few more reinforcement bars and fill in the top layer with plasticizer. It must be perfectly leveled using a trowel. Most likely, the top of the product will have to be sanded, and therefore the better the leveling is done, the less work you will do later.
Step 5. At the final stage, the form filled with concrete is left in a dry room (t – 15-20 C). After 48 hours, the monument is removed from the mold and left for a month to completely harden. During this time, it will require constant moistening to ensure that the product becomes as durable as possible.
For reference : If the production technology is strictly followed, and high-quality components are used in the work, then such a monument will last for decades, being slightly inferior in strength to monuments made of artificial stone.