Material selection
You can make your own sink from various materials. These include wood, acrylic, stone and concrete. But concrete products remain easy to make. This material is cheap and easy to manage.
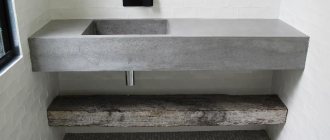
Concrete sink
Getting a sink that matches the design is not so easy. After all the work, the concrete sink will not be inferior in appearance and functionality to a marble sculpture.
Features of external decoration
A hole is made in the resulting form for drainage and external finishing is performed. This could be grinding, which will reveal the texture of the stone, or tiling with mosaic tiles. Both options are good in their own way, so it all depends solely on the preferences of the owner.
A concrete sink is an excellent piece of furniture. It can become the center of an interesting composition of a unique bathroom or a kitchen decorated in a rustic style. The main thing is that you can make a fairly high-quality product of any shape with your own hands without much difficulty, you just have to follow the instructions.
A concrete sink can hardly be considered an economical solution for installation in an apartment or private house, given the wide variety of different options on the market. The main advantage of this version of the sink is the ability to create a design of almost any shape, which can be realized using the means available in a particular case.
Required tools and materials
It is important to use high-quality materials in your work. In this case, attention is paid to the concrete solution. It is advisable to choose a solution with high performance. In addition, a mold for filling is required, but you can make the mold yourself.
To make a sink with your own hands from concrete, you need the following tools to organize the formwork:
- Plastic dowels and screws 8 mm – 30-35 pieces;
- Fiberboard sheet, small trimmings are also suitable;
- A sheet of stainless material, for example tin;
- Sealant, it is better to purchase a plumbing sealant;
- Reinforcement per 100 mm – 8 rods;
- Plastic pipes for part of the drain and under the mixer;
- Polyethylene film;
- Hangers and corners of various shapes;
- Bricks or blocks that will support the weight of the formwork.
In this case, the option of not simply manufacturing the product is considered. It is much easier to make a concrete sink by pouring it with parallel fastening in place.
Before starting work, purchase the required materials. The manufacturing process requires full attention, and being distracted by searching for a screw or other tool can negatively affect the final result of the work.
To prepare a concrete mixture you will need the following materials:
- Sand, pre-sifted, washed, dried. Sand size no more than 2 mm;
- High quality cement;
- The water is warm, without impurities, it is better to take filtered or bottled water;
- For cladding you will need granite or marble chips;
- Fiber fiber, if available, it is advisable to add to eliminate cracking of concrete;
- Plasticizer of any brand, additive for waterproofing.
It is advisable to use concrete grade M400 and higher.
For cladding I use the following materials:
- Tile mosaic tiles;
- Grout on seams with a waterproof effect;
- Mold resistant tile adhesive.
To make a sink with your own hands from scrap materials you will need the following tools:
- Jigsaw, electric circular saw;
- Vibrator for concrete;
- Screwdriver;
- Hammer drill with drills for concrete 8-10 mm;
- Hammer;
- Welding machine;
- Scissors capable of cutting metal;
- Grinder with a diamond-coated disc;
- Level and tape measure to control measurements;
- Mixer for mixing concrete;
- Construction pencil for markings;
- Rule;
- Pipe gun;
- Metal lighthouse;
- Container for stirring the solution;
- Plastic tile crosses;
- Rubber spatula;
- A comb to apply the glue evenly.
Making a washbasin from concrete with subsequent cladding
The most important thing in such a labor-intensive process is the high-quality shape of the future washbasin and, of course, the preparation of a special concrete solution that will have improved performance characteristics. Let's consider the option of not just making it, but pouring it while simultaneously attaching the sink to the wall.
What is required during the manufacturing process
In order not to be distracted and not to slow down the production process, it is best to prepare everything you need in advance. Such an omission may affect the quality of the future product.
Required materials for formwork:
- plastic dowels + screws measuring 8 mm – 30 pcs;
- OSB or fiberboard sheet. If there are scraps of various sizes of such goodness in the bins, then there is no need to purchase whole sheets;
- stainless steel sheet;
- sealant. You can use any, but preferably plumbing;
- fittings with a diameter of 10 mm - 8 rods;
- parts of plastic pipes for drainage and for making holes for the mixer. If you wish, you can purchase a set for equipping the overflow system in the sink;
- polyethylene film;
- any furniture corners and U-shaped hangings;
- bricks or other strong objects that will provide reliable support for the poured concrete formwork.
Necessary components for concrete mixture:
- sifted, washed and dried river sand, with a particle size of 1-2 mm;
- Portland cement grade not lower than M400D0;
- warm water without chemical impurities;
- if finishing cladding is expected, then granite screenings are used as a filler; if this is not expected, then marble chips are used;
- to improve the characteristics of a concrete product, fiber fiber is often added to its composition, which protects the concrete from cracking;
- any plasticizer and water-repellent additive you like.
The recommended grade of concrete is not lower than M400.
| Concrete grade | Approximate consumption of materials per 1 m3 of concrete | Recommended W/C that should not be exceeded | Material consumption in relative units | |||
| Cement M400, kg | Sand, kg | Elimination, kg | Water, l | |||
| M400 | 492 | 661 | 1000 | 187 | 0,38 | 1 : 2,03 : 2,03 : 0,38 |
Materials for cladding:
- mosaic tiles;
- waterproof grout for joints;
- tile adhesive is resistant to fungal formation.
Required tools:
- electric jigsaw or circular saw;
- screwdriver;
- concrete vibrator;
- hammer drill complete with concrete drills measuring 8 and 10 mm;
- hammer;
- welding;
- grinder with diamond blade;
- metal scissors;
- measuring devices: level and tape measure;
- kneading mixer;
- rule;
- pencil for marking;
- pipe gun;
- metal beacons;
- basin for preparing the solution. You can use an old bathtub;
- crosses for tiles;
- rubber spatula;
- comb for applying glue.
Formwork assembly and fastening
Before you start making the mold itself, clearly plan not only the location of the future sink, but also take into account possible changes during subsequent repairs - finishing the walls, floor screed, etc.
What exact shape the future concrete sink will have is entirely your choice. You can make formwork anywhere, the main thing is that it turns out smooth and of high quality. If smooth curved sections are planned in its geometry, it is better to use a metal sheet for their execution. The body of the washbasin itself is also best made of tin. After assembling all the elements, carefully seal all seams and joints.
When the formwork is ready, you can begin to secure it in the wall. It is necessary that the wall be a reliable concrete or brick structure. It is best if the sink is mounted in a corner opening. If you decide to make an outdoor washbasin, then you need to make a stand for it in advance from bricks or high-quality concrete blocks.
Stage 1. Through holes are drilled in the wall for the reinforcement structure. It is important that it is in the middle of the mold being poured. The frame itself is fastened with knitting wire or by welding. The first method is preferable.
Stage 2. The finished formwork is attached to the wall with screws and corners.
Stage 3. On the back side of the wall, metal plates are welded to the reinforcing bars.
Stage 4. Under the formwork you need to build a solid foundation of bricks or blocks. It is better if it looks like a continuous stand covering the entire area of the form.
Stage 5. Thoroughly clean the formwork from dirt and check for the last time that the structure is even.
Preparation of concrete
It is best to mix the solution with a construction mixer in a prepared container, and not in a concrete mixer. This approach will maximize the mixing of components.
Stage 1. Initially, add all the cement and an eighth of water with additives. It is necessary to stir until a homogeneous mass is obtained. It is best to first dissolve the plasticizer and fiber in water.
Stage 2. Afterwards, the entire part of the sand is added to the composition and mixed, then screenings or granite chips are added.
Step 3: After mixing thoroughly, add remaining water if necessary.
Important! Do not try to make concrete more plastic - this reduces its strength characteristics. The tougher the mixture, the better the quality of the product.
Driving and removing formwork
It is best to start pouring the form from the most inaccessible and complex places, gently vibrating the concrete until cement laitance is obtained - no more than 2 minutes. After completely filling the mold, smooth the surface of the sink thoroughly and cover it with film. After 2 - 3 days you can carefully remove the formwork. It is better to postpone the installation of the tap and siphon for a month, when the concrete product has completely dried.
Finishing of the product
After you remove the form, you will see a finished concrete product that needs to be brought to perfection. This can be done in two ways:
- grinding;
- tiling.
If you decide to simply sand the surface, then before doing this you need to cover all the roughness and cracks with cement paste. It is prepared very simply - cement is mixed with water. When the shaded surfaces have dried, you can thoroughly sand them with a diamond disc. If necessary, do this procedure several times.
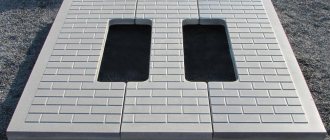
When tiling with mosaics, there is no need to repair minor imperfections. And the algorithm for laying tiles is similar to laying ordinary tiles. Do not skimp on grout and glue, because the surface of the sink will be constantly exposed to direct water.
Formwork production and fastening
Before you begin assembling the formwork, select a location for the future sink.
The choice of shape for the sink remains arbitrary. You can make formwork of any size and shape, the main thing is that it is smooth and strong. If the shape of the sink suggests the presence of smooth curved sections, then it is better to make them from a sheet of iron.
Also, it is recommended to make the womb itself from tin. As soon as the formwork is assembled, all that remains is to go over the seams with sealant, this action is necessary to prevent the solution from leaking.
After the formwork is completely assembled, all that remains is to fasten it to the selected location on the wall. The wall must be strong enough to support the weight of the concrete. A good option would be to mount the sink in the corner, this creates additional support area.
The fastening process takes place in several steps:
- Drill holes in the wall for the structure's reinforcement. It must be located somewhere in the middle of the intended shape. The frame is welded or tied with wire.
- The formwork is securely attached to the wall using corners and screws.
- On the back side of the wall, several iron sheets are welded to the reinforcement. This will make the structure more reliable.
- Under the formwork a podium is made of bricks and blocks. It must be strong and stable.
- Clean the formwork from dirt. It is also worth checking the evenness of the structure and its stability.
When attaching formwork, the main criterion is stability and evenness. If there is a slight tilt, the sink will also be at an angle.
Manufacturing process
The technology for making a sink with a concrete countertop with your own hands is quite simple. You just need to follow a certain procedure.
Preliminary preparation
You should start work with a sketch (drawing) indicating the dimensions of the finished product.
This will allow you to accurately calculate the volume of materials that will be required to complete the work.
Practical advice! Before starting work, it is advisable to mark the position of the future sink with countertop on the load-bearing walls, and free these areas of their surface from paint, plaster and other coatings.
Manufacturing of formwork
It is best to start making formwork with a full-size mock-up of the product.
It’s not difficult to do (ordinary thick cardboard is suitable for this purpose), and the work will be simplified significantly.
After making the model, they proceed to the most difficult part of the formwork - bending the blank for the sink bowl.
Then they cut pieces of fiberboard or other material of the required sizes for the base and sides of the formwork and fasten them, using the model as a frame.
The parts are fastened with self-tapping screws and metal corners. The joints are treated with sealant.
If desired, use plasticine to form rounded or angular (45 degrees) chamfers.
Important! When assembling the formwork for the sink bowl, it is necessary to provide holes for draining and overflowing water.
They can be easily organized using pieces of plastic pipe of the appropriate diameter. They are inserted into the formwork holes under the bowl.
Installation of fittings
Using a hammer drill, through holes are punched in load-bearing walls for reinforcement bars.
The location of the holes is chosen so that the reinforcement is located in the middle of the thickness of the concrete of the countertop and sink.
Important! The reinforcement bars passing under the bottom of the bowl are first bent before installation, giving them the desired shape.
For reliable fastening in load-bearing walls, steel washers are welded at the ends of the rods, which are then driven into holes drilled in the wall using a hammer.
The entire structure is connected by welding at the intersection points of the rods or tied with steel wire.
Installation of formwork
The assembled formwork is pressed against the wall and secured using steel angles, dowels and self-tapping screws.
Temporary brick supports are placed under the base of the formwork.
Important note! The supports under the sink bowl should occupy as large an area as possible, since the formwork for it is a thin sheet of galvanized steel, which may not withstand the weight of the poured concrete.
Preparation of concrete solution
For countertops and sinks intended for finishing with tiles or other materials, the entire volume of concrete is prepared in the same way.
For the solution take:
- 1 part cement grade 400 or 500,
- 3 parts of fine filler - sand or granite flour,
- 3-3.5 parts of fine granite or other crushed stone,
- Add ½ part of water to the mixture.
Important! Water is added to the solution gradually to avoid excessive water content, but also not to make the solution too dry and hard.
The ideal consistency of concrete mortar for sinks and countertops is the consistency of thick sour cream.
If decorative finishing of the countertop and bowl is not planned, concrete is poured in several layers, using different recipes for each of them.
For the bottom layer, prepare ordinary concrete grades M200 - M400.
The base layer can be the same or lightweight, in which part of the coarse filler is replaced with polystyrene foam balls.
The outer layer and the space along the sides of the formwork are filled with decorative concrete, in which granite or marble crushed stone, fired glass cullet and other materials are used as coarse aggregate.
When preparing this layer, various dyes are used. Their gradual introduction during mixing and pouring will create original color patterns.
Important ! The main condition for obtaining high-quality concrete is a thoroughly mixed solution.
For this, use a regular bucket and a special drill attachment. For large volumes, you will need a flat container in which it is convenient to mix the solution with a shovel.
Pouring the structure
The prepared solution is poured into the installed formwork, starting from the most difficult place - the sink bowl.
During pouring, the solution must be compacted with light blows, which allows the crushed stone to be compacted and excess air bubbles removed.
Concrete is poured in one or several layers so that the final height of the compacted material exceeds the level of the formwork by 1-2 mm, since as it dries, the volume of concrete will decrease and the level will drop exactly by this amount.
After the pouring is completed, the structure is left to dry for at least a week.
In 7 days, the concrete gains about 70% strength , which allows you to dismantle the formwork and begin finishing work.
The formwork is dismantled from above , and the temporary supports are removed last.
You can leave them until the structure dries completely and gains strength - for 28-40 days.
After dismantling the formwork, remove the plastic pipes from the drain and overflow holes.
Making a solution for the sink
It is better to mix the concrete solution with a special mixer. This should not be done in a concrete mixer. Only a mixer can ensure good mixing of products.
The solution is prepared according to the following scheme:
- Add the required cement and only 1/8 of the liquid. Mix everything, making sure that no strong lumps or areas of dry concrete form.
- Then add plasticizers and fiber. To stir thoroughly.
- Add sand and granite chips. Stir and ensure homogeneity.
- Add the rest of the water and finally mix the ingredients.
Concrete should not be made plastic. This may reduce its performance. The mixture should be hard, this will make the finished product high quality.
Also, if it is planned that the bottom of the sink will be directly in the concrete, and not made of another material on top of it, then it is worth pressing a bowl into the concrete to the required depth, and insert a small pipe under it. Before doing this, they need to be greased or wrapped in cling film.
Pouring concrete
Concrete is first poured into the most inaccessible places. It must be constantly vibrated so that the mixture is distributed evenly. After completely filling the formwork, you need to level the surface and cover the sink with film.
After 3 days, the concrete will completely harden. You can remove the film. After the same period of time, the formwork is removed. But the installation of taps and siphons is postponed for a month. This is necessary so that the product dries completely and becomes strong.
Finishing
After removing the formwork, the wall will have a finished product. But the sink still needs to be processed and brought to its final form. This is done either by sanding or tiling.
If it is just grinding, then before starting the work you need to cover up the unevenness and cracks with concrete paste. After the paste has dried, start sanding. Here everything is done individually. You can bring the surface to perfect smoothness using a grinding machine, and also leave a slight roughness.
Tiling does not require the removal of minor imperfections. The tiles are laid like tiles. But don’t skimp on glue and grout.
The shell bosom can be filled with epoxy resin. For beauty, it is recommended to pour granite chips there. When the resin hardens, you will get a smooth surface.
Similarities and differences between sinks made of artificial stone and concrete
Sinks made of artificial stone can last for several years if the manufacturer follows the correct manufacturing technology. Just like concrete sinks, such products retain their original structure and shade throughout the entire period of use.
The sinks are also highly hygienic. Artificial and concrete surfaces are coated with special compounds that eliminate the presence of pores - the main causes of dirt, plaque, bacteria and unpleasant odors. Coatings protect against deformation as a result of the use of aggressive detergents.
But still, artificial stone is much inferior to concrete, especially if it is a product of the GIACOTTI brand. Architectural concrete is a stylish, sophisticated design solution that is ideal in all aspects of use. Artificial stone does not tolerate high temperatures - a hot frying pan will leave an unsightly white mark on the sink. If heavy objects fall, it may become chipped and cracked. When using GIACOTTI concrete sinks, such problems do not arise. In addition, they are much lighter than sinks made of artificial stone, although they look massive and are highly durable.
From us you can order a GIACOTTI concrete sink of any design, size and shade. To submit an application, please contact our consultants by phone.
Features of the material
A designer sink costs a lot of money, but because all the concrete components are available, the price of a DIY sink will pleasantly surprise you. The advantages of concrete for making sinks are obvious.
To obtain a smooth, elegant concrete surface of the sink, it is recommended to use M300 sand concrete instead of heavy concrete with coarse aggregate.
Better installation and creation of a smooth surface will be facilitated by adding a plasticizer to the solution. Concrete sinks in the interior of a kitchen or bathroom always look stylish and modern.
Important! If it is necessary to give a concrete sink a particular color, it is necessary to use special pigments and dyes for this material, which can be added to the solution at the stage of its preparation or allow for high-quality coloring of the surface after it has been sanded. It is worth noting that when using white cement the shade will be richer.
Recommendations for choosing the main components of a concrete mixture for making a sink:
- To produce a high-quality and beautiful product, it is recommended to use cement M400 - M500;
- As an internal filler, it is recommended to use clean fine sand (from 1.2 to 2 mm), which must first be washed and dried;
- The concrete mixture is prepared in the traditional way in a ratio of 1:3 with a water-cement ratio not exceeding 0.5, depending on the brand of cement. Instructions for plasticizer dosage are provided by the manufacturer;
- The consistency of the finished mixture can be compared to wet sand after rain; it should be plastic to the touch.
Advice. If there is no vibrating table and plasticizer, then you can evenly tap the formwork until the cement laitance comes out.
Formwork material
For the manufacture of formwork, it is recommended to use fiberboard bars or sheets of the required size, boards or plastic sheets, the thickness of which does not exceed 2 mm. It is important to make high-quality formwork for the sink bowl. If the original shape of the product is assumed, then the best solution would be to use galvanized steel sheets.
To make the structure monolithic, durable and securely fastened to the wall, it is necessary to use reinforcement in the form of steel rods with a diameter of 10 to 15 mm.
Important! The fittings are laid in increments of 20 to 40 cm (for the countertop), and under the sink bowl it must be laid in increments of 1.5-2 times more often.
It should be taken into account that a sink made of reinforced concrete has a high weight, so it can only be securely fastened to a strong supporting structure of the building. To do this, the reinforcement is inserted into a concrete, reinforced concrete or cinder block wall with the condition of through penetration. When calculating the length of the reinforcement, the thickness of the load-bearing wall is taken into account.
For example, if the structure has dimensions of 1 X 1.2 m, and must be attached to two concrete walls with a thickness of 250 mm, it is necessary to make a longitudinal laying of 2 reinforcement rods 1.45 m long. The transverse laying, taking into account the sink, is carried out using 4 reinforcing bars 1.25 m long. As a result, the metal reinforcing bars will have a total length of 7.9 m.
The formwork must be strong and monolithic, especially at the joints; for this, the use of corners, sealant and metallized tape is recommended. To fasten the formwork elements you will need to use dowels and self-tapping screws.
The structure should dry under plastic film. Also, it is necessary to install temporary supports that will withstand the high weight of the structure while the concrete gains strength. It is recommended to use bricks for these purposes.
Exterior finishing and tools
Exterior finishing can be done using tiles. To do this you will need to purchase tile adhesive and grout. It is possible to use cement mortar with decorative filler.
Minimum set of required tools:
- To make formwork, it is recommended to use an electric jigsaw or other tools with a similar function (a regular hacksaw will not cope with the upcoming amount of work);
- In order to drill holes for reinforcement with a diameter of 10 to 12 mm and for formwork dowels with a diameter of 6 to 8 mm, it is necessary to use a hammer drill with concrete drills;
- You must have a screwdriver or screwdriver, a hammer and metal scissors;
- To securely fix the fittings, you will need to use a welding machine;
- To mix the concrete solution, it is necessary to prepare a container of the required volume;
- A construction mixer will allow you to mix all the components of the composition evenly;
- Measuring tools will require a ruler, tape measure, building level, plumb line and pencil;
- To apply the solution, you must have spatulas of various sizes.
Sink, concrete countertop - how to make it yourself?
The marble patterns are mesmerizing. But marble is soft, so it is rare in the kitchen. Hard granite, but difficult to process. Concrete is an artificial stone, it is lighter, more varied in color and pattern. A tabletop made of acrylic or epoxy conglomerate would compensate for the shortcomings of stone slabs, if not for the price. Casting it yourself from concrete, feeling like a sculptor – isn’t that an idea? Having immersed yourself in technological tricks, it turns out that concrete does not hide any special difficulties.
We recommend: What is the difference between aerated concrete or foam concrete - comparison of advantages and disadvantages
Features of concrete in the manufacture of kitchen furniture
Required properties of furniture concrete:
does not crack at a small thickness, that is, it has sufficient viscosity, does not create an extremely high load on furniture supports, absorbs a minimum of heat, the slab must be highly decorative, fit into the interior, can be ground and polished, and therefore the filling granules are selected with a hardness identical to concrete, the mass is created homogeneous consistency, but thick, plastic - in such a way that the mold can be filled manually, without pouring (the used construction term “casting” is not entirely correct here), the result is a durable slab up to 40 mm thick, this is the main requirement.
The listed properties are achieved by adding washed quartz sand, marble chips, plasticizers, broken glass, and stable (dry/pasty) dyes to cement (grade no lower than 400).
Interesting : white grout for tile joints is white cement M500, which has all the properties of a molding material.
The chaotic mosaic is interesting. Pieces of polished onyx and marble are placed at the very bottom of the mold, the gaps are filled with a mixture of sand, cement, and crumbs. The fragments in the lower part should not be polished - for bonding. The thinner the mosaic elements, the stronger the monolith.
Design and drawing creation
A product that is longer than 4 m must be reinforced. Depending on the method of reinforcement, concrete countertops are divided into:
with chipboard filling, reinforced with metal and fiberglass.
The reinforcement methods are as follows:
From channels and corners, triangular brackets up to 60 cm are welded (the width can be greater), they are fastened in increments of 0.5 m to the wall using dowels. This provides access to the floor that has not yet been equipped. The level from the concrete floor screed is h=25 (floor) +850 (kitchen cabinets) - 30 - 30 = 815 (mm), the first 30 mm is the thickness of the concrete countertop, the second 30 mm is the moisture-resistant plywood base. The wall is tapped until a groove is formed. The groove is filled with strips of foam plastic (the plate will “play” in size as it heats up and then cools down). The side of the tabletop is mounted on a plywood sheet. Poured. Replacement of plywood - two sheets of fiberboard fastened together.
A reinforcing welded lattice made of metal rod is placed in the pouring tray between the layers of concrete, having previously treated the insert structure with an anti-corrosion compound. The rods do not reach the contour of the slab by 5 cm.
With a total tabletop height of 35 mm, the first layer of fiberglass is laid after pouring 15 mm of concrete, the second - after 20 mm, by pressing. The third layer is applied on top.
But chipboard filling is considered the most advanced reinforcement: with it, the tabletop weighs less, the slab can be drilled, and it becomes possible to reduce the thickness and reduce the cost. An important point is that the fiberboard sheet itself is used again as an insert after the template is made. Paradoxically, the combination of fiberboard with concrete must be prevented (the stretch coefficient of the materials is different). The recessed sheet serves as a substrate; even before contact with cement, it is impregnated with drying oil.
The “sandwich” of both layers is safer to install and transport. To prevent the fiberboard from falling out of its socket, it is wrapped with tape, the last stage is glued with assembly glue.
Combining different reinforcement methods is always acceptable. Welded contours are reinforced around large holes. It is important to prepare the reinforcing inserts in advance because the casting process lasts only 50 minutes. After the first setting, the concrete cannot be moved or moved: the structure will be damaged. Complete hardening occurs after 2 weeks.
Drawing, template
When working with a plan, you need to decide where the hob will be and where the sink will be. It is important to use the capabilities of the cast countertop to the maximum: the arbitrary configuration allows you to place the sink in the protruding “crest” of the wave; the hob can stand across, rather than along, the wall. Perhaps we need to abandon the semi-circular edge of the table and give the edges some kind of avant-garde shape.
While being original, they remember the modularity of the cabinets and upper cabinets. Having measured the wall, they look for options in a grid with a step of 20, 30 cm (scale 1:10), fitting in the hob, oven, hood, and taking into account that all the furniture will be covered with the same type of doors, flanges - it should look complete, rhythmic.
We recommend: Reinforcing tape for drywall - step-by-step installation instructions
Using two strips of fiberboard, the size of each specific angle is determined in place, and the sheets are fastened with a glue gun. Then they bring the sheet to the wall, mark future slots on the fiberboard, protrusions for niches, wall turns, sink contours, electric stove, etc. The starting/ending reference points are not set on the plaster - at a distance of 18 mm from the corners (the thickness of the ceramic apron). You also need to take into account that the real angles of the rooms differ from 90 degrees.
Experiments with color
Determining whether the countertop should be light or dark, maybe gray? Reddish, beige, yellowish or with a cool tint. The emerging inclusions are dark on white. Then from what? Same for the opposite effect.
Cut off the milk carton, mix the sample, adding broken brown, green, transparent glass, mica, amber along with dye. The result is corrected.
Regardless of additives, the base of concrete is classic:
for casting – cement + river (preferably quartz) sand, ratio 1:4; for modeling – ratio 1:3.
Water is added gradually. The thickness of the first solution is oily. The thickness of the second is plasticine. The mold is poured first. The second is mixed for frame concrete.
During sample creation, the ratio of ingredients is recorded. The main components are ordinary. To improve the plasticity of the mass, it is recommended to add 150 g of washing powder (solution) to 25 kg of cement. A universal concrete plasticizer is commercially available that improves viscosity and plasticity.
Preparing the form
Chipboard is placed on a durable table, exceeding the contours of the product by 20 cm. The surface is covered with PVC, a sheet of thickness. 2 mm (options: polystyrene, fiberboard). Lay out a side lubricated with silicone using strips of chipboard (planed beams) on the drawn contours, fasten it with self-tapping screws, clamping it so that the silicone goes beyond the gap. The excess is washed off. To form a facet, a hose with a diameter of 1 cm is fixed at the junction of the substrate and the side, filling the gap between the hose and flat surfaces with window putty.
You can set the facet configuration yourself. To do this, the wooden plank is thinned at the edge “under the shoulder blade”, the profile is cut with a jigsaw. Made from hardwood, water-repellent properties are obtained from impregnation with sunflower oil. Using this type of abacus, window putty is distributed using broaches.
To prevent the side from moving away from the perpendicular, it is reinforced with stiffening ribs made of pieces of plywood or chipboard.
The circles are laid out with thick plastic, also fastened to the “ribs”, drilled “into the countersunk”. Sharp bends are made from strips of thick plastic of the same height as the side, heated to 160 degrees. The work is carried out while protecting hands with thermal gloves. A tungsten filament coil behind a metal box, covered by an even larger box - a simplified heater design. Plastics chosen are refractory.
Places of pipe inlets and cutouts are covered with plastic plugs from shampoos, from old basins, polypropylene pipes, etc., secured with an adhesive gun. The sides, checked for level, are sprayed with liquid wax (soap water, as an option) from a household sprayer. Dried surfaces are protected from sticking to concrete 2–3 times.
Filling the table
The concrete mixer is filled with cement - 60% of the volume, sand - 10%, and solid fractions - 29.5%! (MISSING) Only 0.5% water! (MISSING) Check the viscosity, transfer by hand or by pouring from buckets. Movable concrete is spread with a trowel. The plasticine is trampled down with palms and small blocks of wood. Level along the top edge with a block (or a “knife” type construction level). Having leveled, cover without gaps with plastic film.
The thick mass (for “molded” tables) is laid by a team of manufacturers: in 50 minutes you need to have time to lay it out and compact it.
Laying decorative elements and inserting fastening elements
The location of the recesses for the dowels, metal corners, if any, are established in advance and marked on the template. Then the template is attached to a wooden frame that coincides with the contour side. The template sheet is drilled (cut) at the marks.
The recesses for the dowels are formed by the dowels themselves, and the corners are welded onto pieces of reinforcing mesh. Moving the corners along the unfrozen mass, they find a match with the template and pour it on top.
We recommend: Liquid glass - proportions of addition to concrete for waterproofing
Pre-cast molded brackets with protruding reinforcement are welded to the reinforcing mesh. Inserts protruding beyond the tabletop are leveled with squares and a level according to the marks indicated on the template.
Grinding, polishing
After 2 weeks, the tabletop is opened, wetted several times, and dried to ensure the completion of the chemical processes. The dry slab is sanded first from below. Then they turn it over, wet it, dry it and polish it with a P 80 grit sander. Increase the grit size by 50 values and continue sanding until a “mirror” surface is obtained. Finish the process with P 500 sandpaper and add water. The grinder must have guaranteed moisture protection. In hard-to-reach places, use a round stick with a piece of sandpaper attached to it, or a wooden block.
Restoration of an old concrete countertop
Concrete primer is applied to the old concrete countertop and dried. Distribute with a spatula the same composition as the previous one. Use a knife, awl, or trowel to fill the cracks. The dried surface is sanded, giving it water-repellent properties with liquid wax, polishing wooden surfaces (like Pronto).
Video: how to make a concrete countertop, kitchen sink with your own hands - instructions
Above we looked at how to make a countertop from concrete, below are instructions for making a sink with your own hands.
Wide planes are comfortable and visually expand the space. Arranging a kitchen with ordinary rectangular countertops can be achieved by cutting chipboard and MDF boards. Is it worth bothering with the casting process if only rectangular shapes are planned? Also: in a small kitchen it is impossible to appreciate a spectacular wavy line. You need at least 4-5 meters of free wall.
The process of making a concrete sink
You don't need any specific construction skills to make your own concrete sink. It is enough to follow the sequence of work performed.
The video in this article will tell you how to make a concrete sink with your own hands.
Preparation
First, you should make a sketch of the product with dimensions in order to determine the volume of material. The walls where the sink and concrete countertop will be located must be cleared of furniture and paint, plaster or other decorative coating must be removed from their surface.
Markings are applied to the prepared wall surfaces using a pencil, indicating the location of the structure.
Formwork
To simplify the work, it is recommended to make a mock-up of the structure in natural dimensions. For this purpose, it is possible to use ordinary thick cardboard. When the layout is ready, we begin to make a blank for the sink bowl.
The base and sides of the formwork structure of the required size are cut out from pieces of chipboard or other material. Then they are secured in accordance with the previously made layout, using self-tapping screws and metal corners. The joints are treated with sealant.
Important! At the stage of forming the formwork structure, it is necessary to provide holes for draining and overflowing water. To do this, plastic pipes of the required diameter are inserted into the formwork at the locations of the bowl.
Armature
Using a hammer drill and a drill of the required diameter, it is necessary to punch the required number of through holes for the reinforcing bars in the load-bearing wall. The holes should be positioned so that the reinforcing bars are located in the middle of the concrete countertop and sink structure.
The reinforcing bars that will be located under the bottom of the bowl must be given the appropriate configuration by first bending them.
In order for the reinforcement to be securely fastened in the load-bearing wall, a steel washer must be welded to the end of each rod, which will be fixed into the drilled hole. To do this you need to use a hammer.
The entire structure must be connected by welding in the places where the rods intersect. If you don’t have a welding machine, then in these places you can tie the rods together with wire.
Design options
Concrete sink designs can be classified according to a fairly large number of characteristics.
Depending on the design it may be:
- Concrete countertop with recess for sink
- Freestanding sink.
Each option has its own advantages and disadvantages. The choice depends on the room where the sink is supposed to be installed. For the kitchen, installing a combined sink would be an excellent option. So, without extra costs, you can install additional work surfaces, which are always the weak point of the interior, since a large number of surfaces is unsightly, and a small number is inconvenient.
For the same option to be appropriate in the bathroom, you need to have a room of sufficiently large dimensions. Rarely does a modern apartment have a bathtub of this size. But in a private house in a spacious bathroom this would be a good option. Such a sink will emphasize the spaciousness of the room. If this is not particularly necessary, then in the bathroom it is better to get by with a free-standing product.
Depending on the shape, the sink can be:
- Geometric shapes
- Traditional or round shapes
- Original
Here everything depends solely on the preferences of the owner. The only thing worth mentioning is the depth of the sink. If you are installing a purchased product, be prepared for a shallow sink depth. This was done for a reason. The fact is that only with such parameters concrete fully reveals its aesthetic properties. A deep concrete sink is not beautiful. Therefore, if, due to technical requirements, you require a deep sink, then it is better to choose a different material.
Manufacturing a concrete countertop for a sink based on an existing laminate structure
To create a modern look for your kitchen interior, it is not necessary to dismantle the existing furniture. You can make a stylish concrete countertop using an existing laminate surface as a base. This will require a concrete mixture used for floor screed, which is applied to the surface of the countertop.
This method of updating an old, scratched, damaged countertop will update the interior, breathe new life into it, creating an atmosphere of industrial style.
Materials and tools
To carry out the work you will need the following:
- You need to purchase a concrete mixture for screed at a hardware store. One bag (4.5 kg) should be enough for a medium-sized tabletop;
- A set of spatulas of different sizes, the large one should be at least 20 cm, and the small one should be from 5 to 10 cm;
- A container for preparing the solution and a wooden stick for stirring the mixture;
- For grinding, you will need to purchase sandpaper of different grits - 20-N, 25-N, 5-N and M28N-2;
- For personal protection, you must have a painting mask or respirator;
- Requires sealant, liquid to strengthen the concrete surface and varnish
Below is the sequence of work:
A washbasin built into the countertop looks much more interesting than one standing separately, without any decoration.
And it’s more convenient to use - cosmetic accessories or a razor can be placed nearby, rather than held in your hands.
Many users will be interested in a homemade countertop in a bathroom made of tiles - this will be discussed in detail below.
Homemade sink
What will we need from the tool?
Note. All materials and tools must be prepared in advance so that there are no failures during the work, since setting and hardening of concrete cannot be expected.
- You cannot do without an electric jigsaw or a hand-held circular saw - a hacksaw is also not considered here, since you will need to cut out curly lines.
- A hammer drill with concrete drills (with a pobedit bit) with a diameter of 6, 8 and 10 mm (the first two are for dowels, and the last one is for reinforcement).
- Mixer for mixing the solution.
- A screwdriver (possibly a curved screwdriver, but this is too uncomfortable).
- Hammer.
- Metal scissors.
- Welding machine.
- Construction level, rule and pencil.
- A metric tape measure of at least 5 m and a construction (thick) pencil.
- Crosses for mosaics (for gaps).
- A comb for applying glue with teeth no more than 5-7 mm and a rubber (soft) spatula.
- Pistol for tube.
- A pair of steel beacons.
- Container for mixing.
Materials
- Chipboard or OSB - perhaps entire pages, but also trimmings are possible, given that the price for them is a pittance.
- Plastic dowels 6-8 mm along with self-tapping screws (20-30 pieces).
- Furniture corners of any size and U-shaped hangers (used for frames under plasterboard structures) are useful for assembling and fastening the formwork to the wall. In addition, it is necessary to strengthen all joints, since the product in its raw form has a lot of weight.
- Galvanized Sheet.
- Reinforcement 10 mm, at least 6-8 rods.
- Pieces of plastic pipes - one for the drain, the other for the hole for the mixer. Anyone who wishes can also stock up on an overflow pipe, as required by the instructions for factory sinks.
- Sealant for sewerage for sealing internal joints of formwork.
- Bricks or blocks , which will serve as temporary supports for the formwork.
- Fine-grained concrete not lower than M400 or in addition M500. The quantity is calculated based on the volume of the formwork.
- Mosaic tiles of your choice and waterproof grout for joints.
- Tile adhesive must have antifungal additives.
Tips for preparing concrete
Before we figure out how to make a sink with our own hands from concrete, let's learn how to make a high-quality solution that can stand for a long time without cracking.
In our case, we will clad the structure with mosaic tiles, which means that instead of crushed stone we will need granite chips or simple granite screenings, which will be much cheaper. In cases where cladding is not provided, marble chips are used instead of crushed stone, and after hardening is complete, the surface is polished with “turtle” discs (with diamond additives).
To make the mixture as strong as possible, first of all, pour water into a concrete mixer, add cement and carefully mix. When you have a homogeneous mass like milk, add the required amount of well-sifted sand in that direction, just make sure that there is no clay in its composition. After mixing the cement-sand mortar, add crumbs or screenings, mixing it all until ready.
Considering the subtlety of our design, mixing the solution in a concrete mixer will not be enough; therefore, it should be thrown into some container (trough, bathtub) and additionally mixed with a mixer.
In addition, you will protect the finished structure from the influence of temperature changes if you add a plasticizer to the finished mixture. The required amount of plasticizer for a certain volume is indicated on the container (in most cases, this is 1 glass (200 g) for a medium-sized concrete mixer).
Making a sink
Note. To fasten this structure, given its mass, you need a strong brick or cement wall, but it is better if it is a corner, as in this case. If a garden sink will be poured in an open space, then brickwork will need to be built for it.
First of all, we need to make formwork from chipboard or OSB, in addition, if it is a sink made from a basin with your own hands, its size does not have certain parameters and will depend on your thirst.
Start from the main outer box, which you can also assemble on the floor in order to fix it to the wall when finished. In addition, the place where the formwork will be attached must be marked using a building level - its position determines the final position of the sink itself.
Now it is extremely important to take into account all possible transformations in the interior parameters, for example, this may be the thickness of the future floor screed or the thickness of the tiles on the floor and/or on the bowl together with a layer of glue.
In order for the calculated height of the structure to be the most ergonomic, you can take 80-82 cm as the base - this is the usual size of cabinets and cabinets for kitchen sinks. Only these figures should be calculated from the future (present) final floor covering.
On the wall, according to the size of the formwork, mark and drill holes through the load-bearing wall for the reinforcement, which will be installed across the structure. The formwork is sewn together with self-tapping screws, and it is fastened to the wall with corners, U-shaped hangers and plastic dowels with screws. The trough for the bowl is made of galvanized sheet metal and OSB.
Heels are welded to the reinforcement on the opposite side of the wall, which can be steel washers or the same pieces of rods. Try to ensure that the reinforcement is in the middle of the pour - you will need to release rods from the wall along the edges of the sink and countertop, and long pieces along these edges. The frame is connected either with knitting wire or electric welding.
Be sure to install as many supports as possible under the formwork so that they can withstand the mass of wet concrete and the additional load during compaction. Carefully sweep away dust from the formwork body and seal all joints. Make sure all structural components are secure.
It is now possible to prepare concrete using the recommendations and proportions indicated in the table. Start pouring from the most difficult places - these are the recesses near the gutter and so that there are no cavities in the solution, it must be compacted throughout the pour.
For this, the most ordinary stick is suitable, for example, it could be a handle from a shovel, or even better (narrower), a piece of slats 50x20/25 mm. Once pouring is complete, cover the structure with cellophane film.
After seven days, the formwork can be removed, but it must be dismantled from above, assessing the level of quality of the pouring. Do not pay attention to small bubbles - they will all overlap when finishing with tiles.
Now all you have to do is cover the sink with mosaic tiles and grout the seams. It is best to install the faucet and siphon 4 weeks after installation is completed - this is the period of complete (operational) drying of the concrete.
Advantages and disadvantages
The following arguments speak in favor of a homemade countertop with ceramic cladding:
- affordable price . Branded granite and marble countertops, especially those made to order according to consumer sketches, are much more expensive;
- diversity. There are countless types of tiles on sale with different textures, colors, patterns and surface types. This allows the home designer to create an exclusive product that fits perfectly with the bathroom interior;
- excellent characteristics. Ceramic tiles are moisture-resistant, durable, stable to temperature changes, and are easy to keep clean. Porcelain stoneware has the best characteristics: due to the absence of pores, it is close to natural stone in terms of strength, wear resistance and water resistance.
Tools and materials
To make a tabletop you will need the following arsenal:
- drill with impact mechanism;
- jigsaw;
- tile cutter for shaped cutting (you can order tile cutting in the workshop);
- levels: rack and bubble;
- roulette;
- crosshead screwdriver;
- brush;
- spatulas for laying tiles: metal (solid and serrated), rubber.
The following materials are used:
- galvanized profiles for plasterboard structures: guide and rack;
- for supports: profiled pipe or brick;
- moisture-resistant plywood (FSF);
- moisture-resistant plasterboard (GKVL) or cement-bonded particle boards;
- tiled or porcelain tiles;
- tile adhesive.
You will also need a fungicidal grout (with an antifungal additive).
Tile sizes
In ceramic cladding, the seams are a weak point, so it is advisable to use tiles that are as large as possible. But in a small room, large modules look bulky and emphasize cramped spaces.
It is recommended to use tiles of the following sizes:
- in a spacious bathroom: from 30x30 cm to 60x60 cm or mosaic (5x5 cm or less);
- in compact: from 10x10 cm to 20x20 cm.
Frame preparation
The tabletop frame is formed as follows:
- markings are applied: on the wall 80 cm from the floor, draw a strictly horizontal line with a marker, having previously marked the extreme points using a bubble level; a rectangle is drawn on the floor, repeating the outline of the tabletop. A sign of the absence of distortions is the equality of the diagonals of the drawn figure;
- mark the position of the brick supports and remove the floor tiles in these places, having previously cut them along the contour with a grinder. The tool is equipped with a metal disk for dry cutting of stone (segmented);
- walls are erected from bricks to the level of the line drawn on the wall, fixing them with cement-sand mortar. Such supports are good because they allow you to install shelves and doors;
- The brick supports are plastered and a day later they are covered with tiles. It is important to do the finishing at this stage, since after installing the countertop it will be more difficult to implement;
- they make a frame from CD profiles for plasterboard structures. To make the frame stronger, each element is made of two profiles, inserting one into the other (they have a U-shaped section). The result is a prefabricated profile with a box-shaped section. Metal elements are fastened together with blind rivets or metal screws;
- Several cross members from the same profile are fixed in the frame to add rigidity;
- lay the frame on supports and screw one side to the wall using dowels.
In addition to stone supports, they use:
- racks made of profiled pipe with section dimensions 50x30, 40x40, 60x40 mm or purchased chrome;
- welded brackets from the corner, transferring the load from the tabletop to the wall (suspended version).
Sheathing
- From a sheet of moisture-resistant plywood of the FSF brand with a thickness of 19 mm, cut out two identical blanks and glue them together, laying them on top of each other. If the design of the tabletop involves curved outlines, cutting is done with a jigsaw;
- lay the plywood base on the frame and screw it to it with metal screws;
- glue onto the top and ends of the plywood a material similar in thermal expansion coefficient to ceramic tiles. For plywood, this indicator is very different, so you cannot glue tiles directly onto it.
The following materials are used:
- cement particle board (CSB) with a thickness of 6 – 13 mm;
- moisture-resistant plasterboard sheet (GKLV).
When cutting with a grinder, the DSP generates a lot of dust. It is more correct to make cuts with a construction knife and then break the slab on the corner of the table. If necessary, the ends are ground. The DSP is screwed to the plywood with self-tapping screws, having previously countersunk the holes so that the caps are flush.
The following manipulations are performed with the gypsum board sheet:
- glue it to the plywood with tile adhesive and additionally fix it with self-tapping screws;
- apply two layers of nitro varnish diluted with nitro solvent on top and on the ends;
- fill the joints with silicone sealant “For aquarium” (excess is immediately removed);
- seal the joints with sickle tape;
- apply 2-component automotive putty (the cheapest one will do) with a thickness of 1-2 mm on top and on the ends with a medium-width spatula;
- After waiting for the putty to harden (it takes about an hour), sand it with coarse sandpaper, wrapping it around the block.
Next, an opening for the sink is cut out at the base using a jigsaw. In the case of using gypsum plasterboard, this is done before applying a protective coating of nitro varnish. Modern sinks are equipped with a template - the opening is cut out from it.
In the absence of a template, you will have to make it yourself. To thread the jigsaw blade, drill a small hole on the contour of the opening with a drill.
Execution options
There are no restrictions on the shape - rectangular, square, round, with curves... Order a washbasin with or without a countertop, with one sink or with another required quantity. The base for the tabletop is made from any material that you can independently find elsewhere or purchase from us.
Advantages of the countertop sink from the Bershovo workshop:
- Stylish design that will harmoniously complement the interior of the room.
- The monolithic design guarantees protection against leaks.
- There is additional space for placing the necessary items.
- if you want to visually expand the space, choose narrow and long models,
- To fill spacious rooms, massive options are used (thick and wide countertop with 2-3 sinks).
You can buy a bathroom table with a countertop by calling the number listed in the “contacts” section. The company's consultants will answer your questions.
An attractive and original kitchen, the dream of many people. Some people hire experienced specialists to create a kitchen interior, while others try to arrange everything themselves. Not the last place in the kitchen is played by the countertop, the manufacture of which will be discussed in this article.
Today, kitchen countertops can be made from a variety of materials - glass, wood, concrete, etc. But it is the concrete countertop that has gained great popularity due to its attractiveness and durability of use.
You can make a concrete countertop yourself, using available materials. By the way, in great detail about how to make a kitchen countertop with your own hands. This approach will allow you to save considerable financial resources, because today it is very expensive to buy a kitchen countertop made of natural stone.
Before you start making a concrete countertop, you should make a drawing of it indicating the dimensions, angle, etc. This will help you avoid many mistakes and disappointment when making a countertop with your own hands.
In addition, do not forget that concrete has a decent weight, so a kitchen countertop made from it must be able to support the frame on which it will be installed. Otherwise, you will have to additionally strengthen the frame with slope supports made of timber or a metal corner.
So, after all the measurements have been made, and the drawing for the manufacture of a concrete countertop is ready, you can proceed directly to solving the issue of the composition of concrete and materials for the manufacture of the countertop.
For this you will need:
- Portland cement;
- Clean sifted sand;
- Wooden blocks 5x5 cm;
- Plywood 12 mm;
- Reinforcing mesh (will be used as reinforcement);
- Glue or sealant for gluing decorative elements to the tabletop to solve the question of how to cover a concrete tabletop;
Of the tools, in order to make a concrete countertop with your own hands, you will need the most available tools, which are sure to be found in the household of every “jack of all trades”.
First of all, the tools you will need are:
- Metal spatulas of different sizes;
- Grinder and polishing wheels on it;
- Construction level with tape measure for performing various measurements;
- Screwdriver;
- Wood screws;
- Thick polyethylene film;
- Wood saw and other small carpentry tools.
Now a few words about the composition of concrete for making kitchen countertops. To make a concrete solution, you need the following components, which are maintained in the following proportions:
- Three parts of sifted sand;
- Two parts of Portland cement grade not lower than 500;
- One part polymer-based concrete plasticizer;
- N - water, depending on the amount of all components. The concrete solution for the countertop should not be too liquid, it should have a certain degree of viscosity.
First you need to assemble the formwork for the concrete countertop into which the solution will be poured. It is made either from plywood or plastic sheets. Of course, the second option is preferable, since the concrete solution does not adhere well to plastic.
The dimensions of plastic sheets or plywood must be strictly those dimensions that were previously indicated in the drawing. Be sure to attach a 5 cm thick beam around the perimeter of the plywood using self-tapping screws. If you need to make a concrete countertop of greater thickness, then the thickness of the beam increases accordingly.
If, after assembling the formwork for the tabletop, there are gaps between its structural elements, then it is advisable to seal them using silicone sealant or any other suitable for working with a particular material.
If you want the table top to have rounded edges, then you need to insert small plastic inserts in the form of a semicircle into the formwork before pouring it with concrete mortar. Then, it is necessary to fix a metal mesh for reinforcement at a height of 3 centimeters from the surface of the formwork.
However, before installing the reinforcing mesh and pouring the concrete solution into the form of the tabletop, it is recommended to lubricate its base and sides with machine oil. After the formwork is completely filled with concrete mortar, it must be covered with plastic film on top and left to dry for at least ten days.
Polishing and sanding concrete countertops
Grinding a concrete countertop is carried out using an angle grinder (grinder) with a polishing disc installed on it (as well as )
. You should know that at different stages of grinding a concrete countertop, different discs are used.
At the initial stage, a rough disk is used to remove the main irregularities of the tabletop. Then exclusively discs of 50 and 100 units are used (for finishing the kitchen countertop).
After sanding the concrete countertop is completed, the final stage of polishing follows. A concrete countertop is polished with the same tool, but only with a much less abrasive disc (no more than 400 units).
The finished concrete countertop should have a smooth and shiny appearance. If you run your hand over its surface, you should feel absolutely no abrasions or roughness.
DIY video concrete countertop
Loft is now more fashionable than ever. And that’s why everyone wants to replace even the usual earthenware sink with something more “lofty.” There are eccentric solutions, for example, a copper basin with a hole in the middle or a galvanized bucket, but such ideas are difficult to combine with a modern interior, and are not very convenient to use in everyday life. If you don’t want to complicate your life, then a sink made of real concrete will become the highlight of your loft and cannot be compared with any other option, in all respects.
Concrete is still not earthenware, but that’s why we’ve gathered here, to find out all the pros and cons.
It's at least original.
This is exclusive - each of our sinks is made by hand and can be considered a work of modern art
It is durable - a high-quality concrete sink will last for centuries, and maybe even thousands of years))
It is reliable - breaking off a corner is as difficult as with a faience sink
This is unique - the picturesque texture of concrete cannot be imitated by any other material
Now about the cons:
Vulnerability. A concrete washbasin can be either varnished or protected with impregnation. In the first case, it is well protected from dirt, but the coating is easier to scratch than earthenware enamel. In the second case, it is difficult to scratch, but it is necessary to constantly (once every 2-3 months) renew the impregnation, and if this is not done, then sooner or later stains may appear, which only sanding will help get rid of.
Price. Setting up a sink production process on an assembly line is very difficult. Therefore, if we are not talking about a piece of foundation weighing 200 kg, but about a sink made of high-strength and beautiful concrete, weighing an acceptable 20-40 kg, then this is painstaking manual labor with a large number of stages, complex technology and expensive materials.
Since all over the world, concrete sinks are much more often protected with varnish, we will tell you about it in more detail. Varnish for concrete in the interior meets several requirements:
1) it must be non-toxic;
2) lay down in a beautiful matte thin layer so that it is difficult to identify as something foreign;
3) do not allow water to pass through, because if the varnish allows water to pass through, it will also allow contaminants to pass through
4) be as scratch resistant as possible
Only one type of varnish meets all these requirements to the maximum - polyurethane, and even then not just any one. We conducted many experiments to choose the best varnish, but, unfortunately, we never found the perfect one in all respects. So when purchasing a concrete sink, prepare to be treated with care.
Don't expect miraculous performance and practicality from concrete or you will be disappointed. Although if you take care of such a product properly, then there will be no problems with it. Do not use aggressive acidic or strongly alkaline cleaning agents or abrasive sponges.
PS: And for lovers of everything real, I recommend bare concrete without coating. In this design, the sink will be as natural as possible. And over time, becoming covered with patina during use, it will only get better.
A beautiful and comfortable kitchen is the desire of every person. Some realize this dream with the help of designers and expensive building materials, while others use personal imagination and skill. For example, a DIY concrete countertop is absolutely doable. In addition, it will be no different from similar countertops made of marble. And the use of the countertop can be found in any home. You can simply be proud of your product.
Tiling
Tiles for countertops are selected according to the following criteria:
- type . The surface of the countertop is not subject to significant loads, so wall tiles are sufficient (there is an icon with a hand on the package);
- surface . Relief tiles look interesting, but they are difficult to keep clean: dirt is firmly held in uneven areas;
- color . All shades of blue, reminiscent of the sea, are always appropriate in the bathroom: azure, turquoise, sea green. You can add white or make the tabletop red and black.
Tiling is done as follows:
- treat the surface of the base of the tabletop with a latex-based primer - it will increase the adhesive strength of the glue. Work continues after the primer has dried, which takes a day;
- The glue is applied with a spatula with a straight blade. For leveling, notched spatulas are used, which have different tooth heights; this determines the thickness of the adhesive layer. Typically, tile adhesive manufacturers indicate on the packaging which spatula to use to apply the mixture when gluing tiles of different sizes;
- lay the tiles on the layer of glue, using a slatted level to mark the horizontal position. The method of gluing the mosaic depends on the type of flexible base: the synthetic mesh should be on the bottom, the paper mesh on top. After the glue has hardened, the paper is soaked and removed;
- Apply glue again and glue the next module, inserting plastic crosses into the seam between it and the previous one. Cross stitches ensure that all seams are of equal width. When gluing mosaics, select crosses with a width equal to the width of the seams between the chips. The glue that comes out of the seams is wiped off with a rag;
- continue to glue the tiles, leveling the modules relative to each other;
- The tiles adjacent to the sink are cut using a tile cutter for curved cutting. Tiles for gluing the ends can be cut with a regular tile cutter, a diamond glass cutter (if the thickness is small) or a grinder.
The ends can be decorated using a special part - an outer corner. The glue used is waterproof. Better - cement glue diluted instead of water on latex.
It is not advisable to use expensive and difficult-to-work epoxy adhesive, which is characterized by the highest water resistance, in this case, since the countertop is not constantly exposed to direct water.
If the product is going to be covered with glass mosaic, white glue is required.
DIY materials for mosaic countertops
The countertop, lined with mosaic tiles, will add a special atmosphere to the kitchen. Having decided to make the countertop yourself, you need to decide on the type of mosaic itself. It is better to opt for ceramic or glass, which is ideal for rooms with high humidity.
Materials for mosaic countertops are inexpensive, so everyone can afford them
In addition to the facing material, to make the countertop you will need:
- Moisture-resistant drywall;
- Metallic profile;
- Self-tapping screws;
- Serpyanka;
- Primer;
- Epoxy or tile adhesive;
- Grout for joints;
- Bracket for fastening.
To reduce work time, you can purchase ready-made compositions in the store, mounted on special paper or mesh, rather than laying each element separately. Having armed yourself with the necessary building materials and decided on the location, you can proceed to the implementation technology.
Before carrying out the main work, it is necessary to take accurate measurements and make outlines. After taking measurements, you should begin assembling the frame of the future tabletop using a profile and self-tapping screws. A hole is cut in the drywall where the sink will be located. Next, all sheets must be coated with a primer and allowed to dry. Using self-tapping screws, the tabletop is covered with plasterboard.
All existing joints are glued with serpyanka.
Glue is applied to the drywall, on top of which a pre-prepared mosaic is laid. The tiles should be laid out from the most visible corner of the product. The joints are being grouted. In the kitchen, it is preferable to use grout based on epoxy resin (unlike cement analogues, it has better dirt-repellent and heat-resistant properties). After complete drying, the base of the tabletop is attached to the wall using a bracket.
Grouting joints
The grout is also moisture resistant. Cement-based latex is also preferable; there is no point in buying expensive epoxy. An exception is if silver or gold powder is supposed to be added to the epoxy grout, as is done in expensive interiors.
Filling of joints begins a day after gluing the tiles:
- Remove glue residue from the seams using a special scraper coated with tungsten or diamond. In its absence, a construction knife is used;
- moisten the seams with a spray bottle or a damp sponge;
- Apply the grout to a rubber spatula and rub it into the seams, trying to fill them as much as possible. It is useful to press the mixture with the blade of a spatula and then go over the seam again, filling the resulting void;
- in 15 – 20 minutes. After starting work, return to the first area and wipe off traces of grout from the tiles with a rag or damp sponge. This moment is the most suitable, since the mixture has not yet dried and can be removed, but at the same time it has already hardened somewhat and therefore is not squeezed out of the seam with careless movement.
Contact of grout with water is allowed no earlier than after two days.