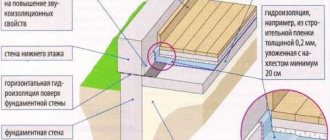
One of the most popular alternatives to the traditional metal caisson for a well is a caisson made of concrete rings. It is believed that this is more profitable, because the price of a concrete caisson is lower due to the ability to use the materials used in the construction of the house, as well as the available labor force. It is also generally accepted that a caisson made of concrete rings is eternal because it will not rot, unlike a steel one.
Here we will look at how reliable a concrete caisson is, what are its features, pros and cons, how to make it and how to waterproof it. This will help you decide whether a caisson or rings are better for the well.
DIY caisson made of concrete rings
Let's take a closer look at how to make a caisson from concrete rings, it's not that difficult.
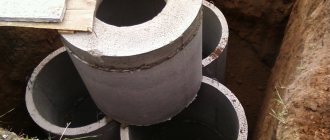
In essence, this is a kind of imitation of a caisson, where instead of a solid container, reinforced concrete rings are used, laid on top of each other, the bottom is concreted and waterproofing is done. It's simple. The diameter of the concrete ring is 1 meter, and to make it convenient for workers to walk around it, they need another 1 meter around the ring. In total, the diameter of the hole for the concrete caisson is 3 meters, the depth is at least 2 meters. Next, the bottom is concreted, rings are placed on top of each other, the joints are sealed and waterproofing is done.
Waterproofing a caisson made of concrete rings
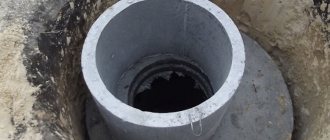
Typically, Hydrostop, Hydroseal, mastic or similar things are used for waterproofing. They coat the rings with them, cover them with waterproofing and everything looks very airtight. But in the end, water comes through the bottom... If you can coat the rings on the outside somehow, then you won’t coat the bottom from the outside, only from the inside, but the water will push through any coating. The point at which the casing pipe enters the caisson will be the most vulnerable point because it is impossible to make a 100% sealed insertion of a metal pipe in concrete. Metal and concrete interact poorly; there will still be a microcrack and water will ooze out (there is a photo of a typical caisson made of rings next to it), but that’s half the battle.
In addition to the casing pipe entry, there are points for pipe exit from the caisson to the home and other consumers.
waiting for such a point, these are all weak points, water will penetrate from there. Our practice, as well as the experience of other companies, shows that it is impossible to make 100% waterproofing of a caisson from concrete rings anywhere, no matter who or what anyone says. Of course, everyone thinks that they will have a unique case; they know exactly who will do the sealing best and how. As a result, in the spring the caisson made of rings is full of water to the brim... Moreover, it is impossible to waterproof a concrete caisson, even if it is a caisson made of monolithic concrete. Again, the entry and exit points of the pipes will allow water to pass through. If your caisson floods, then no worries, you can pump out the water, lubricate everything again, but the result will be the same - you will still have to redo everything with a metal caisson. It is impossible to repair a concrete caisson; you will be throwing money down the drain.
mezozoi.ru
Hello, dear forum users. Usually, I read more on the forum than I write, but I decided to share my experience of pouring a concrete caisson, since few people mention this topic; when studying this issue, I found very little information.
So, let's begin:
What you wanted and why. A sealed container with a volume of about 12 m3 was required to store sewage. Sealed - first of all, so that groundwater does not disappear into it (otherwise you don’t want to pay for the removal of water to sewer trucks), and secondly, so that a lot of wastewater does not leak out of it into the ground. For 12 m3 - to load the sewage tank completely at one time, so as to call in less often and not carry half a tank.
What was there. I chose a place in the corner of the site that was most convenient for the sewer truck to access; the distance from the house was about 8 meters. Soil – 0.25 m fertile layer, then about 8 m clay.
What did you choose from? I considered two options. The first one was a concrete tank of 12 m3 with a wall thickness of 200 mm made of high-grade concrete with hydraulic additives. Estimated costs - 75,000 rubles The second is a plastic container of 10 m3 with a wall thickness of 15 - 20 mm. Estimated costs - 150,000 rubles. I settled on the first option with dimensions 2*2*3 m
Having studied the experience of Murych on the forum, he went on vacation and began work.
It occurred to me that this structure should be filled in one day, including the neck (to avoid cold seams). In connection with this, all work had to be carried out in an accelerated manner.
I decided to dig the pit manually (with the help of Tajiks) so that the walls of the pit would be smooth and could later serve as external formwork, the volume of excavation work amounted to 24 cubic meters, and they agreed on 14,000 rubles. Before the digging began, it was decided to build a temporary roof; the rain protection would later be very useful since it rained half the time.
The length of the hole turned out to be 3.3 m. To my surprise, they dug quickly, especially the first two meters; the four of us completed it in 3 days. While they were digging, my assistant (Tajik) and I began assembling the panels for the formwork - in accordance with the plan - assembled the side panels and the floor panel from an inch (a new board was bought for this purpose, but I felt sorry for it, in the end I made everything from old used ones) y), the ceiling panel was assembled from old floorboards, the thickness is about 60 mm. I assembled all the panels using self-tapping screws, taking into account that after pouring they would have to be disassembled into planks in order to be removed from the bunker. On a horizontal platform, I assembled the boards into a cube (as a sample), installed spacer boards (50 mm) in the inside of the cube, strengthened the ceiling board with racks, and covered the outside of the boards with polyethylene. I prepared the formwork for the outer neck and the inner height of the neck turned out to be about 1.5 meters. Meanwhile, the next day after the completion of the excavation work, the fun began - the pit began to crumble. The bottom layer (the last meter) crumbled; at the very bottom, the clay was sandier and subsidence formed or constant rains did their job (there was a slight seepage of groundwater). We had to urgently strengthen the walls of the pit. It looked like this - they took three-meter boards, cut a recess under them in the walls with a step of 20 - 30 cm, secured the lower part with a wedge, and just above the middle of the board they drilled holes and drove in reinforcement 1 - 1.5 m with a hook, on top of the boards they attached thin plywood lying around nearby. At first they wanted to strengthen one wall, but while they were strengthening it, more than two began to collapse, and in the end we had to go around in a circle. As a result, the three of us completed this task in half a day while the rest dug a trench to the house. After that, the upper part of the pit was covered with geotextiles with large flaps to prevent drying clay from falling into the concrete. We started reinforcing with 12 mm reinforcement in increments of 20*20, reinforced the walls and floor, prepared a reinforced panel for the ceiling and neck. Quite cleverly, they tied the reinforcement with a nail, using it instead of a hook. Everything described above took 5 days, the hole is ready for filling.
On the sixth day, M450 concrete with a hydraulic additive of 9 cubic meters was ordered (two deliveries of 3 and 6 cubic meters), don’t ask why exactly M450, for some reason it seemed to me that concrete of this particular brand should be used.
At the place at 11 o’clock for which the first flight was ordered, the concrete truck arrived at 13:00, although by this time we only had time to fully prepare; in preparation for pouring, a 6-meter trench was built from a wide 35 cm board (later it turned out that such a length was very convenient ), and a container for concrete of 1.5 cubic meters.
The pouring has begun. The floor of the tank was filled in minutes and leveled in a few minutes, it took 1.5 cubic meters to fill it, the remainder was poured into the prepared storage, after installing the formwork it was planned to take it to the beginning of the walls. The next flight was booked for 16:00.
www.forumhouse.ru
Many owners of private houses sooner or later think about a way to safely and long-term food storage and preservation. Despite the fact that cellar equipment comes to mind first, a more convenient option is to install a special caisson for the cellar.
Caisson for a cellar: what is it and what is it for?
A caisson is a sealed capsule capable of being in any environment for a long time and maintaining the internal environment in an acceptable condition.
Caissons for cellars are designed for food storage and preservation under any external conditions.
Important: The container is installed using special equipment. In some cases, you can install the caisson yourself.
Often the caisson for the cellar is immersed directly into these waters, since in some places they are located quite high. In this case, a special technology is used to immerse the container under the cellar, followed by additional sealing of its walls.
A caisson is installed for a cellar, garage or any other room.
After the caisson is installed, the container will look like a capsule buried two meters into the ground with a single hatch on the roof.
Device and dimensions
The main advantages of using a caisson for a cellar are:
- product durability;
- the ability to install the structure on your own;
- functionality;
- low cost;
- creating a unique environment suitable for storing products.
Users consider the main disadvantages of caissons to be the need for additional thermal insulation and sealing of the structure. In addition, if the house has already been built, then the structure can only be placed outside of it, which is not very convenient to use.
The material from which the container is made is of great importance.
The dimensions of the capsules can be completely different. Small-sized caissons are a shaft measuring 1 by 1 meter with a depth of human height. The shelves in this storage are placed around the stairs.
In practice, the standard height of the caisson is set at two meters so that a person can move freely in it. Medium-sized models have dimensions of 1 by 2 or 2 by 2 meters.
Large caissons for a cellar may well compete with some cellars.
The optimal temperature for storing vegetables is always maintained in the caisson - in the range from 5 to 15 degrees. This is facilitated by the location of the container and the operation of the ventilation system.
At this temperature, food will remain fresh for a long time, mold and fungi will not be able to exist, and moisture will quickly evaporate.
Kinds
At the moment, there are several main types of caissons that can be installed under a cellar, garage or other room. Such containers are produced mainly in factories, but in some cases owners of private houses prefer to make them themselves.
The main and most popular varieties include caissons:
- made of reinforced concrete;
- made of metal;
- made of plastic.
Reinforced concrete containers are caissons that can be assembled independently - without outside help. Such a sample is assembled from reinforced concrete rings and covers, which, with proper skill, can be secured using a small construction crane. The remaining manipulations of assembly, sealing and thermal insulation can be performed on your own.
The disadvantage of such structures is the low level of sealing, so additional work on finishing the caisson inside and outside cannot be avoided.
Plastic
The most popular at the moment are cellar caissons made of polymer plastic. In most cases, the wall thickness starts from 10 millimeters. To give greater strength to the product, the walls of the caisson are reinforced with stiffeners. This popularity is due to a number of undeniable advantages of such a capacity:
- resistance to temperature changes and moisture;
- durability (up to 80 years with proper installation and operation);
- no need for additional updating;
- easy installation of the structure;
- light weight of the product.
At the same time, the low weight of the product can also be a disadvantage of this type of construction, because in this case it is necessary to install an additional reinforced concrete box.
Metal
You can also assemble a metal caisson yourself, but experts strongly recommend that you trust the assembly of metal containers to professionals.
A metal caisson is a sealed casing welded from metal sheets. All seams must be welded as efficiently and reliably as possible, since the durability of the structure depends on this.
The thickness of the walls of the product varies between three and ten millimeters. The thickness of the walls determines the rigidity of the material and the time period during which the tightness of the structure will be broken.
It is important to understand that metal is highly susceptible to moisture, which is why it needs to be updated and treated with an anti-corrosion compound quite often.
Which caisson is better to choose?
As practice shows, the most popular and durable are plastic caissons for cellars. They are much easier to install than reinforced concrete or metal products. In addition, the tightness of the plastic box is significantly higher than in other models, and the durability of the structure with proper installation can reach eighty years.
Installation instructions
Experts recommend installing a caisson in the cellar at the stage of building the walls of the house - when the foundation has already been poured, but the internal work has not yet been fully carried out. In this case, it is easier not only to install the structure, but also to install a ventilation system.
Otherwise, the caisson for the cellar is installed near the house in any convenient place.
For plastic caissons
In order to independently install a plastic caisson under the cellar, you must follow the following steps sequentially:
- dig a pit (by yourself or with the help of an excavator);
- create a sand cushion at the bottom of the hole eight to ten centimeters thick, lay roofing material on top or pour bitumen;
- concrete the base or install a reinforced slab (using a winch or crane) to level the base and protect the caisson from moisture;
- installation of the caisson and its fixation using special slings;
- backfilling the structure with soil and a mixture of cement and sand, compaction.
Important: If the groundwater level is high, it is recommended to make a concrete floor inside the cellar, and when installing the product under a residential building, concrete the walls of the pit to reduce soil pressure on the storage wall and premature deformation of the caisson.
For metal caissons
In general, the installation of a metal caisson consists of the following steps:
- site selection;
- taking measurements;
- digging a pit (50 centimeters wider than the dimensions of the caisson chamber);
- filling and compacting the bottom with clay (additional heat and water insulation);
- installation of a caisson in a pit;
- adjusting the position of the container;
- drilling holes for ventilation;
- sealing joints;
- plastering the walls and bottom of the caisson with cement mortar (layer thickness about 20 millimeters);
- filling the openings between the edges of the body and the foundation pit with greasy clay;
- finishing work inside the chamber, including waterproofing (optional);
- supplying and connecting ventilation;
- backfilling the chamber under the hatch, compacting the soil;
- floor installation (if work is carried out in the house);
- internal arrangement of the caisson: installation of stairs;
- installation of shelves;
- ventilation adjustment.
In this case, it is necessary to weld a pipe with a valve to the bottom of the caisson, which should be kept open for the first few months of use.
Video
Watch a video about installing a plastic caisson:
How to install a metal caisson is described in the video:
Price with turnkey installation
The cost of a caisson for a cellar depends not only on the material from which the container is made, but also on the dimensions of the product.
At the moment, you can purchase plastic containers at approximately the following prices:
- from low-pressure polymer (using the example of “PolymerProPlus”): dimensions 2000/1200/1500 millimeters - from 60 thousand rubles;
- dimensions 2000/1200/2000 millimeters - from 75 thousand rubles;
- dimensions 2000/1500/1500 millimeters - from 68 thousand rubles;
- dimensions 2000/1500/2000 millimeters - from 81 thousand rubles;
- dimensions 2000/2000/2000 millimeters - from 91 thousand rubles;
- dimensions 1500/2000 millimeters - from 52 thousand rubles;
- dimensions 2000/2000 millimeters - from 89 thousand rubles;
- dimensions 2000/2000/2350 millimeters - from 210 thousand rubles;
The following prices apply to steel caissons (using the example of Stroy-Technology Group of Companies:
- dimensions 1500/1500/1500 millimeters: wall thickness 3 millimeters: from 25 thousand rubles;
- wall thickness 4 millimeters: from 30 thousand rubles;
- wall thickness 5 millimeters: from 35 thousand rubles;
- wall thickness 6 millimeters: from 40 thousand rubles;
- wall thickness 8 millimeters: from 55 thousand rubles;
- wall thickness 3 millimeters: from 40 thousand rubles;
- wall thickness 3 millimeters: from 55 thousand rubles;
- wall thickness 3 millimeters: from 65 thousand rubles;
Where to buy a caisson for a cellar?
In Moscow
The following companies sell caissons for cellars in Moscow:
- "POLEX": Moscow, Ryabinovaya street, building 28A, office 137;
- "POLYMEROS": Moscow, Northern Boulevard, building 9, building A;
- "EXPOCOM": Moscow, Seslavinskaya street, building 16, building 3, office No. 51.
In St. Petersburg
You can purchase caissons for cellars in St. Petersburg from the following companies:
- "POLEX": city of St. Petersburg, 9th January Avenue, building 3, building 1;
- "RosBio": St. Petersburg, Kosmonavtov Avenue, building 47;
- "ProfOsnastka": St. Petersburg, Kyiv street, building 2.
Thus, purchasing a caisson for the purpose of equipping a container for a cellar is much more profitable than building a traditional cellar. In addition, high-quality plastic products can last up to 80 years, and the low cost of products and ease of installation allows you to acquire your own plastic or metal “cellar” in a short time.
howseptik.com
What is a caisson and its purpose
Externally, the caisson design resembles a familiar box or barrel, which is hermetically sealed with a hatch cover. Cylinder-shaped caissons are popular. The caisson houses all the equipment necessary for pumping water to the surface.
The optimal height for a structure is up to two meters: with a smaller diameter it is inconvenient to carry out repair work, and if the diameter is larger, then such caissons are expensive and consume an increased amount of materials during operation. Experts identify two main tasks that caissons cope with:
- protection of the well head and pumping equipment from moisture, in addition, the caisson design allows you to save space for placing the pump and other devices;
- protection of units and pipelines from low temperatures and freezing.
Caissons are special equipment that does not allow moisture to penetrate inside, and is also waterproofed inside. The upper part of the structure is insulated to improve thermal insulation. Such a simple device serves as a reliable protector against water freezing, debris and other groundwater getting into it. In addition, such a structure can serve as a real utility room if repair work is required.
Based on the existing dimensions of the caisson, you can also install the following:
- water resource filtration devices;
- devices for measuring various indicators (for example, a pressure gauge to control the water pressure in the pipeline);
- expansion tank (more often it is installed directly in the house);
- automatic devices.
Please note that when arranging the caisson on your own, you should first take care of its insulation.
And internal waterproofing will protect the pumping equipment from moisture and ensure long-term uninterrupted operation.
What types of caissons are there?
Before you go to a hardware store to purchase materials to construct a caisson for a well, it is important to choose the type of materials themselves and the shape of the future structure.
The following types of caissons are installed today:
- square;
- with round top;
- rectangular structures.
According to the type of material and the type of construction rings used, caissons come in the following types:
- concrete caissons;
- metal caissons;
- plastic caissons;
- caissons made of sand-polymer materials.
Let's take a closer look at the listed types of caissons for installation in a well.
Plastic caisson
For shallow wells, caissons made of plastic are suitable. Plastic structures are common due to the fact that the material does not allow moisture to pass through, does not require additional insulation, and is very easy to install due to its lightness. But installation requires care, as the plastic is fragile. When constructing a plastic caisson, it is important to surround it with a layer of concrete (up to 1 m) to avoid deformation.
Metal caisson
The most senior type of protective structure. Such caissons are popular due to their affordable prices.
To avoid damage by corrosion, structures are made of aluminum or stainless steel. The advantage of such a caisson is also the flexibility of the material, which avoids cracks and leaks. The wall thickness must be at least four millimeters. When performing installation work yourself, be sure to apply a protective anti-corrosion agent before installation. This precaution will ensure the operation of the structure for decades.
If you do not have the funds to buy a caisson made of metal, then if you have a welding machine, you can make the structure yourself.
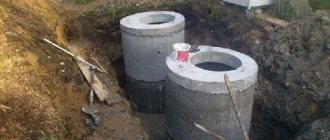
Concrete type
Concrete caisson is not a cheap design, since one person cannot complete the construction of a well with concrete rings and you need to seek help. When installing the device, it is also necessary to use special equipment due to the large weight of the concrete rings. You will need an excavator and a truck crane.
It is worth noting that the heavy weight of concrete can cause the structure to fail over time. To prevent this, you should equip a strong pallet where the structure will be installed in the future. Take care of waterproofing and additional insulation, as concrete allows moisture to pass through and does not retain heat well.
Reinforced concrete view
The device is the most expensive. The structure is made of reinforced concrete rings. Installation work takes a lot of time, money and effort, but it pays off with a long service life. The disadvantage is the low level of thermal insulation, as well as the high probability of groundwater ingress.
Metal
A metal caisson for a well can be of various shapes, such as rounded, hexagonal, square, cone-shaped and other shapes. The caisson must be welded so that there are no cracks or holes through which water can leak.
Installation of a metal caisson for a well
A metal caisson for a cellar must be installed on a previously prepared sand cushion with a layer of at least 20 cm. The space between the soil and the caisson wall must also be filled with sand. To make a caisson from metal, metal sheets 4-5 mm thick are used, which are welded together using a welding machine. When making a metal caisson with your own hands, it is necessary to take into account that the number of welds greatly affects its quality and service life. At the bottom, be sure to make a hole slightly larger than the casing pipe. A sleeve is welded to this hole so that it can be easily put on the casing pipe. To attach water pipes, nipples are welded into the walls. Typically, waterproofing a metal caisson is done by covering the outside with bitumen mastic, and waterproofing the caisson from the inside is applied as a primer. The metal caisson must be insulated on the outside and on top.
Arranging a concrete caisson with your own hands
Now you have already chosen the shape and decided on the type of caisson for your well. The following question arises: how to make a caisson for a well with your own hands?
Installing a caisson for a well using your own efforts does not require any special knowledge or skills. Such an arrangement is possible for anyone who has the slightest idea about the organization of this process.
After the drilling of the well itself is completed, a pit should be dug around it to a depth of at least two meters, exceeding the dimensions of 10 cm in each direction. You should dig a pit, taking into account that the upper part of the caisson structure is at least 10 cm above the surface. This precaution will avoid the ingress of water. Digging a pit can be done manually or using an escalator.
The bottom of the pit must be carefully leveled by hand, and the remaining soil must be raised to the surface. Afterwards, sand is poured onto the bottom of the pit, and a concrete tray is installed where the caisson will be placed.
It is better to immediately check how close underground water resources are after digging a pit. If the water does not come up, then you should cover it with large crushed stone, otherwise you need to install a concrete slab.
To extend the service life of the structure and increase the level of waterproofing, concrete rings should be coated with mastic before direct installation.
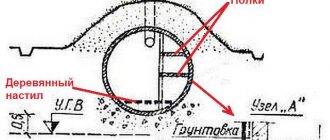
Then a stump of boards is installed around the caisson. If the walls of the pit are prone to crumbling, then it is better to take care of double protection: one frame - directly next to the walls of the pit, the second - near the caisson. The stump can be constructed from existing old boards and bars. To extend the service life, it is better to cover the resulting wooden frame with polyethylene oilcloth.
The resulting distance from the formwork to the walls of the pit is filled with reinforcing mesh, and then filled with a dense concrete solution. It is important that when filling the space with solution, no air spaces are formed. The concrete base is left for 6-7 days for the solution to harden. To avoid drying out, it is better to cover the formwork with film.
Take care first of running several pipes through the future concrete wall:
- pipes that supply water to the pumping unit and directly to the house;
- pipes in which the electrical wiring will be placed.
If you do not take care of the holes for the pipe in advance, you will have to make them after the concrete has dried with a hammer drill. In the area of passage through the concrete layer, metal sleeves should be put on the parts.
A cover is attached to the built-in caisson, which should be insulated. A shield made of wood, plastic, or a finished concrete slab with a special hole for a hatch can be used as a cover. It is important that the cover is attached at a height of 10 cm from the soil surface to prevent rainwater from entering the device.
To complete the installation work, you should perform the following steps:
- waterproof the outer and inner surfaces of the concrete caisson - bitumen mastic can be used for this purpose;
- lay the water supply system pipes, and also, if required, the power cable: the resulting space should be filled with polyurethane foam;
- If, upon completion of the installation of the concrete structure, empty spaces appear, then the pit should be refilled.
Recommendations for installing a caisson
Remember that the functioning of the entire water supply system depends on the correctness of installation work. Errors and inaccuracies can lead to problems and then it will be difficult to eliminate them without the help of specialists. Some tips for installation:
- To place the hydraulic accumulator in the caisson, it is important to move the hole for the casing pipe slightly away from the center: the main condition is that the casing pipe must fall into the hatch;
- cable and hydraulic outlets must be installed at the water supply entry point;
- Before you start welding the sleeves, put it on the pipe to check that there is a small margin.
If you live in an area with cold climatic conditions and harsh winters, then the distance between the concrete wall and the caisson should be filled with dry sawdust, which will provide additional temperature protection for the equipment. In addition, the inside of the ring can be insulated with foam plastic.
It is important that before directly installing a caisson made of concrete rings for a well, you need to clean, remove dust and wet the mating surfaces.
It is worth considering that the slightest deviation from equipment installation technology can lead to malfunctions of the entire water supply system. If you understand that your existing knowledge and skills are not sufficient to carry out installation work yourself, then it is better to turn to the services of specialists.
With proper installation work and waterproofing measures, the concrete caisson will serve the owners for a long time. With the help of a caisson, you can solve the problem of using water resources all year round. This design is a reliable protector of the pump unit and pipeline from frost and damage. Therefore, think through all the pros and cons, and make the only right decision for yourself!
vodospec.ru
Autonomous water supply from a well
Today, a modern person living in a country house or dacha simply needs the comfortable conditions that we are accustomed to in the city. Unfortunately, central communications are not available everywhere. Let's think about the availability of water in the house. In order to have water in the house, you can bring water from a well in a bucket, and if a whole family lives in the house, then the best solution for you is an autonomous water supply from a well .
In order to correctly develop an autonomous water supply for your home, you need to attract specialists who will advise you and help you correctly plan the sequence of work, and get the result that suits you. Water is supplied from a well using a pump (we described the types of pumps for a well above). In order to choose a pump, you need to get advice from specialists who are engaged in arranging an autonomous water supply for your dacha or country house . Autonomous water supply from a well is organized using a pumping station, which is located in a caisson, house or separate building. Important! The temperature where the pumping station will be located should not fall below +2. Above is a table with the cost of materials and prices for work for conducting autonomous water supply from a well on the site . Specialists will come to you, provide free consultation and make preliminary calculations for the water supply of a country house .
Water supply from a well
Features of an autonomous water supply device for a private house
Plumbing in a private country house is one of the main components of a comfortable and cozy stay. To properly ensure all water consumption standards, an autonomous water supply system or a centralized system is used. However, centralized networks do not always exist in holiday villages. If all technical rules are followed, you can independently install water supply in a private house using commercially available materials. Everything depends, for the most part, on financial capabilities, as well as on compliance with all points of the instructions when carrying out this type of work.
Water supply schemes
The most common option for such water communication is the use of a well or borehole as a water source. Not everywhere, aquifers come close to the surface, but even in this case everything depends on technical, and therefore financial, capabilities. If, due to the depth of the water, it is impossible to build a well, then the well will certainly reach any, even the deepest, water layer. However, in the case of a well, before installing an autonomous water supply system, it is necessary to purchase a water pump. If the water source is a well, then most often a submersible pump is used, which is installed at the bottom. Submersible pumps are also used to supply water from wells, but they differ in their design and size.
Depending on the time of year, there are two water supply schemes:
1). Summer. Used during warm periods. Installation of the structure is much cheaper, but it cannot be operated at subzero temperatures.
2). Winter. Accordingly, it is used in winter, taking into account all climatic and weather conditions existing in the area.
The standard water supply installation scheme includes the presence of a main source of water, external technical networks, a distribution system and an internal water supply system (risers, pipes, water tap).
This system includes the following technical devices:
— pump or pumping station;
— hydraulic accumulators;
— special filters;
— storage tanks;
— water heating devices;
- expansion tanks.
The selection and installation process of technical equipment is based on preliminary calculations of water consumption volumes, which are carried out by experienced specialists in accordance with existing standards. If you do not have experience in carrying out such calculations, then it is better not to take on this work yourself. After drawing up a plan and making all the necessary calculations, you can immediately begin installation work.
Water supply from a well
Description of installation work
Installing a water supply system in a private building begins with identifying the main source of water supply. If there is a possibility of direct connection to a centralized network, it is necessary to agree and obtain permission from any operating organization or from their owners. If the choice fell on an autonomous water supply , then you need to drill a well yourself or build your own well. At the next stage, the actual installation of the external water supply is carried out. Taking into account the climatic conditions of the region, it is necessary to lay pipes below the frost line. To insulate pipes, heat-insulating linings or bulk building materials (perlite, expanded clay and others like that) are used. After installing the external elements, it is necessary to connect the water supply directly to the house. The input hole should not be large. This is done for the purpose of high-quality insulation of the pipe. The inlet pipe is then connected to the already installed distribution unit via a pumping station or directly. At the next stage, it is necessary to install a storage tank or accumulator. Special filters are connected to the pipeline; they are designed to directly purify drinking water. If desired, the owner of a private house can equip the premises with a hot water supply system. At the same time, an expansion tank and a water heater are installed, as well as other necessary equipment. At the final stage of the work process, a test run of the installed water supply system . The performance and quality of all components and elements are checked. The reliability and strength of technical connections is checked. To install a high-quality water supply system, it is best to purchase pipes made of polypropylene. It should also be mentioned that before installing the water supply system, experts recommend installing a sewerage system connected to the water supply system.
Thus, in order to save your time and nerves, we suggest contacting specialists who will advise you for free, and our master will come directly to your site and make accurate calculations!
Why are caissons installed?
When installing downhole equipment, it should be taken into account that it will be located in the soil layer that is susceptible to freezing. This fact may well cause physical damage to the equipment due to temperature shifts in soil layers. In addition, water in equipment cavities can also freeze and cause them to rupture.
To eliminate the possibility of such situations, caissons are often installed in wells, which are an insulated container in which downhole equipment is installed. The great advantage of caissons is also that their internal volume provides fairly easy access to the devices located in it.
Let's build your dream home together
Do you know why a caisson is installed in a well? No. Then let's look at what they are and why they are needed.
Caissons for a well are a kind of cylindrical or parallelepiped-shaped structure into which a water well is hidden. They protect the well from freezing in winter and spring from the penetration of melt water. It should have a hatch on top to provide access, and a ladder if you want to get out of there