It is necessary in most cases, since during masonry it is impossible to avoid the appearance of errors that negatively affect visual perception.
Currently, there are many different materials used for these purposes, which differ significantly from each other not only in their final appearance, but also in the chemical composition of the components.
What is grout and why is it needed?
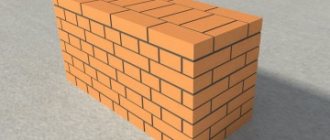
Experts call the seam processing process “jointing”. Grouting/grouting is the application of an additional layer between bricks after installation. Performed on walls that are not planned to be plastered or covered with other materials.
Gaps are left during laying
What does grout do?
| Photo | Description |
| Decorative purpose: |
- emphasizes the correctness of the lines,
- gives clarity to the drawing,
- combines horizontal and vertical lines,
- makes the masonry neat and expressive,
- a new color scheme is introduced into the design,
- the appearance of the building is improved.
Grouting is not able to eliminate errors: excess cement, mistakes on bricks, curvature of walls and seams.
When can you grout:
Jointing is possible only with careful laying. When planning to decorate the seams, use only intact bricks without flaws.
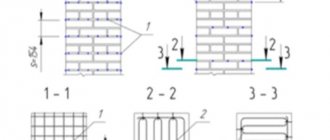
All seams must be the same thickness. According to SNiP standards, the width of the seam between bricks is maintained at 10–15 mm horizontally and 8–15 mm vertically.
Masonry under grout
Grouting is possible for construction and decorative bricks, for gypsum tiles under brick. It is also used for facade panels and natural stone.
Grout: 5 ways
Joining is performed in several ways:
Practical purpose:
|
| Photo | Description |
| Method 1. Trimming (flush) |
Simple and fast way.
The mortar that has gone beyond the plane of the masonry is removed with a trowel.
The surface is treated with a stiff brush.
The mixture located between the bricks is compacted with a sharp spatula.
Then they are cut and smoothed with a jointing spatula.
It turns out to be concave in the middle, and the edges are covered with cement.
The joints need to be filled with a jointing spatula, which is also used to compact the cement mass.
The solution is cut off, and then a spatula is passed over it.
You need an arc-shaped spatula.
They are passed along the seam, filling the space with the building mixture.
An outwardly curved seam is formed.
The most difficult, requires skill.
Most often used inside the house on decorative brick.
Cement is removed from the seam by 5–6 mm.
The solution is placed into the resulting gap, and a triangular cut is formed with a sharp spatula.
Doesn't require any special skills and is done quickly.
A trowel is passed along the seam at an acute angle and excess mortar is removed.
The depth is 3–4 mm.
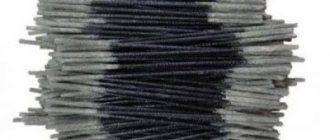
Tool for grouting - jointing spatula
Some craftsmen use a certain type of masonry - horizontal seams are thicker than vertical ones. This is an interesting modern design.
Mixtures for jointing
For grouting, ready-made compounds are sold (30 kg/700–900 rubles), they come in two types:
- cement-based;
- on epoxy resin.
| Method 2. Concave (fillet) | |
| Method 3. Convex (roller outward) | |
| Method 4. Double-cut triangular | |
| Method 5. Beveled (single cut) |
| Photo | Description |
| Cement grouts |
Cement mixtures are popular: they are cheaper, easy to use, and easy to clean off the surface.
The packaging contains clear instructions with dilution proportions.
Usually this is water, but there are solutions that are mixed with latex.
- high-quality types of cement;
- dyes;
- quartz sand;
- plasticizers;
- additives to speed up drying.
The color range of cement grouts is varied.
Epoxy grouts are effective in places with mechanical stress and in aggressive conditions.
In terms of resistance and durability they are superior to cement ones.
Types of brick jointing
Rectangular, trimmed (flush) . It is one of the simplest ways to decorate a facade. This jointing involves cutting off excess mortar with a trowel and subsequent processing of the masonry joints with a stiff brush. This technology is often used in the construction of facilities whose facade walls will not be plastered. Rectangular jointing allows you to achieve clear contours, at the same time it is simple and does not require much time.
Rectangular recessed . This method is labor-intensive, but allows you to make facade walls more expressive. Jointing involves removing the mortar from the masonry joints to a depth of 5–6 mm, their subsequent compaction and smoothing. This design is not recommended for use in regions with difficult climates, as it somewhat reduces the thermal insulation properties of brick walls.
Concave . As in the previous case, the wall processing technology includes cutting off excess mortar. Then the seams are processed with a special tool, a jointer, to give them a concave shape. This method is not recommended for masonry buildings located in difficult climatic regions, for the same reasons as the previous one.
Beveled . It is the best option for houses built in areas with harsh climates. Bevel jointing is carried out with a sharpened trowel, which is directed so as to cut the mortar from the masonry at an acute angle. Can be performed in single- and double-cut versions.
Independent work
Take M500 cement, white alabaster and quartz sand in a ratio of 2:2:10 parts. Add water and knead. The mass should not be liquid.
It is better to work with a semi-dry suspension - it will not get dirty and spread. The grout mixture can be prepared in other proportions:
- cement - 4 buckets,
- package of white grout mixture (2.5 kg),
- water - 6 l,
- fine sand - 2 buckets.
To obtain a white joint, it is recommended to add lime, but... Rain can cause it to streak and look gray. But a 100% snow-white seam can only be obtained when using a purchased mixture.
Check the correct mixing with a trowel: the mass should not flow or fall off it. Use the prepared solution within 2 hours. If the time is longer, plasticity is lost and the mixture hardens.
Tools and materials
- putty knife;
- trowel;
- jointing;
- drill with a kneading attachment;
- sand sieve;
- paint bucket.
Seam rubbing technique
Grind the seams after finishing the masonry. This is a monotonous process that takes time, but can be done independently.
Step-by-step instructions for beginner masons:
| Epoxy grouts |
| Photo | Instructions |
| Step 1 |
Prepare the surface: clean the masonry and seams with a stiff brush.
We wash the masonry with water. It is more convenient to do it from a hose with pressure.
Wet the entire surface of the wall.
A wet brick will not draw moisture out of the mortar—cracks will not appear during drying.
Prepare the solution, observing the proportions, in accordance with the instructions.
Scoop the mixture onto a large spatula and apply it to the seam.
We work with narrow jointing: we move the mortar into a horizontal seam.
To remove air and create density, press the tool into the gap.
Vertical joints are filled with cement-sand mortar according to the same principle.
Professionals start working with vertical seams.
At this stage, the solution is held in the palm of your hand.
The area with filled seams is cleaned with a brush.
The type of jointing begins to be formed after the solution has set.
Try to choose the right volume of solution so that you have time to complete all the steps before it hardens.
Tool for the job
Without organizing convex or concave jointing, you should not begin work on filling the masonry joints. This is an indispensable universal tool in this case. With its help, the remaining solution is removed. Since the seams can have different thicknesses, the size of the jointing and cross-section must be selected in accordance with the specific situation. Seams of rectangular, rectangular undercut, convex, concave, single-cut and double-cut shapes have become widespread.
The design of the jointing is very simple, so instead of going straight to the store, some craftsmen take on making it themselves. You will need a piece of metal strip of the required width; you need to bend it along its entire length in the shape of an arc. For convenience, one part of a homemade tool should be wrapped, for example, with electrical tape - you will get a handle. An old knife will serve as a blank. Before you start deforming, you need to heat the knife, that is, hold it a little over the burner flame. You will also need the following tools for the job:
- trowel;
- falcon;
- shovel for mixing and supplying the solution;
- bucket;
- mason's box for mortar;
- mop.
A falcon is a kind of square metal or wooden tray (40 cm wide and 40 cm long), only with a handle. Cement mortar is applied to it, which is taken in portions during the process of filling the joints.
Typically, a trowel is used to lay brick, but in this case it is used to level the mortar, fill vertical seams, and also trim off excess mortar protruding from the masonry. The trowel consists of a working part resembling a spatula with polished surfaces and a wooden handle.
Most houses have ventilation ducts, which are also made of brick. The masonry seams of these channels are formed using a working tool such as a mop. It not only fills the seams, but also smoothes them out and removes any remaining mortar.
Practical advice
Knowledge of the nuances and experience of professionals will help you avoid mistakes and improve quality:
- Be sure to sift the sand. There should be no large fractions in the grout mixture.
- A fresh batch should sit. Let the solution sit for at least 20 minutes.
- When filling the seam, try not to get the solution on the surface of the masonry.
- When laying on the front side, leave gaps to decorate the seam.
- A concave seam can be made by filling the vertical and horizontal at the same time.
- It is better to remove the remaining solution immediately.
- Correct any unevenness/mistakes immediately while the solution is damp; this will not be possible after it has hardened.
- It is better to work on a cloudy, dry day.
- You can make the jointing yourself from an old knife or any metal object.
Start filling the seams from the vertical gaps
Tips and secrets
- Dilute the required amount of the composition with plain water. You should not fill the entire package, because the grout may dry out. Prepare the composition for approximately one square meter of tile, and then make the next one. This way you only use the amount you need.
- Add coloring if necessary.
- Apply grout to the seams using the method you chose.
Grout application process - Remove excess from the surface of tiles/decorative stone/brick.
Removing excess - After a few hours, you can wipe the entire surface of the oven with a damp sponge.
This way you will wash away unnecessary grout residues and achieve a perfect-looking surface. Wiping the surface with a sponge - Leave the oven for several weeks to allow the composition to dry completely.
And finally, a few tips and secrets that will help improve the quality of the work performed.
- The sand must be sifted through a sieve so that no large inclusions remain in it. Otherwise, they may ruin the appearance of the grout.
- There is no need to rush to work with the newly mixed solution. You need to let it brew a little.
- During the work, the brick is protected from the mixture getting on it. By the way, when laying bricks, it is better if the mortar does not completely fill the gap on the front side of the wall.
Decorative seams
- If concave grout is done, then you can fill both horizontal and vertical joints at the same time. If it is convex, then first vertical, then horizontal.
- After completion of work, the remaining solution is removed immediately.
- You need to work with the mixture as quickly and carefully as possible, because it dries in a short time. But at the same time, it is important to seal the seams carefully and without mistakes, because after drying it will be difficult to simply fix them.
- To obtain a specific color, tints are purchased.
- It is important to carry out work in cloudy but dry weather.
- You can make the jointing yourself from any dense metal product, for example, from a knife.
Grouting errors
Grouting brickwork joints is one of the most durable ways to decorate the appearance of a brick facade wall. It looks very impressive, and all the work is easy to do yourself, without the help of specialists. And this is undoubtedly a huge plus.
We invite you to familiarize yourself with DIY bath accessories
Conclusion
Grouting the joints improves the appearance of the masonry, making it more impressive and expressive. Having an idea of working methods, tools and the quality of mixtures, jointing is not difficult to do yourself.
In the video presented in this article you will find additional information on this topic. In the comments, share your experience with unstitching.
After completing the finishing work on the base, it is necessary to grout the seams of decorative bricks or other material, which will give the masonry a finished look and ensure its uniqueness. It is easy to do this work yourself and does not require special education or skills. You can prepare the mixture yourself or buy it ready-made at a hardware store. If the work is carried out correctly, the decorative finish will last on the wall for many years and will not lose its appearance.
Surface and solution preparation
Joining brickwork can be done in several ways:
Joint jointing of brick walls.
- buried method
- in pruning
- convex, roller outward,
- with a fillet,
- single-cut,
- triangular double-cut.
The essence of this method is that the seam of the brickwork is cleaned and then filled with the prepared mortar. This work is best done in cloudy and humid weather. Before starting work, the seams are cleaned, after which the prepared mortar is applied with force to ensure its maximum adhesion to the material that was used during bricklaying.
Joint jointing of brickwork can be done on both new and old buildings.
If the house is old, then you will have to work harder, since you need to clean the seams from the mortar to a depth of 15-20 mm. To do this, you can use a hammer and chisel, but it is easier to do this work using a hammer drill. Experts do not recommend using a metal chisel, as it can damage the brick; for this it is better to use a hewn piece of hardwood.
Shapes of seams.
After all the seams have been cleaned, the next step is to clean the building façade from any remaining mortar, dust and dirt. To do this, use a brush with hard bristles.
Before starting work, to ensure maximum adhesion of the mortar used for jointing with the brickwork material, the wall must be moistened with water. The work should not be done on a sunny or rainy day; cool, cloudy weather is best.
To perform jointing, you can purchase a ready-made solution, which is sold in dry form; all you have to do is dilute the required amount with water. The consistency should be thick enough so that it does not flow down the wall. If you mix the solution yourself, then in each batch you must strictly adhere to the ratio of components.
If you decide to make the solution yourself, then you need to take cement, lime and sand in a ratio of 1:1:10 and mix everything with water. You need to prepare such an amount of solution that you can use within 2 hours, otherwise it will begin to dry out and lose its elastic properties.
Return to contents
Features of grout
In order to fill the gaps between individual building materials after they have been laid, various compositions can be used. When choosing such a composition, it is necessary to take into account the color of the decorative product, the space between its individual elements, the thickness of the bricks and other points. You can grout with mixtures that differ in different shades depending on the color of the finishing material itself. You can also mix solutions of different colors to achieve the desired shade.
When preparing such a composition with your own hands, you need to take into account the features of the masonry and the location of the wall itself. If this is a room with high humidity, then it is necessary to use joint sealing compounds that will prevent the possibility of moisture getting between the bricks. To do this, you can use various additives for solutions.
The advantage of gypsum grout is that the material hardens quickly, but the work must be done carefully so that no mortar remains on the front side of the brick. Otherwise, it will be difficult to scrub off or wash later.
In some cases, wiping after bricklaying is done with silicone sealant, which is usually colorless, but dyes can be added to it. Such grouting after completion of the work will highlight the natural color of the finishing material itself and smooth out unevenness in the seams, if any.
Types of finishes and their descriptions
Depending on your wishes, you can use one of these decoration methods.
Basic methods of grouting joints:
- Angular. When making such seams, the binder solution is cut to a depth of 2-4 mm.
- Convex. It is used only for interior decoration. It looks very impressive, but retains moisture, which is unacceptable for facades. The solution is completely removed to a depth of 5 mm and filled with new one.
- Flush. Is the most common way. Cut off the protruding mortar and smooth the surface flush with the bricks.
- Concave. It is done as the previous option, but the surface is smoothed in a certain way to create a hollow.
All types of jointing look equally beautiful. Use the one you like best or the one that works best for you.
Quantity of joint filling compound
All grouting work should be carried out only after completion of the installation of the finishing material. You can reliably and beautifully erase the distance between individual elements if you follow the rules and regulations. It is also important to carry out the masonry itself at the same distance between the individual bricks; in this case, filling the seams will be easier.
Depending on the width of the seam and the depth of the masonry itself, you can calculate the amount of material required to fill them. For brick joints up to one centimeter wide, you need to spend 7–8 kg of mixture per square meter. But these parameters may vary depending on the characteristics of the masonry.
Varieties of material and methods
For interior finishing, epoxy-based compounds are used.
Masonry joints must be treated with special compounds. Several different types of grout can be used for these purposes. However, in Russia, with frosty winters, only 2 types are widely used:
- cement-based mixture;
- composition made from epoxy resin.
The first is mainly used for treating external walls, the second - internal, as it is much easier to wash and clean. The color of the composition is determined depending on the wishes of the owner and is achieved by mixing with the color scheme.
In addition, you can use chemical components that will prevent the formation of fungus and mold, as well as increasing resistance to sudden changes in temperature conditions.
The appearance of the wall will depend on the grouting method chosen. The final result will depend on what tool will be used to complete the work. While some of the grout joints can be applied using a spatula, more complex compositions will require a special device.
To a greater extent, seaming is done in the following ways:
- Flush, in this case the composition is placed inside the seam, and the excess is removed with a spatula. After this, the brick is cleaned with a brush.
- A convex seam is applied using a similar method, however, the excess is not removed with a spatula, but, on the contrary, a special arc-shaped device is passed along it, after which a neat mark is formed. Thus, horizontal masonry is processed; vertical seams must be made after the first ones have partially hardened.
There are quite a few ways to lay out the jointing. The most common of them are presented below.
When performing work, you need to press the compound firmly into the seams between the masonry. This will create a high-quality and durable surface.
Grouting technology
To carry out all the work, you must have a tool, the main one of which is a spatula and a special bag where the composition is placed. But the work of filling the seams can also be done with a syringe. The use of these tools will help you quickly process the seams without contaminating the surface of the brickwork.
Depending on which grouting method will be used, it is necessary to prepare additional tools:
It is important to initially prepare the surface and clean it of excess solution and dust. The mixture is carefully placed into the seams and compacted, and its excess is washed off immediately after application so that it does not dry out.
Mixtures must be selected depending on the specifics of their use, and diluted in accordance with the instructions on the package. Often such compositions are sold in dry form; they only need to be diluted with water and stirred. It is better to prepare such an amount of the mixture that the master can use it in the period of time during which the grout cannot harden. In addition, stale mortar can impair the waterproofing of joints, and when drying, cracks will form in them.
This point must be determined at the stage of laying the brick, depending on why the method of laying the brick itself will be chosen. Each grouting technology has its own execution technique, and therefore must be adhered to throughout the entire duration of the work. Grouting is usually done in several ways.
- Flush. This is the simplest option and is done with a semi-dry mixture. You can make it yourself. The composition is applied between the bricks with a trowel, and its excess is removed. Upon completion of work, it is necessary to wipe the surface with a hard rag or brush to remove excess.
- Inside. All the mortar that remains when laying bricks between them is compacted and, if necessary, additional recesses are made. This will create a concavity in the seams, and the bricks will protrude outward.
- Convex. To do this, use a special spatula, which is passed along the seam filled with mortar. Thanks to this method, the seams come out. But the process requires certain skills and not everyone can handle it.
- Triangle. It is a rather complex process and is often used for grouting joints indoors. To carry out the work, it is necessary to remove a small amount of mortar between the bricks, and distribute the remaining composition in a triangle. This technology requires certain experience from the master.
- Beveled This method is simple and does not require skill. You need to move the trowel along the seam and remove part of the mortar, making a small indentation of up to 4 mm at a certain angle.
Work order
Before grouting, you need to clean the walls of debris and dried mortar. This is usually done with a brush. Afterwards, moisten the treated area with water. Select the mixture for work by color - either matching or contrasting. The working composition comes both in dry form, which needs to be diluted, and in ready-made form. Please note that the shade will be different in dry and raw form. There is no point in preparing a lot of solution; it may simply dry out.
After preparation, begin grouting. Remove part of the cement-sand mortar between the bricks (1 cm or one and a half) and fill it with a decorating mixture. Take a little more than you need, and remove the excess with a trowel. Moreover, the application technique is similar to rubbing or pressing, this ensures better adhesion and removes air that can tear the seam.
Next, depending on your preferences, shape the appearance of the seam. You can use a teaspoon, a wooden stick, or a piece of hose to obtain the desired shape. All work is done in dry and warm weather. If necessary, cover the wall with plastic film. Both heat and rain are equally unfavorable for grout.
If masonry materials such as natural stone or clinker brick are used in construction, then it is a good idea to use a special gun to finish the seams. With its help, you can get a better quality seam, since the mixture is supplied under stronger pressure. The obvious advantage is that the grouting process itself will be significantly accelerated. If you have a large area of work, then it makes sense to purchase a convenient device. The quality of grouting using a gun is very high.
Expert recommendations
To ensure that no defects or errors occur during the work, you need to read the recommendations from the craftsmen.
- When preparing the grout composition yourself, it is necessary to use sifted components so that they do not contain large fractions.
- After preparing the solution, it should be allowed to sit for 10–15 minutes and then mixed again to improve plasticity.
- When grouting, you should avoid applying the mortar to the bricks.
- If the solution gets on the decorative finish, it must be removed immediately, preventing it from drying out.
SNiP indicates that the thickness of the seam should be up to 1 cm, and therefore it is recommended to make small gaps between the bricks themselves, adjusting the size depending on the climatic conditions at the work site. There is no need to start grouting joints on hot days, as the solution will quickly harden, which can lead to disruption of the technological process. You should also avoid carrying out work in wet weather. The solution must be mixed in small portions in order to quickly produce it and not allow it to harden.
As you can see, grouting is a responsible but effective way to improve the appearance of a ceramic or other coating after finishing work, and it will also make it possible to create a complete finish. Professionally applied grout will improve the appearance of the base and protect the wall from damage. In addition, it will increase the thermal insulation properties of the masonry, which will allow it to stand for a long time and not require annual repairs. To do this, you just need to complete all the work according to the recommendations and written rules.
Grouting stages
Grouting the face joints serves to prevent precipitation runoff and its penetration into the masonry.
- If the color of the brick joint does not match the desired one, then the grout will be made from a sand-cement mixture. As a result, we will get a joint of light or dark gray color. If you need to make it, for example, white or another decorative shade, you need to use a dry grout mixture that will contain color.
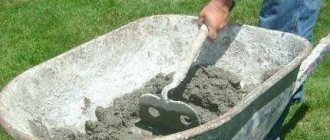
- In order to prepare the mixture yourself, you first need to sift a couple of buckets of sand through a metal sieve in order to remove various waste from it. After this, the sifted sand must be mixed with cement in a ratio of 1 to 2, but this must be done dry. After mixing, add water to the trough and knead using a hammer drill with a special attachment (spinner) until it becomes a thick, homogeneous mass.
- To get white or colored, you need to pour about 5-6 liters of water into a container. Next, the previously prepared dry mixture, which contains the desired color, is poured into the water. After thoroughly mixing with a hammer drill with a nozzle for grinding lumps, allow the mixture to swell, leaving it for 5 minutes, and mix again.
- When working on clean masonry, it is recommended not to stain the brick with mortar. To do this, apply the solution so that more goes on the inside of the wall and as little as possible on the front. When the brick shrinks with a trowel, the mortar will spread evenly along the plane between the bricks, and the outer seam will be slightly unfilled.
- Grouting is done in two types - convex and sunken. When arranging a convex, the finished mixture is placed into the joint using an arc-shaped device, with the arc facing itself. First of all, it is necessary to fill the horizontal ones, while drawing an arc along the seam. After the mixture in the horizontal ones has set, the vertical ones go to work.
- When performing a sunken joint, all seams - both vertical and horizontal - are simultaneously filled with the mixture using a small spatula. After filling, the arc-shaped tool is turned over with an arc inside the seam between the bricks and pulled out, removing the remaining mixture.
All of the above applies to the processing of brickwork seams.
Why is it needed?
Grouting the seams of brickwork is the alignment of the seams formed during the laying of bricks, their decorative design, possibly applying an additional layer of mortar of a different color, which will effectively emphasize the correctness of the lines and the neatness of the masonry itself. This is a unique way of finishing walls, thanks to which they will become more expressive and neat. The grout combines the horizontal and vertical seams formed during the bricklaying process into a single whole.
Where is seam stitching used?
Grouting the joints of brickwork is necessary not only for decorating the facade of the house. It makes the masonry more resistant to weather conditions, increases its tightness, and increases the service life of the entire structure. That is, it increases the density and strength of the masonry seam and makes it possible to give clarity to its pattern.
On a note! Grouting joints is not always able to improve the appearance of masonry. If the work on building a brick wall was carried out carelessly and carelessly, then even the best and carefully applied grouting mixture will not correct the curvature of the seams and walls, unremoved pieces of excess cement and other defects.
Grouting decorative brick joints
The main purposes of using grouting or grouting.
- Improving the appearance of the facade of the house. The use of grout mixtures that have different shades (and their color range is quite rich) can emphasize the neatness of brick laying. Contrasting shades are often used, for example, light-colored grout looks good in combination with dark brick and vice versa.
- Grouting will protect the cement mortar seams from moisture, which will significantly improve its service life, as well as the house and walls as a whole.
- The thermal and sound insulation values of walls made of bricks are significantly increased by grouting the joints.
Brickwork for jointing
Where can jointing be used? After all, it’s not always possible to see houses with such finishing, which means, theoretically, you can do without it? Grouting is necessary if the walls of a brick house will not be tiled or plastered in the future.
Convex jointing of masonry joints
Advice! If the walls of the house will be decorated using grouting, then during masonry it is necessary to use only intact and neat bricks without flaws. And the seams between individual bricks should be of the same thickness, although some craftsmen make the horizontal ones slightly thicker than the vertical ones - this is a kind of design move. In general, according to the requirements of SNIP, the thickness of the joint layer of brickwork should be as follows: vertical joints from 8 to 15 mm, horizontal joints from 10 to 15 mm.
Grouting joints is suitable for any type of brick - construction, facing. The main thing is that the bricks themselves are beautiful if grouting work is planned specifically for aesthetic purposes. It looks very good both on the facade walls of the house and inside the room. Grouting the joints of natural stone masonry can also be an excellent option.
Demonstration of the grouting process
What tasks does grouting or jointing perform?
Plunging headlong into the construction whirlpool, many novice craftsmen are faced with the problem of grouting joints on a brick wall. Everyone who has ever done a renovation knows why to grout the seams on the tiles in the bathroom. Or just stood nearby. In the matter of grouting decorative bricks, we are guided by approximately the same motives.
Tools for grouting brickwork joints.
So why do you need grout? Or jointing, as it is also called. Firstly, the special composition of the grout prevents the harmful effects of the environment on the cement mortar. The composition has excellent waterproofing properties. This ensures that after 5 years the wall will not crack from heat, cold and moisture.
Secondly, the jointing prevents the joints from blowing through, it simply seals them. Elementary, you will be warmer, because it is no secret that most of the heat in the house comes out through the joints in the masonry! And if it’s warmer, you can save a lot on heating the room in winter.
Thirdly (if the first two points didn't convince you), it's just beautiful, that's all! A house with neat joints of the same color looks much more aesthetically pleasing than a building in which something dark gray is visible in the seams, and even in different shades if the cement mortar was prepared using different technologies.
Grouting methods
Grouting brickwork joints can be done in several ways. The effect that can be given to the walls of the building will depend on this. Let's take a look at the most popular of these methods.
Types of joints in brickwork
Table. Grouting methods.
| Step 2 | |
| Step 3 | |
| Step 4 | |
| Step 5 | |
| Step 6 | |
| Step 7 |
| Name | Characteristic |
| Flush | This is the easiest way to grout joints and can be done even without a special narrow spatula. Grout placed in the cracks, or ordinary cement mortar that protrudes beyond the border of the brick, is simply removed from the wall with a trowel. After this, the seam is processed with a stiff brush. |
| Concave | In order to do just this type of grouting, you will need a small spatula (called “grouting”), which will be used to fill the joints with the mixture and compact it. It should not be long so that it can fill both vertical and horizontal seams. The cement mortar from the masonry is cut flush, and then passed over it with a special jointing spatula. The same technology is used to carry out work with a special solution applied inside the seam. |
| Convex | In this case, the spatula should be arc-shaped; it is applied to the seam with the arc part outward, and the free space is filled with the building mixture. Then the spatula simply moves further along the seam, and the process of applying the mixture continues. |
| Rectangular | But the rectangular grouting method is more complex. First of all, about 5-6 mm of mortar (sometimes even already dried) is removed from the seams, and then the gaps between the bricks are again sealed with new mortar. This finish looks beautiful, but it is not advisable to use it for facade work, since it does not drain water well. |
| Beveled | An ideal grout option for those houses that are built in regions with harsh climates. In this case, the mortar inside the seams is cut with a sharp trowel not evenly, but at an acute angle by about 3-4 mm. |
Types of grout and tools used
Grouting not only looks impressive and colorful, but also brings considerable benefits. It is performed to solve the following problems:
- To improve the decorative appearance of the building. Colored grout for brickwork looks very unusual. It can be contrasting with the color of the brick. For example, light grout is used on a dark facing stone, or dark brown grout is used on white sand-lime brick.
- Grout provides additional protection to the masonry cement mortar, thereby extending the life of the walls and the house itself.
- Thanks to the grouting, thermal insulation is improved and the sound permeability of the walls is reduced.
Joining brick joints should be done only in cases where the walls will no longer be plastered or covered. The grouting process can be carried out in many different ways. Here are the most famous options:
- Flush (undercut). The most common, simple and easy way. It can be done without a special tool; the excess solution is simply cut off using a regular trowel. Then the seams must be treated with a stiff brush.
- Concave. The method is no less popular, but to perform it you will need a special tool - jointing. This tool looks like a small concave sharp spatula. It cuts off excess mortar inside the seams and then carefully smoothes it out.
- Convex. The procedure is the opposite of the previous one. Using an arched joint, the pre-laid fresh construction mixture is pressed against the seam.
- Rectangular recessed. It looks very nice, but is not recommended for external walls. The bottom line is that it is necessary to remove the old masonry mortar to a depth of 5-6 mm. In its place, but not flush, the jointing compound is laid and compacted.
- Beveled. Using a sharp trowel, cut the grout diagonally and inward by 3-4 mm.
To perform such work, no special equipment is required. Here is a sample list of tools for grouting brickwork:
- trowel (spatula);
- hard brush;
- sieve;
- a bucket or other container for preparing the grout;
- a construction mixer or drill with a special attachment for mixing grout;
- jointing of the required types and sizes.
Brick grout is prepared from the following ingredients:
- fine sifted sand;
- high grade cement;
- ready-made dry construction mixture for troweling;
- water.
All ingredients are thoroughly mixed. The formation of lumps is absolutely not allowed, this can negate all efforts and the seams will look ugly. The finished mixture for brickwork joints should stand for a while so that the moisture is absorbed into the components. Then you need to mix again. Grout for artificial and natural stone is prepared in the same way, but it is much more flexible and you need to work with it even more carefully.
What is used for grouting
What might be needed to grout the joints between bricks? Not as much as it might seem. First, you need the grouting solution itself, the creation of which we will talk about a little later. Secondly, we also need tools with which all the work will be done.
To grout the joints you will need:
- spatula (trowel);
- “spinner” for a hammer drill or a construction mixer;
- the hammer drill itself is directly used for working with the “turntable”;
- fine sieve for sifting sand;
- container for mixing the solution;
- jointing of such a size that its width is equal to the width of the seam between two bricks. If the width of the vertical and horizontal seams is different, then two types of this device will be needed.
Brick jointing tool
Construction mixer price
Note that the main tools that may be used are listed here. But in some cases they may not be useful at all. For example, if you do not plan to make a shaped gap, then you can simply remove fresh excess cement during laying with a trowel.
Tools and materials
To perform jointing work, you will need the following tool for grouting brickwork joints:
- putty knife;
- arcuate device;
- hammer drill and spinner attachment;
- container for mixing cement grout;
- syringe or construction gun.
To perform this work, you can use a special dry mixture.
Injection is carried out using materials such as:
- cement-sand mixture;
- special dry mixture for putty;
- water.
| Type of brick | Format | Dimensions, mm | Consumption, kg |
| Full-bodied | Ata NF | 240×71 | 5,0 |
| Hollow | Ata DF | 240×52 | 7,5 |
Preparing the solution
The color of the grouting solution is determined after the masonry is completely completed. But in general, you can choose the color scheme at the stage of choosing a brick. It is better to buy materials that match each other in color as closely as possible; they should be in harmony with each other, and not make you want to immediately look away from the wall of the house. But often designers experiment with a combination of two bright contrasting colors, and such experiments often look very impressive and beautiful.
Contrasting grout for seams
On a note! If the desired color was not available, then you can grout the seams with ordinary cement-sand mortar. In any case, it will look nice, as it has a grayish natural color that is in harmony with all other shades.
To prepare the mixture itself, which will be used to grout the joints on the brickwork, you will need the following components:
- high quality cement - 4 buckets;
- clean fine sand - 2 buckets;
- dry ready-mix for preparing grout mortar;
- clean water - about 6 liters.
Note: the volumes of materials are approximate, but will allow you to roughly calculate costs.
To prepare the solution, you need to carefully sift the sand using a fine sieve, removing large fractions and possible debris from it. One part of the entire sifted material must then be mixed with two parts of dry cement, after which a little water is added to this composition and everything is mixed to a thick mixture of uniform consistency with a construction mixer. Then the grout mixture and water are added, and everything is thoroughly mixed again.
The finished mixture should be allowed to brew. After the solution swells a little, having absorbed the liquid, it is mixed again. That's it, the solution is ready for use.
Quick Mix series VK 01 – Masonry mortar with route for facing bricks
Prices for cement and basic mixtures
How is jointing done?
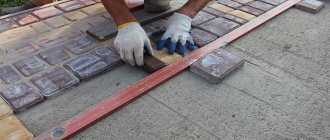
The jointing is carried out on freshly laid masonry while the mortar is still elastic. Having laid out several rows of masonry, they immediately begin the process of jointing. First, unstitch the vertical seams, running the tool along the seams of the masonry with slight pressure from top to bottom or bottom to top, and then the horizontal ones.
After compaction, the remaining mortar must be removed from the brickwork. This is done with sweeping movements of a broom or soft brush. And so you need to continue, in the process of masonry, all the time.
How to grout brickwork seams
The process of grouting brickwork joints may be monotonous, but quite simple. Any person can carry it out, so the owner of a country plot will be able to cope with this task on his own.
How to grout brickwork seams
On a note! It is important to carry out grouting work only when the bricklaying is completely completed. Otherwise, there is a risk of ruining all your work. It is important to take into account the weather conditions during the work, humidity and the quality of the materials used for grouting - all this will significantly affect the quality of the entire work.
Step 1. Grouting of masonry joints should be done on a clean and prepared surface, it is even advisable that the cement mortar has already been dried. First of all, the surface of the seams is cleaned of debris with a brush.
Step 2. Then the seams are washed with ordinary clean water from a hose. In addition, this procedure will ensure that the brick itself does not draw water from the cement mixture.
Step 3. The grout solution is prepared according to all the rules.
Grouting solution
Attention! If you use a ready-made mixture for grouting, then you need to prepare it as written on the package. The above instructions are just a rough guide.
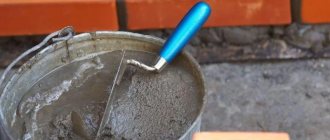
Step 4. The prepared mixture is placed on a large spatula, which is then placed close to the seam. Using a narrow joint, the mixture is carefully but quickly applied to the horizontal seams, in the process lightly pressing into the gap to remove air from the cavity.
Applying the mixture to horizontal joints
The mixture is pressed into the seams
Another photo of the process
Step 5. It is convenient to fill vertical seams if you hold a little mixture in your palm. By the way, builders advise first filling the vertical joints and only then moving on to the horizontal ones.
Filling vertical seams
The process of grouting vertical joints
Step 6. After filling the joints with grout, remove any remaining grout with a brush. The work has been completed.
Removing grout residue
Attention! After applying the solution to the seams, it is important to immediately remove any excess, if any. Otherwise, they will freeze and ruin all your work. You can form the shape of the seams when the solution has set a little.
Video - Method of grouting brickwork joints
Why is jointing done?
The jointing is done on the front side of the masonry, which does not provide for further finishing in the form of plaster or insulation and further installation of facade material.
The jointing process consists of compacting the masonry mortar in the seams between the bricks and giving them a more attractive appearance with a special tool, which we will discuss below.
This is done in order to give a more artistic look to the brickwork and seal the seams, which, by the way, must be carefully filled with mortar. If there are voids in the seams, you need to add the required amount of mortar and expand this area additionally.
Well-made jointing decorates the masonry and does not allow moisture to penetrate into the seams between the bricks, which can destroy the masonry over time.
Grouting old masonry joints
Grouting of joints can be done not only on fresh masonry. Using this method, you can improve the appearance of an old brick building. This is especially true if the mortar in the gaps has already begun to deteriorate, causing the thermal insulation of the entire structure to deteriorate.
Old brickwork
If grouting is done on old brickwork, then you must first remove part of the old mortar (about 1-2 cm). This is done using a chisel and a hammer. You can also wash off the remains of the old mortar using a special device that blasts the masonry with a powerful stream of water (for example, a mini high-pressure washer).
High pressure washer Skil F0150760AA
Price for the range of high pressure washers
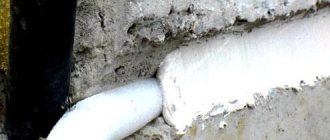
The solution prepared as described above is applied in the usual way inside the gaps. It is important to ensure that during work the solution does not get on the vertical surface of the brick - stains may remain.
Brick for the plinth
You cannot choose a brick for a plinth without understanding what kind of architectural element it is, when it is needed and what requirements are put forward for it. Only taking into account these data can you choose the optimal brick for the plinth, taking into account all the parameters and performance characteristics.
Separating the seams of the brickwork
In houses built quite a long time ago, the mortar in the seams begins to lose its strength and crumble over time. To avoid serious consequences of this process, it is necessary to immediately cut the masonry joints.
Cutting joints means removing old mortar from them and filling them with new one.
There are several tools you can use to remove old grout. These include a hammer with a special chisel and a device with a hook at the end. The choice of a particular tool is influenced solely by the range of your equipment and your personal preferences.
Removing old mortar using a hammer and chisel: wedge and serrated.
The depth to which the solution should be removed is approximately 25 mm. Also remember to take care of your safety and wear either goggles or a full face shield before starting work.
Removing mortar using a tool with a hook.
The solution can also be cut using a carborundum disc of a hand-held circular saw, but in this case it is necessary to wear a respirator in addition.
Seam prepared for new sealing.
The prepared seam must be cleaned with a brush to remove any crumbs and rinsed with water under pressure from a garden hose. When filling the joint with new mortar, its surface should be damp, but without free water.
For this type of cutting, it is recommended to use type N mortar. Its mixture includes one part hydrated cement and three parts sand without water. Add enough water to make the solution hard enough. You can check the correct consistency by squeezing it in your fist and unclenching it.
Layer-by-layer filling of the seam with mortar.
If the shape of the solution is preserved, then all the ingredients are in the correct proportions. But it’s too early to apply it to the seam. You need to wait about five minutes and then add more water. This way you will receive a solution ready for installation. Work dynamically, as the entire solution must be used within half an hour after its preparation.
A properly cemented brick wall will last for decades.
The seam must be filled with mortar in layers of 6 mm. Those. walk along the seam for several meters, tightly hammering it with 6 mm of mortar. Then go back and do the same operation. Do this until the seam is completely filled.
Wait until the last layer of mortar has hardened enough to show your thumbprint and create a mortar profile that matches the grout style of the remaining masonry joints. For this purpose, use a tool with a rounded end.