During the renovation or reconstruction of a house, sometimes it is necessary to redesign the premises. Often an obstacle to this is a load-bearing wall that cannot be demolished. But the problem can be solved by installing an opening in such a wall for a window or door. How to do this correctly so as not to weaken the building structure?
Before you start making an opening, you need to install a lintel that will take the load - from the part of the wall above the future opening, from the ceiling resting on the wall, from the wall of the upper floor or from the roof structure.
How to make a doorway in a brick wall
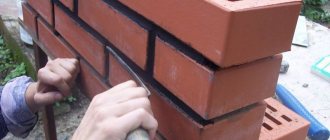
To correctly break through a doorway, no professionalism is required, you just need to determine the type of brickwork. The available documentation for the house will help you understand this issue. Otherwise you will have to use a hammer drill. To work, you will need a core cutter with a diameter of 100 mm. Holes are drilled in the place where the opening is planned to be made. Your hand should fit through them freely. The type of brickwork is determined by feeling the space of the wall.
Punching through brick walls is always accompanied by the formation of a large amount of dust. Therefore, you should not start work without special protective clothing:
- gloves,
- respirator,
- safety glasses.
After breaking through the opening, the wall is sprayed with water from a conventional sprayer. This helps the resulting dust to settle.
Any opening, regardless of the masonry or purpose of the wall, must be shaped like the letter “T”. A crossbar is inserted into the top to hold the brickwork in place. If the opening is made in a partition, then an ordinary wooden board can be used as a crossbar. A reinforced concrete beam is required in the load-bearing wall for these purposes.
The partition is thin, so making an opening in it is not difficult at all. The work process consists of the following steps:
- Using a square and a ruler, the appropriate markings are made. It is important to remember that the opening should be slightly wider than the intended door.
- The marked section of the wall is cleared of plaster, whitewash and wallpaper so that the brick is clearly visible.
- Incisions are made along the drawn lines. To do this, you need a grinder with a diamond-coated disk installed on it. The diameter of the disk must be at least 200 mm. The resulting cuts will serve as the edging of the future opening.
- It is best to knock out the first brick using a hammer drill with a core cutter or a large-diameter drill. Holes are drilled along the seams of the brick.
- Using a chisel and hammer, several bricks are knocked out.
- First, a hole is punched under the partition. A wooden board is inserted there and filled with cement mortar. Ignoring this process will result in the formation of cracks in the wall.
Breaking through a brick wall
First, the brick wall is cleaned of wallpaper and plaster. Then, using a tape measure and a pencil, markings are made. After this, a reinforcing jumper is installed on top. This is necessary to ensure that the wall does not burst or collapse. The jumper is made from a corner measuring at least 35 mm. Two blanks are cut 30 - 40 cm longer than the opening.
Using a grinder with a diamond blade, the top is cut on both sides of the wall. They cut 15 - 20 cm more than the width of the future doorway, cutting depth = the size of the corner (shelf). After this, the corners are inserted into the cut made, securing them with anchor pins and filling the cracks with cement mortar.
Now you can begin dismantling the brick wall. You can quickly and efficiently remove an unwanted area using a diamond saw. However, not everyone can afford such pleasure. Therefore, a grinder, a hammer drill or a sledgehammer with a chisel is most often used.
Using a grinder, a cut is made along the marked lines of the doorway as far as the diameter of the diamond blade allows. Then, using a hammer drill or a sledgehammer with a chisel, the brick is gradually removed. After removing all unnecessary bricks, you need to finish the lintel. To do this, both corners need to be welded together from the bottom.
If for some reason welding is not possible, they can be fastened with metal plates. The plates and corner are drilled and secured together with powerful metal screws. Everything is almost ready, all that remains is to refine it and you can install the door.
Making an opening in a load-bearing wall
Punching an opening in a load-bearing wall has minor differences and consists of the following steps:
When making an opening in a load-bearing wall, you should not skimp on reinforcement material. The slightest deviation or error leads to subsidence of the floor. This is dangerous for people's health and lives.
When making a doorway in a brick wall, it is important to take into account two points:
Analysis of non-load-bearing brick walls
Non-load-bearing structures are dismantled from top to bottom to reduce the risk of part of the wall collapsing. If you need to make an opening in a brick wall up to the ceiling, markings are made. Using a hammer and chisel, knock out the top row. When removing the next rows, you must remember that the brick can lie freely without adhesion to the masonry. The chisel is directed perpendicular to the wall.
- To make a hole in the wall for a doorway, it is blocked using a lintel, which transfers the load to sections of the wall on both sides of the opening. The opening is drawn on the wall, and a gap of 30 mm is taken into account, which should be between the door frame and the wall;
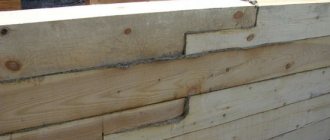
- The size of the jumper is drawn above the designated element. It extends beyond the vertical mark 250 mm in each direction. Punching begins with the hole for the jumper.
Installation of steel lintels in load-bearing walls and partitions.
You need to make sure that it matches the jumper. This is done because the mark of the bottom of the lintel does not coincide with a multiple of the rows of brick. Because of this, the extra row is removed and the jumper is mounted at the desired level.
If the walls are thick, two lintels are laid and sealed in place. The gap between the wall and the laid lintel is filled with cement mortar using a trowel. Further punching is done in the manner described above. If there is a fear of the brickwork collapsing, it is dismantled completely up to the ceiling and laid out in a new one above the lintel.
How to make a window opening
An opening in a brick wall for a window is made much less frequently than doorways. But if such a situation arises, strict requirements must be followed.
Window openings are made in the load-bearing walls of the building, so the main attention in this process is paid to the lintel. It is she who will take on the entire load of the wall above the cut opening.
When choosing a jumper, it is important to take into account the following points:
The process of punching a window opening in a brick wall is similar to working with a doorway. You can use the following algorithm:
Before making an opening in a brick wall, you need to make sure that there are no communications in this area. If you have such elements, you should think about moving them to another place. It is also necessary to pay attention to the existing ventilation shafts, the distance to which should be at least 300 cm.
Video - making an opening in a brick wall
During the renovation or reconstruction of a house, sometimes it is necessary to redesign the premises. Often an obstacle to this is a load-bearing wall that cannot be demolished. But the problem can be solved by installing an opening in such a wall for a window or door. How to do this correctly so as not to weaken the building structure?
Before you start making an opening, you need to install a lintel that will take the load - from the part of the wall above the future opening, from the ceiling resting on the wall, from the wall of the upper floor or from the roof structure.
What types of lintels are there in a brick house?
The installation of lintels in brick walls above windows and doors involves the use of durable and reliable materials, because their main purpose is to strengthen the opening and distribute the load evenly. Reinforcing elements come in different types and designs, but the most commonly used are reinforced concrete, wooden beams, and metal channel. Standard non-load-bearing lintels are installed on walls where the load is minimal. Reinforced structures are designed for load-bearing walls.
Reinforced concrete
This type strengthens load-bearing walls and the hole formed in them. You can make a reinforced concrete lintel with your own hands using reinforcement, wooden formwork and concrete mortar. If this is not possible, ready-made elements are purchased. It is important to install reinforced concrete lintels correctly. Thus, the element must completely cover the hole, extending into the wall at least 250 mm.
Brick
Designed for making holes in load-bearing walls in a house built from blocks. Brick lintels are preferable in one-story buildings, and where there is more load they should not be used. The laying of lintels is carried out using a special, durable mortar mixture. An additional metal corner or pipe is installed inside the wall.
The main feature of this type of design is the ability to build spectacular arched vaults. In this case, the opening in the brick wall is framed by arched or wedge-shaped elements, and it is necessary to control the location of the seams - they are formed perpendicular to the finished lower tier. And also in this way a wedge lintel is formed, which is considered a continuation of the wall masonry.
Metal
Used to strengthen door and window openings. Such elements are sold in the form of metal corners made of a reliable alloy that can withstand high pressure. Before installing a metal lintel, it is selected for the masonry seams, while vertical masonry does not require additional reinforcement with reinforcement. The corner needs to be located at a depth of 150-200 mm deep into the wall.
Jumper is serious and not easy
The safety of not only the wall structure, but also the entire house will depend on how the lintel is made. When designing a lintel, a number of factors should be taken into account, namely:
- the size of the opening in relation to the wall area;
- distance from the opening to adjacent walls;
- distance from the upper border of the opening to the ceiling;
- opening width;
- type of material from which the wall is made;
- thickness and technical condition of the wall,
- number of floors above the opening
- type and location of floor slabs.
jumpers are needed while running
support the floor slab to relieve the wall. This may be necessary if the opening is very large. The designer also has the choice of the material from which the jumper will be made.
Easier - made of steel
Most often, when making repairs, they resort to installing steel lintels, since they can be done relatively easily and quickly. As a rule, they consist of two channels, but can be made of I-beams and angles.
These profiles are tightened together with bolts (the distance between the bolts is no more than 50 cm).
The length of the channels is selected so that after punching the opening they rest on the wall on each side to a depth of 15-30 cm. The recommended diameter of the bolts is 20 mm. The outermost bolts should be in the support zone, that is, above the section of the wall on which the lintel will rest.
The bolts can be easily tightened if their length is selected in such a way that after installing the channel they protrude beyond its wall by approximately 5 cm. Attention! If the wall thickness is less than 24 cm, the lintel must be done in two stages. First, installation is carried out on one side of the wall (so as not to weaken the wall), and only then on the other.
Step-by-step instructions for making an opening in a load-bearing wall with your own hands
- Work begins by cutting out steel channels of the required length and drilling holes in them for bolts
- Mark the outline of the future lintel on the wall. Drilling through the wall, mark a place for the lintel on the other side of the wall
- Then the plaster is knocked down in these places
- Niches are knocked out on both sides of the wall for installation of steel channels. This can be done by hand or with an electric jackhammer.
- Holes for bolts are drilled in certain places
- The recesses for steel channels should be thoroughly cleaned of brick residues with a wire brush, and then the dust should be washed off with water
- Thick cement mortar (minimum grade M50) is applied to the wetted surface and a steel channel is pressed into it
- The voids of the steel channel are filled with cellular concrete tiles or bricks
- The bolts are passed through the holes. Place washers on their ends and screw in nuts.
- When the solution sets and hardens, use a jackhammer to make an opening in the wall.
- A steel mesh is placed on the lintel and opening slopes prepared in this way...
- Cement mortar is applied on top
- Plaster the remaining surface
THE JUMPER IN THE EXTERNAL WALL NEEDS TO BE INSULATED
If you make an opening in an external load-bearing wall, you should remember about the appropriate insulation of the lintel. Only in this case it will not become a cold bridge through which heat will escape from the house. If the wall is two-layer or in the future it is planned to insulate the house, then insulating it is not difficult. After completing the lintel, it is enough to apply a polystyrene foam slab on the outside of the wall. It is somewhat more difficult if the wall is single-layer. Then the jumper should be made narrower so that at least 5 cm remains on the outer side for the insulation layer. Attention! If a steel channel is mated to polystyrene foam, it can accelerate its corrosion. In this case, it is necessary to use a galvanized steel channel or coat a regular channel with anti-corrosion paint.
Figure - Insulated lintel in an external wall
You can do it another way
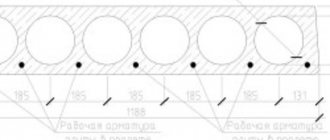
When making an opening in the wall, you can also decide to install a prefabricated reinforced concrete lintel consisting of two L-shaped beams. There is no need to tighten them with bolts. After clearing the niche where the lintel rests, a thick layer of durable cement mortar (Ml00 grade) is applied on both sides, then a reinforced concrete beam is installed. When the mortar has set, the voids between the beam and the wall are filled with cement mortar (minimum grade M50). After the mortar has set and hardened, the opening is knocked out, wrapped in mesh and plastered. Attention! The brand determines how strong the solution is: the higher the number, the stronger it is.
Figure - Reinforced concrete lintel made of two L-shaped beams
How to install a door into an opening with your own hands
We encounter this problem quite often. Some are not satisfied with the typical layout of a city apartment, others have had a change in their marital status, and others want to turn their apartment into a salon - there are enough reasons to think about “reformatting” their home. But when the question concerns openings in load-bearing structures, certain, and quite large, difficulties arise.
For owners of private buildings, perhaps this is not so important, because they, as owners, are not obliged to coordinate all their plans with someone, much less ask permission. If we are talking about residents of “high-rise buildings”, then they should first carefully study the issue of the legality (or illegality) of constructing an opening in a load-bearing wall - where and with whom can they clarify, how to coordinate and what responsibility is provided for violation of the law in this area? Related information.
We will consider the purely technical side of the problem - the technique of “cutting” an opening in a load-bearing wall. However, first it is worth noting a number of specific points as recommendations.
What to consider
- Have the neighbors done any redevelopment in adjacent apartments along the riser (below and above)? The best option is if all openings coincide in location.
- Capital walls perceive the load differently. As the number of floors of an apartment decreases, it increases. Therefore, for the first two or three openings, if it is allowed, it will be with a limitation in width. This parameter requires accurate calculation. If we are talking about 70 - 90 cm, then this is not a problem. And if you need a larger “window”? It is better not to do anything here without consulting a professional.
- Not every load-bearing wall can have an opening (this applies more to panel buildings). It all depends on its specifics, so, as a rule, you will have to think about strengthening the structure.
- At what distance from the external wall is it supposed to be installed? If you don’t make calculations first, then it’s not a fact that it won’t “lead.” But there is also a mandatory minimum - 1 m.
So, let's look at the entire algorithm of actions in detail:
Surface cleaning
Literally everything is removed - paint, wallpaper, plaster layers. The surface is cleaned down to the base.
Marking the opening
There is no point in explaining how to “draw” the contour - whatever is more convenient for you. After this, holes (through holes) are drilled in the corners, as well as at certain intervals in straight sections. Markings are also made using these “marks” on the other side. This is especially important for thick walls, since the “inset” will be done gradually, both here and there. Otherwise, it will be quite difficult to achieve precision “penetration”.
Arrangement of the opening
First of all, you need to know that the use of powerful impact tools (for example, a jackhammer) most often contributes to the appearance of cracks that “scatter” in different directions, thereby reducing the strength of the entire structure. In some cases, depending on the characteristics of the walls, experts warn against using a hammer drill.
In this regard, the best option for any base material is a cutting tool (“grinder”). It will not create any dangerous vibrations or cracks. Naturally, the disc must be diamond-coated.
Installation of temporary supports. They are necessary to relieve the wall and protect the ceiling from possible collapse. As a rule, the easiest way to make them is from logs that are installed in the work area. The specifics of such an operation depend on local conditions (number of floors, load of the building, its deterioration, and so on), so in some cases you can do without this stage.- Before you start cutting the wall, you should take care to maintain the integrity of the floor covering. There will be enough dust and debris, that's understandable. But quite massive pieces often fall onto the floor. What to cover it with? Plywood, boards, thick rubberized sheeting - there are plenty of options.
- Using a grinder, the markings on both sides are deepened. This is the outline of the opening.
- Next, it is advisable to divide it into sectors, which will greatly facilitate the process of removing material, especially in the case of brickwork.
Gain
For brickwork, you can get by with one channel lintel, which is installed horizontally along the top of the opening. Niches are built on both sides of it, into which the metal is placed (about 30 cm in each). Therefore, the length of the workpiece should exceed the width of the “window” by about 0.6 m. But if the wall is thick (more than one and a half bricks), then 2 workpieces will be required, on both sides.
The holes are pre-prepared, studs are installed in them (threaded, at least 3 pieces), after which the entire structure is tightened with nuts (2 pieces each) and strengthened with mortar. There are other options - fill the channel with it, and then “plant” it in the groove; Pre-lay the concrete mass, then “press” the workpiece. All these nuances are determined depending on the conditions at the work site.
Since metal will have to be drilled, you need to think - with what? If possible, it is better to do this in advance, on the machine, having previously marked the points. Will fit perfectly.
But in the case of a panel structure, you will have to additionally install vertical racks. The result is a U-shaped design. Therefore, you will also need a welding machine. How to reliably fix such a frame - with mortar, additional fastening with anchors at the end of the opening - is decided individually.
Depending on the specifics of the house, along with channels, you can use thick strip iron or “I-beams”. By the way, it is even stronger.
If necessary, supports should be left in a massive opening to support the floor. It’s easy to “convert” them into columns and design them accordingly.
- Before making markings, it is necessary to clarify how the electrical wiring is laid in the wall. If the house is not built on its own, then it is advisable to carry out appropriate diagnostics of the foundation.
- The article discusses only those points that relate to the issue “on your own”. In some cases, the services of specialists will be required. For example, to install a “cage” of reinforced ceiling with injection. A special solution, which is introduced in this area, after hardening, provides additional strength to the entire structure. There is no point in talking about the cost, since it is determined individually and is negotiable. And the design looks like this (“before” and “after”):
Many homeowners, planning a thorough renovation of their apartment, decide to remodel by creating an opening in the load-bearing wall. Such a need may arise if you decide to increase the size of the bathroom, combine the kitchen with the living room, or turn the apartment into a studio. For residents of panel high-rise buildings, creating openings in load-bearing walls is not only a problem from the point of view of an attractive design. Redevelopment will require a competent technical approach, coordination with utility services, obtaining permits and compliance with hole-punching technology. In this article we will look at how to make and legitimize an opening in a load-bearing wall.
A load-bearing wall is a wall that supports the floors. The design of a panel house assumes the presence of such blocks as vertical support for the slabs. Such dismantling without installing supporting mechanisms will cause the slabs on top to crack, resulting in cracks along the floor and walls of the apartment above you. If the problem is not eliminated in time, the building may collapse.
As you can see, capital walls are an extremely important element in the structure of the entire house. Their location can be determined thanks to the housing plan, which is indicated in the technical passport. You can familiarize yourself with the scheme at the Technical Inventory Bureau or at the Housing Office. On the apartment diagram, the main partitions will be highlighted with thick lines.
If you do not have access to the necessary documents, you can try to determine such a wall yourself. Pay attention to the thickness - as a rule, load-bearing slabs are wider. Almost all load-bearing blocks are located at the junction of apartments and at the junction of an apartment and a flight of stairs.
If you are not sure whether this wall is permanent or ordinary, remember: expanding the opening in the load-bearing wall will in any case require a special permit, and specialists from the Housing Inspectorate who will issue it will provide an explanation on this issue.
Recommendations from the experts
Before making a new window or doorway, make sure that it complies with building codes: the cutting in the brickwork should not exceed 210 cm in height and 70-200 cm in width. If the wall is located on the ground floor, then the maximum permissible width – 90 cm.
It is more correct to make a standard opening in the center of the brick partition. It is important to ensure that the opening in the main partition coincides with the cement seam of the wall.
To combine a room or kitchen with a loggia, the window sill, partitions and lintel area are dismantled from the wall.
For the door and windows of a brick building, a gap of 2.5 cm is left on the sides between the frame and the wall, and 0.6 cm on top of the gap. The rule applies to both private and apartment buildings. A passage up to 90 cm wide does not require additional reinforcement - reinforcing structures are always built in a permanent partition.
Before you decide to make any opening in a lightweight hollow-core partition, study the characteristics of the material. Without proper experience, it is not recommended to cut an entrance into brickwork with voids in the wall; use the advice or services of a professional.
Before starting work, we advise you to study both photos and video materials, and remember that it is enough to make a minor mistake and the new opening will disrupt the structure of the entire house. This applies to both load-bearing and interior walls.
Proceed to demolishing a brick wall with an approved project in hand or under the guidance of an experienced craftsman.
Is an opening allowed?
Making an opening in is possible in many cases. It is not uncommon for apartment owners to hear refusals. There are several reasons for the decision:
- Outdated load-bearing structures of the entire building. The fact is that every house has its own age, and if yours is more than 20 years old, and major repairs have never been carried out, then making an opening in the load-bearing wall of the house is fraught with negative consequences.
- A door in a load-bearing wall on the floor above or below will make redevelopment of your apartment impossible. It is important to pay attention to the location of such holes - they should not be located exactly on top of each other.
- Another reason for refusal is the number of floors of the apartment. The apartments on the first and second floor are subject to maximum pressure, so here the likelihood of obtaining permission to cut a hole is minimal.
- Presence of construction defects. In houses delivered with violations of construction technology, there are discrepancies in interpanel seams, gaps between ceilings and blocks, and other defects. In such cases, you will receive either a categorical refusal or demands for additional reinforcement of the wall.
- House wall material. In houses with brick walls, it is easier to obtain permission to punch holes than in panel or monolithic buildings.
Remember: before starting redevelopment, it is necessary to approve the opening in the load-bearing wall.
You will need a number of documents and certificates, but it is better to get them right away than to worry about it later. The housing inspection, when identifying uncoordinated redevelopment, has every right to issue you a fine in the amount of 3 thousand rubles. The fine is small, but besides it you will still be required to obtain a permit. If, according to the results of the inspection, the cut doors in the load-bearing wall turn out to be defective, you will be forced to fill in the hole, as a result of which all your repair work will be meaningless.
An apartment with unauthorized changes cannot be officially sold.
Bearing wall
Let's start with the most difficult thing - an opening in a load-bearing brick wall.
The difficulty is that you need to strengthen the floors with special supporting elements. Such elements are thick wooden beams, which are mounted on powerful boards. As a result, these load-bearing beams rest against the supports.
If you need to build a wide passage, load-bearing elements must be mounted on both sides along the walls before installing the supports.
Only in this way can a convenient location of the jumpers be achieved. Sequence of work: Punch the wall and place the jumper in the resulting groove, then concrete it. After the solution has hardened, install the next fence. If the masonry is old and not strong enough, it is recommended to punch vertical strips on both sides of the future hole. This way you can connect the old masonry with slopes, which should be made from new brick. If the masonry is strong enough, you can pierce it without preliminary reinforcement. You only need to make nests for the supporting structure. Before installing the slopes, moisten the old masonry and baked bricks with water - the material absorbs moisture very quickly, so if it is not moistened, it will take all the liquid from the concrete mortar, and it will become fragile.
To firmly connect new bricks to the old masonry, use the tenon ligation method with a height of 5 rows and a masonry length of up to 30-45 cm. When the lintels are installed and the opening is ready, all loose bricks should be strengthened with mortar, all edges should be aligned so that they go under at a right angle. If punching openings in brick walls is needed for doors, install plugs before leveling the slopes. To strengthen the doorway, use steel angles, attaching them to the outside and inside. To do this, make a horizontal opening, place the corners in it and tighten them with bolts.
What you need
To make an opening, you need:
- project documents. This item refers to the reconstruction plan made by the design engineer. To make a remodeling plan, you need to contact the design institute. An even better option would be to contact the design department of the same construction company that built the house. After the engineer has determined whether reconstruction of the housing is possible and in what form, he will draw up a final plan and issue a package of design documents (a resolution regarding the load-bearing capacity of walls and ceilings, a floor plan where places for demolition and construction of partitions will be marked, identification of structural elements, influencing the method of strengthening the opening);
- statement. The application is written to the housing inspectorate personally by you on a special form;
- documents confirming ownership of the apartment. The types of such documents vary depending on the form of obtaining housing (privatization, by inheritance, by court decision, and so on). In any case, you must have a copy of the certificate of ownership of housing, certified by the city BTI;
- technical report on the condition of the building and the possibility of arranging the opening (issued by the design institute);
- permission for redevelopment from the apartment owners and owners of neighboring premises (in writing);
- an agreement with a contractor who has an SRO permit. Since partial dismantling of the supporting structure refers to work that is not carried out by residents themselves, subsequently, to confirm the completion of the redevelopment, you will need to present an SRO permit, which your contractor must have. Without permission, you will not receive a construction completion certificate, so it is better not to skimp on the contractor company.
As a result of receiving all permits from the housing inspectorate, the owner is issued a Work Progress Log, in which it is necessary to record all stages of the repair. Moreover, it is necessary to record the progress of work honestly and in detail, since deviations and inaccuracies in the log are grounds for refusing to issue the owner with a certificate of completion of construction work.
As for the technology itself, it will depend on the type of opening - rectangular, arched. In any case, punching a hole is not recommended. It should be cut, which is done with a non-impact tool - a diamond wheel. Cutting with such a tool can be carried out stationary or manually, depending on the material and volume of work. As a result of cutting, less dust is generated and the hole does not require additional processing.
Types of walls
It is more difficult to make a high-quality opening without damage to the load-bearing partition, since the wall carries the load from above. The apartment plan or the following signs will help determine whether it is possible to cut a hole in the brick plane of the house: the partition has an exit to the outside, communicates with a neighboring dwelling, has access to a landing, or its thickness is more than 38 cm.
It is easier to make an ideal opening in non-load-bearing brickwork, since the wall is loaded only with its own weight - most often an additional hole is made under the door.
OLYMPUS DIGITAL CAMERA
It is a mistake to think “how easy it is to make a standard doorway yourself.” First, make sure that the electrical wiring is not walled up in the brickwork, find out whether there are pipes or fittings in the wall, and where ventilation is installed.