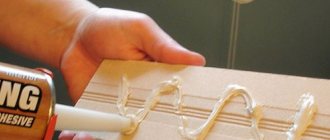
But there is also a significant drawback, in particular the long drying time of the foam. Therefore, within 5 minutes. Fundamentally important: In order to ensure optimal contact between the surfaces to be bonded and the foam, they must be lightly wetted with water. Whichever of the above compositions you choose, before attaching wood to concrete, both surfaces must be properly prepared. In order for the installation work to result in a strong and durable connection, both surfaces must be as smooth as possible, dust-free and grease-free.
The main problem is the porous structure of the material, especially if diamond drilling of holes in concrete was carried out. This property is a circumstance of excessive absorption of adhesives, and therefore the connection does not have time to gain the proper strength.
Connection technology
It is not difficult to make a coating from concrete that is predisposed to gluing; to do this, it is necessary to reduce the number of pores. For this purpose, deep penetration primers are used, which penetrate into the porous structure of the material and harden there.
As a result, the micropores close, and the density of the concrete allows the use of glue. It is fundamentally important: Wooden parts should be glued to previously prepared cement bases in strict accordance with the instructions of the manufacturer of the adhesive compositions. If you need high-quality and durable fastening of a wooden pole to concrete, simple glue or foam is not enough.
In this case, it is possible to use fastening iron products designed for high mechanical loads. Heavy wooden parts can be attached using dowel nails and anchor bolts.
The principle of operation of these fasteners is similar, since after they enter the concrete, their working part begins to burst.
Methods of fastening materials to concrete
Both of these options are completely different and have different holding characteristics. The main element is the nail itself, or rather a rod with threaded notches; when installed, the sleeve expands in the mounting hole, and the fastener is firmly held in the wall.
If it becomes necessary to dismantle such a mount, due to the notches on the rod, you can simply unscrew it with a screwdriver and then install it by screwing it back into its old place. The scope of application of such fasteners is so vast that it is easier to find an area where the use of fasteners would be inappropriate, rather than vice versa. When installing various profile frames, fasteners are an indispensable part of all structures.
Installation of kitchen furniture, hanging cabinets, hoods: all these household appliances are firmly held due to the use of such fasteners during installation. In practice, dowels for hard materials are not very advisable to use on brickwork. Moreover, if such a wall consists of bricks with voids inside.
Stud anchor: installation, features
Let's start with a nuance. For each variety, two accuracy classes are established, this is indicated by the main state standard GOST. There are fasteners of the following accuracy groups:
- A – the highest and is used in large structures, where strict conditions and requirements are imposed on the quality of fasteners;
- B – accuracy class, which allows for some errors. Therefore, such studs are used to connect less significant buildings.
It is worth noting that connecting elements of the first accuracy class are much more expensive because they do not have errors. Therefore, they are widely used for the construction of high-strength and extremely reliable structures with improved technical properties.
The actual size of the fastener is selected taking into account the individual characteristics of the object. GOST defines the range of stud diameters from 6 to 48 mm, where the latter are the elements that are most often used to connect large structures.
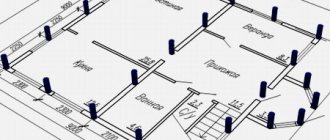
Design of frame house components
Vertical frame posts are installed on top of the lower frame and secured with nails. Fastening with metal corners is used for T-shaped connection of beams without cutting. It's easier to do. Fixing beams with metal nails is used at the junction with partial cutting of the lower beam. This is a more difficult connection to make with your own hands.
A joint without cutting is used for corner frame supports. Butt joints with fixation with plates or corners are used in the main components of a frame house, if the construction is carried out with your own hands, without the involvement of professionals. If experienced builders work, they use a connection with a partial insertion. It prevents strong movements of the timber and frame boards when drying out.
On a note
The size of the cutting for the vertical frame post is 30-50% of the thickness of the bottom trim beam.
The corner joint without cutting is fixed with metal plates using wood screws. In this case, reinforced steel corners with several perforations are used. As well as durable self-tapping screws in light golden and silver colors.
Strengthening the corners for fastening the corners of the house is carried out due to technological processing - the metal plates are hardened during the manufacturing process. Or through the use of metal with a large section thickness, up to 2-3 mm.
Methods of fastening racks.
A notch joint is often used to attach studs in the middle of a wall. The supports are inserted into the prepared recesses and additionally secured with nails. Then they are secured in a vertical position with jibs - diagonally inclined slats that rest against a vertical post on one side and a horizontal frame on the other. For ease of support, the ends of the jib are made beveled - part of the end is cut off.
Temporary jib
During the assembly of the frame, temporary jibs are also installed, which fix several vertical posts. Temporary jibs are placed between the upper and lower trim at an angle. They connect several vertical posts and are fixed with nails.
Temporary jibs are placed on the outside of the frame. To attach them, you do not need to cut down, but they need to be fixed in such a way that upon completion of construction, the temporary auxiliary beams can be easily dismantled. Therefore, nails are used to fix them.
Temporary jibs for racks.
Temporary jibs hold the posts upright until permanent jibs are installed at the bottom and top of each rack. Once the permanent jibs are in place, the temporary fixing beams can be removed.
On a note
The construction project contains a description of the components of a frame wooden house in the drawings. They often do not describe in detail the method of attaching temporary jibs, since they do not bear the main load and support the frame temporarily.
Specifics of using a stud anchor
Unlike other fasteners, studs have a more extensive specific application. It is worth noting that the scope of use is not limited to construction alone.
This type of fasteners is widely used not only in the construction of structures, but also in mechanical engineering and the arrangement of large production machines. Regarding the latter, the pin serves as a fixation of the machine to the pedestal and ensures the stability of the factory equipment during operation.
Studs with a screw-in tip are one of the main elements that are used specifically in mechanical engineering. They are distinguished by their larger diameter and size.
Anchors and studs often used in the construction of complex pipelines and ventilation systems.
For these purposes, a special type of connecting element is used - flanges.
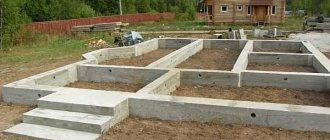
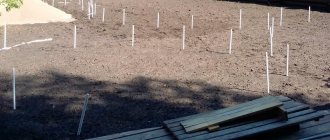
Attaching joists to a concrete floor
Scheme for attaching joists to a concrete floor.
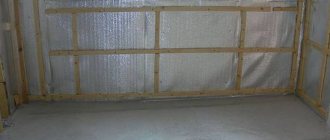
The second common case in construction of attaching a wooden beam to a concrete surface is installing joists on the concrete floor. Modern floor equipment techniques are very diverse: various insulating materials, heated floors, various solutions for leveling and improving the floor surface, etc. are used.
But even today, the option of installing ordinary wooden logs is quite relevant for both houses and apartments. This method of laying floors is used, as a rule, in houses where there are no problems with ceiling heights, but where one would like to save on expensive insulating materials.
Types of mounting components
Threaded products are the main element when carrying out installation work of varying complexity, including the installation of large-sized installations. In most cases, 2 main groups of anchors are used:
- with equal diameter of the smooth part (SP) and the threaded connection;
- elements having a smaller diameter (HS).
The components are selected taking into account the characteristics of the object being fastened and the specifics of the further use of the structure.
Screw-in end elements
There are no fundamental differences from ordinary hardware. The main feature is the presence of a thread at the end of the rod, due to which the anchor is screwed into the hole. This type of element is used if the workpiece has a threaded connection.
It is worth noting that the use of such mounting components is strictly regulated by the state standard GOST. Basic requirements represented by the following aspects:
- GOST 22038-36/22040-76 – studs that are used for working with workpieces made of light alloys of steel or bronze;
- GOST 22034-76/22036-76 defines fastening names used for working with gray/ductile cast iron with different rod end lengths;
- GOST 22032-76 specifies the use of studs in parts made of titanium alloys, steel, bronze or brass.
Depending on the material of the object that needs to be fastened, an individual type of connecting element is selected.
Flange Mounting Products
Items belonging to this group are widely used for the installation of steam, gas and turbine pipelines. However, there is one limitation - the temperature of the environment used must be in the range from 0 to 650 degrees.
Structural and dimensional features are determined by the state standard GOST 9066-75 and are represented by the following groups:
- products that have the same thread diameter and cylinder head;
- items in which the thread diameter is greater than that of the cylinder head;
- means having a 4-sided protrusion and an axial hole.
Also classified according to GOST 9066-75 are hardware with a cylindrical protrusion and an axial hole along the entire length of the mounting product.
Bonding concrete with various materials
A fastener for concrete foundations is not at all what you need in this situation. For such a base, there is a special dowel for bricks with voids inside; it has a special structure and, accordingly, installation specifics. First of all, it is an elongated plastic or metal bushing, the structure of which has a double thrust system mechanism. This design guarantees reliable fastening only for the reason that one of the spacers in any case ends up on a solid base, where it is fixed.
A threaded rod of the appropriate diameter, a self-tapping screw and other anchor fastening elements can be used as a rod, which plays the role of a spacer element.
It all depends on what exactly you need to mount on the wall, and how much force a particular device will exert on the mount. Naturally, an important point before installation is the choice of the length of the fastening element.
Features of working with different materials
But you should not choose fasteners that are too long; in the future, difficulties may arise when installing the fastening device. But the dowel-nail for concrete is technologically designed to work on a completely different principle.
That is why today a wide variety of anchor fastenings to concrete are produced, which themselves are firmly fixed in its mass and reliably hold the screwed structures. An anchor is essentially a cylindrical body or sleeve that, when a bolt is screwed into it or a nut is tightened, experiences pressure from the inside. This causes the sleeve to spread out to the sides, and the expansion anchor literally gets stuck in the wall - friction forces come into play and mechanical blocking occurs. It depends on how the head of the bolt is made, what can be attached to the wall using such a product, and how convenient it will be:.
For example, in a hollow material it will never create a strong fastening connection, no matter how long we use it. The process of installing such fasteners itself involves driving it into the hole, which significantly speeds up installation work.
ANCHORS FOR HIGH AND MEDIUM LOADS FOR CONCRETE
In loose materials, using this technology, we will simply destroy the mounting hole and will not achieve high-quality fastening.
When choosing such fasteners, be sure to focus on the category to which a particular fastener belongs. The marking of dowels always indicates what material the fastening is intended for, for a soft base or a hard one.
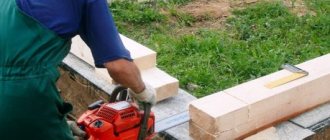
The option of combining different building materials in one structural unit depends on their type and the required degree of reliability. When building a wooden house, you need to know how to attach the timber to the foundation so that the box cannot subsequently change its spatial position and the wood does not begin to become moldy. Basic techniques and methods have been used by builders for decades, so we can say with confidence that the test of time has been successful. Do we need to remind you that compliance with the fundamentally important stages in the work will allow the construction of a capital, durable structure in which not only grandchildren, but also great-grandchildren can live. The appearance of the box and its trouble-free operation depend on exactly how the first crown of a wooden house or the bottom frame of a frame structure is laid.
High-quality concrete lintels for window and door openings, drilling under an anchor with a ten-millimeter drill is not an easy task. For such situations, it is better to use plates, which can be fixed using self-tapping screws for a 6mm dowel. In conventional panel high-rise buildings, concrete is more amenable to drilling, and in most cases, anchoring does not cause any particular difficulties. Regarding the installation technical conditions mentioned above, there are a number of points that require special attention.
When glazing balconies or loggias, the structure must be placed almost flush with the outer part of the opening. Anchoring in such a situation is quite dangerous: the edge of the concrete floor or wall may be destroyed. Mounting to plates in such cases is the only correct option. Perhaps the simplest installation, but with some caveats.
How does installation work?
The installation process is not difficult. First you need to prepare the hole, namely clean it of dust and dirt. This will ensure reliable fixation and better reliability of the structure. Then the hardware must be inserted into the hole and secured with a nut.
Regardless of the chosen connecting element, the time required for installation work is significantly reduced. Also, the use of anchors makes it possible to connect large structures and production plants without a welding machine.
Dowels for concrete: types and methods of use
However, consultants from construction supermarkets can also solve this problem. It is enough to provide them with the following data: - material and thickness of the wall; — weight of the suspended structure; — number of points for fixation. Despite the fact that the final and exact choice of fasteners depends on the individual situation, it is possible to distinguish general subtypes of mounting elements used for fixing heavy objects on walls made of different materials. When preparing the workplace, you need to create the most convenient conditions so that the drill enters the wall strictly perpendicularly.
That is, when making holes, the drill should be at chest level - otherwise it will be difficult to control.
Often you have to attach heavy objects to the wall. To successfully solve this problem, it is necessary not only to take into account the base material and the characteristics of the fixing elements, but also to correctly perform the preparatory and installation work. It’s worth noting right away that only heavy objects can be tilted against solid walls. It is advisable to take this aspect into account during the design of the building.
To minimize the spread of dust and debris, attach a cardboard with a bag under the drill. In hollow bricks and aerated concrete, holes for anchors and dowels are made only in the “drilling” mode.
In harder walls, for example, from solid brick, holes are made in the “drilling and chiselling” mode with a high frequency of light blows.
Installation of corner posts
First, install the side racks. In the simplest case, they are attached to the base using reinforced metal corners. The corners themselves are screwed to the boards with screws or nails. It is advisable to use galvanized corners - they are less susceptible to corrosion. Corner posts must be carefully checked for verticality with a plumb line. For their further stability in a vertical position, it is advisable to install temporary braces before the final fastening of the frame.
Fastening the racks with a metal corner
There is another way to attach the side posts - with a wooden dowel. A dowel is a small round block. It is hammered into pre-drilled holes when assembling the corner of the lower frame, so that the dowel protrudes above the plane of the frame by 8-10 cm. This additionally fastens the beams of the frame and serves as an element connecting the frame to the stand.
Fastening with dowel
A hole is also drilled in the rack beam to match the diameter of the dowel and to a depth of 8-10 mm greater than the length of the dowel release. Then the stand is put on the dowel and also secured with braces. This method is quite labor-intensive, but has a number of advantages:
- No metal fasteners subject to corrosion
- A more reliable connection than a threaded connection, which weakens over time due to drying of the wood
The connection of homogeneous materials contributes to greater ductility under lateral loads on the racks.
Labeling requirements
Stud markings
Material Standard ASTM A193 and A320 define the marking requirements for studs and bolts. Markings should be made on the ends of the stud or on the head of the bolt. Only due to space limitations are the manufacturer's markings and grade/material grade shown on the stud and bolt.
The ASTM standard provides a list of markings for various grades of materials. Pictured below is ASTM A193 Gr B7M, only marked B7 on one end and the manufacturer's identification mark on the other ends. For a hex bolt, both symbols are marked on the head of the bolt.
Nut markings
ASTM A194 and A563 material standard sets marking requirements for nuts. The marking must be made on the bearing surface of the nut. Only the manufacturer's identification mark and the grade/class of material are noted. Instead of a full description of the material, the material symbol is used as shown above. The list of symbols is given in the ASTM standard.
Preparing vertical racks - choosing a board
There are several basic techniques for constructing a frame using frame technology. The first method is to assemble the frame frame on the floor, lift it and install it vertically around the entire perimeter.
The second method is to install each rack vertically separately.
Fundamentally, both methods differ in that the racks are fastened in the first case to the upper and lower beams of the frame, and in the second - directly to the foundation frame. However, the fastening methods themselves are the same, so let’s take a closer look at the second case, as the most indicative.
Installing racks individually and in an assembled frame
The racks perform an important function - ensuring the structural strength of the frame, taking on significant (up to 3-5 tons) loads from the roof and roofing. The material for them is accordingly chosen to be durable and of high quality.
The heaviest loads fall on the corner posts, so a massive beam is taken for them - usually 100x100 mm. Side racks located along the wall line carry less load individually, and for them, as a rule, a beam with a cross-section of 40x100 mm is sufficient. You can also use beams of larger sections, but this will generally cost more. If necessary, you can sew racks from two boards of a smaller section, 25-30 mm thick.