Repair and decoration
04/06/2018 Anastasia Prozheva
It is quite possible to level the floor using a self-leveling mixture yourself, without resorting to the help of specialists. The most important part in the apartment is the floor. This surface is constantly exposed to physical pressure and contamination. Therefore, it is so important that all the elements that make up the floor are strong and durable. However, the service life and strength of finishing materials can be negatively affected by the curvature of the base. Most topcoats require a perfectly smooth base; this effect can be achieved by using a special self-leveling mixture. Even a beginner in the construction business can cope with work with such a composition.
Advantages of self-leveling mixture
Self-leveling mixture is a real godsend for those who want to screed the floor with their own hands. Such compositions are quite liquid, so they easily spread across the floor, filling all the holes and depressions. Liquid leveler has all the properties of traditional poured screeds, plus some additional benefits.
The main advantage of a self-leveling mixture is that it dries very quickly.
Advantages of a self-leveling screed:
- Such mixtures dry out very quickly. You will be able to walk on the base after the screed has been poured in just 4-5 hours.
- Unlike a traditional screed, the self-leveling mixture contains very small dry particles. Thanks to this feature, the surface filled with such a composition becomes smooth and even.
- Shrinkage of such a floor is almost impossible.
- The maximum height of the self-leveling floor is 5 cm. This leveling is suitable for rooms with low ceilings.
- Pouring such a mixture is such a simple and understandable process that you can handle it without even having minimal knowledge in the construction industry.
Self-leveling products will help you quickly and efficiently screed the floor. The main thing is to follow the instructions on the package exactly when diluting the mixture.
Flaws
Self-leveling floor screed also has some disadvantages:
- It is necessary to prepare the base - seal all cracks well, remove dust, remove debris, dry the surface well.
- If the screed fails for some reason, it is quite difficult to remove it.
- The cost of this material is relatively high.
- Toxicity. The plasticizers included in the composition can release chemical compounds into the air that are quite harmful to human health. That is why the room must be well ventilated while the screed is drying. When working, you must always use personal protective equipment.
Types of self-leveling floor screeds
The self-leveling mixture will, of course, make it easier for you to screed the floor, but you shouldn’t expect any miracles from it. You can simply pour the screed and wait for the result only if there are only small irregularities on the floor surface. In other cases, you may have to use several types of self-leveling screeds.
Related article: Canopy over the bed: types, pros and cons
There are several types of self-leveling compounds, which should be selected taking into account the room where they will be used
Types of self-leveling compounds:
- A rough self-leveling screed is used when the floor is in critical condition. This composition is poured into a fairly thick layer (about 5-7 cm).
- The medicinal mixture is used to eliminate defects in certain parts of the floor. This product will perfectly cover small holes and cracks.
- The finishing liquid leveling mixture is used for the final preparation of the floor for installation of decorative covering. This composition is applied in a layer of 0.2-1 cm. After the finishing screed dries, you will receive a perfectly flat and smooth floor.
Each type of screed is used in its own specific case. Sometimes it happens that you have to combine several layers of different products on one floor. Often, rough and finishing screeds are used together. A combination such as a local and finishing mixture is also possible.
If you do not want to use a liquid self-leveling mixture for the floor, then you should pay attention to the Knauf Superfloor dry screed, which is made by laying GVL elements on an expanded clay filler.
Self-leveling mixture can be used on almost any substrate. The only exception is wooden floors. However, some craftsmen claim that a strong wooden base can be leveled with a finishing compound if you first put a film under it.
A Brief Overview of Substrate and Coating Types
- Plaster. It is in great demand due to its ease of use and drying speed. It sets in just 4 hours, and after 7-10 days it gains density and is completely ready for laying the coating. This is provided that its width does not exceed 4 cm.
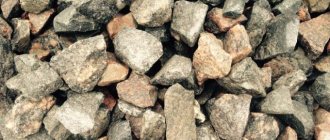
- Cement strainer. This is the simplest type. By type it is divided into semi-dry, dry, bulk. Pour the solution in thin layers of about 10 mm, waiting for each previous level to set a little. The larger the final width of the screed, the longer it takes to dry. A thickness of 40 mm under optimal conditions requires the ability to settle for 28 days.
- Sand concrete screed m 300. The special composition sets a little faster than cement - after 3-4 days. The final coating is applied after 4 weeks.
- Under the tiles. Place without waiting for the screed to completely lose moisture. Then the glue connects the surfaces better and the blocks are easier to lay perfectly flat. Therefore, it usually takes 1-2 days for the screed to dry under the tiles, depending, again, on the type of mortar. Most often, cement is used for these purposes.
- Under laminate. This coating is universal, so any type of sole can be used under it, without waiting for complete hardening. True, the humidity of the base should not exceed 5%. Typically, a self-leveling concrete screed on a laminate floor takes 4 weeks to dry. Sometimes, to speed things up, without waiting for the moisture to completely evaporate, waterproofing and a cork backing are laid under the coating.
- Screed for linoleum. This material remains the most affordable and practical floor covering. It can be placed on absolutely any surface, as long as it is level, because it is plastic, flexible and takes the shape on which it lies. Linoleum is easy to install and dismantle. It is even placed on parquet, tiles, and plank floors for the purpose of surface repairs. For a thorough finishing, it is better to lay it on a fully established and dry screed, otherwise mold may grow under it. Usually the floor is covered with linoleum 1.5 - 2 months after laying the mortar.
Humidity measurement
Which self-leveling floor is better, gypsum or cement?
The self-leveling mixture consists of a large number of different substances that give it plasticity and the ability to spread quickly and evenly. However, the main elements in such solutions can be only two substances, namely: gypsum or cement.
Both gypsum and cement floors are characterized by good qualities
Many people are concerned about the question: “Which is better, cement or gypsum composition?” There is no definite answer! Each remedy is good in its own way and is used in a specific case.
Gypsum mixture is used when it is necessary to pour a sufficiently large layer of screed. The height of such a fill can reach 10 cm. Gypsum is an environmentally friendly and harmless material that will provide additional insulation to the room. The gypsum composition is a particularly good neighbor for wooden coverings, for example, parquet or tongue and groove boards. With this symbiosis, gypsum will prevent the floor finish from cracking and rotting. In the event of a sudden increase in humidity, the screed will absorb water from the wood and, if necessary, return it back.
Related article: What is more convenient in the bathroom: a hygienic shower or a bidet?
For rooms with high levels of humidity, such as a bathroom or kitchen, gypsum self-leveling screed should not be used. A more unassuming cement would be appropriate here. The layer of such a mixture can reach from 5-30 cm (depending on the curvature of the floor). The cement leveler also contains sand and fine-grained expanded clay.
There is also a polyurethane self-leveling floor, but it is used not for leveling the base, but for finishing it.
Both types of floor leveling compounds are good in their own way. Gypsum composition is more often used in European countries, and concrete is a favorite in the Russian construction market.
Basic terms
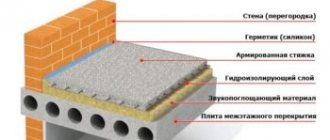
The rules use terminology according to which the floor is divided into tiers, components that have specific names:
- External covering - the outer layer of the floor surface that absorbs the load during operation.
- The intermediate layer is a floor element that provides elasticity and is located under the top layer.
- The waterproofing contour is a layer that impedes the access of groundwater, wastewater, and liquids through the floor surface.
- Screed is a leveling layer that serves as the basis for installing the floor, which ensures the flatness of the base, distributes loads, and covers various communications.
- The bedding is the bottom layer that evenly distributes the forces from the floor and the weight of the screed onto the surface of the base.
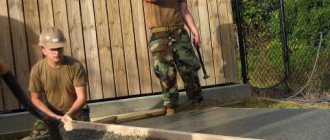
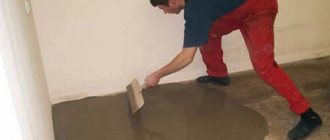
How to level the floor yourself with a self-leveling mixture
Leveling the floor yourself with traditional compounds is quite difficult, but anyone can cope with self-leveling mixtures. The main thing is to properly dilute the composition and step by step perform all the steps associated with pouring such a screed.
Before you start pouring, you should first thoroughly clean the floor surface, remove the old coated
Technology for floor leveling with self-leveling self-leveling mixtures:
- At the first stage, the floor is prepared. All debris and dust are removed from it, large holes are filled with cement mortar, and the surface is primed. The primer is necessary so that the filler leveler spreads better and adheres to the base.
- At the second stage, you need to knead the mixture. The proportions of the composition must be strictly observed; they are usually indicated by the manufacturer on the packaging. To mix the correct solution, you need to pour the required amount of mixture into the already poured water. Only properly prepared liquid screed perfectly levels floors.
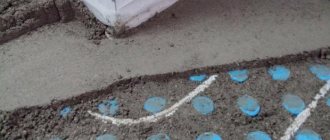
- After the mixture is mixed, it can be poured onto the base. In this case, the screed should not be hot; the optimal temperature for such a product is 25 degrees. To make a level floor, it is necessary to apply markings to the walls, to the level of which the leveling mixture should reach. The leveler layer should not be thinner than 0.5 cm. It is more convenient to pour the mixture in strips, and it is important to pour the second strip before the first hardens. To remove unnecessary air bubbles, you must use a needle roller.
Related article: How to quickly clean out your clothes closet
To ensure high-quality floor leveling, you must strictly follow all the manufacturer’s recommendations. Deviations from the norm when mixing the mixture can give a completely unpredictable result.
Pay attention to the self-leveling floor “Prospectors”. This manufacturer is recommended by many professionals.
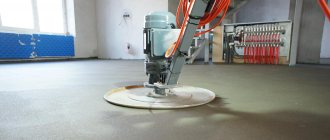
It is also important to understand that although the self-leveling mixture can spread over the base on its own, it needs a little help with a special needle roller. Such work will not only ensure a more even distribution of the composition, but will also remove unnecessary air bubbles.
There is practically no shrinkage of these mixtures. Therefore, you can be sure that the layer poured for you will not change its thickness.
Preparatory work
Before pouring, preparatory work is required:
- Wash the floor covering/substrate from dirt, mortar residues, oil stains, etc.
- Dry, but do not overdry.
- If possible, seal cracks and prime.
- Mark the horizontal level of the top point.
- Stick a damper tape around the perimeter, which is a braid made of all-foam polymer, roughly speaking, polyethylene. It compensates for the expansion of concrete to prevent damage to the walls.
- Attach metal profile strips in the doorways so that the solution does not leak out of the room and ensure relative horizontal alignment.
It is very simple to prepare a solution from a purchased mixture; a beginner can easily handle it. But it is worth considering that you need to adequately follow the instructions; you can change the parameters of the ratio of the mixture and the diluting liquid if it is clear that the solution is too thin or thick. Because such an imbalance will affect the quality indicators of the created floor covering.
An approximate step-by-step process for preparing the mixture:
- Carefully read the mixing instructions on the package.
- The mixture must be diluted in a large container.
- Stir with a construction mixer at least twice: when diluting with liquid, then wait 10 minutes and mix again.
- Remove air bubbles with a needle roller after pouring, otherwise the service life, reliability and resistance to stress of the floor covering will be reduced.
Drying time of self-leveling floor
In order to be able to continue repair work without the risk of damaging the floor, you need to know how long it takes for the self-leveling mixture to dry. If you start finishing the floor before the screed is completely dry, then most likely you will have to do it all over again.
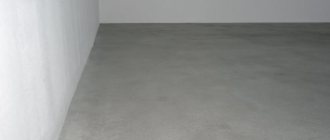
As a rule, the self-leveling floor dries within two to three weeks.
Despite the fact that it is possible to finish the poured floor only after two weeks, you can walk on it in just a couple of days.
The drying time of self-leveling mixtures can vary within two to three weeks. It all depends on the composition of the mixtures and their manufacturers.
Maximum
SNiP says nothing about such an indicator as the maximum thickness of the screed - there is simply no data. In practice, it is resorted to only in two cases:
- the base of the floor is heavily littered;
- the screed functions as a foundation (the basic principle of building individual houses in Germany).
In the first case, it is better to first level the base of the floor, and then install and fill the heating pipes, which will allow you to heat the room more efficiently. In the second case, pouring the screed onto a warm water floor should not exceed 17 cm - there is no point in pouring a thicker layer. In Russia, the maximum size of screed is poured in the garage and on problematic soils during the construction of a private house.
Professional leveling of the floor with a self-leveling mixture (video)
Self-leveling floor mixture is an excellent choice for those who want to eliminate uneven floors themselves. Use this composition and you can avoid a lot of problems.
The best posts
- How to make a plasterboard box in the bathroom - step-by-step instructions
- Drywall figures or how to make the interior stylish and fashionable
- DIY decorative corner fireplace made of plasterboard
- Wiring under drywall: lay it out correctly
- Painting drywall - step-by-step instructions
- How to join drywall in corners and the process of building a decorative niche
- Socket boxes for drywall: correct selection and installation
- How to seal a doorway with plasterboard - installation diagram
general information
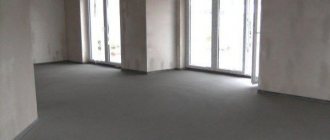
The screed is the top layer of the floor that bears the main load. With its help, the floors in the room are leveled (potholes and cracks are sealed) for further work. It also provides sound insulation properties and helps retain heat in the room.
In order for these functions to be performed at the proper level, you need to calculate what layer of screed the apartment or house should have, otherwise there is a risk that the base will quickly become unusable. In rare cases, the screed acts as a finishing layer, however, most often, additional types of floor coverings are used on top of it.
There are a number of requirements that an ideal foundation must meet:
- equal density throughout the volume,
- smoothness (no scratches, cracks, peeling, unevenness),
- the slope is no more than 5 millimeters per 2 m2,
- the compressive strength indicator must be at least 15 MPa.
We invite you to familiarize yourself with Butternut - Israeli pumpkin in my garden