With the growth of civil engineering in Europe, a need arose for a new building material that combined strength and reliability with an external resemblance to natural stone.
foam blocks appeared - the result of mechanical and chemical foaming of a cement-based solution.
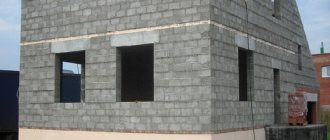
In this article, we will talk about what is better to build a garage from: foam block or cinder block? Or maybe it’s still made of aerated concrete? Let's find out more about all types.
Choosing a garage type
Before construction, you need to decide on the type of garage space for storing vehicles. There are several types of car garages that are popular among motorists.
Capital
Owners of large summer cottages build permanent structures that are located separately from the residential building. The main difference between garages of this type is that, in addition to the building, a separate place for parking and entry of cars is also being built. Some builders make small rooms in permanent garages for storing auto parts or tools.
The advantages of the buildings include:
- reliability;
- soundproofing;
- thermal insulation.
Combined
People who do not want to spend a lot of time on construction prefer combined structures. When constructing such a garage, the Swedish construction method is used, in which the foundation is made of concrete and the upper part of the structure is made of metal.
When creating the frame of combined garage spaces, steel pipes are used. To cover the frame, experts advise using corrugated sheeting or siding.
Temporary
To quickly build a vehicle storage space, temporary garages are built. They are assembled from corrugated sheets, wood or metal building materials. The main advantage of temporary buildings is that for their construction you do not need to obtain permission in advance. This allows the car owner to save not only his time, but also financial resources.
How to buy a safe garage?
Pay attention to things that will definitely indicate problems with the security of the garage from car thieves.
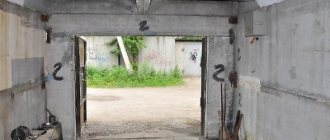
The first is the castle and gate. They should be metal, not rusty; ideally, the lock should be changed immediately after purchase. Pay attention to the gate hinges and whether there are reinforcement pins built into the wall. Such gates will be difficult to pull out or open.
Second, there should be a lit area near the garage, and better yet, other garages or residential buildings. If this is not an option, then simply wire the light to your garage.
Third, the rear wall of the garage must be made of good materials (at least one and a half rows of brick). It is also important that the rear of the garage faces a lighted area and not a vacant lot or landfill. In this option, there will be much fewer problems with possible car theft.
Fourth, if there is an option to buy a garage in a protected area, it is better to use it. You will have peace of mind and reduce risks for both yourself and your car. You can also purchase not a garage, but a space in a large guarded parking lot, if you are determined to save money not on security, but on a personal place to store your car.
Brick
Full-fledged capital buildings are erected from this material. They are durable and suitable not only for storing cars, but also garden tools, bicycles and much more. As a rule, inspection pits are organized in such garages to carry out car repairs. This is not just a garage, but a full-fledged workshop.
If we talk about the advantages of a brick frame, then it is worth highlighting the following:
- Long service life of the building (more than 50 years).
- In such a garage there will be no problems installing electricity, installing a ventilation system and even plumbing.
- Fire resistance of the material.
- If desired, after some time you can build a room over such a garage.
- Brick does not require cladding or interior finishing.
Healthy! For the garage, you can use broken bricks or materials of a lower standard. But, if you plan to build a building of several floors, then it is better to buy solid brick.
But there are also a number of disadvantages:
- Since brick is a compact material, construction will require more time.
- If the building is located separately from a residential building, then in this case you need to take care of proper insulation. To do this, the wall of the future building must be two bricks thick.
- Based on the previous point, it follows that the foundation for such a garage must be solid.
- Brick is more expensive than any other building material.
What's the advantage?
For the construction of a garage, lightweight concrete blocks are preferred, which, at an inexpensive price, have the properties of low thermal conductivity and strength. They also fit easily and quickly into masonry, reducing construction time. Garages are usually built from aerated concrete, gas silicates, expanded clay concrete, foam concrete or cinder blocks.
Aerated concrete and gas silicate
Gas silicate blocks fit easily into masonry due to their geometrically precise shapes, the same circumstance makes their transportation less troublesome.
Gas silicate “breathes” perfectly, relieving you of an overly humid atmosphere in the room, but there is also a downside. The same property that provides breathability also creates hygroscopicity, which contributes to the accumulation of moisture directly in the material itself.
So, aerated concrete blocks, with all the advantages of gas silicate material, benefit from the following characteristics:
- They are noticeably cheaper.
- Less vulnerable to moisture.
- They are more resistant to fire.
- Gas silicate blocks are stronger and lighter.
- Aerated concrete blocks will be heavier than their counterparts, which will increase the complexity of working with the foundation and, in general, the process of building a garage will take more time.
- But aerated concrete is more heat-intensive and, thanks to this property, will reduce a small percentage of heating costs.
- Due to its resistance to frost, aerated concrete is more confidently able to maintain its integrity.
- The shape of the gas silicate material is more precise and this will save on glue.
- A garage made of gas silicate block material will be durable, warm and easy to build. But among block materials it is an order of magnitude more expensive, which, combined with durability, is compensated over time.
Comparative analysis of other materials:
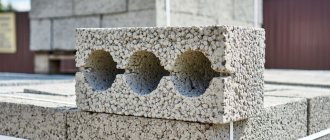
- Cinder concrete blocks have the advantage of weight, they are light and have high insulating properties. But the material contains components harmful to human health, however, for a garage this will not be a big problem.
- Expanded clay concrete materials are the most resistant to moisture, but they are more difficult to withstand shock loads.
- Foam concrete is produced using low-cost technology and at the same time has good strength, which makes it rated in the list of durable and cheap building materials.
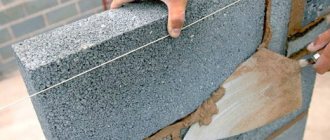
- Due to their highly porous structure, cinder blocks and foam blocks must be finished over the entire surface of the wall to protect them from moisture, while more expensive materials do not need additional finishing, such as aerated concrete, gas silicate, expanded clay concrete.
- The cellular structure of gas silicate and aerated concrete materials requires reinforcement.
- Lightweight and durable, easy to lay, gas silicate blocks also require a special adhesive, which increases money costs.
About preparation
First of all, I would like to say that it is cheaper to build your own garage than to buy one. Sometimes prices skyrocket for old and rotten boxes, especially in cities with a population of over a million, where there is an acute shortage of even parking spaces.
- Before construction, you must notify the administration of your locality that you are going to build a garage. Be prepared that the authorities may demand money, that’s how everything works.
- First you need to choose a place . A dry place on a small hill is ideal so that excess moisture quickly evaporates and puddles do not form. Otherwise, in cold weather you will have to literally fight your way to the entrance.
- Feel free to attach yours to another garage, but only with the owner's permission . It is advisable that the foundation of the future garage be sand or clay for subsequent excavation of space for a basement.
- Once the location has been chosen, you should start building the basement first . Dig with an excavator (if money is really tight, you can do it yourself) the entrance to the basement about one and a half to two meters, and then start leveling the basement itself of any shape and size that you prefer. Then install concrete walls (concrete is recommended because wood and other wooden materials will quickly rot), floor and ceiling. The basement is ready.
Types of blocks
In fact, there are not so few varieties of piece block materials on the market. They differ from each other in the number and variety of components, or rather, the difference is in one thing - the composition.
According to this principle, wall blocks are divided into the following types:
cellular concrete
: foam and gas blocks;
Let's consider each type separately and outline their characteristics.
Concrete blocks
We must start with the fact that this type of wall material is a concrete product in its pure form. There is nothing else in it except cement, sand, crushed stone (gravel) and water. Hence the high strength of the product.
When concrete dries, it becomes as strong as stone, which is why structures made from concrete mortar are often called artificial stone. But it should be noted that the concrete used in the production of blocks can be different. Hence the different characteristics of this material.
For example, blocks made of heavy concrete, the density of which varies in the range of 1800-2500 kg/m³. It turns out this way only because the formulation uses large stones of heavy and durable rocks: basalt, granite, diabase, limestone, etc. Note that blocks made of heavy concrete are expensive, and they are more often used for the construction of foundations.
Solid concrete blocks
Lightweight concrete blocks with a density of up to 2000 kg/m³. They are used to build walls. This material contains lightweight granular products as filler, as well as bulk materials, for example, perlite or agloporite.
The third type in this category is blocks made of cement-sand mixture, reinforced with steel mesh or wire mesh with a diameter of 6 mm. Manufacturers offer two versions of this material: hollow and solid. It should be noted that blocks of this type have the same strength as products made from heavy concrete, but they are several times cheaper. Therefore, when the question is asked which blocks are best to build a garage from, then in this category it is better to give preference to cement-sand ones.
Cement-sand hollow block
Cinder blocks
The appearance of cinder blocks was preceded by a huge shortage of bricks. There was always a shortage of it, especially in private housing construction. Therefore, it was decided to begin mass production of this wall building material with the addition of so-called waste filler to the cement mortar, which was obtained almost free of charge. These were slags from blast furnaces and thermal power plants that burned coal. Slag is a useless material and is difficult to dispose of. The advent of cinder block production technology solved two quite serious problems at once.
It should be noted that today, under the concept of cinder blocks, they produce and sell piece wall material with different fillers. That is, it will not necessarily use slag. Instead, sawdust, shell rock and other cheap ingredients are added to the solution, which primarily reduce the weight of the finished product. But at the same time, the strength of the material is not lower than blocks made of lightweight concrete.
Hollow cinder block for walls On our website you can find contacts of construction companies that offer construction services for small architectural forms. You can communicate directly with representatives by visiting the Low-Rise Country exhibition of houses.
The popularity of cinder blocks is enormous. They are still used in low-rise construction, as the main building material for the construction of walls. Depending on the type of filler used, cinder blocks have different characteristics:
density
from 750 to 1500 kg/m³;
thermal conductivity
from 01027 to 0.65 W/m K, in comparison with brick - 0.8 W/m K;
compressive strength
corresponds to grade materials from M35 to M150;
lifetime
– up to 100 years, if we take into account the negative impact of natural loads, if the roof of the house is strong and reliable, then a house made of cinder blocks will last no less than a brick one.
It should be added that this wall material also has its disadvantages:
unpresentable appearance
;
moisture resistance
not the highest;
difficulty of fastening
interior items in walls built from cinder blocks.
But this material retains its popularity firmly. The reason is the low price, plus ease of installation. Let us also add that today manufacturers offer cinder blocks with one decorative side. An original approach to solving the problem of decorating buildings.
A cinder block with one side decorated to look like crushed stone. This could be interesting!
In the article at the following link, read about the construction of a garage in Moscow, the price for turnkey work.
Expanded clay blocks
Thermal insulation of walls has always been given special attention. And although this is not fundamentally important for many garages, blocks with the addition of expanded clay today are no less popular than those filled with slag. Their main distinguishing feature is low thermal conductivity in the range of 0.14-0.65 W/m K. The difference in indicators is quite large, it depends on the amount of cement added to the solution. The more it is, the higher the thermal conductivity of the material.
Today, manufacturers offer two types of blocks made from expanded clay concrete:
constructive
, from which walls are constructed;
thermal insulation
, with the help of which insulation of buildings is carried out.
We are interested in the first option. Here are its technical characteristics:
specific gravity
from 600 to 1800 kg/m³;
strength
from 35 to 500 kg/cm²;
frost resistance
– up to 500 cycles;
water absorption
- to 10%;
temperature operating limit
from -180С to + 1050С;
soundproofing
within 50 dB;
vapor barrier
within 0.4.
Garage blocks made of expanded clay concrete are increasingly being used in the construction of garages today. Many car owners began to understand that a dry and warm garage means long-term operation of the car without the formation of corrosion areas on the body.
Expanded clay blocks for the construction of small buildings This may be interesting!
In the article at the following link, read about the choice of paints and varnishes for painting a garage.
Cellular concrete blocks
This building material got its name only because its structure is a solution filled with voids (cells). Today, this type of piece wall product is represented on the market in two positions: foam and aerated concrete blocks. Accordingly, they are made from foam concrete and aerated concrete. Let's look at their differences from each other.
So, foam concrete is a standard concrete solution to which special substances (organic or synthetic) are added. They are called foaming agents. That is, upon contact with water, substances begin to form foam. Small air bubbles form inside the solution due to the foam. The solution is poured into molds where it turns into stone. And the air remains inside, making the structure of the material porous.
Aerated concrete is produced using a completely different technology. Firstly, lime and aluminum powder are added to the concrete mortar. By interacting with each other with the participation of water, both substances enter into a chemical reaction in which hydrogen is released. So it forms bubbles inside the mixture. But a chemical reaction can only occur under pressure and with increased temperature, so aerated concrete blocks are produced in special equipment called an autoclave. High pressure is created inside, and the temperature rises due to the formation of saturated steam.
We also note that foam blocks are a material formed in special shapes with the exact dimensions of the final product. Aerated concrete products are a material with large dimensions, which are then cut to the required (standard) parameters. A string is used for this. It turns out that foam concrete has a structure with closed pores, while aerated concrete has open pores. Therefore, the water absorption of the latter is much greater than that of the former. Hence the important requirement for garages built from aerated blocks. The walls of the building must be protected; this can be plaster or any other type of cladding.
Blocks for a garage made of aerated concrete This might be interesting!
In the article at the following link, read about the main advantages of garage lifts for cars.
As for the density, it is almost the same for the two materials and varies in the range of 300-1200 kg/m³. But at the same time, the strength of aerated blocks is almost twice as high, because they are manufactured using the autoclave method. Although we must pay tribute to the manufacturers of foam blocks, they are already offering products whose production is established using autoclaves.
And other characteristics:
shrinkage of foam blocks
– 1-3 mm/m, for gas blocks – 0.5 mm/m;
aerated concrete material retains heat better
than his opponent, because his structure is uniform;
degree of fire resistance
the two types are the same, that is, they are non-combustible materials.
Gas silicate blocks
If all the previous varieties belong to the category of concrete products, then this is a completely different material that does not contain cement. Its recipe includes only sand, lime, water and gas-forming fillers. The production process is autoclave.
What can you say about the characteristics of gas silicate:
density
300-900 kg/m³;
pore diameter
– 1-3 mm;
shrinkage
– within 0.5 mm/m;
frost resistance
– 70 cycles;
begins to collapse
already at a temperature of +400C;
thermal conductivity
0.12-0.145 W/m K.
As you can see, this material absorbs moisture like a sponge. So you need to think about whether it is worth using it in the construction of a garage. Of course, if protective measures are taken, then this structure can be erected from gas silicate. Although a cinder block would be more reliable.
Construction of a garage from gas silicate blocks This may be interesting!
In the article at the following link, read about how to choose a country house for permanent residence: setting your priorities correctly.
Sandwich panels
These building elements are metal sheets with insulation laid between them (polystyrene foam, mineral wool, polyurethane or basalt fiber can be used). This type of construction is lightweight, which means that the foundation is not subject to such serious requirements as when building a brick garage.
Sandwich panels also have other advantages:
- Low cost. A garage made of panels will cost much less than a brick or wooden one.
- The building can be erected in 3-5 days. In this case, all the work is done with your own hands; no heavy equipment is required.
- Construction in winter is allowed.
- Since the panels already have insulation, there is no need to think about additional thermal insulation.
- Such a garage can be disassembled and moved to a new location without any problems.
The disadvantages include:
- Low strength of the building. Shelves cannot be attached to the walls of such a garage.
- The building can easily be destroyed by a hurricane, so not every region can build such structures.
- The panels must be connected very tightly. If the garage begins to sag and gaps form between the panels, it will become very cold in winter.
- The internal insulation is highly flammable. Therefore, it will be difficult to conduct electricity.
Dependence of the choice of block foundation on the characteristics of the site
When selecting the type of block foundation structure, the following factors are taken into account:
- soil type;
- depth of groundwater;
- freezing level (at minimum air temperature);
- the presence of water lenses in the soil.
Priming
Depending on the type of soil, it is recommended to choose the following types of foundations:
- rock - foundations of any type are used that do not require the construction of wells;
- for conglomerates characterized by volume stability and strength, any scheme can be used;
- clay and loam with a large freezing depth - heavy structures (for example, block);
- sand and sandy loam with reduced freezing depth - any type of base.
Table: minimum foundation depth in sand and clay
The table shows the minimum values for the depth of the structure into soil consisting of sand or clay.
| Soil type | Depth, mm |
| Sand | 500 |
| Clay | 700 |
To determine the type of soil on the site, a manual or mechanical drilling rig will be required. The resulting soil section is analyzed independently or in the laboratory. When constructing permanent residential buildings, it is recommended to conduct laboratory geodetic surveys.
Groundwater
The type of foundation is chosen depending on the depth of the water. If the liquid is close to the surface, then it is recommended to equip the structure with blocks buried 500-700 mm. If the water level is deep in the soil, then the base is additionally recessed into the soil layer. It is possible to organize a network of drainage channels that drain liquid from the area where the house is being built (used in the construction of multi-apartment buildings).
Freezing depth
The depth of freezing depends on climatic conditions. When arranging a buried structure, the base is located below the hardening point of the soil. It is necessary to take into account possible seasonal changes in the volume of soil located under the foundation, which leads to the appearance of cracks on the walls of the house.
Water lenses
The formation of water bubbles is possible at the junction of layers that differ in liquid transmittance coefficients. When arranging the foundation for a house, you should take into account the heterogeneity of the soil and avoid water lenses along the route of laying the blocks. The structure of the soil is determined by geodetic research carried out by mobile laboratories.
Which garage blocks are best for construction?
Before starting construction of a garage, you should choose a building material for the garage box.
Various types of blocks are used to build garages
Composite blocks, which have improved performance properties and the following set of advantages, confidently compete with brick, reinforced concrete and sheet metal, traditionally used for garage construction:
- necessary margin of safety;
- light weight;
- increased volume;
- practicality;
- reasonable price.
However, blocks are manufactured by specialized enterprises from various types of raw materials using individual technology, which affects the properties of the block building material.
Different types of blocks differ in the following performance characteristics:
- the ability to maintain structure when frozen;
- level of hygroscopicity;
- thermal insulation characteristics;
- strength properties.
Using individual technology, blocks are manufactured by specialized enterprises from various types of raw materials.
Today, the following types of garage blocks are used:
- Foam concrete composites.
- Slag-filled blocks.
- Aerated concrete products.
- Gas silicate materials.
- Blocks made of concrete and expanded clay granules.
When deciding on the possibility of using a certain type of block to build garage walls, you should carefully analyze the properties of the material. Let us consider in detail the operational characteristics of composite blocks and evaluate the possibility of their use for the construction of a garage.
Foam concrete
The production of foam concrete blocks is carried out by introducing a foaming agent, as well as fillers, into the concrete mixture, followed by pouring the mixture into molding containers. Foam concrete hardens under natural conditions. Simplified production technology allows the production of blocks in small enterprises. A special unit is used to supply the foaming component to the working mixture. After the foam concrete blocks harden, a porous structure is formed, formed by evenly distributed air bubbles.
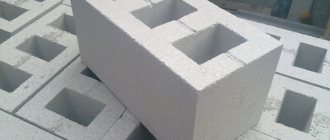
Foam blocks have increased strength
When planning to build a garage from foam blocks, you should use foam concrete products that have the required density.
The specific gravity of the blocks varies from 0.2 to 1.2 t/m³, which affects the properties and purpose of the block material:
- blocks marked D200-D500 are used for thermal insulation purposes. The material effectively retains heat due to reduced thermal conductivity, however, it is not durable enough;
- foam concrete grade D500-D900 is used for the construction of building walls. The blocks have increased strength, which is combined with higher thermal insulation characteristics;
- blocks made of foam composite, which are marked D900-D1200, have an increased safety margin compared to other types of foam concrete products. However, as the specific gravity increases, the thermal conductivity of the material increases.
For the construction of a garage, blocks with dimensions of 0.6x0.3x0.2 m are used. The dimensions of foam concrete blocks allow the construction of garage walls of various thicknesses:
- for an unheated garage, the wall thickness will be 20 cm;
- for a comfortable temperature in a heated garage, the thickness of the masonry is 30 cm.
No special training is needed for self-construction of garage walls from foam blocks.
No special training is required for self-construction of garage walls from foam blocks. Foam block walls are impervious to the effects of aggressive liquids and retain their properties during operation. To protect the material from moisture, the foam block surface should be plastered.
Cinder blocks
Cinder blocks are an inexpensive building material. The blocks are produced by vibratory compaction of metallurgical waste mixed with sand, gravel or crushed stone filler. Portland cement is used as a binding component in the manufacture of blocks. The block production technology allows the use of brick fragments, shell rock or gravel screenings as filler. A garage made of cinder block, which has increased weight, places an increased load on the ground surface and is installed on a poured foundation.
Depending on the filler used, the specific gravity of cinder blocks reaches 2 t/m³.
Various types of slag-filled blocks are used for construction:
- hollow blocks characterized by reduced thermal conductivity. The weight of hollow products does not exceed 15 kg;
- solid cinder blocks, characterized by increased strength and increased thermal conductivity. The weight of a full-bodied product reaches 30 kg.
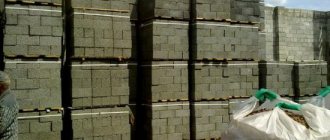
When planning to buy cinder blocks for the construction of garage walls, do not purchase handicraft products that are of low quality.
Various types of cinder blocks are used for construction
Aerated concrete blocks
For the manufacture of gas-filled blocks, Portland cement, purified sand, lime and a foaming agent are used. Aerated concrete is similar in structure to foam concrete blocks, however, it differs in the reduced size of the air cells. Aerated concrete blocks are easily distinguished from other block materials by their white color. The material is in demand due to the following advantages:
- correct geometry of products;
- dense structure;
- ease of processing;
- fire safety.
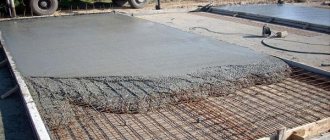
A garage made of aerated concrete will not crack and will last a long period of time if reinforced. To do this, lay a metal mesh or reinforcement along the entire length of the wall. Reinforcement of the following rows is carried out through three levels of masonry. When planning to build a garage out of concrete blocks, check the depth of the groundwater to select the correct foundation.
A garage made of aerated concrete will last a long period of time
Gas silicate
Gas silicate blocks are made by autoclave processing from quartz sand, Portland cement and lime. To form the cellular structure of the gas silicate mass, aluminum powder is introduced, which reacts with lime.
Gas silicate blocks are distinguished by the following set of operational properties:
- environmental cleanliness;
- fire resistance;
- vapor permeability;
- durability;
- increased strength.
Gas silicate also effectively absorbs noise and provides an increased level of thermal insulation with a reduced thickness of garage walls. Having decided to use gas silicate for the construction of garage walls, it is easy to save on the construction of the foundation. Indeed, due to the light weight of the blocks, the load on the base is significantly reduced. When building a garage from gas silicate blocks with your own hands, use special glue. It will reliably connect the blocks and prevent the formation of cold bridges.
Use special glue when building a garage from gas silicate blocks
Expanded clay concrete blocks
Expanded clay concrete blocks are an environmentally friendly building material, characterized by increased sound insulation characteristics and heat-insulating properties. Portland cement, fine sand and expanded clay granules are used to make blocks.
Thanks to the introduction of granulated expanded clay into the blocks, the material acquires the following properties:
- increased level of thermal insulation;
- ability to absorb external noise;
- reduced weight;
- high fire resistance.
In addition, expanded clay concrete blocks do not crack during sudden temperature fluctuations, are resistant to the development of microorganisms, and also have increased strength and reduced hygroscopicity. A garage made of expanded clay concrete blocks is much cheaper than a similar structure built from ceramic bricks. A garage made of expanded clay concrete should be reliably moisture-proofed. Plastering, as well as finishing from the inside, protects expanded clay blocks from waterlogging. Drawings for the construction of an expanded clay concrete garage are not needed; it is enough to determine the size of the building.
Expanded clay concrete blocks have increased strength
Block garage: types
To obtain a foam block , you need a foaming agent, which, due to small cavities formed by gas bubbles, will increase the volume and change the structure of the product. The following are used as foaming agents:
- organic substances on a protein or protein basis (GOST 25485 from 1989);
- synthetic - artificial foam concentrate (cheap, but less effective);
- homemade (rosin treated with alkali + wood glue).
Garage made of blocks - photo :
Which blocks are best to build a garage from?
- concrete stands apart , which is obtained by mixing cement paste with previously prepared foam in mixing mechanisms. Air bubbles in the concrete mass are distributed evenly and form cells. Hardening occurs in molds at normal temperatures. The simplicity of the process makes it accessible for use in artisanal conditions .
The density of foam concrete varies from 200 to 1200 kg/m³, which characterizes its strength. Depending on the density, foam concrete brands specialize:
- D900-1200 - structural, very durable, blocks are used for high-rise construction;
- D500-900 - structural and thermal insulation, well balanced, blocks are used for load-bearing walls of multi-story buildings;
- D200-500 - thermal insulation, has low strength and thermal conductivity, blocks are used for thermal insulation.
The size of the particles that make up the structure of a cinder block determines its density , and, consequently, strength . It also makes the surface of the block more or less porous and susceptible to moisture. Based on this, cinder blocks can be solid (weighing up to 28 kg) and hollow (weighing 14 kg).
Due to the porosity of the surface, both cinder blocks and foam concrete require mandatory finishing that can protect them from external moisture.
- Aerated concrete is an artificial stone made from cement (gypsum), sand and a gas-forming agent, with a cellular structure, the pores of which are smaller than those of foam concrete - only 1-3 mm. This is achieved by using aluminum powder or paste , which, creating a chemical reaction with the release of hydrogen, foams the concrete.
Unlike foam concrete, the surface of the blocks is smooth , has a regular geometric shape and can be easily processed with a cutting tool (hacksaw, chisel, drill). The marking of aerated concrete is also based on the density criterion: the higher the density, the stronger the material.
To increase this indicator, autoclaving (hardening under pressure in a saturated steam environment) is used in the production of aerated concrete; the material can also harden under natural conditions. Blocks are obtained by cutting a monolith or using molds.
To lay walls from such blocks, a sand-cement mortar or special glue is used, which reduces the thickness of the seam by 4-5 times. Aerated concrete blocks are gray or black, which reduces the aesthetic appeal of the wall.
The cellular structure of all types of blocks requires mandatory reinforcement of the walls along the entire perimeter. Only this can prevent cracking of the blocks during shrinkage of the structure.
Garage made of aerated concrete - photo :
Foam blocks, cinder blocks and expanded clay blocks
All these building materials are very methodically pushing brick out of the market. This is not surprising, because blocks of this type are lightweight and durable. Since they are much larger than bricks, buildings made from blocks are built much faster. At the same time, a ready-made garage will cost much less.
There are other advantages:
- You can build a two-story building.
- Foam blocks retain heat well. According to these indicators, they are three times higher than the characteristics of brick.
- You can easily organize additional heating or install plumbing and electricity.
- Fireproof materials.
Healthy! For construction you will need a reinforced belt.
But there are also some disadvantages:
- Foam blocks (and other types of porous building materials) require high-quality external and internal finishing.
- When the building shrinks strongly, the blocks crack easily.
- The building material is difficult to store (the blocks are quite brittle).
- Installation of shelves and cabinets is carried out only with the help of special fasteners.
Columnar recessed and non-recessed block foundation
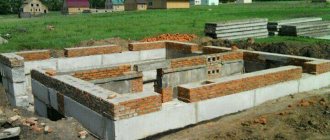
The basic structure of the base is assembled from blocks made of concrete or cement with fillers, they form support pillars. The use of bricks connected with cement mortar is allowed. The design of a buried foundation differs from a foundation installed on the ground surface in the amount of building material used. When constructing supports with great depth, it is necessary to fill the air gaps with soil and then compact them.
Columnar foundation made of FBS blocks
Required Tools
The minimum set of tools includes:
- a container for mixing cement with water or an electric mixer;
- bayonet and shovel shovels;
- stretcher or wheelbarrow for moving soil and mortar;
- vibration compactor;
- hammer with rubber working part;
- hydraulic or laser level;
- measuring devices.
Step-by-step creation of a columnar foundation
Brief instructions for building a columnar base:
- Prepare the selected area from which vegetation and foreign objects are removed.
- Level the surface and then mark the contour of the base. To mark the boundaries, string and pegs driven into the ground are used - they indicate the points at which the posts are supposed to be installed. It is recommended to equip supports with a pitch of no more than 1500 mm, this increases the strength of the structure.
- Dig niches with a depth of 300 mm at the installation points of the pillars.
- Fill the bottom of the niche with crushed stone moistened with water. Compact the soil using an electric vibrating tool or a hand tamper.
- Place the blocks on the gravel base. If 2 elements are used, they are mounted layer by layer without displacement. When using 4 parts, 2 layers are formed with perpendicular orientation of the elements. To connect the blocks, a mixture of Portland cement M400 with sand and small crushed stone in a ratio of 1:2:5 is used.
- Raise the pillars to the required height above the ground surface, and then wait for the moisture to evaporate from the solution.
- Protect the outer surface of the supports using liquid mastic or sheets of roofing material.
- Fill the gap between the posts and the soil with soil, which is compacted with a vibrating plate.
- Mount a grillage made of wooden beams impregnated with an antiseptic composition on the top of the supports.
- Install wooden lintels in the grillage to increase the rigidity of the structure. The floor of the first floor of a residential building or utility room is built on the formed platform.
Video: construction of a columnar foundation from blocks
Builders of residential buildings and utility buildings shoot videos that show the sequence of actions when planning a site and installing foundation elements. Watching such videos allows you to understand the design features and reduces the risk of erroneous actions. When arranging the foundation, the individual characteristics of the site and the type of soil on which the house is built are taken into account.
Roof, gate and floor
Then you will need to install a strong iron gate, which you can buy or make yourself. After erecting the walls and gates, you will need to work on the roof. The roof can be made flat (the easiest option). To do this, lay concrete slabs on the wall using specialized equipment.
It is not prohibited to erect a sloped roof. Which is often not recommended, because it is inconvenient to use when applied to garage structures.
After the walls and roof are built, the floor needs to be built. To do this, place boards around the perimeter of the entrance to the basement, as if fencing it off. Fill the remaining space with concrete (not in the basement, of course) up to the level of the door. After the concrete has hardened, you will have a garage, or rather a “sub-garage.”
We build a columnar foundation from foundation blocks
Like any construction on a summer cottage, a block version of the foundation can be built several hours a day if you have free time and physical strength. The work is not hard and does not require a huge amount of digging of trenches or foundation pits. But there is one feature - the construction of a columnar foundation, first of all, will require very serious preparatory work. It is necessary to lay out the blocks, install beacons and landmarks along which the material will be laid on the cement mortar. The easiest way is to do this delicate part of the work right away, while the necessary details of how to mark the area are fresh in your memory. See how to seal and level a cushion under a columnar foundation of 20x20x40 blocks:
Two words about building blocks for a columnar foundation
For the construction of the foundation, in most cases, monolithic stones are used, cast on a vibrating machine or press from concrete grade M100-150. The easiest and cheapest way is to buy such material than to try to make it yourself. It is relatively inexpensive; during the construction of a summer house or utility room, you can buy leftover material from the owners, especially since you won’t need much of it, 40-50 pieces.
A 20x20 block with a length of 40 cm is most often used for the construction of columnar foundations for quite objective reasons:
- The size of the block determines its light weight. Depending on the filler used, the weight of one stone ranges from 30 to 32 kg, which makes it relatively easy to lift and lay out blocks without additional tools and devices;
- Most often, blocks are made on vibrating presses, in standard forms for foam concrete or cinder block. In this case, a cast stone is obtained with an initial strength that is significantly higher than an artisanal concrete casting;
- The successful proportions of the material make it relatively easy to fold the foundation column and level the plane, without using a grinder to trim the top of the support.
Marking the site and preparing the cushion for columnar supports
At the initial stage of preparation, you will need to correctly mark the installation points of the columnar foundation supports. For this purpose, the dimensions and shape of the frame of the dressing timber grillage, which will rest on the pillars, are used. Based on the project sketch, it is necessary to calculate the exact dimensions of the midline of the beam and transfer it to the ground using cords. In addition to observing the lengths of the sides of the future foundation with millimeter accuracy, you will need to check that a right angle is maintained between the adjacent sides.
The result should be four main installation points for corner column supports, between which a construction or marking cord will be stretched without sagging. In this case, the stakes on which the thread or cord is attached must be located outside the perimeter of the foundation.
In a similar way, you need to align the position of the marking cord in height so that the plane is perfectly aligned with the horizon.
The next step is to prepare the cushions for laying the blocks. It would be more reliable to bury the columnar supports into the ground by 20-25 cm, but in this case you will need to use an additional pair of blocks for each pillar, instead of laying three rows.
If you perform additional soil compaction within a radius of 50 cm around the support, you can get by with a non-buried version of a columnar foundation. In a pit dug to a depth of 30-35 cm, it is necessary to pour two layers of sand with the thickest layer of crushed stone in between. The poured material is carefully compacted layer by layer so that a small layer of spreading sand remains on the surface.
Installation of columnar foundation supports
Laying blocks at the base of a columnar support is carried out using the same technology as laying bricks. High mechanical strength is not required from the masonry mortar; the main thing is that it is plastic, but does not spread on the concrete. The sand base on which the block will be laid is moistened and immediately covered with a thin layer of mortar 1-1.5 cm thick. Blocks can be placed on the concreted layer.
The position of the block must be aligned with the stretched cords and the building level so that the supporting surface is well filled with the solution and there is no blockage along the horizon.
When laying the next pair of blocks, they are turned a quarter turn, thereby ensuring the ligation of the rows. If there is a third row, it also needs to be tied with the bottom pair.
In some cases, craftsmen make a cushion for laying blocks in the form of a concrete screed, which, after preliminary setting of the mortar, is cleaned with a lath and leveled horizontally. In this case, the top layer of sand is not poured onto the cushion, but the masonry mortar is laid directly on the crushed stone with liquid concrete poured over the gravel.
Finishing work and laying of strapping
After the masonry mortar has set, the base of the blocks in the columnar supports is cleaned, the cracks are filled with mortar, plastered and waterproofing is laid. If the pillars are installed correctly along the beacons, without blockages of the supporting surface, you can proceed to tying the foundation with timber.
The wooden frame of the grillage is made in carpentry in advance, most often in the form of two L-shaped elements. The lower part of the corner joint, which will rest on the columnar masonry of blocks, is reinforced with a metal plate. There will be an anchor pin running through a pair of metal flashings, embedded in the seam between the top two blocks.
Tree
Timber, logs and boards are environmentally friendly building materials. Garages of this type are usually built on suburban areas. Often such buildings are combined with bathhouses, sheds and workshops.
The advantages of this building material include:
- Nice appearance.
- Good thermal insulation properties of wood.
- Construction speed.
- The ability to attach cabinets and wall shelves using any convenient method.
- The material does not emit toxins, so the garage can be attached to a residential building.
The disadvantages are usually the low moisture resistance and fire safety of the material. Both of these shortcomings are easily compensated for today with the help of special impregnations. For example, if you coat wood with a fire-retardant compound, its fire-resistant properties will be in no way inferior to any other material.
Which building blocks are better?
What blocks should I use to build a garage? Depends on your financial capabilities and a number of external factors (climate, operating conditions). For example, expanded clay concrete blocks have lower moisture absorption and higher moisture resistance than aerated concrete blocks, which actively absorb moisture. On the other hand, expanded clay has less resistance to impact loads than conventional concrete.
To decide which building blocks are right for you, check out the comparative characteristics of their main parameters.
Cost calculation
- Wall blocks - the average cost is about 3 thousand rubles per m3 (block dimensions - 60/30/20 cm). The price for one block is 100 rubles.
- Partition blocks - average cost within 2800 rubles per 1 m3.
In addition to purchasing blocks, for construction you will need a standard set of building materials:
- Cement. Price for 50 kg (M300) - within 250 rubles.
- Sand. The price per cubic meter is within 200 rubles.
- Crushed stone - 1,700 rubles per 1 m3.
- Gravel - 1200 rubles per 1 m3.
- Insulation - within 1300 per 1 m2.
- Waterproofing - from 40 rubles per 1 m2.
As we can see, building a garage, even taking into account the low cost of foam blocks, will cost a lot of money. There are ways to help save on construction costs:
- The floor in the garage is covered with crushed stone, rather than making a monolithic layer of cement. It is only necessary to pre-compact the soil before backfilling.
- Making a foundation on pillars, which will help save on cement mortar.
- Purchasing materials can be cheaper if purchased in winter.
Aerated concrete blocks
Aerated concrete blocks
Aerated concrete is a subtype of cellular concrete made from cement, water, quartz sand, lime and a gas-forming agent (usually aluminum powder). The components are mixed and fed into an autoclave, where they foam and harden. Aerated concrete blocks for garage construction are good because, with a low volumetric weight, they have sufficient strength, excellent vapor permeability and low thermal conductivity.
This material is easy to machine: it can be cut, sawed, trimmed, drilled. Aerated concrete blocks are used for the construction of external/internal walls and insulation.
Corrugated sheet
This is one of the cheapest options for constructing a garage that needs to be built in a short time. Such a building can be dismantled in a matter of minutes and moved to a new location.
Other advantages include:
- Corrugated sheeting can last up to 30 years.
- The building material is much cheaper than any other.
- The building can be erected with your own hands in a few days.
- Light weight material.
But there are also disadvantages. For example,:
- Corrugated sheeting is not able to protect a car from theft. Thin sheets of iron can be broken using a regular can opener. Therefore, such buildings are suitable only for protection from precipitation and sunlight.
- Additional insulation will be required. Iron has very high thermal conductivity.
- Dents appear on walls easily.
- Shelves and other niches for storing tools will have to be fixed to the floor.
- Corrugated sheeting has extremely low noise insulation.
The same applies to sheet steel. Such a garage cannot be built without welding equipment. It will also have to install additional heating devices. However, the issue of insulation is faced by the car owner in most cases.
How much does each block cost?
The price component is an important selection criterion. Therefore, the question of which is the best block for building a garage at a price concerns many who are planning to start building this building.
Manufacturers offer a fairly wide range of wall blocks in terms of their sizes. To compare prices, we will consider a traditional block with parameters 20x20x40 cm.
concrete block
costs 50 rub. per piece (price averaged by region);
expanded clay concrete
– 38-40 rubles;
cinder block
– within 30 rubles;
foam block
– 120 rubles;
gas block
– 120 rubles;
gas silicate
- 100 rubles.
It should be noted that the price in each group varies greatly. Because blocks are made from different concrete solutions. This refers to the brand of material. And the higher it is, the more expensive the final product. It would be correct to say that factory-made products, and even more so those produced using the autoclave method, are many times more expensive than handicraft materials.
Here you can also add inaccuracy in dimensions and unevenness of the edges of blocks made on construction sites or in small workshops. And, as practice shows, the quality of such products is not the highest.
Two-story cinder block garage
So, now, having examined all the pros and cons, we can dot all the i’s in the topic of our article, namely: what are the best blocks to buy for building a garage. The ideal option is cinder blocks. They correspond to the strength of low-rise construction, their price is the lowest, these are products with a fairly smooth surface that does not need to be finished, although, as mentioned above, the market offers blocks with decorative designs or painted throughout the entire body of the stone. In terms of thermal insulation characteristics, this material is inferior to its cellular materials or those filled with expanded clay, but for garages this is not the most important selection criterion.
The cinder block has one more characteristic, which is inferior to products with a cellular structure. This is the specific gravity. That is, it is larger, which means that a high-strength foundation will have to be built under the cinder blocks. And this increases the budget allocated for the construction of the garage. But even this does not stop private developers from using cinder blocks as the main material in low-rise construction.
Expanded clay concrete blocks
Expanded clay concrete is a highly environmentally friendly material with excellent sound and heat insulation characteristics. In terms of environmental friendliness, it is comparable to ceramic brick.
Expanded clay concrete blocks are made from baked clay (expanded clay), sand, water and cement. By means of vibrocompression, the mixture of starting materials is compacted, formed into blocks and undergoes heat treatment.
The result is a high-strength material that is successfully used not only for the construction of low-rise buildings, but also for the construction of external walls of high-rise buildings.
Foam concrete blocks
Foam blocks blocks
Foam concrete is produced by mixing water, cement, foam former, and various fillers. High-density material is used for the construction of floors between floors and foundations. Less dense foam concrete is used for arranging partitions, filling voids, and organizing sound and heat insulation.
Foam concrete blocks are widely used in low-rise construction due to their strength and low cost. Such buildings are practically not subject to wear and tear, do not rot, do not crumble or collapse. High-quality foam concrete is resistant to aggressive chemicals. It will not be damaged by drops of technical oil, acetone or gasoline. This material is also supported by its non-flammability.
What material to insulate a garage with?
In this case, everything depends on how the building will be used. If the car owner plans to spend a lot of time in it and store tools, sports and other equipment in the garage, then it is best to insulate the walls with glass wool. For finishing, you can choose chipboard sheets. Some install stoves, but for this you will need to think through a hole for the pipe in the ceiling in advance.
Important! The stove can only be installed in buildings made of fire-resistant material.
If the garage is wooden, then the building needs to be insulated in several stages. Some people use sheets of glass wool for this. But this is far from being an ecological material, which is completely illogical to use with wood. It is best to use natural clay for this. It is non-toxic and does not allow cold to pass through. You can sheathe the inside of the room with boards. This is an inexpensive but reliable option.
The foundation of the building is also important in this matter. It provides additional insulation, and in some situations it is completely impossible to build a garage without a good foundation.
Choosing material for the construction of garage walls
If the garage is combined with a house, it often involves heating and, as a rule, is made of the same material, insulated, externally finished, etc. This is also done in order to create a unified architectural composition. However, it is quite possible to construct a garage building from a different building material, followed by cladding in the same style as the house. Well, if we are talking about a separate building, then, in principle, any option can be considered. But not everything is as simple as it might seem at first glance. There are many nuances and subtleties that should be taken into account during construction.
Types and characteristics of blocks
Various types of blocks are used to build a garage. All of them are distinguished by high strength and practicality, low weight, increased volume and affordable price.
Building materials are made from various types of raw materials, which affects their properties and characteristics. When making a choice, you should first analyze the properties of each material.
Foam concrete blocks
A foam concrete structure is produced by mixing cement, a foam-forming substance, fillers and water. Organic substances on a protein or protein basis, synthetic concentrates or homemade compounds from glue and rosin act as foam formers.
The following characteristics are considered to be the advantages of the material:
- low price;
- strength and reliability;
- the building will stand for a long time;
- the walls do not rot, do not crack or crumble;
- the surface of the material is resistant to aggressive solutions;
- high fire resistance.
The surface of foam concrete structures is porous and not uniform. To increase moisture resistance, the foam block surface should be plastered.
To erect foam block walls, no special preparation is required. In the construction of the garage, blocks measuring 0.6 by 0.3 by 0.2 meters are used. If the room will not be heated, then the recommended wall thickness is 20 cm.
Cinder blocks
This type of material contains binder material, lime, and fuel slag. A special feature of cinder blocks is that they are obtained from various components, for example, from river gravel, crushed stone, small fragments of brick or glass, and expanded clay granules.
The advantages of this material include:
- low price;
- low volumetric mass;
- fire resistance;
- high insulating properties.
Hollow or solid cinder blocks can be used to construct the structure. The first option is characterized by low heat conductivity. The one-piece variety is characterized by high thermal conductivity and strength.
To increase the moisture resistance of slag-filled structures, it is necessary to carry out work on finishing the surface with protective materials.
Expanded clay concrete blocks
Environmentally friendly building materials include expanded clay concrete building materials. Expanded clay granules, fine sand and Portland cement are used for production. A garage built from expanded clay concrete blocks is strong, reliable and durable.
The advantages of the material include the following characteristics:
- resistance to moisture;
- high thermal insulation ability;
- sound insulation;
- light weight;
- fire resistance;
- the wall does not crack due to sudden temperature changes;
- strength and reliability.
To protect the building from excessive moisture, it is necessary to plaster the wall.
Aerated concrete blocks
This building material is made from water, quartz sand, cement, lime and a gas-forming substance.
The advantages of the material include:
- light weight;
- strength;
- breathability;
- high fire resistance;
- heat preservation inside the garage;
- easy to machine (the blocks can be simply sawed, drilled, cut).
The surface of the blocks is smooth, of regular geometric shape. To avoid cracking of the walls of a building during shrinkage, it is necessary to carry out reinforcement.
Gas silicate block
The structure of gas silicate building parts is porous. Contains quartz sand, cement, lime. The color of the blocks is white or creamy. The surface is smooth and regular in shape.
The advantages of the material are the following characteristics:
- high density and reliability;
- light weight;
- high frost resistance;
- safety and environmental friendliness;
- ability to retain heat in a room;
- high fire resistance;
- the blocks are suitable for machining.
Disadvantages include susceptibility to moisture and vapor permeability. During construction, it is necessary to reinforce the walls to avoid cracking of the structure.
Gas silicate blocks - Hoffman's invention, second only to wood
For more than 100 years, this cellular material has been superior in strength and appearance to all other members of the foam block family. It has an ecological basis - crushed quartz sand, lime, cement. It also foams with an aluminum gas-forming agent as a result of a chemical reaction, and also consolidates its physical properties during the autoclaving process.
Even in appearance, artificial stone is very different from other foam blocks: it is white or cream in color, with a smooth outer surface, and a regular geometric shape. To build walls from these blocks, special glue is used.
Gas silicate blocks have the following characteristics:
Recognized advantages of gas silicate blocks:
- light weight;
- the density and strength of the blocks are sufficient for the construction of walls of low-rise buildings;
- excellent thermal insulation and sound insulation properties;
- fire safety;
- strength of wall masonry with minimal thickness of adhesive joints;
- suitability of blocks for machining;
- environmental friendliness of the blocks;
- the speed of laying walls made of blocks is 4 times higher than that of brick;
- relatively low cost.
Flaws:
- hygroscopicity and vapor permeability;
- insufficient bending strength;
- mandatory reinforcement of walls made of gas silicate blocks.
Gas silicate blocks in industrial production are produced in the following types :
- wall rectangular blocks;
- wall tongue-and-groove blocks;
- tray blocks;
- blocks with pocket grip;
- wall tongue-and-groove with pocket grip.
Garage made of gas silicate blocks - photo :
Which foundation is better
There are several options for mounting the base:
- Prefabricated reinforced concrete blocks. This is a reliable material that installs quite quickly. Using reinforced concrete blocks, you can quickly build an inspection hole. But such panels are very heavy and expensive; you won’t be able to do it without a crane.
- Monolithic foundation with reinforcement. This is exactly the kind of foundation that will be needed for a brick garage. A monolithic foundation is made without the use of a crane or other heavy equipment. However, this is not a cheap pleasure. You will need to purchase not only cement, but also a sand-gravel mixture, prepare formwork (you can use plywood, old boards and used panels for it). You also need reinforcement (can be replaced with a metal profile or mesh). Such a foundation takes a long time to build and gains the necessary strength over a long period of time.
- Strip foundation. This is the optimal solution for garages made of foam blocks. Such a foundation is erected only under load-bearing walls. The foundation can be made of concrete, brick or rubble stone (as a rule, a concrete mixture with reinforcement is most often used).
- Made from brick or cinder blocks. This is a rather complex type of base; in addition, you will need to pay great attention to heat and waterproofing.
The best option would be a shallow strip foundation.
Advantages and disadvantages of FBS blocks
The advantages of structures made from FBS blocks include:
- speed of installation;
- low consumption of cement mortar;
- Possibility of use on any type of soil;
- identical shape of factory-produced elements.
When arranging the base, no formwork is required, but a crane will be required to install the blocks.
The disadvantages are the high cost of parts and the difficulty of cutting FBS elements into fragments of the required size.
How to choose a gate
An important element of any garage is the gate, which protects the garage from intruders. There are different types of doors that can be installed in your garage.
Sectional
Structures of this type are made of several sections that are connected by movable elements. The advantage of sectional doors is their compactness, since they do not take up space in the garage and do not interfere with the exit of the car. Other advantages include thermal insulation properties and protection from moisture.
Lifting
The products are made from a single piece of fabric, the size of which is equal to the dimensions of the garage entrance opening. Lifting structures can be operated manually or electrically. The lifting mechanism at the gate is very reliable, since its components are made of durable steel that can withstand any load.
Rolled
Roller models are equipped with a special shaft onto which the leaf is screwed when the gate is opened. They are installed in small garages with little free space. The advantages of the design are considered to be low cost, compactness, and the ability to cover large passages.
Swing
Swing gates attract buyers with their low cost and ease of use. Most often, double-leaf models are installed in garages, consisting of two reliable supports. It is better not to use single-leaf gates, as they sag.
Cinder blocks
Cinder blocks
Cinder blocks contain lime, a binder (Portland cement) and aggregate (fuel slag). The proportion of lime does not exceed a third of the total volume, cement should be at least 2/3.
The advantage of slag concrete blocks is the low (about 1000 kg/m3) volumetric mass of slag, and the lighter the material, the more profitable it is. At the same time, slag concrete has excellent insulating properties. According to these parameters, a 20-centimeter slag concrete masonry corresponds to a 45-centimeter brick wall. Unlike brick, cinder blocks do not have the effect of thermal accumulation.
The disadvantage of this material is the presence of harmful impurities introduced along with the fuel slag. In general, the properties of slag concrete depend on its porosity. Such blocks are used for masonry of both internal and load-bearing external walls of the garage and more.
The most important part: electrical
To turn your creation into a full-fledged garage, you should install electricity into it. If your neighbors also do not have electricity supply, then you can negotiate with them to “chip in” money to install an electric cable.
This procedure is not exactly cheap, and if your neighbors have electricity, then simply install electricity to your place, of course, notifying the administration. The premises will not be approved without a meter, so you need to take care of the meter during the connection process.
Basic information about block foundations
The design of the block base is extremely simple. It consists of a reinforced cushion, block walls and waterproofing. If necessary, an upper armored belt is installed. This will be discussed separately below.
The only significant drawback of such a foundation is the need to use a crane to lift the blocks. Of course, you can build a winch and try to place the blocks manually, but the labor costs in this case will be inappropriate.
Otherwise, even a beginner will not have any difficulties with arranging a foundation from FBS blocks.
Foundation diagram of FBS blocks
In terms of rigidity and strength, block foundations are inferior to their monolithic counterparts, but outperform them in cost, simplicity and speed of construction.
Block foundations are best suited for soils with a predominant sand content. In areas with crumbly and soft soil, it is better to refrain from constructing such a foundation - the structure may simply sag, which will lead to significant deformations or even complete destruction of the building erected above it.
Block foundations normally withstand the effects of soil heaving forces. Under conditions under which a monolithic strip concrete structure could rupture, the blocks will bend at most. This property of the block base is ensured precisely by the absence of its solidity. The design contains seams, which provides the necessary mobility and flexibility of the masonry.
Block foundation
FBS foundation
Also among the advantages of blocks is the possibility of laying them even in snow or rain. Concrete cannot be poured under such weather conditions.
What to build a garage from?
Today, construction from the following types of material is justified:
- brick;
- foam block structures;
- cinder blocks;
- tree;
- sandwich panels.
Find out in our material how to properly prepare and paint a car.
You can also learn how to insulate a garage from the inside with your own hands.
Pros and cons of different types of materials
- Brick. When building a garage, not only the financial component is important, but also the purpose of this building. If you use the garage only in the warm season, then insulating the walls is not practical. For year-round use, it is necessary to select a material that meets these requirements. Brick garages, if they are not first insulated, will not be the best option for using a garage all year round. In addition, it is worth installing a brick garage in cooperatives, which will protect against possible intruders. Brick garages can also be built in vacant areas, but in this case, you will have to take care of fairly thick walls of the building (at least one brick wide). Building a brick garage is a difficult task, because you need at least minimal knowledge of masonry methods.
- Foam concrete. This type of material is quite popular, gradually displacing the usual brick buildings. This is achieved due to a simple and convenient method of constructing these objects, deep energy saving and speed of masonry. Blocks made of foam concrete or aerated concrete are large in size and light in weight, which makes the process of building a garage a simple matter. Upon completion of construction, the outer surface of the blocks is treated with a primer (modular, acrylic). This is necessary to protect the garage from exposure to moisture and other aggressive environments.
- Wooden beam. A little time ago, this type of material was unsuitable for the construction of garage structures, due to the fact that wood was considered a fire hazardous material. Today, thanks to the advent of effective fire-resistant impregnations, wooden garages have become commonplace and commonplace. The main advantage of this material is its appearance, thanks to which you can easily make all the buildings on your site in the same style. In addition to the external treatment of the timber, the interior is lined with basalt wool slabs, which will improve the fire resistance and integrity of the building. When installing the floor, you need to think about insulation in advance. To do this, we use expanded clay screed, which we cover the floor with. This procedure is necessary for a comfortable stay in the garage, and to preserve the vehicle body.
- Sandwich panels. This material belongs to the category of prefabricated ones, which makes the material attractive for purchase. It is based on a metal frame, which is later sheathed with corrugated board. To build an insulated structure, a certain gap is left between the frame posts, into which the mineral wool slab is placed. Sandwich panels are divided into 2 types:
- an ordinary sandwich with various insulation (foam, mineral wool, etc.);
- OSB sheets with polystyrene foam.
Construction will require skills in working with a welding machine and a screwdriver, so self-assembly is difficult. When purchasing, they also order the installation of the structure, so there will be no problems with this. When constructing a structure, the main point is considered to be a properly poured concrete floor. Errors in this work lead to difficulties when installing garage walls, so you need to be careful.
Sources used:
- https://avto-moto-shtuchki.ru/avtotekhnika/346-iz-chego-luchshe-stroit-garazh.html
- https://garazhyk.ru/postrojka/iz-chego-luchshe-stroit-garazh
- https://1decor.org/postroyki/iz-chego-postroit-garazh.html
- https://pobetony.expert/stroitelstvo/garazh-iz-blokov
- https://procrossover.ru/avtolyubitelyu/garazh/vybiraem-material-dlya-garazha-iz-chego-s.html
- https://postroy-sam.info/garazh/16-bloki-dlya-stroitelstva-garazha-preimushchestva-i-nedostatki-html
- https://garazhyk.ru/postrojka/bloki-dlya-stroitelstva-garazha
DIY garage
How to build a garage from blocks - step-by-step instructions:
- Selection of location (high terrain in the northern part of the site in the vicinity of the entrance roads).
- A simplified construction project with the size of a garage made of blocks and proposed additions in the form of an inspection pit, a cellar, and guest parking.
- Purchasing building materials (calculation can be done in an online calculator):
- gas silicate blocks D500 (600x150x250);
- special glue: winter - “Bonolit” , “Prestige” , summer - “Insi” ;
- concrete for foundation (dry mix) M300;
- cement, sand;
- boards for formwork and roof sheathing;
- film waterproofing;
- corrugated metal rod (ᴓ8-10mm) or mesh;
- steel I-beams for floors (100x120m), calculating installation in increments of 80 cm, or laminated timber 150x60;
- roofing and finishing materials.
- Purchase of the necessary tools and equipment (band saw, electric cutter, hacksaw, rubber mallet, corner, grater, notched trowel, scraper bucket with serrated edge, drill with paddle mixer, hand wall chaser, special plane for gas blocks, carriage for adhesive solution).
At the same time, you can dig a cellar or inspection hole (this is unacceptable for heaving soils): dimensional guidelines - wheelbase (80cm) of the car and the owner’s height + 20cm. The length of the pit is determined taking into account freedom of access: vehicle length + 1 meter.
A cellar, even a small one, will require a depth of 3 meters , the creation of a drainage system and drainage of rainwater. For its installation, the level of groundwater, the quality of waterproofing and floor screed will be of significant importance. The cellar must be equipped with ventilation, electrical wiring, a sealed manhole and a ladder for safe descent. Is there a need for such an expensive structure?
What conditions for finishing does gas silicate dictate?
The hygroscopic porous structure of gas silicate blocks requires external protection of the walls from precipitation and internal protection from evaporation. The thermal insulation properties of the blocks eliminate the question of insulating the garage space. Effective exterior finishing materials are:
- mineral, acrylic or silicate facade plaster;
- facade metal profile with polymer coating;
- porcelain stoneware cladding;
- creating a ventilated façade from clapboard or siding;
- facing brick;
- facade thermal panels.
Only moisture-resistant and weather-resistant silicone-based façade paints are suitable for painting
The interior decoration of the garage walls is selected based on the characteristics of the storage facility and associated combustible and flammable materials:
- plaster for painting with silicone enamels;
- ceramic tile;
- PVC lining;
- waterproof or fireproof drywall;
- sheathing with OSB or wood siding.
Building a garage from gas silicate blocks with the recommended finish will take you a month of working time, but it will meet all the nuances of your idea of a comfortable garage, because you will build it with your own hands, according to your own design.
The procedure for constructing a metal garage
Setting up a metal garage requires less money and time.
First step. Make a foundation. Pre-prepare a trench about 400 mm deep around the perimeter of the future metal structure. Fix the formwork boards along the outer boundaries of the pit. Make the formwork at such a height that after pouring, the layer of mortar protrudes above the ground by at least 10 cm. Pour the mortar over the entire area at once.
Second step. Make a frame from a profile pipe. You will need a welding machine. Attach the frame elements to the dried concrete base. For fixation, use anchors about 20 cm long and about 14 mm in diameter. Anchors can be made from reinforcement. For greater convenience, pre-prepare holes in the concrete with a diameter equal to the diameter of the anchors.
Third step. Weld the bottom chord of the garage frame to the driven rods. To securely fix a structure measuring 4x6 m, 15 anchors will be enough. Continue welding the cross members of the structure until you get the frame to the required height.
Fourth step. Cover the frame with sheet metal. Sheets 3-4 mm thick will be enough.
Fifth step. Insulate the garage walls from the inside. To do this, first attach a frame made of wooden blocks to the walls. Place the beams in increments equal to the width of the insulation slab. For thermal insulation, it is most convenient to use mineral wool or polystyrene foam. The wooden frame should first be covered with plastic film, and insulation should be laid on it. Place a vapor barrier film over the thermal insulation. Finally, cover the walls with clapboard, OSB, siding, chipboard or any other material of your choice.
Thus, if you need a simple and inexpensive garage, opt for a metal structure. If built correctly and handled carefully, a metal garage will last a very long time.
If you want to have a capital and most durable structure, make a garage from concrete blocks, bricks and other similar materials. Both problems can be solved on your own without any problems; you just need to carefully follow the instructions and unconditionally follow the basic recommendations.
Good luck!
Garage construction layout
When planning to build a garage, you should initially carefully consider its dimensions - height, width and length. Again, if you plan to put a car in the garage and no longer use the garage space for any purposes, it’s worth dissuading you - make a small reserve - it will certainly be very useful to you in the future. There you can store, say, winter tires, spare parts, tools, etc. There will never be excess free space.
Again, there are no specific standards for building a garage, but they can be considered. In Fig. 2 you can see several size options for the garage, each of which will allow you to save money, get maximum usable space and convenience, or find a middle ground.
Now that you have decided on the dimensions, you should start choosing the materials from which we will build the garage.
Installation of gates, construction of walls and construction of the roof
First step. Install the gate. This element is installed strictly before the construction of walls begins. Weld reinforcement rods with a diameter of about 12 mm to the gate frame. Thanks to the rods, a stronger connection between the garage door and its walls will be ensured. During the construction of the walls, reinforcement will be embedded in the seams. Install the gate strictly vertically. Once the gate is level, secure it using wooden braces.
Second step. Start laying out the walls from the selected material. The next row of masonry, regardless of the material used, must overlap the seams of the laid row. The actual laying should begin from the corners. Be sure to check the verticality of the walls, the correctness of the angles and the horizontality of the masonry rows at each stage.
Third step. Install the garage roof at a slope necessary to drain atmospheric water. To obtain a slope, make the end walls of different heights. Traditionally, a slope of 5 cm per 1 m2 is performed. For example, if the garage is about 6 m long, the total height difference will be about 30 cm.
The ceiling of a private garage will have the form of metal beams with additional lining made of wooden boards. Prepare I-beams. Their height should be about 12 cm. Use beams such that their length is approximately 250 mm greater than the width of the future garage. Insert these beams into the structure by at least 100 mm. At the support points of the beams, cinder block, brick or other building material used should be replaced with monolithic concrete blocks.
Lay the beams across the building at a distance of about 800 mm from each other. The beams are laid embedded in the long wall of the building and with the same slope as that of the given wall.
Step four. Attach wooden boards 4-5 cm thick along the bottom of the beams. Lay the boards as closely as possible to each other. Cover the boards with roofing felt. The edges of this waterproofing material should extend approximately 100 mm onto the wall.
Fill the roofing material with slag or cover the waterproofing with other insulation, for example, mineral wool insulation boards. Visors protruding approximately 40 mm should be installed along the rear and front edges of the roof. Use boards to make canopies. Pour a cement screed about 3-3.5 cm thick over the insulation. Try to level the screed as thoroughly as possible. Be sure to treat the hardened screed with a bitumen primer.
Step five. Finally, the roof needs to be waterproofed. To protect against moisture, you can use the roofing material you already know. This waterproofing material is laid using the fusion method. Roofing felt can also be fixed using bitumen mastic. Lay roofing felt sheets with an overlap of about 100-150 mm. At the edges of the roof, overlap the visor.
Foundation Construction Guide
The procedure for arranging a block base is reduced to the sequential implementation of several technological stages. Follow the guide and everything will definitely work out.
The first stage is preparatory
First, let's get acquainted with the features of the blocks themselves, and also study recommendations for their selection and overall work planning.
Foundation blocks are produced using the vibrocompression method and are used advantageously for the construction of supporting structures. Also, such blocks are suitable for laying walls of basement floors.
Before starting work, it is necessary to create a project for the future foundation. To do this, open any computer program with the appropriate functions and draw the layout of our blocks. This way we can thoroughly understand the order of their installation and bandaging. If you don’t have the skills to work with such programs, we draw the masonry the old fashioned way on paper.
Project of a stepped foundation made of FBS
Project of a stepped foundation made of FBS
Project of a stepped foundation made of FBS
Most often, the width of the first row of a block support is maintained at 400 mm. For the next two rows this figure is reduced to 300 mm. Knowing the required dimensions of the structure and the required number of blocks, you can go to a specialized store to purchase them. As a rule, such stores offer services for the delivery and installation of building materials, which is very convenient.
Important! You must decide in advance where utility lines will be installed and select blocks taking these points into account. Masonry elements with pre-drilled holes are available for sale. If you forget about this event, holes will have to be drilled in the future, which will require additional time, labor and financial costs.
Stage two – excavation work
Study the construction site carefully. Think about where it will be most convenient to place the crane, what may interfere during operation, etc. If possible, eliminate any existing interference. Next, the work is performed in the standard manner.
First step. We determine the corners of the future structure and drive pegs into them. We stretch ropes between the rods, and then place intermediate marking elements in the places of future arrangement of external and internal walls.
Second step. Digging a pit. According to the standards, the depth of the pit should be equal to the freezing depth increased by 20-25 cm. But in some regions, the freezing depth can reach two meters - the costs of arranging such a foundation will be inappropriate. Therefore, a value of 80-100 cm was taken as the golden mean. We stick to it. Additionally, it is recommended to remove the top fertile soil layer (10-20 cm) around the perimeter of the remaining space of the site.
The third stage - arrangement of the sole
There are 2 options for arranging a block base: on a sand cushion and on a concrete base. The second type of support is suitable for unstable soils, however, pouring a concrete base significantly increases the cost of effort, time and money for construction.
Until the moment of arrangement of the compacted sand cushion, inclusive, the procedure for constructing both types of foundation is the same. The actual process of constructing a foundation structure on a concrete support begins with the stage of installing formwork and laying reinforcement.
We first prepare crushed stone of 20-40 fractions, sand and reinforcement. Next we work in this sequence.
First step. We level the walls and bottom of the pit to arrange the sole.
Second step. We fill the hole with a 10-15 cm layer of sand, spill it with water and compact it thoroughly.
Third step. We fill the sand cushion with a 10-centimeter layer of crushed stone and compact it again.
Next, the formwork is installed and the reinforcing mesh is laid.
Stage four – installation of formwork and reinforcement
For assembling the formwork, a 25 mm thick edged board is suitable. We fasten the formwork boards in a suitable way. Typically self-tapping screws are used for this. We place the formwork along the walls of the pit and be sure to check the evenness of its installation using a level.
For reinforcement we use steel rods with a diameter of 12-14 mm. We will tie them into a mesh with cells of 10x10 cm (15x15 cm is possible) using flexible wire. As a rule, reinforcement is performed in 2 layers, with the lower and upper mesh placed at approximately the same distance from the crushed stone and the top of the future fill, respectively. To attach the mesh, we first drive vertical reinforcement bars into the base. If necessary (for example, if the construction of a large and massive building is planned), the number of reinforcing layers can be increased.
Fifth stage - filling the pillow
We fill the entire structure below with concrete. Pour slowly, in an even layer. In several places we pierce the filling with fittings to remove excess air. Carefully level the surface of the pillow.
We leave our structure to gain strength for 3-4 weeks. In hot weather, concrete must be periodically moistened with water to prevent it from cracking.
Let's move on to laying the blocks
Stage six - laying blocks
To lay FBS, as noted, you will need to call a crane. The equipment will lift heavy building elements. You and your assistants will need to correct the blocks and place them in the designated places.
Installation of FBS blocks
Installation of FBS blocks
For masonry you will need concrete mortar grade M100. On average, the installation of one block takes about 10-15 liters of this solution.
First, we place the blocks in the corners, for better orientation we stretch a rope between them and sequentially fill the spans with blocks according to the level. Fill vertical seams with mortar. We lay the next rows of blocks on the solution in the opposite direction. We gradually move from corners and external masonry to internal partitions. We regularly check the quality and correctness of the work performed using a level.
Seventh stage - waterproofing
For waterproofing, it is most convenient to use liquid mastic. We carefully coat the internal and external walls of the foundation with an insulating compound.
In regions with particularly generous precipitation, it is recommended to additionally lay a layer of roofing material for better waterproofing.
Foundation structure
Today there are many types of foundations. Private garages are usually built on rubble concrete foundations. This is a relatively inexpensive and extremely easy-to-install system that you can do yourself.
First step. Place rubble stone in the trench. This stone must be placed in layers, pouring each layer with concrete mortar. Prepare the solution using cement M400 or higher. Place the stone up to the top of the hole.
Second step. Install wooden formwork for the base around the entire perimeter of the pit. Assemble the formwork structure from boards. Boards about 10 cm wide are suitable. In general, the structure is set strictly according to the level.
Third step. Lay moisture-proofing material along the base. Two layers of roofing felt will be more than enough. The material is laid dry.
Fourth step. Fill the base of the future garage with concrete mortar to the level established by the formwork.
Basement and blind area
To protect the garage from moisture, a plinth should be built directly on the foundation. It can be made of silicate or ceramic bricks (not facing, but solid wall) in 4-5 rows. Such a base will allow you to compensate for foundation errors. There are other options, such as pouring. To do this, place continuous formwork 20-50 cm high around the perimeter of the base, check the correctness of the right angles, and fill it with concrete. Then waterproofing is carried out, most often using sheets of roofing felt, cut to the required sizes and overlapped at the joints (by 15-20cm). But no matter what the base is, you should definitely take care of arranging a blind area to drain atmospheric precipitation from the foundation. To do this, soil is removed along the walls at a slope to a depth of 10-15 cm and a width of at least 50 cm. A layer of clay is placed in the resulting groove, then a mixture of crushed stone and sand, everything is compacted and filled with cement mortar. This is the simplest and least expensive option.