BBQ masonry
The next stage is setting up a barbecue.
It is necessary to strictly follow the developed project. The blocks are connected with special construction glue. At this stage, you need to make all the holes and install the fasteners for the grates, spit and doors.
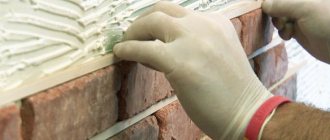
Joining seams
In order for a barbecue built from block material to have a beautiful appearance, it is necessary to undo the seams. To do this, you need to use a level and special grout to make them smooth and neat.
Weather protection
To be able to use the fryer at any time of the year, regardless of weather conditions, you need to take care of its protection from atmospheric agents.
To do this, you just need to make a canopy or build a structure like a gazebo.
In addition, it should be noted that hygroscopic building materials, for example, foam blocks, should not come into contact with the ground, so a higher foundation is required, especially in swampy areas.
To prevent the destruction of blocks under the influence of moisture, their porous surface is coated with acrylic varnish, as well as polymeric agents with water-repellent agents. Experts also advise using decorative finishing to increase the degree of protection and improve its appearance.
Installation of grilles, fastenings, final decor
After the concrete has completely dried, it is necessary to remove the formwork.
, and then install grill grates, a metal or hardened door on the firebox window. If a cinder block was used to construct the brazier, then the outer walls must be lined with natural or artificial stone, brick or fire-resistant tiles.
For sufficiently large barbecues, experts recommend additionally installing mounts for the spit. The entire construction process is shown in the video
You should also take care of the presence of a hood, the stands of which will be made of lightweight building materials, for example, foam concrete.
Alternative materials for your barbecue
Recently, more and more people prefer barbecues made of aerated concrete. This is due to the fact that it is made of porous concrete and has the appearance and performance properties similar to brick
. Due to its compact size and light weight, this material is ideal for constructing a tall roaster on a light foundation. In addition, thanks to the wide range of colors, you can choose the shade that will best suit the landscape and decorate the site.
A private house or cottage is a place where many people gather for friendly gatherings. At such moments, it is especially convenient to cook food on an open-air grill.
A barbecue made from blocks is ideal for this, as it is easy to use and can be quite large in size.
For the construction of such a structure, you can choose a beautiful building material, thanks to which it will perform both practical and decorative functions.
In the summer, meat is often cooked outdoors. This is a fairly popular method. Cooking meat in small pieces using skewers does not require much effort - just build a small hill above the ground. What if you decide to cook a whole bird, for example, chicken or turkey? In order for it to be completely ready, a slightly different structure is needed.
Necessary materials
1. Cinder block - 25 pieces 2. Covers for cinder block - 15 pieces 3. Iron fittings - from 6 to 8 pieces 4. Sand or gravel - 2-3 m³ 5. Half concrete blocks (8x8x8) - 4 pieces 6. Patio stones ( optional – 12x12) – 22 pieces 7. Nylon rope – 1 reel 8. Metal pipe (4x15) – 2 pieces 9. Food barrel 10. Iron corner (20x1.8) – 1 piece 11. Wooden stick – 1 piece 12. Bolts – 4 pieces 13. Rod – 2 pieces 14. Heat-resistant black paint – 1 piece 15. Steel pipe 2 pieces.
Required Tools
1. Shovel 2. Gloves 3. Hammer 4. Long level 5. Short level 6. Safety glasses 7. Tape measure 8. Ax 9. Marker 10. Hand grinder 11. Metal cutting discs 12. Welding helmet 13. Metal mesh.
Step by step description
1. It is necessary to approach the choice of a place for a barbecue extremely seriously. It should be far enough away from trees. While you are digging a hole, you should carefully inspect the area to ensure that there are no tree roots, as this could subsequently cause a fire.
2. Cinder block is quite heavy, so the foundation must be strong. After the hole is dug, it is necessary to lay patio stones around the perimeter in order to evenly distribute the load and prevent the structure from slipping in the future. To hold the soil, you need to stretch a dense metal mesh. Cover the bottom of the pit with sand or gravel for fire safety purposes.
3. Now you can start stacking the blocks tightly. In this case, there should be holes on each side for better traction. You need to place 3 rows of cinder block on top of the patio stones. At the third end of the row, a half cinder block is used so that there are small holes on both sides. Starting from the second row of masonry in front of the barbecue, you need to leave a window for access to the cooked meat. The support should be slightly higher, but not in contact with the second row of blocks. The depth of the hole turned out to be 25 cm. In the upper part of the third row of cinder blocks, small holes should be drilled on four sides.
4. Directly for the stands you need 2.4 m of steel pipe, after making several holes in them so that the height can be adjusted. The pipe must be driven tightly into the ground so that the height is approximately 20 cm below the height of the second row of cinder blocks (depending on the size of the iron corner).
You should weld iron corners onto the pipes, and on them “V”-shaped brackets (three for each corner) in order to rotate the pipes on which the meat will be cooked. The length of the corner should correspond to the width of the barbecue.
5. For the hinged lid you will need a food barrel.
It needs to be cut in half vertically. Place two parts of the barrel with the hole down, one on top of the other. From the corners you should weld a square around the perimeter of the parts of the barrel and use welding to connect the two parts into one. You will get a lid. As a handle, you will need an old wooden stick, which is screwed to the resulting lid using bolts.
The design of the barbecue ideally combines the best qualities of a barbecue, grill and smoking chamber. There is a huge variety of its models. You can make many barbecues yourself by following step-by-step manufacturing instructions.
Setting up a barbecue area
Considering that the stove itself will occupy an area of at least 1.60 x 0.80 m, the hole for the foundation is dug 5-7 cm wider so that there is room for the formwork. The place for the pit is chosen away from trees, wooden buildings and fences in order to ensure fire safety. Next, a step-by-step arrangement of the strip foundation is carried out. Having marked the edges of the hole on the ground, dig 30 cm deep. This depth will be quite sufficient for the foundation of the stove.
The bottom of the pit is covered with fine crushed stone and compacted thoroughly. The formwork panels made from boards are fixed in the pit using wooden blocks. The shape of the foundation and the perpendicularity of the corners are leveled. A reinforcing mesh is installed at the bottom or pieces of scrap metal are simply thrown over it.
Concrete mortar is prepared in a wheelbarrow or bucket with your own hands using a shovel and drill with a stirring attachment. Before pouring the foundation, the formwork must be thoroughly wetted so that it does not draw water out of the concrete mixture. Concrete is poured in one step to prevent delamination, making sure that the mix of reinforcing scrap pieces is completely covered. The filled space is leveled with a lath. After a minimum of 72 hours, with regular moistening of the top of the foundation, it will completely harden. The formwork is pulled out, and the construction of the foundation is considered finally completed.
The design of the barbecue ideally combines the best qualities of a barbecue, grill and smoking chamber. There is a huge variety of its models. You can make many barbecues yourself by following step-by-step manufacturing instructions.
Features and purpose
The basis of the barbecue design is a box, inside of which there is a tray for coals and a grate for cooking food. High sides protect the heat from blowing out, and it maintains the temperature, heating the sides themselves.
This kind of design allows not only to speed up the cooking process, but also ensures uniform roasting, and also prevents overdrying and burning of food.
The undeniable advantage of a barbecue is its versatility.
both regarding the design and the possibility of preparing various dishes and products. You can use it to cook not only barbecue, wings and any type of meat, but also more ordinary everyday dishes from soup to baked fish. In addition, it is ideal for quickly drying mushrooms and fruits. A homemade grill in the country will certainly become an indispensable thing. To make it yourself, you need to select suitable projects, drawings and follow the advice of experts.
Advantages
Today, interest in adobe stoves is beginning to increase. They are built not only by rural residents, but also by the urban population. They can be erected both indoors and outdoors. Therefore, today clay ovens, which are built in the garden or on a summer cottage, are very popular.
The design itself is not particularly complicated. Every self-respecting man and true owner can build such an adobe structure with his own hands. To do this you need two things: material and great desire.
The great popularity of adobe stoves today is explained by their obvious advantages. They are characterized by:
- ease of creation;
- compactness;
- environmental friendliness;
- low cost;
- practicality.
In addition, this design can be used for:
- heating the room;
- preparing unusually tasty, aromatic and healthy food;
- baking bread, including hearth bread, which does not go stale for a long time and has a specific pleasant taste.
Varieties
All barbecue models are divided into two options.
- Mobile models
can be folded and easily carried, they are small in size and light in weight; - Stationary models
are barbecue ovens made of brick or stone. They are large in size, and almost all models require installation on a foundation.
Mobile barbecues are made of brick, laid without the use of mortar. These outdoor models are easy to assemble, take apart and put back together again. Design in such structures is not very difficult. Stationary barbecues are usually made of brick or stone. The functionality of such a barbecue is limited only by its design.
The simplest model of mobile barbecues is a disposable one.
Its design consists of a coal tray and a thin grate. Since it is made of a thin type of tin, the tray burns out after the first use. There are a wide variety of folding models that fit into a small plastic suitcase, making them easy to transport. Their design is very simple, consisting of a roasting pan and a grate.
A more complex model is a barbecue boiler.
This original American version is made of chrome-nickel. In appearance, it looks like a cauldron or deep frying pan, is presented on three stable legs and is complemented by a dome-shaped lid. At the bottom there is a round tray that is suitable for plates and other utensils. Thanks to this device and the presence of a lid, it can be easily used as an oven or smokehouse.
The barbecue trolley has a fixed or folding surface.
Hibachi is a round-shaped cast iron model with stable legs and a height-adjustable grill.
An electric barbecue is convenient for use indoors in the kitchen.
A gas barbecue is a whole complex that contains the basic functions of a barbecue and grill. Such models are more suitable for use in the catering industry. They are very massive, weighing about 60 kilograms, which classifies them more as stationary models.
Any model has many additional elements, which gives more comfort in use.
These include the following:
- built-in mechanical and automatic spit;
- an open firebox area of increased dimensions, due to which a variation of a garden fireplace can be easily created;
- a grill designed for frying foods;
- space for installing a cauldron, which allows you to prepare a large variety of culinary masterpieces in the fresh air;
- separate barbecue area;
- structure for preparing barbecue;
- hob and work surfaces;
- smoking chamber and more.
Do-it-yourself barbecue table made of brick and concrete to bookmarks 5
The warm season is the traditional time for cooking on the grill, grill and barbecue. Such equipment requires the presence of an appropriate workplace, which you can build and arrange in your own yard yourself. You can see ideas of what it might look like, what needs to be taken into account, and the step-by-step construction process in this step-by-step instructions.
To build a barbecue table with your own hands you will need:
- bricks;
- concrete;
- fittings;
- metal grill;
- pieces of plywood to create a mold for pouring;
- roulette;
- containers for mixing cement mortar;
- the cement mortar itself;
- grinder with a diamond grinding disc for concrete of different calibers;
- chisels and so on.
Step 1
. First, you will need to develop a design of what the desktop will look like for your equipment. If, as in this case, you have both a barbecue and a grill grate, you can make a single tabletop for them, on which there will be enough work surfaces for preparing and serving meat and vegetable dishes.
The length of the tabletop will depend on the number of equipment you have.
The width is determined by the dimensions of the equipment and the space it occupies when the lid is open. The height of the table is calculated based on the parameters of your workplace in the kitchen. If you feel comfortable working behind it, just add another layer of brickwork to this parameter.
Be sure to take into account the shape of the equipment in your calculations. It will be necessary to provide the shape of the holes into which it will be inserted. This is necessary to connect the units to gas cylinders or a source of electricity.
Additional holes will be needed for easy cleaning of the equipment.
In this project, a vertical hole was also made through which chemicals for cleaning barbecues and grills, gas cylinders, and so on will be placed under the tabletop.
When developing a project, take into account the characteristics of the territory on which the table will be built.
Step 2
. The base of the table will be brickwork. To strengthen the back surface, two wooden beams were installed, since the table itself was adjacent to the fence. If in your case it is located in the middle of the territory and does not have any supports at the back, also lay out the back wall with bricks.
Be sure to leave a gap of approximately 10 mm between the bricks. If you wish, at this stage you can apply one coat of paint to the brickwork. You don't have to do this at all. It's a matter of taste.
Step 3
. Now you need to start making a mold for pouring the countertop. First, lay plywood on the brickwork, cutting it according to the developed project.
Please note that in this case the barbecue was round. A hole of the appropriate diameter was cut in the plywood. A plastic bucket weighted with stones was then sent into it.
Once you place the plywood on the brickwork, be sure to make a casting mold on the sides. The sides must be assembled from plywood and fastened with ordinary screws or nails.
Step 4
. Place a metal grid or fittings directly on the plywood inside the countertop.
Step 5
. Mix concrete or cement mortar according to the manufacturer's instructions and then pour it onto the countertop.
The optimal tabletop height is 40 – 50 mm. Once the concrete has been poured, leave it to dry for about a week in good, dry, warm weather. If it’s bad, you’ll need more time.
Step 6
. Also in this project, it was decided to make concrete edges at the access points to the lower part of the equipment. They were made in the same way as the tabletop. Plywood forms were assembled, small pieces of reinforcement were sent inside them, and everything was also left for a week until completely dry.
Manufacturing materials
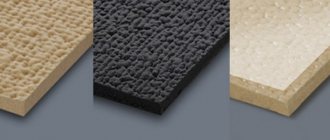
The basis for a barbecue is metal, natural stone, brick, foam block and high quality concrete. The main requirements for manufacturing materials are their resistance to loads and high temperatures. There is a large selection of materials for the exterior decoration of a barbecue oven (natural stone, porcelain stoneware, shell rock). You can make your own barbecue structure from cinder blocks, blocks and foam blocks.
The design made from an ordinary barrel looks original.
Erecting a barbecue from blocks
As already noted, there are plenty of projects for such barbecues.
The key factors here are:
- frequency of use of a charcoal brazier,
- volume of products for cooking.
The design looks elementary in appearance, but its design can be much more complex. Therefore, even before starting work, it is important to adequately estimate the costs of creating a barbecue from foam blocks with your own hands.
Based on them, the following projects are quite optimal:
- The simplest. It may not be particularly user-friendly. However, it allows you to cook decent dishes, no worse than in massive, elegant ovens. The project can be completed in a week. The time taken from creating the drawings to preparing the first dish is taken into account.
- Simple with external graces. It is similar in functionality to the first project, but has a rather catchy appearance.
- Project "Candle". Of the presented projects, this is the most reliable and durable option. If built correctly, it will last for many years. The design of brick and foam blocks is thought out down to the smallest nuances. It is optimal for barbecuing, boiling, frying and baking food. Of course, its implementation involves significant expenses. And before starting masonry, you need to improve your skills in the stove craft or entrust the job to a true specialist.
The simplest projects
If a simple box (in format) is enough for your needs, then you can safely start implementing this project. As a rule, no special problems arise here. Design features: three walls, grate, metal coal box. This is the whole set of components.
This building is also characterized by its modest mass. Therefore, the criteria for its foundation are minimal. It is necessary to remove the turf, create a sand-crushed stone cushion and arrange a screed
For masonry, M200 brick is required. For its laying, a clay-sand mixture is used.
In such a barbecue, impressive temperatures do not form. Therefore, cracks should not appear on the masonry.
Strengthening the connection of brick lines and achieving better strength of the entire structure is carried out in a simple way - 1/10 of M400 cement is introduced into the working mixture. A sheet of roofing material or other similar waterproofing is placed under the starting line.
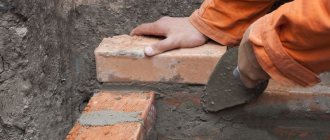
Laying bricks usually goes without any dilemmas. Simple dressing is used here. The spoon method works. This is how the barbecue body is laid out in about a day. An important condition is to maintain the parameters of the seams: each seam should not be thicker than 5 mm. Remember to use a level and plumb line. They will help maintain the evenness of the structure and rows.
On the 6th and 10th lines, the side bricks turn 90 degrees: supporting protrusions are formed. There is a table on the right side of the barbecue. Its folding variation is often used here.
After about 5 days, a grate and a coal box are placed on the barbecue. It is made of steel. A test run is in progress.
Example of working drawings:
Project "Candle"
This design differs significantly from the three-wall version. It is more complex, but also safer.
Smoke from smoldering coal will not cause discomfort. You will also be able to cook food safely even in rain or cold weather.
This project requires a high-quality slab base. Reinforcing elements are placed along the contour of the poured base (it is filled with concrete composition). The mass from the block or brick walls will be based on them.
Getting started - choosing a place for the foundation and laying it
Below is a working diagram of the brick layout for this project. Here you need a ceramic hollow brick, its format is one-and-a-half. The masonry is used using a purchased ready-made stove composition.
You also need approximately 40 fireclay bricks. Their species is SHA8. You will also need a composition for laying fire-resistant bricks. The shrinkage should be as uniform as possible. This condition is achieved through additional control over the thickness of the seam of the working composition. Acceptable parameters: 8 – 10 mm.
The 6th and 11th lines have the following specific layout: first, a steel section with a shelf of 4.5-5 cm is laid.
Very meticulous work here goes on creating the back wall and the combustion chamber in which the coal being placed will burn. A thermal gap is formed between the external ceramic walls and this compartment. It guarantees acceptable expansion of fireclay bricks.
Next, the vault is laid out. Then a transition is made from the walls of the combustion chamber to the pipe. This transition resembles a pyramid in format. It is published in this format. There should be 6 lines of red brick.
One-and-a-half bricks are used. Each line is indented 4 cm.
If the position of this barbecue is located in the home yard near the wall, then a cast iron pipe is added from the top line of the masonry. Its length is 1 m.
If the barbecue is positioned in an open area and the wind favors the desired draft, such a pipe does not need to be added.
Where to place it?
Proper placement of a barbecue is a matter of not only convenience and beauty, but primarily safety.
The basic requirements for the location of the barbecue are the same for all models, namely:
- Smooth surface;
- there should be no flammable objects (buildings, plants, cars, etc.) nearby;
- distance from a residential building by 5–15 meters;
- providing protection from rain under a canopy or roof;
- wind rose (the direction of the smoke should be in the opposite direction from the residential building).
Don’t also forget that the intense heat from a barbecue can damage any vegetation, so you shouldn’t place it surrounded by flower beds or garden beds. Not only the appearance of the landscape will suffer, but also the crop. It’s also better to think in advance about the path to the barbecue from the house and the recreation area.
How to build a barbecue?
The process of constructing a barbecue from blocks is quite lengthy. There's no rush here. You need to immediately prepare a clay solution. To do this, take the prepared clay, place it in barrels, and fill it to the top with water. There it will get wet, and after a week it needs to be thoroughly mixed until a homogeneous mass is obtained. It should resemble thick sour cream. After this, take 2 buckets of clay solution and filter through a sieve into a box prepared for this. Add 2 buckets of river sand and 1 liter of cement. Mix everything again. We pick up the solution with a trowel and tilt it a little. The clay should slide off completely. If there are no marks left on the trowel, then you did everything correctly.
Then we prepare a cement-sand mortar in a ratio of 1:3.
We lay out a pedestal for the future furnace from blocks using cement mortar. Making an open woodpile. Firewood will be stored there. It is better to make it of such a size that you can put firewood on 2-3 fireboxes.
Next we build the furnace part. We lay bricks in 2 rows on clay mortar. In this case, 1/3 of the brick should protrude forward so that finishing work can be carried out later. The facade of the barbecue can be made rectangular. An excellent design solution would be an arched façade. To do this, you will first need to build an arch from the boards, and the bricks will have to be given a wedge-shaped shape. Approximately the width should be 6 bricks and the depth should be 3 bricks.
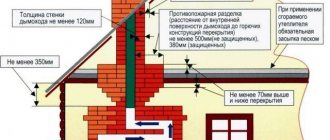
Upon completion of the construction of the combustion chamber, we begin the construction of the chimney. It also needs to be laid from stove bricks on a clay mortar. Attention: bricks must be laid flat on top of each other. The valve must be inserted. It is also necessary to add a bend along the back wall to improve traction.
From blocks on cement mortar we place a structure for the sink on the side of the woodpile and firebox. You can supply water to the sink or make a niche at the back of the barbecue for buckets. The water in them will heat up when the stove operates. We are diverting the sewer.
On the sides of the stove we make countertops (from blocks, concrete and wood).
Under the countertop there is a convenient cabinet with doors for kitchen utensils.
Pipes need to be laid at the corners of the stove to secure the roof. Remember that the chimney cannot be covered with a roof. Slope the roof to allow water to drain from the surface. We decorate the barbecue with decorative stones and provide lighting. You can install a home-made or store-bought box for skewers and coals in the firebox.
After finishing the work, you need to wait a couple of days, do not heat the stove right away. Otherwise it will crack.
We have all thought more than once about how best to spend our free time, so that we can gather all the people close to you at one big table, so that both soul and body can rest. One of these types of recreation is nature, cottage and barbecue. After all, you can watch the dances of the flames endlessly, and not only watch, but also satiate your stomach.
In addition, in ancient times, a home with a lit fire was considered a symbol of well-being.
Dimensions
The requirements for any type of barbecue are standard.
- The minimum distance for the fryer should be from 70 to 80 centimeters.
- The location of the stove is always 10 centimeters below the level of the fryer.
- A place to store firewood and tongs is required.
The final height of the location of the brazier, hob, surfaces of cutting tables and additional shelves is calculated based on the height and convenience for the owner.
The simplest barbecue models are equipped with a hob and a work surface.
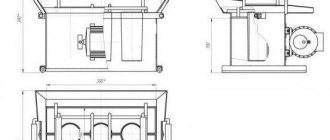
They are also suitable for self-construction. The dimensions of such a complex are 1210 mm in depth, 2240 mm in width and 1900 mm in height.
The simplest model of a barbecue oven is one assembled with ordinary brickwork, which has a standard size. The height of such a stove corresponds to 13 rows (about 702 mm each), determined based on the thickness of the seam. The perimeter of the structure corresponds to the base 1810x900 mm. Even an inexperienced builder can build such a structure.
A BBQ oven model with a hob will require basic oven masonry skills. The dimensions of such a structure have the following standards: depth 1778 mm, width 434 mm and height 1900 mm.
When building such a barbecue, a type of Dutch masonry is used.
Construction materials
The first thing you need when creating a stove structure is a clay solution, of which you need a lot. In addition to the main substance, it also contains sand and water. During construction, they use oily, fine-grained clay, which has a slightly reddish tint. Before use, it is recommended to soak it in barrels or other large containers, then mix well.
Advice! To obtain an almost ideal homogeneity of the mixture, it is recommended to mix the clay with your feet, as they did in the old days.
There is no exact ratio of the ingredients of the clay solution, since in each area the material has its own fat content. In order to obtain a high-quality mixture, it is necessary to make several different compositions in small quantities and practically select the desired option.
Important! The quality of the functioning of the furnace structure depends on the quality of the solution. Therefore, ultimately the solution should be dense, thick and homogeneous.
How to do it yourself?
To independently build a simple barbecue oven, you will need the following materials:
- about a hundred bricks;
- Metal sheet;
- lattice.
Do-it-yourself installation of the structure and cladding occur in a certain sequence.
- The first row is laid out on a flat, stable surface with a perimeter of 1x1 meter. The shape of the future barbecue can be square, round or polygonal. The choice is limited by the desire of the designer;
- in the first row, bricks are placed at a distance of about 5 centimeters from each other;
- the remaining rows of bricks are laid out in a checkerboard pattern using the same technology;
- the number of rows is calculated from the desired height of the roasting pan;
- a sheet of metal is placed on the resulting base, on which the coal will lie. Another 2-3 rows of bricks are laid on top of it according to the same principle;
- then the gratings and two finishing rows of bricks are installed.
This structure is assembled without the use of mortar
, which ensures ease of assembly. It does not require special construction skills and takes a minimum of time.
The construction of a more substantial structure requires laying a foundation, the size of which depends on the dimensions of the future barbecue plus 30 centimeters around the perimeter. They are calculated based on the size of the firebox and the presence of additional structures. Building a barbecue yourself is not at all difficult if you follow the recommendations of experts.
There are three foundation options.
- Ready reinforced concrete slab. A layer of sand and gravel cushion about 5 cm thick is placed at the bottom of the excavated pit, on which a reinforced concrete slab is placed. The depth of such a pit is calculated based on the width of the slab plus the cushion layer. This option will take little time, but has significant inconveniences due to the need for a crane to lay the slab; the shrinkage of the cushion may turn out to be uneven.
- A slab foundation is a more reliable option. Its peculiarity is that the reinforced concrete slab is poured on site directly in the pit. The technology is simple: a pit is dug about 35 cm deep, a layer of sand and gravel cushion is laid, formwork is installed, a reinforcement frame is made and concrete is poured.
- The most common and reliable option is a strip foundation. To build a barbecue, it is not placed in a U-shape, but along a closed contour. For it, a pit about 50 cm deep is dug, a layer of sand and gravel cushion about 15–20 cm thick is made, and a reinforced concrete base is poured.
The choice of foundation option depends on the type of soil on which the construction will take place. After choosing the construction site and foundation, you can begin building the barbecue. Setting up a traditional style barbecue is easy. This design does not require special skills.
The first step has been completed, the place for the barbecue has been chosen, the foundation has been poured and all that remains is to wait for it to completely harden (up to approximately 3 weeks).
The second step begins with the preparation of building materials.
For the construction of barbecues, two types of bricks are used: refractory and facing. Refractory (fireclay or solid) brick is used to lay the firebox. Subsequent parts of the structure are laid with facing bricks (it is possible to use other materials, both block and natural). Brickwork requires less skill and is more accessible for building a barbecue yourself. Previously, shortly before laying, the entire brick is soaked in water.
The third step is construction.
Before starting laying work, you should check the horizontalness of the foundation using a level. If errors are found, they are corrected when laying the first two rows using the thickness of the mortar. A waterproofing layer must be placed on the foundation. It is used as roofing felt or other rolled materials. During construction, an ordering scheme is used. It is calculated based on the standard brick size 230x114x65 mm. When laying the firebox and stove, a clay solution is used; for further laying, ordinary mortar is used. Fireclay mortar is mixed in advance from sand, red clay, water and cement.
When the construction of the furnace is completed, it is necessary to burn its internal surfaces. To do this, charcoal or wood is lit in the firebox, bringing it to maximum temperature.
After heating the oven, it should be dried.
The best option for her is the warm summer period, then it will take at least 5 days. If drying is carried out in cloudy autumn weather, no more than 20 days. In any case, you should take care to protect the barbecue oven from rain and cover it. The final stage remains - this is polishing. The bricks are cleaned of mortar residues and painted so that the seams are emphasized. Now you can start using it.
There are unusual options for making metal barbecues yourself. It is worth immediately noting that their design is limited by the desire, possibility and imagination of the manufacturer. One such option is a barbecue made from a gas cylinder. This is a very economical and affordable option, but it requires experience with a welding machine and an angle grinder.
An old empty gas cylinder makes a barbecue 120 cm long.
If desired, it can be reduced by cutting off unnecessary centimeters and welding it along the cut. Such a barbecue, even the simplest one made from one gas cylinder, is heavy and therefore unsuitable for transportation, but due to the design of the legs it can be made both stationary and portable.
The main advantage of this design is the simplicity and speed of production, since it will take no more than 2 hours. Due to the thickness of the cylinder walls, this option is characterized by increased wear resistance. The design can withstand high temperatures.
Regarding the rationality of making such a barbecue, disputes arise about the safety of the products prepared in it, since gas residues could remain on the walls of the gas cylinder. Therefore, you should think about safety right away and before use, the structure must be thoroughly washed and heated several times. After this treatment, the barbecue is suitable for safe food preparation. Before starting work with a gas cylinder, you must make sure that it is empty.
To remove remaining gas from the cylinder, it is placed upside down and the valve is unscrewed completely. This trick is very effective, since the density of the gas is greater than the density of air, so it will come out faster. To test the gas output, you need to soap its neck.
If gas escapes, bubbles will form; to finally confirm that the cylinder is empty, it is filled with water.
A step-by-step description of the instructions for converting a gas cylinder into a barbecue.
- A standard fifty-liter cylinder is taken, there is a production seam on it, along which a cut is made. To do this, use a grinder and a metal cutting wheel. The side walls, meaning the bottom and top of the cylinder, remain untouched, otherwise it will damage the fryer. As a result of the cut, the cylinder was divided into two parts: one of them was the base for the barbecue, the other was the lid.
- The hinges, which were initially secured with aluminum rivets, are secured by welding.
- Handles made of heat-resistant metal are attached to the barbecue lid.
- Metal corners 32x32 mm are welded around the perimeter of the hole in the cylinder, which will serve as a support for the skewer. The same is done with the inside of the lid. The corners will prevent deformation on the cuts.
A barbecue in the country is a distinctive feature of a pleasant holiday outside the city with a barbecue in good company. Perhaps this is why most summer residents are happy to install a barbecue or grill on their summer cottage.
Yes, you can just buy a ready-made barbecue for your dacha, but there is something attractive in plans to build such a barbecue with your own hands. A country barbecue is not only a gathering place for the whole family and an interesting element of country design,
but also a very effective thing when you need to feed quite a lot of people, for example, for a holiday; because The surface size of a homemade barbecue is usually much larger than a standard store-bought one. In addition, a barbecue made by yourself is more durable, less demanding to use, and has a more “warm, individual” appearance than a purchased one.
The task of making a barbecue with your own hands can be solved by a pair of skillful hands over the weekend. There is nothing complicated in the construction of a country barbecue; you can see this for yourself in the drawing.
Choosing a location for a future furnace and preparing for construction
General view of a barbecue with side support consoles.
If you have already decided that you can handle building a barbecue with your own hands, then it’s time to start choosing a place for the foundation for the stove. At this stage, you also need to think about how it should look, whether it will have a pipe or not, and what functional characteristics it should have. The best option to build a miracle barbecue oven with your own hands is to place it in a recreation area. Only at this stage is it important to think over the style of the future stove so that it does not violate the unity of the entire structure. It is very convenient when the barbecue has its own separate roof. It can be made from slate or tiles. You can build a barbecue from red brick, gas silicate blocks, or natural stone. We will look at building such a stove with our own hands from foam blocks.
Construction of a barbecue requires a foundation. If this is supposed to be done in a recreation area, then there is usually already a foundation there. You just need to take into account that it has reinforcement at the base and is at least 15 cm thick. If there is no foundation, then it must be done as follows: dig a trench, make a crushed stone cushion, fill it with water and compact it well. Place reinforcement on the pillow. Make wooden formwork about 15 cm high and pour concrete. Then you will have to wait 2 days until the foundation hardens. You can start building the oven.
When preparing the foundation, consider the following points:
DIY barbecue oven diagram.
- It is prohibited to place a barbecue made of blocks under a tree, next to outbuildings and fences (to ensure fire safety);
- In relation to the house, it is better to place the barbecue on the leeward side, which will prevent smoke from entering the house;
- it is advisable to supply electricity and water to the selected location;
- Don’t forget about paths made of stone and concrete. Because barbecues and stoves always bring together a lot of people, and the lawn will quickly be trampled.
To do this you will need the following materials:
Scheme of a summer kitchen with barbecue.
- 15 gas silicate blocks;
- 150-160 pieces of oven bricks;
- 7-8 10-liter buckets of red clay;
- bag of cement;
- sifted and washed medium-grain river sand;
- decorative stones for finishing;
- crushed stone for the foundation cushion;
- formwork (wooden boards).
Prepare the following tools:
- Master OK;
- shovel;
- 2 10-liter buckets;
- bushhammer;
- 2 barrels of 100 liters each for soaking clay;
- container for mixing the solution and mixer;
- level;
- sieve (to strain the clay solution).
The device of a simple barbecue.
Firebox:
The inner wall of the barbecue can be lined with refractory bricks.
It is better to move the wall forward a little for more convenient access to the grill grate. Grill grate
: Choose cast iron or stainless steel.
Supported by corner ledges. Foundation:
a concrete platform (8-10 cm) on a bed of compacted crushed stone (8-10 cm) ensures the stability of the grill structure.
Brick walls:
They form an enclosed grill frame, reducing wood consumption by 65% and protecting against hot sparks.
Ash pan:
sheet of metal for fuel. Placed at a distance of 20-35 cm below the grill grate.
DIY brick and concrete barbecue table
The warm season is the traditional time for cooking on the grill, grill and barbecue. Such equipment requires the presence of an appropriate workplace, which you can build and arrange in your own yard yourself. You can see ideas of what it might look like, what needs to be taken into account, and the step-by-step construction process in this step-by-step instructions.
To build a barbecue table with your own hands you will need:
- bricks;
- concrete;
- fittings;
- metal grill;
- pieces of plywood to create a mold for pouring;
- roulette;
- containers for mixing cement mortar;
- the cement mortar itself;
- grinder with a diamond grinding disc for concrete of different calibers;
- chisels and so on.
Step 1
. First, you will need to develop a design of what the desktop will look like for your equipment. If, as in this case, you have both a barbecue and a grill grate, you can make a single tabletop for them, on which there will be enough work surfaces for preparing and serving meat and vegetable dishes.
The length of the tabletop will depend on the number of equipment you have.
The width is determined by the dimensions of the equipment and the space it occupies when the lid is open. The height of the table is calculated based on the parameters of your workplace in the kitchen. If you feel comfortable working behind it, just add another layer of brickwork to this parameter.
Be sure to take into account the shape of the equipment in your calculations. It will be necessary to provide the shape of the holes into which it will be inserted. This is necessary to connect the units to gas cylinders or a source of electricity.
Additional holes will be needed for easy cleaning of the equipment.
In this project, a vertical hole was also made through which chemicals for cleaning barbecues and grills, gas cylinders, and so on will be placed under the tabletop.
When developing a project, take into account the characteristics of the territory on which the table will be built.
Step 2
. The base of the table will be brickwork. To strengthen the back surface, two wooden beams were installed, since the table itself was adjacent to the fence. If in your case it is located in the middle of the territory and does not have any supports at the back, also lay out the back wall with bricks.
Be sure to leave a gap of approximately 10 mm between the bricks. If you wish, at this stage you can apply one coat of paint to the brickwork. You don't have to do this at all. It's a matter of taste.
Step 3
. Now you need to start making a mold for pouring the countertop. First, lay plywood on the brickwork, cutting it according to the developed project.
Please note that in this case the barbecue was round. A hole of the appropriate diameter was cut in the plywood. A plastic bucket weighted with stones was then sent into it.
Once you place the plywood on the brickwork, be sure to make a casting mold on the sides. The sides must be assembled from plywood and fastened with ordinary screws or nails.
Step 4
. Place a metal grid or fittings directly on the plywood inside the countertop.
Step 5
. Mix concrete or cement mortar according to the manufacturer's instructions and then pour it onto the countertop.
The optimal tabletop height is 40 – 50 mm. Once the concrete has been poured, leave it to dry for about a week in good, dry, warm weather. If it’s bad, you’ll need more time.
Step 6
. Also in this project, it was decided to make concrete edges at the access points to the lower part of the equipment. They were made in the same way as the tabletop. Plywood forms were assembled, small pieces of reinforcement were sent inside them, and everything was also left for a week until completely dry.
Step 7
. After all the concrete elements have been cast, take sanding discs and process the surfaces, moving from coarse to fine caliber.
What to make a grill from?
Concrete foundation blocks
– the cheapest building material for a barbecue. Inside the firebox it can be lined with refractory bricks for greater heat retention. The outside of the grill can be lined with natural stone.
Natural stone
– natural stone retains heat well. Allow enough time to select and fit the stone. In addition, it is good to have some excess stone in reserve, because... It is difficult to predict the exact consumption of material for the construction of a barbecue made of natural stone.
Red ceramic brick
- almost the optimal choice for building a barbecue. Externally attractive, retains heat well, and is not afraid of interaction with open fire. For a brick grill you will need a little more skill in bricklaying than for a concrete block grill.
What is barbecue?
Barbecue is a common method of cooking food over a fire, but not with an open flame, but with heated heat that spreads from burnt coals. Meat, poultry, sausages, and fish are most often prepared this way. This dish is very reminiscent of the usual kebab. The word “barbecue” itself means a pit with a sacred fire. In everyday life, this word refers to a hot dish cooked over the heat of coals, as well as a small brick oven, a metal grill, or a special grill for roasting meat.
A good stationary grill (barbecue) in a garden plot and in the courtyard of a private house can be built from brick, concrete blocks, aerated concrete, and foam blocks.
Return to contents
Additional barbecue options.
Barbecue with spit
, which will make it possible to evenly fry a large piece of meat.
Brazier with chimney
– will allow you to collect and remove smoke upward away from the summer kitchen or gazebo next to which the grill is installed.
Fireplace with barbecue
– Do you want to build something grandiose at your dacha? We build a fireplace for a patio or a summerhouse, into the walls of which we build in corners to support the barbecue grill.
Pouring concrete
The next step in this project is pouring the concrete into the mold. Mix cement, sand and crushed stone with a mixer or concrete mixer in accordance with the following proportions - 2:3:4 with enough water to obtain the consistency of cream.
To ensure the concrete is evenly distributed, tap the mold with a hammer. Then we level the base using a flat board, moving it along the form.
Barbecue and safety.
Food poisoning.
Wash your hands, buy meat from safe places. This is the best advice to avoid food poisoning in the midst of your picnic at the dacha.
Charred meat.
Do you like well-done meat? Don't char the kebab until it turns black! Charred food particles double your risk of cancer. So you can raise a toast to health and to meat with a slight redness inside.
Carbon monoxide poisoning.
Everything is good in its place. If you're grilling in bad weather and the crazy thought “why don't I do this in the garage” pops into your head, chase it away with a filthy broom. The concentration of carbon monoxide indoors can be dramatic for you.
Fire.
At least 3 m from buildings, wooden fences, sheds, etc. will give you the opportunity to avoid colossal fire damage and serious injury.
Heatstroke.
“It’s so hot in here I’m going to have a stroke.” This may not be just a joke. Overheating can cause serious illness for people with cardiovascular disease.
Casual clothes.
Do not wear loose clothing with loose sleeves or flaps when working on the grill. A spark that hits it may produce a completely different fireworks display than you had planned.
Deep frying.
Working with deep fat is best left to professional chefs. Spattering particles of fat, open fire - it’s better not to overestimate yourself, we are smart enough to understand that “the game is not worth the candle.”
Be careful, wasp.
Wasp stings are extremely painful and very dangerous for people with allergic reactions. Therefore, it is better to have anti-allergenic drugs in your first aid kit and wear a long-sleeve shirt.
Coals and fire safety.
Wait 48 hours before disposing of the ash from the grill.
Benefits of a barbecue oven
Scheme of a garden smokehouse with barbecue.
The barbecue is installed permanently. It does not need to be moved from one place to another every time.
This is much safer than a homemade grill or something vaguely reminiscent of it.
Occupying a fairly small part of the site's territory, the stove can bring a little chic and gloss to the life of this site. Especially if you didn’t skimp on finishing materials and carefully thought through the design of the stove itself.
No barbecue can replace the taste of meat that it acquires when cooked in the oven.
During cooking in such ovens, smoke does not enter the seating area and does not interfere with guests’ enjoyment of nature; moreover, you can safely fry meat even in the rain.
And finally, you can make such a chic thing for your site yourself. Making a barbecue oven with your own hands will definitely delight your guests; they will come to you much more often to sit in a pleasant environment near the oven.
How to care for your grill?
Clean the grill grates with a steel brush to prevent ash and food debris from accumulating there. Spray the cooled grill grate with sunflower oil to prevent rust from forming on it. Remove ashes after each use of the grill to avoid the accumulation of foreign odors for the next cooking.
Whether you make a barbecue yourself or buy a ready-made one, it will bring you many pleasant moments when, with a barbecue in your hand, admiring the open fire in a pleasant company, you will get the much-needed respite from the busy daily rhythm.
Do-it-yourself brazier made of brick and concrete: saving on brick
One of the most practical and attractive designs using the method of manufacturing from inexpensive concrete blocks with brick lining is a free-standing permanent barbecue. The larger the grill and the more complex its design, the greater the savings that can be achieved when using combined masonry.
In the barbecue design described below, the use of concrete blocks allows for tenfold or even twelvefold savings on relatively expensive bricks.
- Initial recommendations
- Materials for barbecue
- Brick and block masonry
- Construction site arrangement
- Procedure for laying bricks and blocks 1. Beginning of laying brick cladding
- 2. Start of laying blocks
- 3. Making connections
- 4. Installation of ash pan rods
- 5. Cantilever installation of bricks for rashper
- 6. Joining seams
- 7. Laying bricks on blocks
- 8. Arranging the top of the barbecue
Before construction begins, carefully determine the location. The first thing to pay attention to is the predominant wind direction in summer. If possible, place the grill so that the smoke is blown away by the wind away from your home, your neighbors' houses, and also away from the area where you will be dining. Orient the grill so that the wind carries the smoke away from the cook and creates draft. Before construction begins, submit the project for review to the building and fire inspectorate.
All work on setting up a barbecue is divided into two distinct stages: laying a concrete base and laying bricks and blocks. The base should be large enough, that is, 150 mm wider than the masonry and have a width of 600 mm in front of the brazier where the cook will stand. The base is made with a thickness of 100 mm from a general purpose concrete mixture. After curing the concrete for one or two days, you can begin laying. Once the masonry is complete, lay the grill cover using a stone slab (described below), tiles or smooth concrete slabs for paving the paths.
To estimate the amount of materials required, compare the scaled project to the list of materials to be purchased below. The calculation method given in this article will help you determine the amount of bricks, blocks and mortar.
To determine the amount of cement, sand, slaked lime and aggregate required for preparing mortar and concrete, you can use these recipes.
Stone slabs for the top of the barbecue should be ordered from a quarry or from a company that sells building materials only after the laying has been completed. If stone is not available or is too expensive, you can top it with ceramic tiles or concrete slabs for paving walkways.
Materials for barbecue
For concrete base:
- Crushed stone or a mixture of crushed stone and sand (if a base is required)
- Concrete
- Concrete blocks (to fill the interior space)
- Brick (for cladding)
- Solution
- Wall ties
- Reinforcing bars 8 or 9 mm thick
- Thin cardboard (from an office supply store)
- Stone, concrete slabs or ceramic tiles (for the top)
Metal parts of the barbecue:
- Rashper (grid for food)
- Grate bars
- Ash tray
Brick and block masonry
Construction site arrangement
The order of laying bricks and blocks
1. Start of laying brick cladding
2. Start of laying blocks
3. Making connections
Finish laying the second and third rows of bricks and every 250 we will install ties for bandaging across the gap between the brick and the blocks. At the corners of the tie, lay it diagonally. Apply mortar to the next corner of the three rows, working the bonds deeper into the mortar. Remove the bond before laying the mortar, hang the mortar, make grooves in it and insert the bond into the mortar.
4. Installation of ash pan rods
5. Cantilever installation of bricks for rashper
6. Joining seams
7. Laying bricks on blocks
8. Arranging the top of the barbecue
Place a large piece of cardboard on top of the side of the grill and press it down with bricks. Mark the top side with the word “top” and from the bottom draw a line along the stonework of the grill. Remove the cardboard and use a ruler to fill in those places where you could not reach with a pencil, then cut the cardboard and place the resulting pattern on the grill. Trim the pattern for precise alignment and make the same patterns for the second side and central parts of the grill. Cut 10mm off each edge of the center piece pattern to allow for a mortar seam.