Features of the material
Foam blocks are used for the construction of low buildings. Suitable for budget construction. The material is inexpensive, and you can save a lot on labor. It is very easy to install, so you can build a shed with your own hands.
Advantages of buildings made of foam blocks:
- Due to its porous structure, the material provides high-quality thermal insulation; a barn made from it can be used not only for storing things, but also for keeping animals;
- Foam blocks do not burn and do not emit toxic substances when heated;
- Walls made of this building material “breathe”;
- The weight of the foam block, despite its impressive dimensions, is only about 11 kg, so the structure is not heavy, which means you can use lightweight types of foundation;
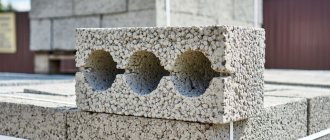
- The blocks can be given different shapes and sizes - they are easy to saw.
Advantages of installing pitched roofs
Multi-pitched roofing options are quite complex in their design, and a single-pitched roof is quite suitable for DIY construction, since, in essence, it is a rectangle without bends, located in one plane. By the way, you will spend much less building materials on a pitched roof than any other structure, and it will be much more resistant to seasonal weather conditions (rain, wind, snow).
Main advantages:
- relatively acceptable final cost;
- light weight;
- convenient arrangement of chimneys and drainage systems;
- the possibility of using different building materials (rafters, roofing);
- simple and affordable installation.
Despite its simplicity, this roof can be used very creatively in design solutions. The degree of its inclination depends directly on the climatic conditions of the region. When you are accustomed to snowy winters, the slope angle must be greater, but when your home is in a windy place, the slope must be made smaller. For the same reasons, the slope of a pitched roof must be directed in the opposite direction from the facade, so that precipitation “goes” behind the building.
A pitched roof can be of unventilated or ventilated type . The last option is used for residential buildings; the slope can vary between 10-24 degrees. In these cases, air exchange is ensured thanks to a layer of insulation and special openings that are located on the sides of the roof.
The non-ventilated option is usually done on house extensions, sheds, garages; their slope angle is small - 4-7 degrees.
Design and calculation of material quantities
Foam blocks allow you to build buildings of any length and width. It is better to choose a rectangular shape for the barn, and the room inside can be equipped with partitions.
To calculate the required amount of material for the construction of an outbuilding, you only need to know the dimensions of the blocks and sketch out a plan of the barn.
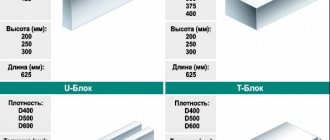
The most common size of foam blocks is 200x300x600 mm. The smallest indicator is thickness; it is not needed for calculations. Knowing the length of the barn wall and the length of the block (600 mm), you can easily calculate how many pieces will go into one row, and the required number of rows is also determined. For example, for a 3-meter wall you will need 5 foam blocks, and for a height of 2.5 meters you need 8.3 rows, round the value up - we get 9. Thus, for one wall of the barn you need to purchase 45 foam blocks.
In addition to the main material, you will need wooden beams for the bottom trim. But this is the case if a columnar foundation is used; they are not needed for strip and solid foundations. Also needed are boards and beams for the floor, joists and roof truss system, metal corners that will serve as fasteners, screws and nails.
Different types of materials can be used as insulation:
- Mineral wool;
- Penoplex;
- Styrofoam;
- Cork plates;
- Penofol.
In regions with low temperatures and long winters, it may be necessary to insulate the interior walls of the shed, ceiling and floor.
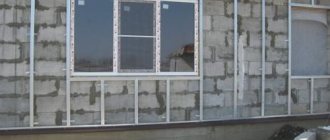
To decorate the facade, you can use plaster, painting, corrugated board or siding.
Foundation arrangement
The type of base is selected taking into account the characteristics of the soil. On sandy or marshy soil, it is recommended to install a slab foundation. Columnar - acceptable on soil with a high gravel content. The universal option is tape, it is used most often.
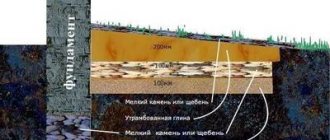
The strip base must be deepened below the freezing point of the soil. In different climatic zones, it can reach from 30 to 100 cm. Under the cement foundation, you need to equip a cushion of compacted sand with a layer of 10 cm, and fill it with the same amount of crushed stone.
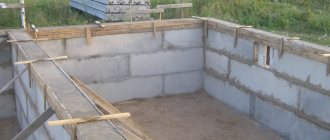
When installing the formwork, it is important to take into account that the base should rise above the ground level by about 40 cm. In order for the foundation to be strong, you need to build a reinforcing frame from metal rods and install it inside the formwork.
It is recommended to fill the trench with concrete at a time, in dry, warm weather. It may take from several days to 2-3 weeks for the composition to reach brand strength, depending on air temperature and humidity.
Construction of walls
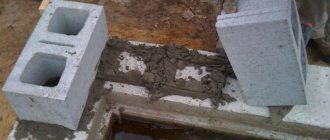
Having freed the foundation from temporary formwork, the concrete is covered with roofing felt for waterproofing. After this, you can begin laying foam blocks. The adhesive solution is prepared from sand, cement and water. The first row of blocks is laid from the corners, moving to the sides along the perimeter.
In places where it is planned to make openings for windows and doors, masonry is not needed; they are immediately left free. When the opening reaches the desired height, a thick board is installed on the side blocks and covered with roofing felt or special metal corners. Some of the foam blocks of the next row are cut in height to make it monolithic.
Every fourth row of masonry is reinforced with reinforcing rods; they provide greater structural strength.
Roof and floor installation
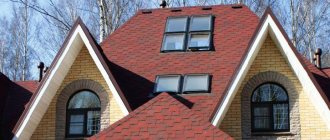
The roof of the barn can be single-pitch or gable. The choice depends on the desire to use the attic space, the size of the building and the snow load. A large barn and an abundance of rainfall require the installation of a gable roof. For a room no more than 3 meters wide, a pitched roof is also suitable.
- Waterproofing material is laid on the last row of foam blocks. A mauerlat is made from timber. Fix it with studs to foam blocks with pre-drilled holes.
- The end trusses are assembled and installed. They can have different shapes, depending on the size and configuration of the roof. The number of trusses also depends on the length of the roof (one should be installed for each meter).
- The sheathing is assembled from boards. The step between them is determined by the characteristics of the roofing material. For roofing felt you need a solid one. For slate, corrugated sheets and metal tiles, a lathing pitch of up to 60 cm is acceptable.
- At the final stage, the decorative finishing of the roof is installed, and the overhangs and gables are sheathed.
To arrange the floor, you need to build columns from brickwork and lay beams on them. If the width of the barn is no more than 2 meters, then the load-bearing beams could be installed at the stage of laying 1-2 rows of foam blocks.
40-50 mm boards or OSB are suitable for the floor. They are attached with self-tapping screws or nails to the beams, leaving no gaps.
Features of installation of overhangs and slopes
When constructing a roof for a house made of aerated concrete, the truss and the angle of inclination of its slopes play an important role. Especially if the building is being built in regions of the country with a cold climate.
If you do not maintain a certain angle of inclination, snow will linger on the roof for a long time, placing a strong load on the structure. This will soon lead to the destruction of the roofing and other dangers.
The sharper the angle at which the rafters are installed, the less load the walls will experience, and the faster the snow on the roof will disappear. And the overhangs will no longer be subject to constant pressure.
Construction of an attic roof for a house made of aerated concrete
Let's briefly look at the process of installing an attic roof.
Construction of an attic rafter system is a complex process. Before starting work, remember some installation features:
- For rafters, beams of 10×10, 15×15 or 20×20 centimeters are used
- It is mandatory to lay a waterproofing layer between the walls and the Mauerlat
- It is better to fasten the assemblies of the attic structure with thick metal brackets
- Wood used for structural elements must be well dried and treated with an antiseptic and fire-retardant compound
- It is better to give preference to coniferous trees, since the influence of humidity on them is the least
Stage 1 - waterproofing the junction of the Mauerlat with the wall
There must be a layer of waterproofing between the wall of the house and the mauerlat. For these purposes, you can use ordinary roofing felt. It is laid along the entire perimeter of the walls and is not fixed in anything.
Stage 2 - installation of the Mauerlat
Mauerlat is a wooden beam that is attached along the perimeter of the walls of the house.
It should be fixed using anchor bolts whose diameter is at least twelve millimeters. Holes are pre-drilled for them.
The ends of the anchors are bent into a hook to prevent them from being pulled out further. However, there are anchors with a spacer system at the bottom. The fastening step is 10-15 centimeters. The mounting location is between the rafter legs at an equal distance.
If the attic roof of a house made of aerated concrete has two slopes, then two mauerlats are needed, if it has four slopes, then four.
A beam with a cross section of 15×15 or 20×20 centimeters is used as a Mauerlat.
Stage 3 - construction of the rafter system
The rafter system must be assembled perfectly, because it is the skeleton of the roof. And all loads (wind, rain and others) fall on it. Therefore, it is important to correctly make calculations with an emphasis on the climatic features of your region. It is difficult to make a calculation, so you can turn to professional workers.
It is better to make a rafter system from coniferous wood. Usually it is pine or larch. Humidity should not exceed 23 percent.
In order to protect yourself in the future from the negative consequences associated with the proliferation of microorganisms and attacks by rodents, you need to thoroughly impregnate the wood with special compounds, including fire-fighting ones.
Before you move on to building a roof, think about the future. Maybe in the future you will have a large family, or maybe you already have one. A large family needs more space, which can be created in several ways. One of these is a two-story house made of foam blocks.
Another way is to create a volume located under the roof as a living space, i.e. attic. The construction of a house with an attic made of foam blocks is discussed here.
And the last one is an extension to the house made of foam blocks. You can find out how to do it in this article.
Rafters can be hanging or inclined.
When the span between the walls is no more than six meters, then inclined rafters can be installed. If the span is twice as large, then inclined rafters are used only if additional support is installed.
Hanging rafters are installed when the span between the walls reaches 12 meters. In this case, the installation of additional support is not provided.
Preparing rafter legs
We will install the rafters in increments of 60 centimeters, leaving holes for the windows. Let’s take the bars for the “legs” with a cross-section of 10×10 centimeters. The length is determined taking into account the slope of the slopes and the size of the building (individual for each case).
Installation of floor beams
For beams, you can use logs, timber, or a board that is laid on the edge. Beams are installed with a selected step into pre-prepared grooves in the wall. Their ends are waterproofed with two layers of roofing material. After the beams are laid, they are additionally secured with anchor bolts.
Construction of vertical racks
If the roof on a house made of aerated concrete is broken, then supporting vertical posts are first erected. They will serve as the frame of the walls.
The height of the racks must be at least two meters to make it comfortable to be on the floor.
Vertical posts are inserted into grooves on the floor beams and are additionally fixed with metal corners and brackets.
Select the beam section from the table.
An attic floor beam is installed between the posts. Additionally, it is secured with bolts or another method.
A certain number of U-shaped racks are assembled with a previously selected step. A cord is pulled between them and checked for level. If the height is different, dismantle one of the arches and then adjust it in height. The racks are sewn together with bars of the same section.
Installation of ridge posts
You can immediately install ridge racks. The ridge itself will be mounted between them, but you can do without them.
Installation of lower rafters
Now you need to install the rafters between the Mauerlat and the upper floor beam. To do this, the distance between the corresponding supports is determined, and rafter legs of the required length are prepared. In the lower part, cutouts are made on the legs of the rafters, with which they rest on the Mauerlat and are additionally fixed with brackets.
Installation of the upper rafters
We need to prepare the upper rafters. To do this, a template is sewn from boards. It is installed at the ends of the attic floor beam, the size is taken and the slope angle of the slopes is determined. Based on this size, the required number of rafter legs is prepared, which are then securely fixed to the horizontal beams.
Insulation and finishing
In regions with harsh winters, insulation of external walls is simply necessary, otherwise the blocks will quickly collapse under the influence of moisture and cold temperatures. In temperate climates, you can only get by with plastering the walls and then painting them.
You can also arrange a cellar under the barn, which you can make yourself.
Walls sheathed with any insulation must be covered with decorative finishing, in the form of siding or profiled sheets. The texture and shade of the material must be selected in accordance with the exterior of the adjacent buildings.
Foam blocks are one of the most popular materials for the construction of outbuildings, after wood. But in many respects they significantly exceed the characteristics of the latter. Foam blocks have improved heat and sound insulation properties, do not rot, just like wood, they provide air exchange and a comfortable indoor microclimate. A foam block structure built according to all standards can have a service life of over 100 years.
You can read how to make a shed from wood here, and from polystyrene concrete here.
Finally, an inspiring video that proves with a clear example that all the work on building a shed from foam blocks can be done with your own hands:
Results
Constructing a pitched roof with your own hands is a very easy task; even one person can handle it without the use of special construction equipment. Thanks to the simplicity of the design, it is possible to construct a roof on a small garage in one working day.
In cases where the walls of the structure have already been built, you can start working on the roof without building up. In such a situation, vertical rafters are nailed to the ceiling beams at the location of the higher side. Then inclined rafters are attached to them, to which the sheathing is already hammered. It is these structures that create the frames of pitched roofs.
Disadvantages of a pitched roof
Before delving into the process of erecting a pitched roof, you must consider:
- The most serious drawback is the small space under the roof.
- If the building does not have a large width, it will not be possible to build an attic or attic.
- Due to the small space, minimal thermal insulation is provided.
- If the winds blow from the smallest part of the roof, then there is excellent resistance to them. But when the wind direction changes, the reliability of these roofs decreases significantly.
Prevention of a pitched roof associated with its damage
The main problem that arises during the operation of a facility with a pitched roof is precipitation, especially snow. When it sticks, it does not come off the inclined surface, which contributes to damage to the roof.
An annual inspection of the roof frame is recommended to identify any weaknesses in the structure.
However, due to its simplicity of design, a pitched roof will be a very durable and reliable covering for small structures, which will not be difficult to build with your own hands.
How to independently build a shed from foam blocks on a summer cottage?
Where does every summer resident start with the arrangement of his plot? From the construction of a barn that provides minimal comfortable conditions. It is in such a commercial non-residential premises that tools for working on the ground, other necessary equipment and materials are located. You can, of course, hire professionals for construction work. But it will be much more economical to build a shed with your own hands. We suggest choosing foam blocks as the main material. Why foam blocks? What is special about this material? What distinguishes it from the rest: brick, plastic, wood?
Advantages and disadvantages of foam blocks for construction work in the country
- Foam concrete is lighter (11 kg) than brick, but is not inferior in strength. The construction will not be as heavy as if it is made from expanded clay concrete blocks.
- High quality concrete. Frost-resistant, sound-proof material, and its heat-insulating properties are several times higher than those of brick.
- The porous material has good thermal conductivity, unlike plastic. The microclimate in the barn will be like in a wooden building.
- Unlike wood, it does not rot and does not burn. Can be exposed to fire for a long time (up to 8 hours) without destruction.
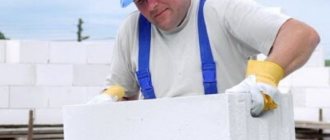
- Processing cellular stone is quite simple using ordinary tools, so it is easier for summer residents to lay it than wood or brick.
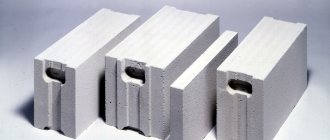
- Construction will not take much time, since the size of the finished blocks is relatively large (20x30x60 cm). By the way, if you make foam blocks yourself, you can cut concrete elements from a monolith of a given size.
- Relatively cheap, economical material.
It is still necessary to take into account that, with all the advantages, the foam block also has a number of disadvantages:
- the strength of the blocks is limited, so they should not be used for the construction of high structures and must be transported carefully;
- it easily absorbs moisture;
- After laying the foam blocks, the structure must be additionally plastered due to the unsightly appearance of concrete and the need to protect it from low temperatures.
By the way, foam concrete was invented not so long ago, only 100 years ago. By adding a foaming agent to the usual cement mixture, we obtained a qualitatively new building material. It consists of small cells-air pockets, so it has good thermal conductivity.
Types and brands of foam concrete
There are natural and synthetic foam blocks (aerated concrete).
- Natural cellular stone is the result of the mechanical addition of organic (protein) foam; concrete evenly filled with air bubbles. Absolutely safe, environmentally friendly material, unlike synthetic ones. Placed on a cement-sand composition.
- Synthetic foam concrete, gas silicate. In addition to sand, it contains lime, aluminum powder and water. The cellular structure of the material is formed as a result of chemical reactions with the release of gas. Unlike foam concrete, it undergoes thermal firing in an oven. The result is smooth finished blocks. It has pronounced quality characteristics of foam blocks. It is laid with glue, which also distinguishes it from foam concrete blocks. Belongs to class 4 in terms of the content of harmful substances.
Foam concrete grades were distributed according to the degree of density, highlighting 3 main types:
- thermal insulation;
- structural;
- structural and thermal insulation.
The preparatory stage of construction must be taken very seriously - the quality of the future shed made of foam blocks depends on it.
The first stage of preparation for the construction of the building
- First you need to think about what size outbuilding you will build, what you are going to put there, except for garden tools. If you plan to store a walk-behind tractor, other mechanical and electrical tools, you will need a separate place for them.
- If you want to keep animals, perhaps in cages, the layout will also be special.
- A separate place is also necessary for fertilizers - organic, chemical. Figure out how many functional areas there will be in the building and whether there will be a workshop.
- Solve the issue with the presence of windows. Will they be full-fledged, or will you just make a small window from glass block. How many entrances will you plan - one or two?
- A garden shed is, of course, the simplest design. But it is still advisable to theoretically prepare for construction. Choose a project that suits you, a diagram, a drawing. Such information is provided in large quantities by relevant websites on the Internet.
- There, first read how to build a shed from foam blocks.
- Then choose the most convenient location for the building. Usually it is placed near a residential building: it is convenient to go for equipment.
- When choosing a location, it is imperative to take into account the presence of underground electrical wiring and a sewer system and build as far away from them as possible.
- Calculate the dimensions of the block shed. We offer the option of the most convenient utility structure, with a total size of 600x300 cm, two isolated zones 200x300 and 400x300 cm. This room will accommodate both a workshop and animal cages.
The second stage of preparation for the construction of the building
- This stage begins with choosing the type of foundation. Most often, utility rooms are built from foam blocks, bricks, stones on a strip monolithic foundation. If the soil at the dacha is soft or the building is very heavy, you can’t imagine a better slab foundation.
- Make formwork for pouring the foundation.
- Consider which roof – single-pitched, gable or straight – to choose. We recommend building a gable roof. It is built at different slope angles (at the owner’s request). Of course, a roof with a lower slope can better withstand gusts of wind, but then the attic that is formed after the construction of the rafter system will turn out to be low. This can be a useful room where food, things, and utensils are stored. The height of the roof and the size of the attic will depend on you, right down to the arrangement of the room on the second floor.
- Decide on roofing material. Slate roofing will be a more economical option than metal roofing.
- Calculate how many foam blocks you will need. This is easy to do if you know the dimensions of the structure. You also need to calculate the number of rows of future masonry. Divide the height of the barn by the height of the block - you get the number of stripes. Do not forget to subtract the dimensions of window and door openings from the general calculations so as not to purchase excess material.
- To build a roof, you need to prepare materials: wooden beams for floor beams (100x50 mm - 20 pieces);
- timber for rafters (section 100x50 mm - 20 units);
- Mauerlat (150x50 mm - 2 pieces);
- unedged board for tying rafters (100x25 mm - one);
- thermal insulation – 3 rolls;
- metal rods 10 - 12 mm for the foundation.
Roof types
To build roofs on foam blocks, all known options are used. Perhaps we can divide them into two types – flat and pitched.
There are no problems with the first option. Floor slabs are laid on the walls and a roofing pie is arranged. The load is distributed evenly across all walls.
The blocks on which the roof rests will be in the same conditions if the masonry walls were erected further, and the upper floors would put pressure on them.
There are more options for pitched roofs:
- single slope;
- gable;
- attic;
- hip or hipped;
- pull-hip.
There are more complex unclassified forms. But this is not so important, because they imply the construction of a truss structure that supports the ceiling.
The load effects from the rafter legs, if they are fastened directly to the walls, will be point-like, for this reason problems are created in arranging the fastening units of the roof to the foam block material. But first you need to understand the features of rafter systems.
It is already clear that the main part is the rafters, connected by sheathing and holding the roof. They are divided into two groups:
- inclined - supported at both ends on a wall, racks or mauerlats;
- hanging - supported only by the lower ends, and the upper ones hang freely. In combination with other elements they can form a farm.
Construction of a barn
When the preparatory work is completed, we begin to build a shed from foam blocks with our own hands. We carry out the work sequentially according to the instructions:
- Preparation of strip foundation. After leveling the surface intended for construction, we make markings. The width of the required trench, which we will dig around the perimeter, should be 30 cm, the depth from 50 cm to a meter, depending on the degree of soil freezing in winter (below the freezing level). We pour sand, then gravel, then crushed stone into the ditch in even layers (total height up to 25 cm). We compact each layer. Then we lay a layer of waterproofing material so that it completely covers the trench.
- We install the formwork (its edges should be higher than the level of the trench). We secure the formwork with supports. It should stand firmly while pouring.
- Then we lay a mesh of reinforcement or a frame of metal rods in the trench.
- Fill it with concrete. For pouring, choose a warm, sunny, but not hot day. The concrete screed will take more than a month to dry. From time to time it must be sprayed with water to avoid cracking.
- After the foundation has dried, we clean the concrete coating from dirt, repair defects in the pouring, and cover it with roofing felt (or waterproofing material).
- Before laying the blocks, prepare a sand-cement mortar (1:3).
- We begin laying from the corner of the future barn along the perimeter of the foundation. It is advisable to use a corner foam block with an ideal angle. We check with a building level and plumb line that each row is erected correctly.
- Please ensure that the thickness of the seams is no more than 30 mm.
- In order for the walls to be strong, reinforcement rods are placed on the blocks of every 3rd row.
Types of roofing for foam block buildings
All existing types of roofing are used with foam block buildings. In principle, they can be divided into only two groups, flat and pitched.
Flat roofs
Flat roofs have the least amount of problems
There are no problems with them at all. Covering or ceiling slabs are laid on the walls and a roofing pie is made over them. The load from the slabs is evenly distributed over the entire cross-sectional area of the walls.
The foam blocks on which the roof rests find themselves in the same conditions as if we continued to build the wall higher, and this would be the weight of the upper floors, not the roof.
Pitched roofs
There are more types:
In addition, there are roofs of complex shapes that are not classified. But this doesn’t matter to us, all these roofs involve a truss structure that supports the roof.
The load from the rafters, if they are attached directly to the walls, will be point-like, which is why problems arise in designing the attachment points for the roof to the foam block. First, let's look at the features of rafter structures.
Elements and types of rafter structures
As is clear, the main detail is the rafters, connected to each other by lathing; they support the weight of the roofing pie.
They are divided into two types:
Hanging and layered rafters
The first rest at both ends (the lower ones are called rafter legs) on walls, mauerlats or racks.
The second type is supported only by the legs, the upper ends hang freely. Together with other elements they can form a roof truss.
The figure shows the names of the parts of the truss structure (trusses)
The picture above shows the most common types of roof trusses (we don’t call them structures, as this means all the rafters and sheathing).
And two more explanations:
- The headstock in the fourth picture is the same as the stand; the author of the picture used a term more common among restorers than among engineers (the author of this article has almost never encountered it).
- The tightening is also more often called a screed (in general, many construction terms have many names; this is even found in regulatory documents).
Note. The figures show the recommended span sizes for each type of truss. This is useful information.
DIY gable roof installation
The shed was made of foam blocks. The roof is erected after the cement adhesive mortar has hardened in the following sequence:
- On the top row of the foam block wall we place a waterproofing material - roofing felt, folded in 2 layers. We fasten the mauerlat on top - wooden blocks 50x150 mm.
- We are putting out the outer trusses. We level them, strengthen them with the help of temporary stops (a board that is nailed to the wall during the construction of the house), and attach them to the mauerlat. We stretch the twine between the gables, creating a direction for installing the next trusses.
- We assemble the rafters on the ground, having previously cut out a gap for fastening to the Mauerlat, then lift them and mount them with metal fasteners.
- We lay under-roof insulation on top of the rafter system - a hydrobarrier film membrane. The layers of waterproofing overlap one another by 7 cm and are fastened with a stapler.
- The counter-batten is mounted with self-tapping screws, then the sheathing, after which the roofing material can also be overlapped.
After completing the main work, you can begin to insulate the outer walls of the constructed barn, carry out internal work, and equip the barn with drains.
How to attach a roof to foam block walls: work order
Foam concrete blocks are an excellent choice for construction work. They combine structural functions and thermal insulation capabilities. But the presence of pores in the material makes the blocks different from dense bricks or durable concrete. Because of this, many people have a question - how to attach a roof to foam block walls. Let's try to understand the existing methods of performing this construction unit.
To build roofs on foam blocks, all known options are used. Perhaps we can divide them into two types – flat and pitched.
There are no problems with the first option. Floor slabs are laid on the walls and a roofing pie is arranged. The load is distributed evenly across all walls.
The blocks on which the roof rests will be in the same conditions if the masonry walls were erected further, and the upper floors would put pressure on them.
There are more options for pitched roofs:
- single slope;
- gable;
- attic;
- hip or hipped;
- pull-hip.
There are more complex unclassified forms. But this is not so important, because they imply the construction of a truss structure that supports the ceiling.
The load effects from the rafter legs, if they are fastened directly to the walls, will be point-like, for this reason problems are created in arranging the fastening units of the roof to the foam block material. But first you need to understand the features of rafter systems.
It is already clear that the main part is the rafters, connected by sheathing and holding the roof. They are divided into two groups:
- inclined - supported at both ends on a wall, racks or mauerlats;
- hanging - supported only by the lower ends, and the upper ones hang freely. In combination with other elements they can form a farm.
Let's figure out the sequence of work.
If there is an armored belt
With its presence, the design is reliable.
The monolithic belt is represented by a strip of reinforced concrete material located along the upper perimeter of the walls. It can be arranged using blocks and other piece materials.
The main purpose is to bind the masonry and distribute the load evenly across all existing walls. Built on cellular concrete, it creates additional protection for the surface from crushing.
Monolithic reinforcement can be done in a formwork structure, but most often block rows are laid on both sides of the wall to create a tray. Reinforcement is installed inside, which is then filled with concrete mixture.
Filling the belt somewhat complicates the overall design of the object, but gives it reliability and makes it more durable. The cost of work increases, but only slightly, because much steel material and concrete mortar are not required.
If a large object is being built, or a heavy roof is expected, then the installation of a reinforced belt is considered mandatory.
There is no need to install the Mauerlat on the foam block; the rafters will be secured to the reinforced belt without it. But it will be better if this element is present, since it is easier to insert the fastening element into the wood.
How to attach the Mauerlat to the foam block? Installation of the element is carried out in two ways:
- At the moment of pouring the concrete mixture, anchors are laid. For them, holes are drilled in the Mauerlat in order to tighten them to the concrete with nuts. The method is reliable, but requires precise marking of the centers of the holes.
- The Mauerlat is drilled for the studs after it has been laid on the concrete. The drill must go through wood and concrete. The studs are additionally fixed with adhesive, or you will have to use expansion-type anchors.
It should be noted that a waterproofing layer must be installed between the wall and the Mauerlat.
Now in the rafter legs you need to select the angle at which they will rest against the Mauerlat; as an addition, you can set corners along the edges. Some craftsmen choose a groove in the Mauerlat to create a more reliable fastening and eliminate the possibility that they will move along the wall when the corner is destroyed.
Those who wish can tie the mauerlat and rafter leg with wire, which is also permitted.
A support block is secured to the rafters with steel plates, with which it rests against the mauerlat beam. Additionally, a metal square is strengthened along the entire surface, for which transverse grooves are selected in the rafters. You can secure such a stop not with a metal plate, but with two more bars, which will create an additional stop.
At the end section of each rafter leg, you can make a recess in the form of the letter “V”, with which it will rest against the mauerlat. But in this case, the rafter will not go further than the wall.
It should be remembered that foam concrete easily absorbs water. For this reason, it is recommended to make decent roof overhangs, which means extending the rafter legs.
As an addition, you can use clamps made of wire, metal tape and other material. They cover the rafters and are pulled to the bottom. The clamp is fixed with dowels to the inner surface of the wall. This measure is good when it is necessary to create an additional margin of safety for the connection between the roof and the wall.
Without armored belt
How to attach the roof to the foam block in this case?
It should be noted here that this method is easier - the roofing parts are laid on the surface of the walls. This option is good for outbuildings erected on their own.
When installing the roof, special attention should be paid to the Mauerlat. Without it, fastening rafters to foam block walls is not recommended. The element will evenly distribute the load forces on the walls; its width should be equal to the size of the wall.
The mauerlat is fixed to the block masonry with dowels or pins. It is best to plant them on a mortar mass or glue them in. The diameter of the fastening elements must be at least three centimeters to prevent loosening.
When the racks or the upper ends of the inclined rafter legs rest on a partition made of foam block material, then it is necessary to lay a purlin on top that distributes the load over the entire available area.
If the hanging rafters do not have tightening, then they will “move apart” in different directions, and the only obstacle to this will be the wall. If it is made of foam block, then the mounting pins will begin to loosen under the load. Therefore, puffs are considered mandatory, and the non-raised type is better.
A shed made of foam blocks: how to build it yourself
Construction of a shed from foam blocks
Building a shed from foam blocks is not a long process, but it has its own nuances and features. Despite all the advantages of the material, it requires additional finishing.
Today we will tell you how to make a shed from foam blocks and everything that needs to be taken into account. You can also see a lot of useful information in the video in this article.
Roofing and foam block
So, let's define what it is. It is from this device that the roof begins, as we have already said, and is a mauerlat, a simple beam or even a log, hewn from the underside.
The beam is located around the perimeter of the outer wall. And if the construction of walls made of foam blocks presupposes certain conditions, then the roof is also designed taking into account all technical aspects and recommendations. This means that we consider the presence of a Mauerlat to be a mandatory condition.
Purpose
The purpose of the timber, or as it is also called in construction circles – “murlat”, is quite clear; it serves as a support for wooden rafters. That is, it is clear that our roof is wooden, and at least pitched.
In addition, the “murlat” distributes the load that is created by the pressure of the roof. Here we need to understand that we can either strengthen the wall made of foam blocks or not, but this will not affect the distribution of loads. And this is an important point; let’s not confuse the quality of the walls with the fact that they can withstand loads.
The fact is that this doesn’t really matter, the timber that goes along the perimeter of the wall distributes and dissipates the pressure. Moreover, our roof can be quite heavy, especially if we choose clay tiles as the roofing material.
Interaction with foam blocks
Since we agreed that we have a foam block structure, we will consider all the nuances associated with the roofing and “murlat” in relation to foam blocks (see also the article Subfloor in a house made of foam blocks: types of flooring, and step-by-step installation instructions ).
The attractiveness of foam blocks
Why is foam block used in most construction work? There is a huge variety of building materials on the market.
Unlike other popular building materials, foam blocks have special technical characteristics, which makes them more attractive. Foam blocks combine all the positive properties that brick, wood and metal have individually.
- Having large dimensions, foam blocks are very light , which reduces shipping costs and eliminates the need to use additional equipment for loading and unloading blocks.
- Due to the large size and low weight, construction proceeds faster , which in turn also reduces labor costs for builders.
- Foam blocks have good thermal insulation , since there are many air chambers in the cavity of the blocks. Thermal insulation is several times higher than the thermal insulation properties of brick.
- The vapor barrier of the blocks is also at a high level. This eliminates the possibility of the formation of fungi and mold. This allows you to increase the service life of constructed buildings.
- Foam blocks can be easily processed and, if necessary, cut with any hacksaws.
- The foam block does not burn ; it contains no harmful chemical impurities that could be released into the atmosphere. For this reason, foam block is considered an environmentally friendly material.
- The price of a foam block is not significantly higher than that of other building materials , and due to its dimensions you can save a lot of money, since the construction of buildings and structures requires much less material than other materials with small sizes.
Despite all its advantages, foam blocks also have some disadvantages. Blocks are capable of absorbing moisture, as a result of which they are susceptible to destruction during sudden temperature changes.
Attention: In order to avoid this problem, a shed made of such foam blocks requires additional treatment with special means.
When thinking about what to use, wood or foam blocks for a shed, it is worth saying that the most correct design will include both materials.
Fastening without armored belt
Let's immediately look at a simpler way to install a roof on a foam block, when the roofing parts are laid directly on the masonry surface. This option is most often used in small buildings erected by hand.
What to pay attention to
When attaching a roof to a building made of foam blocks, you need to pay special attention to the following details of the truss structure.
Mauerlat laid on the wall
Parts of the rafter system cannot be attached to the foam block without this part. The Mauerlat will evenly distribute the weight of the roof over the entire wall area. Its width should be maximum; it is best if it is equal to the width of the wall.
The mauerlat is attached to the masonry using pins or dowels inserted into it. It is advisable to plant them on a solution or glue them. Also, the diameter must be chosen at least 30 mm; the larger it is, the less loosening of the fastening in the foam block will be.
Rack, upper ends of layered rafters
The rafter post must be installed on the purlin
If the racks or upper ends of the layered rafters rest on a partition, also made of foam block, then a purlin must be placed on top of it. It will distribute the load over the entire area, just like the Mauerlat on the external walls.
Hanging rafters “move apart” to the sides without tightening. Only a wall can prevent this. In the case of a foam block, this load can loosen the studs that secure the Mauerlat. Therefore, the tightening must be mandatory and preferably not raised.
For the same reason, it is undesirable to install an attic roof, the side rafters of which also transmit horizontal force to the wall. You can bypass all the restrictions if you additionally secure the rafter legs extended beyond the dimensions of the wall to the floor beams, which will act as tie-downs.
You can do without tightening if the rafters are attached to the floor beams