In what cases is it necessary to attach wooden beams to the wall? When installing various structures to the wall, it is necessary to take into account the properties of the structure, details and methods of fastening.
Often there is a need to fix some interior element, furniture, or fix household and electronic appliances to the wall. In order to install a wooden door, make a redevelopment, cladding a house, or simply install a canopy over the front door of a private house, you need to install a wooden beam. If you want to make an extension like a wooden veranda for a country house, you will need to attach a wooden beam to the wall.
First you need to figure out what kind of wall it is, wooden or brick, concrete or plasterboard, in order to choose the right method and fastening parts.
Today, in any store you will be presented with a wide selection of fasteners. Not every person will be able to make the right choice on their own without getting confused about their purpose.
How to attach a wooden beam to a concrete wall?
Having prepared the beam and drilled holes in it for the fastening element, you can begin preparing the wall on which the structure will be mounted.
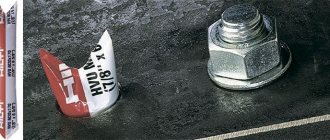
- First, let's drill a hole. We will need a twist drill of hard alloys, a drill with a pobedit tip or with a diamond coating. To maintain the service life of the drill, periodically cool it in water to avoid overheating. Then prepare a wooden plug, dip it in glue, but not water-based, so that the wood does not swollen. You can also make your own lead plug. To do this, take a sheet of lead, cut a strip suitable for the hole, twist it into a tube. Then pierce it with a nail and screw the screw in there.
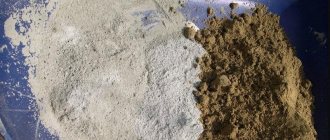
You can also use a monolith made of alabaster or gypsum solution.
Let's take a copper wire and screw it onto a screw in the form of a spiral, then fill the hole with the prepared solution and coat the wire on the screw with it. Without hesitating for a second, in order to avoid the solution drying out, press the screw into the hole to the required depth.
Remove the squeezed out excess solution without waiting for it to harden. After 10 minutes, you should remove the screw to prevent it from drying out along with the solution. When the plug becomes a monolith with the wall, you can begin attaching the timber.
Although when it comes to concrete, be it brick or mortar, anchor bolts are the best choice. They will ensure fastening strength.
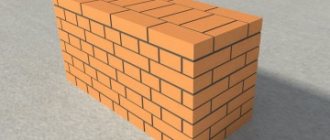
How to attach a wooden beam to a brick wall?
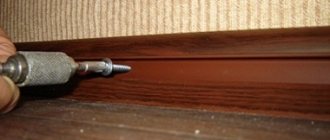
If you have to work on a brick wall, use only a drill.
Drill carefully and slowly, evenly without loosening on the sides, to avoid splitting and scattering of the brick. If you hit concrete, it is better to use a drill with a hammer drill function, this will help crush it. Cases of hitting a hollow brick often occur.
How can we be here? It is better to use a dowel that, when twisted, curls into a knot. Carefully screw it into the drilled hole so as not to break its parts.
It is better to screw self-tapping screws into concrete using dowels made of durable plastic. The dowel is laid between the concrete and the self-tapping screw. It can also be pre-lubricated with glue.
An anchor is also perfect for attaching a wooden beam to a brick wall; unlike nails and screws, it can handle any load.
How to fix beams on brick
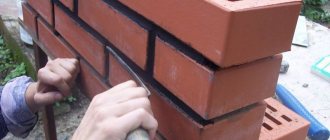
If the wall of the house is made of brick, you should use a slightly different installation technology. To do this, drill holes at a distance along the block with a wood drill, then change the drill to a pobedite one. Having attached the lath to the wall, we make markings through the drilled holes, drilling through the brick.
Then we remove the block and drill holes of the required depth and width in the brick wall. It is recommended to keep the drill straight and not loosen it, otherwise you may crumble the brick. You can attach the beam to a brick wall using dowels and self-tapping screws. You can also use anchors for a brick wall.
How to attach a wooden beam to a gas block wall?
Before you start attaching a wooden beam to an aerated block, you need to take into account that aerated concrete is an easy-to-work material, as it is quite soft. Therefore, the magnitude of the load on the beam plays a very important role here.
If it is a small beam of light weight, then you can use bolts or self-tapping screws. Wedge-shaped bolts will be more appropriate, because they sit firmly in the material. A screw with threads along the entire length is also suitable.
To fasten heavier structures, shelves or cabinets, metal or plastic dowels are needed.
For fastening solid materials, it is better to use nylon dowels in the center of the object. Hollow materials can be caught at the edges.
When making connections to an aerated concrete surface, it is necessary to take into account that parts made of metal may be destroyed when interacting with the block. So consult with specialists, they will definitely tell you proven fastening elements.
Features of installing wooden slats to aerated concrete
Recently, aerated concrete blocks have been used quite often for the construction of houses and other buildings. They are easy to process, so building construction is much faster. However, the specific softness of aerated concrete is associated with the peculiarities of installing beams on its surface.
First of all, the choice of fastening elements will depend on the magnitude of the future load on the beam. If the structure will not be loaded with a large weight, self-tapping screws or wedge-shaped bolts can be screwed into the aerated concrete blocks. Full length threaded screws can also be used for this purpose.
To ensure that the structure can withstand sufficiently large loads, steel or plastic dowels are used.
When choosing fasteners, you should also take into account the fact that aerated concrete blocks can have a destructive effect on the metal over time. Therefore, before purchasing, it is advisable to consult with the seller and find out all the possible risks.
How to attach a wooden beam to a wooden wall?
In this case, the perforated fastening method is common both in roofing and in the furniture industry. Perforated elements are secured with nails, self-tapping screws or self-tapping screws.
Perforated plates connect parts in one plane, for example, roof installation. There are also corners of different widths to strengthen and connect the structure. For auxiliary elements of light weight, mounting tape is suitable.
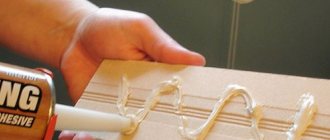
The most common method of fastening wooden structures is with nails.
Liquid nails are often used in everyday life, furniture assembly and construction. Using nails will seem like a very easy way, but we must not forget the technique of hammering a nail. If you use a bolt with a nut at the end, you can easily hammer a nail into any hard-to-reach place.
Calculate in advance how long a nail you will need. For a more durable connection of the boards, the nails are driven in at an angle to each other. Wood that is too dry will split faster with a nail.
If the timber is too dense, hold the nail in the middle with pliers to prevent it from bending. For large nails, you can pre-drill a hole that will be narrower than itself. Make a small drilling for the cap.
How to attach a wooden beam to a plasterboard wall?
Using drywall you can create various designs of fairly smooth surfaces.
At the same time, it is quite fragile, so securing a wooden beam to its surface will be problematic. The use of ordinary nails and self-tapping screws will not lead to the desired result. Even light objects can be torn out, taking the screw with them, and leaving a hole.
To ensure fastening strength, before starting the installation of drywall sheets, lay wooden beams in places where the need for strengthening is expected in the future. Thus, the load will be on the beam itself, so the fastening can be done with the same self-tapping screw. But during installation, it is often not always foreseen what the load will be in a particular place.
There are special fastenings for drywall. Depending on the load on the beam, the type of fastening is chosen.
When using a nylon or metal anchor, first screw it into the drywall with a screwdriver, then secure it with a self-tapping screw. But this method is the weakest, since there is no fixation on the reverse side.
For a stronger fixation, it is better to use a drop-down metal anchor. To do this, insert the folded anchor into the hole. Use a screwdriver to tighten the anchor, it will fold, locking into the sheet of drywall.
In order to secure the beam using a universal plastic dowel, you must perform the following steps:
- we drill a hole of a suitable diameter; insert a dowel into the hole; secure the item we need using a self-tapping screw; the dowel is folded into a knot, ensuring fixation on the reverse side.
Fastening to aerated concrete and plasterboard walls
Aerated concrete blocks are a soft material; screws with full-length threads are suitable for them, but it is better to use anchors, mechanical or chemical. To properly install an anchor with bending ribs or a wedge-shaped one, pre-drill a hole with a diameter slightly larger than the anchor. One type of anchor is perfect for hollow blocks and blocks made of cellular concrete - foam blocks, gas blocks, etc. The main “parts” of the anchor are a steel sleeve with ribs and a nut at the end. When the screw is screwed into the sleeve, the ribs bend and move apart, forming a “butterfly” that securely holds the anchor inside the material.
The most reliable fastening is time-tested
When attaching a beam to a concrete wall, of course, the most reliable fastening will be fixation with an anchor.
Reliable fastening of wooden beams has been known since ancient times, when the concept of “quick installation” and “perforator” did not even exist, self-tapping screws and dowels had not yet been invented. A hole was made with a bolt in a wall made of bricks, blocks, or in a ceiling made of reinforced concrete. A large wooden rod was driven into the hole, lubricated with cement.
A nail was driven into this rod through a wooden beam. Despite the fact that we now have a choice of various fasteners and elements, modern technology and equipment, this method of fastening, although rigid, is still widespread. It is appropriate to use this method for small loads on the beam.
A softer method is the use of U-shaped brackets for drywall profiles.
The positive difference here is the short installation time. But the fastening does not have sufficient rigidity. If you hit a wooden beam with force, the bracket will bend and the surface of the structure will be damaged.
When performing construction work in country houses or on summer cottages, various types of work are performed. During the construction process, it may be necessary to attach the timber to the wall.
A wooden house made of timber maintains an excellent microclimate.
Fastening technology: soft method
This method is used using U-shaped staples. The method has both advantages and disadvantages. The main advantage of soft fastening of beams to the wall is the speed of operation, the disadvantage is the unreliability of fastening the frame, the structure can collapse over time.
Among other disadvantages, the fragility of the timber is noted: the frame can be easily damaged by accidentally hitting it. Therefore, it is worth thinking about before you decide to do this work. However, there is still a solution: if the elements are laid to finish the walls from plastic panels, then, as a rule, no deformations are observed. It should be taken into account that the paneling of the panels with a wooden frame is carried out perpendicular to the panels of the element themselves. On the lower part of the wall, timber is laid more often than in the upper area. As a rule, fastening the timber to the wall to a height of up to 1.5 m is located every 0.4 m. Above this mark, the distance becomes larger and can be 0.6-0.7 m.
Related article: How to make a bird feeder with your own hands - photos and videos
You can do this work yourself. Installation of the frame does not require any special skills in the field of construction; it is only important to follow the instructions exactly.
Timber installation technology
Materials and tools:
- timber; drying oil; antiseptic; screws; nails; hammer; wooden chop; slab; axe; drill; chisel; plane.
How to attach a beam to a wall? They are attached at a certain distance from each other.
Depending on the cross-section of the beam and the quality of its surface, the distance between the fasteners is determined.
Types of connecting beams with the remainder are used when installing load-bearing walls of a house.
If the block has a cross-section of 2-3x4-5 cm, then it must be fastened at a distance of 50 cm from each other.
If the block has a cross-section of 4-5x5-6 cm, then it is fastened every 80 cm.
The cross-section of the element is selected depending on what material the surface will be sheathed with. Another important aspect in this matter is the possibility of saving usable space when covering.
If the surface has a lot of deformations and unevenness, then in this case products with different heights are used.
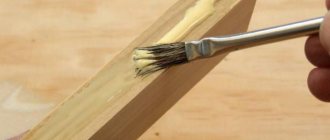
If there is high humidity in the building where the wood frame cladding is being carried out, then before installation it must be treated with an antiseptic or drying oil to protect the wood from mold and microorganisms.
There are two ways to secure the frame:
1. Hard fastening method.
2. Soft method of fastening.
Return to contents
Types of fastening timber to a wooden wall without residue
This method using nails, chops and slabs is the most durable and durable. This method has been used in construction for a long time.
To attach the beam to the wall, you need to make a hole in the concrete or brick wall using a bolt. Then a wooden chop is driven into this hole. Then a nail is driven into this chop through a block and a block.
In modern construction, this method is still used quite often. The disadvantage of this method of fastening is that it takes too much time to complete the wall covering work.
Return to contents
First of all, you need to make markings to determine the level of the future wall surface.
First, the pitch of the elements is noted. This distance ranges from 30 cm to 60 cm. It depends on the quality and thickness of the products.
Then they make the strapping.
In this case, the elements are laid along the contour of the wall, which is leveled. If one wall is leveled, then the wooden elements are attached to perpendicular walls. No pads are used in the work process yet.
Types of beams: a - carriage (half-beam); b - semi-carriage (triangular element); c - tetrahedral beam.
First you need to drill a hole in the product. A hole is drilled for screws. The diameter of this hole should be slightly larger than the diameter of the screw.
Then you need to attach the product to the surface of the wall and, using a nail and hammer, transfer the mark for the hole to the surface.
After this you need to drill holes. Dowels or wooden chops are driven into them.
Then you need to install the wooden block in its place and screw it with a screw. It is possible to perform the installation differently. To do this, the timber must be nailed to a wooden chop using a hammer.
Thus, all contour elements are installed and secured. Then you need to stretch the thread between them.
Using it, the height of the slab is determined at each location where the product is installed to the wall. To do this, determine the distance from the surface to the thread. Then the height of the part is subtracted from this distance.
Then they select pieces of plywood of different thicknesses and make a pattern. The work is carried out using a chisel and an ax.
The beams are connected using straight and oblique overlay locks in structures where the load-bearing supports will be affected by tensile deformation.
Then you need to drill a hole in the head. The diameter of this hole should be slightly larger than the diameter of the screw.
After this, holes are drilled in the products in order to attach them to the wall.
If the height of the part is more than 6 cm and the material from which it is made is larch, then the holes must be drilled with a drill having a drill bit with a diameter of 12 mm. It is necessary that the head of the screw completely enters the body of the block and does not rise above its surface, but is located inside.
If the product is thick, then the holes are drilled to a depth of 3 cm.
After this, it is attached to the surface using pre-made blocks.
Using a building level, check whether all elements are securely level.
If it turns out that the block was attached above the required mark, then the screw is unscrewed and the block is replaced. You can correct the situation in another way. To do this, you need to slightly unscrew the screw and lay pads of the required width on both sides.
If the element is below the required mark, then you need to unscrew the screw and change the head. If the difference in marks is small, less than 2 mm, then you need to plan off the excess part of the block using a plane.
Return to contents
With this method, the timber is secured using U-shaped brackets. The main advantage of this method is the speed of installation. The downside is the insufficient strength of the frame.
If the place where the bar is secured is hit hard, the bracket will be deformed and the frame will be damaged. If the parts are laid for further wall covering with plastic panels, then such deformations will not occur.
It should be taken into account that the wooden frame for paneling must be made so that the products are perpendicular to the panels.
At the bottom of the wall, elements are laid more often than in its upper sections.
At a height from the very bottom of the wall to 1.5 m, parts are fixed every 0.4 m. Above 1.5 m, the bars need to be fastened every 0.6 m. You can leave a distance between fastening parts of 0.4 m.
The technology for attaching the frame to the wall is quite simple. You can do it yourself if you follow all the rules and carefully install the wooden frame.
During the construction of a house or its renovation, a situation often arises when it is necessary to attach a beam to a brick wall. In one case, it must carry a fairly serious load, in the other, it must serve only as a frame into which some kind of facing material is attached, for example, siding on the outside of the building or plasterboard on the inside. For those who know installation technology, attaching wooden beams to brickwork will not be a big problem.
When installing timber to a brick wall, you need to take into account the properties of the structure, parts, as well as the method of fastening.
How to attach a beam to a wall?
Fastening the timber to the wall is present in the process of any construction of a country or private house. The installation technology is relatively simple and consists of several stages.
Schemes for attaching timber to the wall.
The beams are fastened at a certain distance between each other. The gap between fasteners is made depending on the cross-section of the beam and, accordingly, the quality of the wall surface.
Thus, if the parameters of the beam are 4x5 cm or 5x6, then it is fixed every 80 cm. Moreover, this element is installed only after you have decided what you will use to cover the wall surface. Saving free space during finishing is also the main factor in choosing the cross-section of timber.
When installing, do not forget to take into account unevenness, roughness and other deformations of the wall. In this case, you should select construction fasteners strictly according to height - this way you will hide all the shortcomings. If the surface of the house where you are doing the sheathing consists of wood, then before fixing the timber you need to thoroughly treat it with an antiseptic or drying oil so that mold does not form and the wood is not exposed to the negative effects of insects.
There are 2 methods of attaching the frame: soft and hard. Each of them has its own operating characteristics.
What do you need to attach the timber to the walls?
You will need the following equipment and materials:
Tools for working with timber.
- beam;
- antiseptic;
- drying oil;
- hammer;
- nails;
- screws;
- axe;
- coven;
- drill;
- wooden chop;
- chisel;
- plane.
Fastening technology: soft method
This method is used using U-shaped staples. The method has both advantages and disadvantages. The main advantage of soft fastening of timber to the wall is the speed of operation, the disadvantage is the unreliability of fastening the frame, the structure can collapse over time.
Among other disadvantages, the fragility of the timber is noted: the frame can be easily damaged by accidentally hitting it. Therefore, it is worth thinking about before you decide to do this work. However, there is still a solution: if the elements are laid to finish the walls from plastic panels, then, as a rule, no deformations are observed. It should be taken into account that the paneling of the panels with a wooden frame is carried out perpendicular to the panels of the element themselves. On the lower part of the wall, timber is laid more often than in the upper area. As a rule, fastening the timber to the wall to a height of up to 1.5 m is located every 0.4 m. Above this mark, the distance becomes larger and can be 0.6-0.7 m.
You can do this work yourself. Installation of the frame does not require any special skills in the field of construction; it is only important to follow the instructions exactly.
Features of hard installation
Scheme of fastening the timber using the soft method using staples.
This method has been used for a long time and has proven itself to be the best. You should begin attaching the beam to the wall only if you have the following elements:
The method is distinguished by its reliability, strength and durability of the structure.
Experts advise making fastenings to walls using a rigid method, since there will be no further problems with deformation of the frame.
During the work, a bolt is used - a device for making holes. You will need to drill a hole to install the fastener. It doesn’t matter whether the wall is made of concrete or brick - this tool will help you cope with the task.
Insert a wooden chop into the hole formed (hammer it). Next, you need to hammer a nail into the chop using a block or beam.
This method is used more often than the soft fastening method. However, despite the guarantee and quality of work, it has one main drawback - time. The process of covering walls will take a lot of effort and time, which modern people so lack.
DIY installation: step-by-step instructions
Schemes of rigid fastening of timber.
First of all, you need to make markup, which will be the basis for creating the project. This is done so that you can determine the level of the wall surface.
Next, you should measure the pitches of the fasteners. The distance in this case ranges up to 60 cm (the minimum gap is 30 cm). It is determined by the quality of the timber and its thickness.
The next step is strapping. To do this, lay the elements strictly along the contour of the wall being leveled. If you are planning to level one wall, then you need to attach the beam to the walls that are perpendicular. The use of pads is not required during installation.
It is recommended to first make a small hole in the part to be installed. This must be done so that the screws can be inserted. Remember that the diameter of the drilled hole should be slightly larger than the diameter of the screw.
Then you take the product and apply it to the surface of the wall. You do part of this work with a hammer and nail. Your task is to transfer the mark for the hole to the surface.
The next stage of work is to drill the planned holes. As a rule, you must drive wooden chops or regular dowels into them.
Next, you install the wooden block in its place, securing it with a screw. However, you can use another method: the timber is attached to the chop with a nail, using a hammer.
Scheme of fastening the timber to each other.
Now you attach and install all additional contour elements. For convenience, you should stretch a thread between them. What is the thread for? Using it you will be able to determine the height of the block, and in all places where the beam is attached to the wall. This way you measure the distance that forms from the surface of the wall to the thread. Then we subtract the height of the element from this distance.
Then you should take pieces of plywood of various thicknesses and build a structure. During the work you will need an ax and a chisel.
Once the block is ready, you can start drilling a hole in it. The diameter of the hole made must be larger than the diameter of the screw.
Next, you should make holes in the beam so that you can later attach it to the wall. How to drill a hole depends on the height of the element, as well as the material from which it is made. For example, if the beam has a height of more than 6 cm, and the material is larch, then you need to use a drill with a drill with a diameter of 12 mm. When installing, take into account one important circumstance: the head of the screw must be completely inserted into the beam, do not allow any elevations, try to place the screw in the inner part of the element.
If the timber is of considerable thickness, then you should make holes up to 3 cm deep. Then we proceed to fasten the element to the surface using previously made blocks.
To make sure that the fixed timber is level, use a building level. If it turns out that the beam is attached to the surface a little higher than planned, then unscrew the screw and replace the head. You can also use the second method: unscrew the screw (just not all the way) and place spacers of the required parameters on both sides of the element.
If the beam is located below the planned level, unscrew the screw and change the head. However, if the difference in marks is insignificant (up to 2 mm), you can plan off the unnecessary part using a construction plane.
Fastening timber to a brick wall: installation features
To get started, you should purchase:
- dowels;
- self-tapping screws;
- anchors;
- rivets;
- nails;
- corners.
Experts do not recommend using a hammer drill when working with brick, as this material is fragile. In this case, you can easily split the wall. Therefore, only use a drill.
You can choose the right drill at a hardware store. The drilling process will take a lot of your time, but there is no other way.
Installation is done according to the standard scheme: make holes and attach the beam using special devices. Be careful: if installed incorrectly, the entire structure may collapse.
Fastening the beam to a concrete wall is carried out according to the same instructions, the devices and materials are the same. However, the main tool is a drill, which is capable of making holes in concrete (a drill is useless here). For the rest of the job you will also need to drill, calculate and secure. Thus, if all points of fastening technology are followed, the beam will hold securely.
1poderevu.ru
Where is this type of connection used?
The scope of application of units where wooden beams are adjacent to a brick wall is extremely wide. Most often this type of connection is used for the following purposes:
- to secure furniture, household appliances or interior elements; to install a wooden partition; to place doors in an opening; for internal or external insulation, where the sheathing of bars plays the role of a frame; to hang a canopy over the entrance to a house or in another place; to build an extension to the building (vestibule or veranda).
Scheme of fastening the timber using the soft method using staples.
When it is necessary to fix interior items on the wall, a wooden beam is applied flat to the surface and fixed with fasteners. This way it is capable of bearing a significant load. The greater the magnitude of this load, the more attachment points to the brickwork must be provided. The same rule applies when installing a partition, only the starting beam is installed vertically.
The door frame is constantly experiencing dynamic loads, so it is secured to the brick with a particularly reliable type of fastening elements: anchors. They are also used when installing various canopies that experience snow and wind loads.
When insulating brick walls externally or internally, a sheathing (frame) is assembled from the bars, which is the basis for installing the cladding: vinyl siding, drywall, plastic panels and other materials. In this situation, the tree experiences minimal mechanical stress, which is why it can be fastened with dowels for quick installation.
To build an extension, a reliable structure is required that can support the roof with all the ensuing consequences.
In this case, the wooden beams act as load-bearing beams and are adjacent to the brickwork at an angle of 90°. There are several ways to successfully rest them on a brick and securely fix them.
Flat installation on masonry
Scheme of attaching an anchor to a brick wall.
To install the beams on a brick wall with a full fit along the plane, you need to prepare the following tools and materials:
- electric drill; driven dowels with plastic plugs; drills and drills with a diameter corresponding to the size of the dowels; hammer; measuring devices; pencil.
First of all, you need to make a marking, determining the position of the block on the wall, and outline it with a pencil. Then mark on the surface of the timber the places for drilling holes, which should be at a distance of 20-30 cm from each other. Further actions are performed according to the algorithm:
- Select a drill according to the diameter of the plastic insert for the dowel and drill holes in the block. Take a drill whose diameter is twice the original and make recesses so that the fastener heads go into the “sunk hole”. Attach the block to the intended place on the wall and apply markings through the finished holes brick. Place a drill in a drill and drill blind holes in the brickwork. Place the timber, insert plastic plugs and nail it with dowels.
Some types of special fasteners.
The length of the dowels must be selected so that they plunge into the wall by at least 50 mm. If the load is significant, then the distance between the attachment points is made smaller (10-15 cm), and the recess into the wall is larger (80-100 mm).
Fastening to anchors is carried out in the same order, the difference is in a more careful selection of the diameter of the drill and careful drilling.
If the hole is too large, the shank of the fastener will rotate inside and it will not be possible to tighten the anchor.
Installation of beams
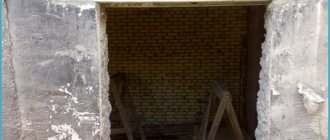
The traditional way to attach the end of a wooden beam to a wall is to embed it in the brickwork.
This design of the junction unit can be used in cases where the thickness of the masonry is 2 bricks (250 mm) or more. The reason is that the end of the beam must enter a specially prepared niche to a depth of at least 12 cm (half a brick). If the thickness of the partition is not enough, then the niche will turn out to be through, which is unreliable and ugly.
The ideal option is to provide niches for the beams in advance when building the wall. If this is not done, then they can be carefully hollowed out. Of course, the second support for the beam in the form of an extension frame must be made before installing the wooden product in the design position.
Installation of the supporting beam is carried out as follows:
- Antiseptic treatment of wood is carried out. The end intended for embedding in the masonry is wrapped with roofing felt. The end of the beam is inserted into the niche, and the second rests on the finished structure. The distance from the end of the element to the rear wall of the niche is 40 mm. The horizontal and vertical position of the block is verified, its second end is secured in the chosen way. The gaps between the surface of the brick and the wood are sealed with M50 cement-sand mortar.
The inconvenience of this method is that you need to spend time preparing the niches and waiting for the solution to harden well, otherwise during further assembly of the roof it will fall out in pieces. There is a more practical way: fasten a support beam of the same cross-section as the beams flat to the brickwork. It must be secured in such a way as to ensure the required angle of inclination of the beams when they rest on this base.
The support beam should be secured securely, using anchor bolts that extend into the thickness of the brick by at least 100 mm. The anchor installation step is 30 cm (3 fasteners per 1 linear meter). Afterwards, the beam rests on wooden structures at both ends and is secured with galvanized screws on steel corners.
Attaching a beam to a wall cannot be called the most difficult operation carried out during construction and repair work, but it requires care and strict adherence to all recommendations and existing rules.
Such manipulations are necessary when installing interior partitions, installing household appliances, or implementing design projects.
There are many ways to attach wooden beams to walls, and each manipulation must be performed using certain fasteners. Their choice depends on the quality of the foundation and the upcoming load.
Methods of performing work
The timber is used both to create sheathing and to design furniture and partitions
In modern construction, high-quality fastening of wooden beams to walls built from various materials is often a necessity. Such work is performed for:
- strengthening structures; installing new frames; constructing partitions; erecting light extensions; assembling designer furniture.
The timber is used to create sheathing, a frame for cladding façade or interior walls, and for reliable fixation of furniture structures, household appliances or electronics. High-quality work makes it possible to create a structure that can withstand increased loads, decorate a room, or carry out a long-planned redevelopment.
Mounting options
U-shaped hanger for mounting
To get the job done efficiently, use several fastening methods:
The simplest is considered to be soft, since to implement it you will need to attach special brackets made of metal and having a U-shape to the wall surface. The distance between them should not exceed 40 cm. The brackets themselves should be securely fastened, and a wooden beam can already be fixed to them.
Before choosing a fastening method, it is necessary to accurately calculate the upcoming load and clarify the features of the base.
Self-tapping screws are used for rigid fastening
The rigid fastening method requires the use of a variety of fasteners, which are chosen depending on what material the wall is made of. It can be:
- self-tapping bolts; dowel nails; anchor bolts; plastic or metal dowels.
The degree of complexity of the work depends on the quality of the walls, but all experts recommend fastening the wooden frame using a rigid method, as this will avoid further deformation of the assembled frame.
In most cases, it becomes necessary to attach the timber to a brick wall. It is important to know some of the features and nuances of the process in order to achieve the desired result.
The process of attaching timber
Tools
Before attaching a wooden beam to a brick wall, you need to prepare the following tools and materials:
- Electric drill;
- Hammer;
- Building level;
- Dowels of the “quick installation” type.
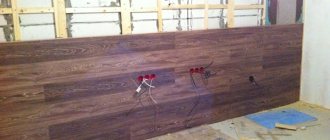
Installation
Instructions for attaching the beam to the wall are as follows:
- First you need to find the position in which the beam attached to the wall should be.
- Next, you need to make holes for the dowels, which are drilled through the timber. At this stage, it is important not to displace the part, so it is better to do the work together, so that one person holds the beam, and the second drills the holes.
The step between the fasteners depends on the cross-section of the beam - the larger it is, the smaller the step should be, accordingly. For example, if a block with a cross section of 5x5 cm is attached, the step should be about 20 - 30 cm.
In addition, depending on the cross-section of the bar, the size of the fastener is selected. The maximum size is 8x120 mm, and the minimum is 6x40 mm. As for the choice of drill, it must match the diameter and length of the dowel.
- Then you need to countersink the holes in order to install the fasteners flush-mounted. To do this, the holes are drilled out a few millimeters with a drill corresponding to the diameter of the fastener head.
Inserting a plastic dowel into the hole
- After this, plastic dowels are inserted into the holes with your own hands.
- To complete the work, nails are inserted into the dowels and driven in with a hammer. As a result, the fasteners expand and are firmly fixed in the wall, while holding the wooden part.
Note! The dowel nails have slots for a Phillips screwdriver, however, they are not designed to be screwed in. The slots are made only for the purpose of simple dismantling of fasteners.
This completes the installation process. It must be said that earlier, before the advent of quick installation, timber was attached to the walls using ordinary dowels. However, this technology is not currently used, as it is much more complex and time-consuming.
Example of embedding beams