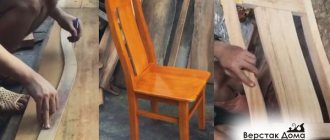
The final stage of work
Let's move on to making millstones.
For minimalists, you can simply screw 2 boards to a wooden plate, drill a hole and thread a shaft for the blades. But in order for the blades to rotate during the wind, it is necessary to install bearings. To do this, we will need the same 2 wooden plates, but we need to drill large holes in them, to suit the size of the bearings, maybe 1 mm smaller. Then we saw it in half and make small holes at the top for the screws so that they can be connected and disassembled if the bearings become unusable. Then we glue a small board on the bottom so that the shaft is at a slight angle and the blades do not rub against the mill; you need to place a small block in front of the board. The resulting structure must be secured to the plate to which the roof will be attached, after which we insert the bearings into the structure.
Now we need a threaded shaft and 4 nuts. We insert the shaft into the bearings and secure it with nuts. We glue/screw the wood lining to the roof and our millstones are almost ready. Then we place the millstones and the roof opposite each other at the same level (place bars under the roof), mark the point of contact of the shaft in the roof and make a hole. Then we lubricate it with glue and fasten the plate with the shaft to the mill, and then the roof to the plate with screws from below (so it should protrude beyond the mill).
Making blades is similar. You can cut large blades from plywood and secure them to the shaft with a nut. A more complex option is to drill holes in the blades and insert threaded shafts onto the glue. Then you need a square, drill a number of holes in it:
- 4 – on the side, in the places where the blades are attached;
- 4 – perpendicular to the existing ones, for securing threaded cylinders into which threaded shafts will be attached;
- central - for securing the blades to a large shaft.
We insert the cylinders into the holes and screw the blades into them until they stop. In this case, you can adjust the angle of inclination and change it depending on the wind. Afterwards, all parts are coated with primer and paint for exterior use.
Now we know how to make a decorative mill for the garden with your own hands. When viewing various photos of garden mills, new ideas and solutions may arise. When manufacturing from metal, we use metal scissors and screws/rivets.
Choosing a location for the mill
A decorative windmill for a garden can become the dominant feature of a landscape composition. It is reasonable to supplement it with an imitation of a well, a small haystack, animal figures or a flower bed.
The choice of location depends on the layout of the site and the tastes of the owner. A decorative mill looks most impressive among fruit trees or in an open area surrounded by flower beds.
A water mill will harmoniously complement a recreation area with a decorative pond or fountain.
At the planning stage, it is important to choose a location so that the structure does not interfere with free movement around the site and care of cultivated plants. The choice of materials depends on the general design style of all other buildings.
It is not difficult to develop an individual design by studying numerous photos of a decorative mill.
Construction of a garden mill
Most of these decorative objects consist of the following parts:
- platform;
- base;
- frame;
- roof;
- rotation mechanism;
- blades.
The platform is where the garden mill will be installed. The structure can, of course, simply be placed on the ground in the garden or on a flower bed, but then it will not last long - dampness will do its job and render the decorative object unusable. Therefore, it is advisable to build a platform of concrete or stone. The last option will be more beautiful.
Garden mill with a platform made in the form of flat stones. Some gardeners use plastic pipes instead of a platform, which are attached to the base of the mill and dug into the ground during installation.
The base is the lower part of the mill itself, usually wider for better stability. The most stringent requirements must be met for the quality of base treatment - this part of the structure is in most contact with wet soil and plants.
The frame is the main part of the decorative object, the wall of the mill. It is assembled from boards, plywood, slats, lining, small logs and many other materials. In addition, the frame has a decorative function and is often decorated with windows, doors, balconies and other small elements.
An example of decoration with various decorative elements such as fences and windows
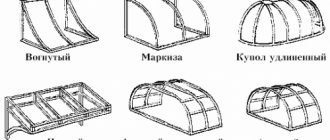
The roof is the upper part of the structure. Usually assembled from slats, planks or lining. In some cases, plastic is used, especially for rounded roofs, which are difficult to make from wood. By its color, this part of the mill should stand out from the frame.
Inside the roof there is a rotation mechanism - an axis on two ball bearings. In most cases, it passes through the entire structure; this arrangement is reliable and stable. The mechanism can be supplemented by connecting the mill roof to the frame on a vertical axis and adding a sail - then the structure will not only rotate the blades, but also turn in the direction of the wind.
An example of a drawing with a simple movable mechanism. The sail on the mill is indicated by a red arrow
The blades, also known as wings, are the second most important decorative element of the mill. Assembled from plywood, planks and thin bars
The main condition is that all blades must have the same mass and be balanced, then the mill will last a long time and without problems. Examples of various design options for mill wings are shown in the pictures below.
Garden mills with beautiful decorative wings Metal is sometimes used to make decorative mills, in which case its shape is different from a wooden one. Do-it-yourself mill for the garden - photo The best environment for wooden crafts will be a green lawn
Table. Types of decorative mills for the garden.
| View | Description |
| With quadrangular walls | Quite a simple design. The walls are quadrangular, straight or inclined. Typically, such a mill is completed with a gable roof, but other designs are also found. An excellent option for those gardeners who do not have much experience working with wood. |
| With hexagonal walls | More complex design. Requires fairly high precision in cutting parts of the required size and giving them bevels. Often the walls of such a hexagonal mill taper towards the top. It ends with a dome or polygonal roof. Compared to the previous option, all other properties being equal, it is more attractive. |
| Windmill | The decorative windmill has the simplest design due to the absence of cladding and a complex roof. In addition to decoration, it helps to determine the direction and strength of the wind on the site. In addition to wood, a windmill can be made from steel profiles, if it is easier and more convenient for you to work with them. |
Mill assembly
Base frame
The assembly of the entire structure is also divided into three main stages: assembly of the mill, roof and windmill. Let's start with the most basic part:
- We lay out the sections of the house block in the correct order from bottom to top: from 35 cm to 25 cm. We apply 4x4 cm slats with a length of 54 cm to the resulting trapezoid on both sides and fix them with self-tapping screws (6–7 cm) along the edges. We carry out similar actions for the remaining three parties. We get ready 4 sides.
- Now you need to assemble the mill box from the received sides, using a 3x3 cm strip 54 cm long. We put them between the joints and screw them with self-tapping screws (6–7 cm) along the bottom and top.
- There are 4 elements left from the block house with a length of 25 cm. We knock them together using a 3x3 cm slats with a length of 10 cm. Please note that the height of the block house elements is 9 cm, so the slats should protrude slightly.
- The base is secured to the bottom of the mill with long self-tapping screws. They must be screwed from the inside into the protruding slats.
Note!
When performing work on assembling the base of the mill, you must carefully check everything and lay out all the elements in the correct order on the table so as not to confuse them. Otherwise you will have to redo the work.
Making a wooden structure
A wooden mill will not be as durable as a stone one, however, the product looks completely different and creates a different mood. Some may think that assembling a structure made of wood is much easier, but this is not entirely true. You can't do without carpentry skills.
Wood products do not tolerate high humidity well, so the mill must be brought indoors for the winter. This will help avoid rotting and darkening of the array.
Required materials and tools
You can make a wooden mill from leftover building materials or buy everything you need in a store. Any solid wood scraps and lumber will do.
Materials:
- wooden beam;
- moisture-resistant plywood;
- wood for decoration;
- blade rail;
- roofing material
- nails, bolts, self-tapping screws of different sizes;
- threaded rod;
- wood varnish or drying oil.
Tools:
- saw, hacksaw or jigsaw;
- drill or screwdriver;
- Sander;
- sandpaper;
- hammer;
- brush;
- roulette.
Foundation – is it necessary?
A small wooden mill that serves a decorative function does not need a foundation. The mobility of the structure will allow you to move it to any part of the garden if desired.
In cases where the stability of a future building is in doubt, four legs made of timber with pointed ends are used as a foundation, which are attached to the bottom of the support platform on one side and stuck into the ground on the other.
If you are planning a substantial construction with a utility room or a children's playground inside, then you cannot do without a foundation. This will prevent the mill from tipping over. In this case, a shallow foundation is made along the perimeter of the future walls.
Support platform
The support platform will give the mill stability. A square of the required size is assembled from timber. For rigidity, you can additionally connect the opposite corners crosswise.
If desired, the area of the support platform can be larger than the base of the mill. This will protect the structure from falling in strong winds and can serve as an additional platform for placing decor, such as a wooden fence.
Case manufacturing
The simplest housing for a mill is a box in the form of a trapezoid. Four bars of equal length are vertically attached to the support platform using self-tapping screws. At the top, the edges are additionally connected horizontally by timber
It is important to maintain symmetry when assembling
The edges of the resulting structure are sheathed with wood. Almost any material can be used. Eurolining, block house or imitation timber looks good.
Roof arrangement and blade assembly
The roof can be either gable or hipped. The second option is best used for large structures, and for small ones a gable roof is ideal.
From the timber we knock together two ends in the form of a triangle. Once upon a time, large flour mills were covered with real roofing tiles made of baked clay. A decorative analogue can be the same material that was used for the base, cutting colored corrugated sheets, or modern antique tiles. A plywood slope is first laid under the roofing material.
The finished roof is placed on the mill body and secured from the inside with long self-tapping screws.
The propeller is assembled in the same way as for a stone mill. A pin is installed in one of the faces of the base, only in the case of stone it was embedded in the masonry, but here it is secured with nuts. Similar to the previous version, the blades are put on the other side of the pin and fixed.
Decorative finishing
A wooden mill has a lot of decorative finishing options. Flowers and greenery look good next to her. As an option, turn the building into a flower garden. To do this, its base must contain a box for soil, where marigolds, phlox, petunia or any other annual garden plants are planted in the spring.
The finished mill must be impregnated with a protective solution and painted, or covered with drying oil or varnish. If you first go over the wood with stain, you can emphasize the structure of the wood. Each additional layer will darken the surface of the mill.
Finishing touches
The mill can be painted
At the final stage, the finished decorative mill is painted with varnish or paint. When the paint layer has dried, you can place the mill in the prepared area of the garden. It should be ensured that there is no direct contact with the ground.
To do this, you can place it on a large flat stone or a prepared concrete platform. You can also attach legs made of durable plastic to the frame of the mill, which are immersed in the ground.
Note!
The inside of the mill is hollow, so air will circulate well, which means that the likelihood of mold and rot will be reduced.
A self-made windmill will look appropriate in any part of the garden. Ideally, there will be a beautiful and trimmed lawn nearby, as well as several perennial plants. The decorative mill looks good at any time of the year: among lush greenery, fallen yellow leaves, and also lightly dusted with snow. But if you want it to serve you for a long time, then it is better to hide it for the winter.
Where is it better to place it and what to combine it with?
Garden mills come in different sizes. An object of this type can be placed slightly back from a high fence, which will create the effect of a fortress. If your garden has a small pond or lake, then the mill structure will perfectly complement this composition. Try not to overload it with large elements.
A mill lined with stone will look great; besides, such structures can be complemented with antique garden wheelbarrows, sophisticated benches, mini-bridges over a pond or tall lanterns. Clay animal figurines can also be used harmoniously to complement the overall composition.
Read how to use amphoras in landscape design.
Artificial nests with chicks, storks on long legs, and herons are perfect. Little gnomes located near the structure or accompanying the stone path to it will be able to transport you into the atmosphere of a fairy-tale forest and will also brighten up this complex.
At the mill itself or nearby, you can place wooden containers in which to plant small flowers of bright colors. This way you can achieve contrast, especially if the structure is dark chocolate color. Shades such as fuchsia, white, yellow are perfect, you can even combine several colors.
Tips before starting work
- Before you begin construction, you need to consider the rules. The first thing you need to do is choose a place. It should be clearly visible and in harmony with the surrounding environment. That is, putting a mill right under the house is not particularly logical, but in the distance, so that you can observe it, that’s what you need.
- Second point: we will make a mill from wood. There will be no problems with the compatibility of this natural material with other elements of landscape design.
Wooden style for decorating the local area
Advice! If you have no idea where exactly to place the mill, you can use a direction such as landscape in the design of the site. It provides for the independent placement of decorative elements on the site, at a certain distance. They may not be connected to each other at all.
A beautiful building in the center of the garden
- The style of the mill on the site perfectly emphasizes the increasingly popular rustic style. The structure can be installed near the gazebo, if it is made in the form of a stylized hut.
- If the design of the site shows an oriental style, then you simply cannot do without a water mill. It can be harmoniously placed near a bench or pagoda. You should not install it in a far corner of the garden, as it will most likely become the central decorative element on the site and should decorate, and not be hidden away.
- You should also choose the placement location very carefully if you plan to have movable blades. This is possible even for a decorative mill, which we plan to create. That is, there is no need to place it too close to trees or any buildings.
Briefly about the main thing
Sitting in the garden, it is nice to watch the mill working. And it doesn’t matter whether it’s an expensive structure purchased at a garden store or a slightly lopsided structure made with your own hands from scrap materials. Such an original element of landscape design is unlikely to leave anyone indifferent, especially if it fits harmoniously into the overall style of the site. Anyone who wants to customize the area around their home can make a wooden mill.
Ratings 0
Internal mechanism
25. Now we need to make a structure for the mill blades.
As you may have noticed, a decorative windmill for a summer house is not an easy project, but it is worth the effort and time spent.
So, you need to make two flat wooden squares with holes inside, as shown in the photo, and drill holes in the right places.
Next, following the photographs, you need to cut them in half.
Now for the two parts you need to make a base from three pieces of boards (you need to drill two holes on the outer ones) and fasten them with glue, placing them in a vice.
And then place it on a solid base.
Note that it should also have 4 holes for screws.
The last step in making the base for the internal structure of the mill is to install a support, cut at an angle so that the structure resembles a slide.
26. Now you can install the tops of the squares with the hole using screws. But don't fasten them too tightly.
27. Next you will need a stainless steel threaded rod, as well as nuts and washers. Follow the instructions to properly mount the cannon structure.
28. You need to make a hole in the hemisphere through which the rod could rotate freely. But to choose the right place for it, take a support panel, attach a wooden ring to it and install a “gun” inside against the wall (to the ring). Having placed the hemisphere at the same height as the height of the support panel and the ring, on the side where the rod is higher, mark the place where the rod and the hemisphere come into contact and make a hole in it.
29. Now you need to glue the ring to the hemisphere, for strength, rewinding the resulting “helmet” with tape for a while.
30. It’s time to install the support panel (using a screw, attach it in the center to the top cover of the frame), the “gun” in the middle and the “helmet”, having previously removed the tape from it when the glue has dried, so that the rod comes out through the prepared for it there is a hole in the hemisphere.
31. Screw the support panel to the ring from below - the holes for this are already prepared.
Greetings to my readers, today we will talk about how to make a decorative mill with your own hands. Many people are looking for a way to decorate their gardens or summer cottages, so I hope this article will help them. We will take a detailed look at making a decorative mill with our own hands using drawings and diagrams.
We will use 50 x 50 mm timber as the main material for the frame. The applicable covering material is imitation timber. After the construction and finishing of various buildings, there is always a surplus of scraps of these materials, so there is no need to throw them away or burn them - we will find a use for them. Well, if you don’t have these materials, purchase them or replace them with existing ones.
After manufacturing, the mill will have the following overall dimensions: base width 1000 mm, height to the ridge 2300 mm, blade diameter 2500 mm, height from the base to the end point of the blade in a vertical position 3000 mm. The blades have a bearing mechanism, due to which they rotate easily in normal winds. If you want to change the dimensions, then read the entire article and see the drawings.
We begin manufacturing the mill with the construction of the base. We cut the timber to these dimensions and file the corners on the diagonals. We assemble it using self-tapping screws; the base must be strong and reliable; if the structure wobbles a little, don’t worry, after covering it will be firmly fixed.
Then we make the frame of the stand according to the drawing: we saw the timber, observing the dimensions and cutting angles, and assemble the stand using self-tapping screws.
After this, we make the frame of the upper part of the rack: we saw the timber and assemble it.
Next, you need to connect all these three frames. Fasten the base and stand with self-tapping screws or furniture bolts. When assembling them, maintain symmetry; place the stand strictly in the middle of the base so that the distance from the stand to the end of the sides of the base on all four sides is equal.
Now let's make the blade rotation mechanism and install it. It consists of two bearings, an axle, two clamps, nuts and washers. We recommend using sealed bearings; we used 303 sealed bearings, internal seat diameter 17 mm, outer race diameter 47 mm. The axis has a corresponding diameter of 17 mm, which is quite enough for the weight of the blades.
Buy or find an even piece of rod, select the bearings and give it to any turner, he will adjust the diameter to the bearings and cut the thread for the selected nuts. The clamps are made independently from galvanized sheet metal, cut and bend the clamp to fit the bearing, make holes for the screws and that’s it, the clamp is ready, so you can make it yourself to fit any bearing number. Make two landing grooves in the wooden base, at least 3 mm deep, they will prevent longitudinal movement of the bearings and fix its position along the axis. We secure the finished mechanism to our frame assembly with self-tapping screws.
Next, we begin covering the frame with imitation timber.
Do not forget that when covering the sides of the base, the imitation on two sides has a size of 1000 mm, and on the other two 1040 mm, since it overlaps their ends.
Start covering the upper horizontal plane from the middle to the edge, the protruding part will be easy to remove, all angles are 45 degrees.
Start covering the rack from the front side; you don’t have to take measurements, but use an imitation that is longer. After completely covering the side, apply a rule or an even piece of imitation to the side surfaces (on the right and left sides) and on the inside, draw out what needs to be cut off and saw off the excess. Then sheathe the back side, then the side surfaces. Carry out the sheathing one at a time, first one completely, etc. Make the connection using self-tapping screws, preferably four per piece, so the connection will be strong and we will avoid the structure from rocking.
Align the top of the rack with the top of the rack and screw it together using self-tapping screws, then sheathe it. If previously we laid the material horizontally, then when facing this frame we lay the material vertically, with a small outlet at the bottom. Under the axis of rotation, drill a hole in the casing with a larger diameter than the diameter of the axis. When cladding the right and left sides, do not forget to make the top cut at an angle of 45 degrees, or lower the imitation lower so that it does not interfere with the roof sheathing. Next we sew the top. That's all, the cladding is finished, and now the outlines of our mill are clearly visible.
Now you need to close the joints using a layout. You can buy it or make it yourself from any material 10 mm thick. The width of the layout for the sides is 50 mm, and for the ridge, wind board and layout on the horizontal plane of the base we use a layout with a width of 80 mm. If you want to highlight it, then after cutting and fitting, before attaching it, you can color it by applying a dark paint coating. Adjusting the layout is a long and tedious process, but it is necessary to hide the unevenness of cutting corners. Then we fasten it, now everything looks more beautiful and smooth.
For decoration, you can make windows and doors, or rather their imitation. In our assembly, you can cut holes for windows and doors, and then attach the elements themselves with a slightly larger diameter than the holes, or you can not cut them out. We didn't cut out the door, but cut out the holes for the windows using a jigsaw to create the complete illusion of windows. For doors and windows, use any material available, but pure wood breaks when making small parts, so use either thin plywood or laminate, these materials are artificial and more durable, and to protect against delamination, cover with waterproof compounds if you are going to cover the entire mill varnish, then paint these parts well. Once fabricated and fitted, glue or nail them.
Next we make the blades. For the guide frame we use 75 x 75 mm timber. We cut it out according to the drawing and fasten it with self-tapping screws. In order for the blades to have a slope, we make landings in the frame with a slope of 10 degrees. We drill the mounting hole for the axle strictly at an angle of 90 degrees to the surface of the frame and strictly in the center; you will find it by drawing diagonals.
We make our own blades. For the guide blades we use a 30 x 75 mm beam, and for the crossbars we use a board 25 mm thick, 12 mm wide, or whatever is convenient for you. You can attach boards of the same size, and then draw diagonals and saw off the excess. Keep in mind: for proper balancing, make all four blades identical, exactly the same, with the same amount and size of material.
We attach four blades to the frame using self-tapping screws or two furniture bolts per blade, this will allow quick disassembly if necessary. We put the blades on the axle and secure them with a washer and nut. To hide the nut, we will make an overlay from a 40-50 mm board. For the nut, use a drill or chisel to make a recess. Let's secure it.
That's all, our mill is ready. You will spend about a week making it, if you don’t rush, but if you are a professional who has been working with wood for a long time and has all the tools for woodworking, then you will spend no more than 1-2 days.
I hope you liked this material and it will be useful to you, a week to make is nothing compared to the beauty that you will create, it only took me a week to write this article. If you don’t understand any nodes, write in the comments, I’ll try to describe them in more detail.
Click on the buttons at the bottom of the article and tell your friends about it on social networks. If you want an accurate step-by-step description of the manufacture of any wood product with drawings, do not hesitate to leave your wishes. That's all, goodbye!
Wind blades
The blades are the main part that makes a mill a mill. There is no need to worry about their design; after all, we are making a decorative mill. But simply knocking down a structure made of boards and hanging it on the building will not be enough. You should consider parameters such as the size and width of the blades, their weight and tilt from the axis. These parameters determine how the blades will take on the wind and spin.
Windmill blades must be calculated
It is especially important to pay attention to size and weight. The following materials can be used to create blades:
The following materials can be used to create blades:
- Wooden slats with plywood - considered lightweight and practical at the same time;
- Wooden beams and dense polyethylene film;
- Thin wooden slats are attached to the axis that rotates the blades.
At the last stage, you need to install the axle and reinforced beams inside the structure, then put on and secure the blades.
Observation deck
19. Now the painstaking work begins. Prepare a base on which you will temporarily attach the "viewing platform" using double-sided tape. You need to cut 30 blocks to form 5 hexagons. Every six bars should be shorter than the previous ones, as they should form a “web”. You will also need to make 6 bars of complex shape with holes, which are attached with glue to each of the 6 corner joints of the “web”. When the glue has dried, carefully remove the still unfinished structure from the temporary base.
20. Now you need to cut out 6 more simple-shaped bars and attach them with screws to the outer sides of the complex-shaped bars.
21. Using glue, attach a “railing” consisting of three boards to these bars on each side.
22. Turning the structure over, install it on the upper part of the base and secure it with screws, connecting the inner sides of the complex-shaped bars to the base.
Popular articles Rules and features of the Dutch style of landscape design
What elements does the structure consist of?
Almost all models of decorative mills consist of the same parts. They may differ from each other in installation technology, for example: objects made of plywood are constructed according to one scheme, and those made of metal or brick - according to another. List of building parts:
- concrete or brick platform;
- lightweight foundation - elevated above the platform;
- building frame;
- roof of different shapes;
- part for rotation;
- balanced blades.
There are not many structural elements, but they all perform different functions. Therefore, it is necessary to know for what purpose this or that part of the mill serves. Description of the design by details:
- Platform. If you place a decorative object on the ground, then after a short time the structure will collapse, since moisture destroys the wood material. The platform should be made of concrete or brick - this is the launching pad on which the object will be built.
- Foundation. This structural element is made of brick. That is, you need to make a small foundation that will protect the structure from dampness. The base is also intended for good stability of the decorative product.
- Skeleton of a mill. This is an equally important part. The frame is mainly made of timber or logs. The roof skeleton must be done correctly, taking into account the location of windows and doors. Then the structure is sheathed with plywood or other material.
- Roof. Often, owners choose rounded hexagonal roofs since the mill is essentially round in shape. However, any roof option is allowed. Soft roofing is used as a roof covering.
- Rotation detail. Typically, such an element is installed from the inside of the roof and consists of bicycle bearings and an axle. The structure is connected to blades, which begin to rotate due to gusts of wind. The rotation mechanism can also be connected to all elements of the mill, and not only the blades, but the entire structure will rotate. But for this, a sail is mounted on the axis. It is also recommended to use bicycle bearings.
- Wings (blades). The structure can be constructed from any available materials, but it is easier to make it from plywood or planks. When installing the wings on the axle, you need to take care of the balancing and symmetry of all four parts.
DIY decorative garden windmill
Hi all! In this article I will try to describe and show you in detail how to make an interesting decorative element for your garden plot. Namely, we will assemble a garden decorative mill, the blades of which will rotate from gusts of wind. This homemade product will fit perfectly into a garden with a large area, since the homemade product itself will be quite large. Absolutely everyone will be able to assemble this homemade product, since it will generally be assembled from cheap and affordable materials and using simple tools. Well, well, I think there’s no need to delay with a long preface, let’s go.
For this garden decorative mill we will need the following, namely:
— Beam 40*40*2500 about 8 pcs — Beam 40*20*1500 — 2 pcs — Lining 13*1500 about 25 pcs — M12 stud — 1 pc — Angles 40*40*2500 about 5 pcs — Bearings for the stud — 2 pcs — Plywood 12-20mm - 1m^2 - Semicircle frame 2 m - 4 pcs - Nails 500g - Self-tapping screws 500g - Nuts M12- 10pcs - Metal washers 2pcs - Impregnation, varnish, etc.
We will also need the following tools:
Hacksaw for metal Hacksaw for wood Construction corner Pencil Tape measure Jigsaw Screwdriver Hammer Plane Spade or core drill
Making a garden decorative mill:
The production itself should begin with a homemade frame; timber with dimensions 40* was used as the material for the frame. 40*2500, we will need approximately 8 pieces of such bars. It is impossible to say the exact quantity, since there may be a defect during cutting or a defect in the timber itself. For the body, we need to cut the following blanks from the selected timber, namely: 4 pieces of 100 cm, 4 pieces of 24 cm, 4 pieces of 44 cm, 5 pieces of 51 cm, 2 pieces of 60 cm, 2 pieces of ~42.5 with a cut at 45 degrees on one side and 2 cuts of 38 cm each. The same with a cut at 45 degrees (see photo).
We begin assembling the frame structure itself; from the blanks cut earlier we need to assemble two identical trapezoids. We will assemble trapezoids from blanks with lengths of 100 cm, 24 cm and 44 cm. We will fasten bars together with a length of at least 100 mm. At this stage, it is necessary to do everything extremely carefully and evenly, since if the frame is crooked, then making the mill itself even will be very, very problematic.
Having collected two “flat” trapezoids, we need to connect them into one volumetric trapezoid. They will be connected to each other using the remaining bars of 24 and 44 cm. This should be done this way: first we place one trapezoid on the floor, place the bars perpendicularly on its ends (short in the upper part and long in the lower part), then carefully place the second one and twist them together with self-tapping screws. As a result, we should get something like the photo below.
We move on to assembling the upper part of the frame, for now we will assemble the base itself without a roof. For this very base of the upper part, we need bars of 60 cm and 51 cm. We place two bars of 60 cm on the floor in parallel, and between them at the edges we place a pair of bars of 51 each. That is, you should get a square with dimensions of 60 * 60 cm. We fasten the bars and then we need to screw on a couple more bars of “spacers”, we screw them parallel with 60 centimeter bars inside the square itself.
Next, we take bars with edges sawn off at 45 degrees. We need to screw them along the edges as shown in the photo below. It is important here that these elements are as identical as possible, otherwise there will be many problems with fitting the roof, and also these crossbars themselves must be flush with the base. We also fasten these two elements together with the remaining block
Then we connect the two parts of the frame together. We connect it so that the roof protrudes at the same distance on all sides. Since this connection will not be subject to a large load, it is recommended to fasten these parts together with a large number of self-tapping screws, approximately 6-8 pieces. The frame is ready, and I would recommend that you impregnate it with some kind of oil impregnation; this is not at all necessary, but thanks to impregnation the service life of the homemade product will be extended.
Let's move on to the sheathing; this is not the most difficult stage of construction, but probably the longest. There is nothing unusual here, we apply a piece of clapboard to the installation site, mark the excess with a pencil, then saw off the excess and use a hammer and nails to nail the section into place. In this way we sheathe the entire trapezoidal part, and do not touch the bottom of the upper part, the roof itself for now.
Now we need to install the rotating shaft for the blades. Our shaft will be mounted on bearings, so we don’t need to fix suitable bearings in the upper part and do it exactly parallel to each other. It was decided to hammer the bearings themselves into a plywood sheet. To do this, we cut out a sheet of plywood with the required dimensions and install it in the upper part using bars (see photo).
We mark the locations for the holes, make sure that the marks are in the right places, and begin drilling. The diameter of the holes should be slightly smaller than the diameter of the bearings you have chosen, this is necessary so that the bearings are tightly driven into their seat and do not dangle in it. This type of hole must be drilled with a feather or core drill.
Next, we remove the plywood blanks, hammer in the bearings and put the blanks back in their places. Now we need to insert a pin into the already installed bearings. In order for the pin to rotate due to the bearings and not fly out of its seat, it is necessary to tighten the nuts on both sides of each bearing. When installing the nuts, it is important not to overtighten them, as the pin may bend and it will not be able to rotate smoothly.
Until we saw off the excess part of the stud and then move on to the sheathing again. Now we need to cover the front and back with clapboard. Here we will have to work a little harder with the front part, since we need to make a through hole for the pin. To do this, install the lining next to the stud and determine the height of the hole. We make a hole in the center of the piece at the found height, then set this workpiece in place, insert a pin through the hole, use a pencil to answer the parts protruding beyond the edges and file them off.
Next, we nail the roof, I recommend doing the following with the roof, namely, immediately cut the required number of pieces of lining, connect them together and nail them in place in one layer. Then we nail the corners where necessary.
Let's move on to making the propeller. For the propeller we will need two bars 40*20*1500. In their center it is necessary to make one through hole with a diameter equal to the diameter of the pin. Then, so that two bars can be connected to each other into one cross, you need to make a couple of grooves as in the photo below.
At this stage we have a ready-made crosspiece, so in order for it to rotate from gusts of wind when we secure the crossbars, we need to set the angle. This is not difficult to do with a circular saw or jigsaw. But I took the difficult route and used a hammer, chisel and plane (see photo).
Having made bevels on the bars on all sides, you need to screw the crossbars to them as in the photo below. I used a semicircular door frame as the cross section itself. I screwed them at a distance of 30 mm from each other, the outermost crossbar was 50 cm and each next one was 5 cm shorter than the previous one.
In principle, you can stay at this stage if you are satisfied with the result. But for decoration, I decided to make a door and a window; comments are unnecessary here, since everything is extremely simple. You can go further and decorate your homemade product as you please.
Everything is ready, in the end we have an interesting garden homemade product that will delight you and your guests.
I will sell this homemade product or make it to order. Message me or leave a comment to discuss details.
Become the author of the site, publish your own articles, descriptions of homemade products and pay for the text. Read more here.
What is a windmill used for today?
Before you decide to choose a place where your self-made windmill will be installed in the future, you should definitely keep in mind that the structure may have different purposes.
Firstly, a DIY windmill made for your dacha can hide some of the least attractive places in your home, like a manhole.
Secondly, most mills, which can be made without any problems with your own efforts, are quite simply made from lightweight materials, which makes it possible to significantly reduce their size.
Thirdly, many owners of country houses decide to turn the drawings of a mill in real life into a playhouse for their children. True, this requires a slightly enlarged design, but nothing is definitely possible.
The main thing you should pay attention to is that it is as stable as possible and with an open entrance.
Of course, if you decide to make a mill for the garden, you can subsequently find a huge number of different uses for it, as a component of modern landscape design.
Frame
Next point. Since the wooden mill will be quite simple in design, it is advisable to lay its frame at the same time. To do this, you need to take into account the scale of the product and install the most massive timber. If there is pine among the prepared stack of logs, it is best to use it. Pine is not so afraid of water.
We proceed to the installation of a frame made of reliable wooden beams. Actually, we have two crowns: the bottom one is the base of the body; and the upper one, lighter and smaller in size - the basis of the roof. The ideal ratio of the scale of the lower and upper crowns is 1:1.5, that is, the lower crown is one and a half times higher than the upper one. These dimensions are needed to create a trapezoid - the classic shape of a medieval windmill.
Both frames must be connected with strong vertical boards that act as racks. The boards must be driven at a certain, clearly formed angle, depending on the length of the racks. They will rest against the lower frame. You can use nails or wood glue to strengthen it. Which is better? Mixtures based on regular PVA, such as Titebond II, work well. But it’s cheaper to stick with Moment-Stolyar glue.
The other end must be aligned with the upper frame. The boards should also be strengthened with poles or thin timber. Thus, the frame of the decorative mill will be made.
How to build a mill?
Initially, you must create for yourself drawings of the future mill for your summer cottage. There are many types of mills, but we will show you how to build a log mill with your own hands.
This mill is inexpensive and easy to make. So, we offer you a plan for building a mill:
You need to take two shovel handles, assemble them side by side and tighten them with bolts. Be sure to ensure that the remaining blanks are slightly longer than the future mill. The marked places for the cups should be at an angle of sixty degrees, because now we are talking about a hexagonal mill.
The combined cuttings should be placed on a sloping wedge. Cut the cups under the frame with an electric saw. After that, turn them over and drill again, but this time from the other edge. The base for the mill is ready. Do this procedure until you have the required number of logs for your mill.
Very carefully you need to cut 6 identical logs in half. You will get one with cups, which will be on top of the base, and the other without, which is necessary for the bottom of the base.
The logs need to be connected together with pins. This can also be done using wood glue. Assemble two boards into a hexagonal base and insert studs into the corners of the next frame. Thread the previously prepared halves of logs without cups onto studs.
Gradually place logs on the studs, creating the correct log house. You can make holes inside for windows or doors.
Attach long and thin blocks to the corners, which are the future walls of the mill.
Next, you need to sheathe the walls of the mill with small slats, also varnishing them.
Drill a hole for the axle at the ends of the roof.
Take three bars and cut them out. They will become the frame of the blades - one in the center and two on the sides. On the middle one, form a rounded pin to seat the blade on the axle. Then nail the pieces of the frame onto the slats and cut them into the desired shape.
Sand the wings of the mill and install them on the axle. Place the finished mill on the required area of the dacha.
Sheathing
Now the important task is to carefully sheathe the frame. In this case, you need to make a small decorative window or door. At this stage, the roof and blades are created. At the first stage of sheathing, plywood is used. On top of it is a pre-polished board.
Advice! The block house looks attractive. This imitation log masonry is installed quite easily. Its decorative effect is very attractive.
Sturdy concrete footrest
Scheme of building a garden mill
At this stage, you can paint and varnish the main body, since once the blades are attached, this will be inconvenient.
Creating parts
To prevent confusion when creating parts in the future, you must initially adhere to a certain sequence of manipulations in your work. As for the algorithm, it is simple and consists of the following sequence.
Cutting materials
The structure that has been planned must consist of a basic element. The base is made up of trapezoids (4 pieces) of equal size. These are two sides, the front of the product and the back. Any element is made from 6 pieces of block house. They are arranged in descending order: from the largest element to the smaller part. Thus, the components below are larger by a couple of centimeters. This action will ultimately result in a trapezoidal shape.
Therefore, in the end you should get 4 parts that have different sizes with an interval of 2 cm from 25 cm to 35 cm. From scraps of material you also need to build the main part of a square shape for the product. So all components are cut at an angle of 90 degrees. Their number is 4 units.
The size of the base should coincide with the shortest length of the completed elements. In this case, this value is 25 cm.
Manufacturing of other parts
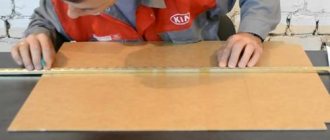
The next stage of working with the mill will be marking the slats. To obtain the bars you need to prepare a tape measure and a pencil.
The result of simple manipulations with parts whose sides are equal to four centimeters will be:
- four parts 35.5 cm each;
- eight elements of 39 cm;
- eight parts of 54 cm.
With pieces of material with sides of three centimeters, measurements are also taken, the result of which will be 8 parts (4 x 10 cm, 4 x 54 cm).
As for the size of the lining to create the roof, its length should be 36 cm. In the end, 10 identical parts are created. To create externally attractive ends, a pattern is used. A triangle with equal sides is drawn on a piece of Whatman paper. The height of the figure is 30 cm, while the base of the triangle should not exceed 39 cm. According to the original diagram, 5 segments of several elements are produced.
At this stage, cutting for the sail is also carried out. Dimensions of the part – 1.5*4.5 cm.
As a result, the following segments in a certain quantity are presented for work:
- one element with a valley of up to 90 cm;
- two pieces of 45.5 cm each;
- four parts 26 cm each;
- twenty pieces of material 19 cm each;
- four components of 8 cm each;
- four links 17 cm each.
A circle is drawn on the material with a compass with a diameter of 17 cm. The part is cut along the contour with a jigsaw.
It is also necessary to take into account that the drawing is made on any large sheet of paper. Unnecessary wallpaper is ideal for work. However, it is most convenient to take measurements on thick Whatman paper or a cardboard base.
Processing of mill parts
After all the elements necessary for the mill have been completed and laid out, they do not immediately begin to assemble the product. The main and important point of the work is preparation and processing. For example, the resulting elements need to be sanded. To do this, take sandpaper. It is important to follow the ends and cut lines of the material for the mill. The absence of nicks on the parts will help prevent injury during work.
To protect such a mill from sudden changes in temperature or exposure to moisture, you can treat all wooden elements with an antiseptic. Modern products in this category easily cope not only with protecting products, but also resist the appearance of fungus on wooden surfaces.
Before using any surface treatment product, you must carefully read the opinions of experts and the recommendations on the product packaging.
Construction of a stone mill
The undeniable advantage of a stone mill is its durability. With minimal care, it will last on the site for decades. The disadvantages include the difficulty of moving and dismantling, so the construction should be taken thoroughly.
Required materials and tools
Construction begins with a project. Having decided on the size and appearance of the future structure, you need to draw a plan. This will allow you to calculate the required amount of materials.
Materials:
- brick or broken fragments for the base;
- cement and sand;
- natural stone or tiles for cladding;
- sheet iron or wooden slats for making blades;
- threaded rod; nails, bolts, nuts, self-tapping screws of different sizes.
Tools:
- mixer and bucket for mixing the solution;
- putty knife;
- Master OK;
- roulette;
- level;
- if the blades are made of wood, then you will need a saw, hacksaw or jigsaw.
Foundation
A stone mill will need a foundation; this is the only way to guarantee that the building will not float along with the soil in the spring or during rain.
The depth of the bookmark depends on the overall dimensions. For a small mill 1-1.5 m high, a hole 40 by 40 cm is dug, approximately 30 cm deep, reinforcement is laid inside and filled with cement-sand mortar. The foundation should dry out within a few days, after which construction can continue.
Construction of a house
The finished house will not be empty inside, so you need to prepare the base. It is most convenient to use a brick or its fragments. It is necessary to fold the masonry into the desired shape. The size and proportions can be any, but it is better to make the mill in the form of a trapezoid or cone. The same cement-sand mortar is used for the bond. The structure must be level, therefore, during construction, a level is used.
During the process of laying the brick, a threaded rod is embedded in the base for further fastening of the blades. A plate is welded onto it in advance or a large nut is screwed onto it, with which it will hook onto the brickwork.
At the same stage, other technical holes are provided in the base of the mill, because when the solution hardens, it will no longer be possible to change the design. Of course, you can try to drill through the masonry, but in this case it is possible that the entire base will split.
The shape of the roof depends on the shape of the house. For a cylindrical base in the form of a tower, a traditional cone-shaped roof, the covering of which is made of facing material, is suitable, and for a rectangle, a regular gable roof.
How to decorate
The mill can be decorated with natural or artificial stone. Tiles made in the form of small bricks look best. A building lined with such material will look like a smaller copy of a real antique mill. The outer layer must be laid using moisture-resistant glue, avoiding voids. The better the work is done, the less moisture will penetrate inside, and the mill will retain its good appearance longer.