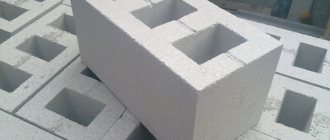
You can make it from what is easier to get. For example, weld metal or use old cement blocks, if the railway is nearby, then you can use old sleepers, etc. Start from this.
It seems to me better to weld metal. Pillars and weaves are dug in in two rows. There are amplifiers between them so that it doesn’t work out. There is sheet iron on top of the corners. Something like this. You can look for metal at scrap metal collection points, where it will be several times cheaper than taking it at the base.
I saw photos of a portable overpass somewhere. You can drive onto it either backwards or forwards. When not needed, it simply goes into the garage. If you don’t do repairs professionally, but only for yourself, then this is it. I'll look for photos now, if I find them I'll post them.
Please take a look, very interesting.
This is a welded structure. You can do something similar, only bolted on. You can take it apart when you don’t need it and it won’t take up much space.
By the way, this would be nice to have in the garage. I'll have to order it from someone.
There is no need to cook anything. Sold ready-made. Costs about 2 thousand rubles. Sorokininstrument seems to do it.
Although you can weld it if you have iron and know a welder. It will probably work out cheaper.
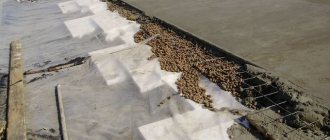
Here is an overpass made in two days by two people. True, it was not far to carry the sleepers. A small mound of earth was successfully used.
Eight drives fine. Afterwards, the sleepers were fastened with staples and nails. Metal pins are driven into the ground to prevent them from spreading, and the pins are tied together with wire. Additionally, some places are sprinkled with gravel to prevent dirt.
Of the minuses: — the ride is quite steep, you need to do it later, if it’s wet, then the wheels are already polished, which, given the lack of side limiters, is fraught with troubles; — you need to put something corrugated on the check-in; — put another sleeper on each side to make it more convenient to get out of the car; — limiters need to be made on the sides and front.
Material costs 0. Only time spent.
Features of the material
It is recommended to familiarize yourself in advance with the characteristic features of such building materials, as well as its advantages and disadvantages. Such information will help you decide whether to build a building from wooden sleepers.
The main advantages that distinguish sleepers from other materials include the following:
- Slow rotting. The building material is treated with special agents that protect the wood from moisture and prevent its premature rotting due to dampness.
- Waterproofing. Garage structures do not need additional waterproofing, since they practically do not allow moisture to pass through.
- Durability. The beams are very reliable and thanks to this, buildings that are built from them can last for several decades.
Thermal insulation. Garages in the construction of which wood was used have good thermal insulation properties. Even with severe frosts, the temperature inside will not drop below 5-10 degrees Celsius.
The only serious drawback that must be taken into account when using sleepers is that at elevated temperatures they emit harmful fumes. To get rid of them, you will have to pre-treat all the beams with protective agents.
It is necessary to raise the garage - the reason is deformation of the foundation
In garage cooperatives, which were formed back in Soviet times, they did not particularly care about the quality and reliability of the foundation. Nowadays, such “islands” of metal garages are often located next to new microdistricts.
And with large construction and deep pits for high-rise buildings, soil deformation is inevitable. Therefore, the problem often arises - how to raise a metal garage if the foundation has sagged or skewed.
Causes of foundation deformation
Reasons for deformation of the strip foundation or subsidence of the soil under the garage:
- uneven weight of metal garage walls. Often homemade welded structures are made from sheets of metal of different thicknesses;
- Along the walls of the garage there are always shelves with tools and other little things necessary for a garage owner. They also add stress to a weak foundation;
- if there is a large-scale construction project nearby, then soil deformation is inevitable, so the foundation “floats” and needs to be strengthened;
- seasonal rainwater or rising groundwater can also cause soil heaving and deformation of the foundation and ground under a metal garage;
- weak soil - clay, loam and sandy loam with sudden temperature changes also pushes out the old foundation strip during seasonal heaving if the foundation is located above the freezing point of the soil.
Calculation of the number of sleepers
Before determining how much material will be needed to build a garage building, you will have to calculate the dimensions of the building. When determining the exact area of a car garage, experienced builders advise taking into account the dimensions of the car that will be parked in it.
Most often, motorists have passenger cars that can fit even in compact buildings. To accommodate one car, the garage must have the following parameters:
- length - not less than six meters;
- width - from three meters;
- height - 2-3 meters.
Some families have two cars, which will require larger buildings to store them. In this case, the dimensions of the room should be as follows:
- length - six meters;
- width - six meters;
- height - two or three meters.
If space is allocated inside for storing spare parts and repair tools, the width of the garage building is increased by 1-2 meters.
Having decided on the dimensions, we begin to calculate the required amount of building materials. For a 6 by 6 garage you will have to prepare at least two hundred and fifty bars. For a 6 by 4 garage you will need a little less materials - 180-200 sleepers.
How to raise a garage
Small lightweight metal garages have become quite popular lately. They are easy to erect and dismantle if necessary. Given the relative ease of construction, foundations are usually not particularly taken care of or are completely abandoned. Today, this is increasingly becoming a cause of concern for garage owners, resulting in problems such as subsidence or skew of the box. In most cases, to eliminate such troubles, you will need to lift the structure.
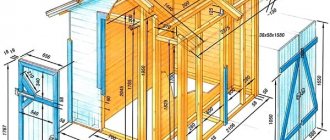
How to build a garage from sleepers with your own hands
To build a wooden garage yourself, you will have to familiarize yourself with the main stages of construction.
Foundation structure
Construction work begins with the construction of a reliable foundation. To do this, a trench 30-35 centimeters deep is dug, and gravel is poured into the bottom. If the soil is too wet, pieces of red brick with expanded clay are added to further strengthen the foundation.
After this, wooden blocks are laid on the bottom, and the distance between them is 2-3 centimeters. Then the foundation is filled with cement mortar.
We prepare sleepers for installation
The next stage of construction is preparing the material for installation. At this stage, fastening bolts are screwed into the bars, with the help of which the building materials will be attached to each other. To install fasteners, small holes are drilled in the sleepers. At the same time, carefully ensure that they coincide with the bolts that are installed in adjacent blocks.
After drilling the holes and installing the bolts, the building materials are treated with bitumen. This is done to improve the waterproofing properties of wood.
Installation of the first row
The installation of the first row is carried out immediately after the preliminary preparation of building materials. When laying, all sleepers are carefully secured with bolts and metal brackets, which will increase the reliability of the connection. They are installed at the corners of the bars and in the middle.
When laying each row, building materials of the same length are used. It is impossible for one of the bars to be much longer or shorter than the rest.
Wall installation
The most important stage in the construction of a garage is the installation of walls. The sleepers are carefully stacked on top of each other and connected with staples. It should be remembered that they must be placed evenly, and therefore during installation you must use a building level.
When creating roofs for garages, a shed roofing scheme is used. In this case, wooden boards are used for covering the floors. The outside of the wood is sheathed with profile sheets or slate for additional protection from rain and snowfall.
Prices (for Izhora garage)*
- Adding crushed stone (fractions of 15-35 mm);
- Lifting a garage onto railway sleepers;
- Making a floor from edged boards (40 mm);
- Filling (making) the entrance to the garage.
- Installation of temporary supports;
- Production of formwork;
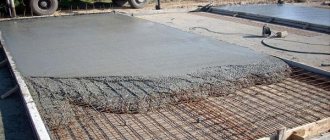
- Construction and pouring of a concrete base (concrete grade M 300).
The price for the work is from 15 to 19 thousand.
* For Levashevsky garages and self-built garages, the price increases by 5-7 thousand rubles based on experience.
What are the advantages and disadvantages of such material
The sleeper garage is always dry and warm. Sleepers, as a building material, have many advantages:
- do not rot and are resistant to high humidity;
- provide good thermal insulation of the garage;
- insect pests and rodents do not grow in sleepers;
- it is a durable and reliable material.
If you use sleepers in construction, it is better to use them for the foundation, and not for the walls of the garage. The reason is harmful fumes that are released when the temperature rises.
Sleepers are treated with creosote - this is a carcinogen that constantly evaporates from the surface of sleepers. Remember the specific smell of the station and railway tracks? This is creosote fumes.
What’s reassuring is that creosote dissipates over time, so old sleepers produce much less fumes.
To eliminate harmful fumes, the garage walls can be additionally coated with a protective finish. For example, a layer of plastic film and sheets of plasterboard or plastering over a painting mesh followed by painting.
It is imperative to treat the sleepers with fire-retardant impregnation - since creosote ignites instantly.
Why is it necessary to raise a garage?
One of the main reasons why there is a need to raise a personal garage is the gradual deformation of the foundation. This happens in cases where:
- During construction, metal sheets of different thicknesses were used;
- on the walls of the garage box there are a lot of shelves for storing tools;
- there is a construction site next to the building (garage cooperative), which can provoke a rise in groundwater, and, accordingly, soil deformation;
- the foundation was laid above the frost line.
However, deformation of the foundation is not the only reason why it becomes necessary to raise the garage. So, it could be:
- the need to replace or insulate a wooden floor;
- difficulty opening doors (gates);
- the need for insulation of the building;
- uneven subsidence;
- obsolescence of load-bearing structures.
If we are talking about lifting, then this is carried out exclusively in relation to the metal structure of the garage. Therefore, it is important to make sure that the building is metal, and not a box originally sheathed with any metal and made of another building material.
How to build a garage from sleepers yourself - step-by-step instructions
A garage made of sleepers is a lightweight structure, so you can install the simplest shallowly buried strip foundation under it (depth 30 - 40 cm, for soft soils - 50 cm, width 3 cm greater than the width of the sleeper).
Stage one - foundation construction
We dig a trench the size of the garage and arrange a sand and gravel cushion, 10 cm thick. On wet soils, you can add expanded clay or broken red brick to the cushion for better waterproofing.
Now we lay out the first row of sleepers in the foundation. An important rule is that the ends should not touch - you need a gap of 2 - 3 mm. We fasten the sleepers with metal staples.
We fill in a standard tape of a shallow foundation, but there is one caveat. You will need to secure fastening bolts (40 mm diameter) in the foundation, cemented directly into the screed in increments of one meter along the entire perimeter, excluding the gate opening.
We install columnar supports, which we also embed into the foundation. We install supports at the corners of the structure, in the garage door frame and in the center of each long side of the structure.
Stage two – prepare the sleepers for installation
The first row of sleepers is attached to the foundation strip with bolts embedded in it. Therefore, it is necessary to drill holes in each sleeper so that they coincide with the pitch of the already installed bolted connections.
The bottom row of sleepers must be treated with bitumen for waterproofing, and rolled roofing felt should be laid in two layers on top of the first row. This will protect the walls from high humidity.
Stage three - installation of the first row
We install the first row of sleepers and, for the reliability of the structure, fasten them with metal staples at the junction of two sleepers and at the corners. It is important to select sleepers of equal length for each row so that the building looks neat.
Important rule. Sleepers need to be laid flat, this will give stability to the structure, although it will increase material consumption.
Stage four - installation of walls
Building a garage from sleepers is not difficult, but it is important to follow certain technology:
- we connect adjacent sleepers in a row into a tenon, but for this we need to cut out the desired shape of the ends, so it is easier to fasten the ends together with metal staples;
- The rows are also fastened together with staples or metal plates, which are fastened with self-tapping screws. The step between staples is 50 cm.
How to raise a garage
The problem of how to raise a metal garage can arise for many reasons:
- the gates have sagged and are difficult to open;
- the groundwater level in the area has risen;
- the wooden flooring needs to be replaced;
- There is a desire to insulate the garage and get rid of dampness.
An insulated cement floor screed also requires lifting the metal box of the garage. If sagging gates can simply be trimmed with a grinder or excess soil removed, other problems are not so easily solved.
DIY garage made of sleepers
21.01.2018 4,
Before building the long-awaited garage, the question arises of what material to use. Nobody wants to spend huge sums of money. This means that a material is needed that will combine practicality and at the same time, low cost. We believe that you can pay attention to such recyclable materials as railway sleepers. Many car owners adopted this idea and did not regret it. Why? More on this below.
Important tips and nuances
When working, it is important to follow safety rules - a metal garage weighs a lot:
- When lifting each wall, be sure to keep an eye on the structure - as soon as the warping begins, you must stop and lift the opposite wall. If there is a strong distortion of the frame, then the entire garage will simply collapse. Take your time, raise each opposite wall in turn by 10 centimeters;
- When lifting the walls, immediately place boards in the resulting gap, not your hands. If the wall falls, injury is inevitable;
- if there are also metal garages nearby, then pay attention to whether the structures are connected to each other. Because when lifted, you can also lift the roof of the adjacent garage;
- Gate leaves can be hung only after the entire structure is rigidly installed on a cement screed or on a reinforced strip foundation.
Be sure to immediately level the entire structure. This is not difficult when all the corners are already installed on the bricks.
Pros and cons of the material
This material has a number of significant advantages:
- The first plus is its durability. This is possible thanks to creosote impregnation. It provides protection against rot, insects and other external factors. Railroad ties may not look the best, but strong ties can last over 50 years.
- The second advantage is easy construction. The material is dimensional and easily connected to each other. The sleepers are light enough, so there is no need to build a large foundation. It is enough for him to use the same sleepers.
- The third advantage is the low cost of the material. When building a large garage, you can save a huge amount of money, which can be spent on finishing a new garage.
But you should understand that there are no ideal materials. Each has its pros and cons, and railroad ties are no exception. The main disadvantage is its impregnation, which ensures its durability. Creosol is a toxic material and has an extremely unpleasant odor. Therefore, lining will be required, and always with a waterproofing material so that vapors do not pass through it. Be sure to plaster and seal joints and cracks.
Foundation made of reinforced concrete sleepers: highlights
Impregnated with creosote, this railway material lasts a long time. Even after serving their purpose on the railway, these products can serve for a long time as piles for the foundation of structures.
New sleepers that have just arrived at the railway cannot really be used for the foundation of a house or greenhouse. Creosote impregnation not only has a strong unpleasant odor, it is very toxic to the human body. And, in addition, the smell of creosote can penetrate through the thickness of the soil. It is quite acceptable to use old sleepers for this purpose.
They are used similarly to pile foundations, using the same technologies.
It is difficult to install reinforced concrete sleepers like piles yourself due to their heavy weight. Without auxiliary equipment, such piles cannot be installed vertically. Additional manpower is needed.
But you can also make a strip foundation from reinforced concrete sleepers. It has higher strength characteristics.
Construction of the foundation
Laying a foundation with railway sleepers is quite simple and does not have any special features. Use the following procedure:
- It is necessary to dig a trench under the foundation. All sleepers are low enough, so the depth of the trench can reach no more than 30 centimeters.
- Cover the bottom of the trench with a cushion to prevent contact with the soil. For this you can use crushed stone, expanded clay and sand. This layer performs another function: leveling the beams.
- Start placing material in the trench. Do not allow the bars to touch. A small gap between the elements is necessary, including for air circulation.
- To strengthen the structure, use metal brackets. To install them, it is better to drill holes at the installation site.
- Ensure high-quality waterproofing of the foundation. They can be lubricated with bitumen and an insulating material, for example, roofing felt or film, can be laid on top.
Foundation
Before you build a garage from sleepers, you need to study some of the features of this material. Its main advantage is its light weight - it is this that makes it possible to save time and money on additional strengthening of the foundation. However, even the lightest garage design requires at least a small foundation, because your car will be stored here.
There is no special wisdom in laying the foundation for a garage from sleepers and the whole process takes place in the traditional way:
- First, we dig a trench around the perimeter of the selected area. Taking into account the weight of the sleepers, it can be quite shallow - only 20-30 centimeters.
- A “cushion” consisting of crushed stone, expanded clay and sand is placed on its bottom. This is done to ensure that the sleepers do not come into contact with the soil. In addition, such layers greatly facilitate the process of leveling the beams in the future.
- Once the trench is ready, you can begin laying out the material. Under no circumstances should individual elements come into contact with each other. Moreover, a small gap needs to be made between them so that air can circulate freely.
- For greater reliability, the beams are secured with metal brackets. Experts recommend drilling holes for brackets at the installation site.
- In order to ensure high-quality waterproofing of the foundation under a garage made of sleepers, they can be lubricated with bitumen, and a layer of insulating material can be laid on top. Its role can be roofing felt or any film insulation.
- Concrete is poured on top and the monolithic base is left to dry completely.
Please note that using worn timbers is not a good idea, as there is no guarantee of the durability of such a structure. But more or less suitable sleepers will serve regularly for several decades.
Building walls
The last stage is to pour the foundation concrete and wait until it dries completely.
The construction of walls is also not much different from the construction of a log house. Before starting installation, it is necessary to prepare columnar supports, which must be embedded in concrete at the previous stage of foundation construction. Step-by-step instructions for installing walls:
- Installation of the first row is carried out using embedded bolts in meter increments. The beams must be laid flat, with wide edges adjacent to each other. This technique threatens to increase the volume of material used, but the benefit will be that this method increases thermal insulation.
- You may come across different sleepers. Try to select uniform ones in a row so that the design comes out as even as possible.
- Connect adjacent blocks “into a tenon”, supplementing the fastening with metal staples.
- Use pins and staples to secure rows of sleepers relative to each other. We remind you that drilling must be done at a distance of half a meter from the ends.
- Strengthen the corners of the structure. To do this, use a metal corner every 3 beams. Rigidity can also be ensured by using steel strips nailed diagonally. The thickness of the element used in this case should be at least 4 mm, and the length about 20-30 millimeters.
- Installing windows requires additional manipulations. It is necessary to install vertical bars in the partition between the window openings. Double-glazed windows will be attached to them.
To install the roof, it is enough to use rafters. This is the most profitable option due to the ease of attachment to the beams. After completing the frame, it is necessary to solve the problem of finishing and insulating the garage.
Walls
As with the construction of any other garage, we will need columnar supports, which are embedded in the concrete at the stage of laying the foundation of the garage from sleepers.
Next comes the installation process:
- The very first row is secured using embedded bolts at one meter intervals. The bars must be laid flat, with wide edges adjacent to each other. This method may slightly increase the consumption of material, but the garage will be warmer thanks to a smooth frame without gaps.
- You may have sleepers of different shapes at your disposal, but for each row of wood you should try to select the same elements so that the structure is as even as possible.
- Adjacent blocks need to be connected “into a tenon” and also fastened using the same staples.
- Between rows of sleepers should also be secured with pins or staples. At the same time, do not forget to make indents of about half a meter from the ends before drilling holes.
- The corners of the structure require additional reinforcement, so a metal corner should be installed every three beams. In addition, additional rigidity can be provided by using steel strips nailed diagonally. It is desirable that these elements have a thickness of within 4 millimeters and a length of about 20-30 millimeters.
- If you are planning to install windows in a garage made of sleepers, you need to pay special attention to their design. Vertical bars are installed in the partition between the window opening, where the double-glazed windows are then attached.
There should be no problems installing a roof on such walls, since the rafters are very easy to attach to the beams and this is an additional advantage of such material.
Upon completion of all work, you need to take care of insulation and high-quality finishing of the structure.
Garage finishing
Don't neglect finishing when building a garage using railroad ties. As mentioned above, impregnation is toxic and can be harmful to your health. In addition, although wood retains heat well, in case of severe frosts it is worth providing at least simple thermal insulation. And the last reason is aesthetic appearance. The material does not have the most attractive appearance both inside and outside. Therefore, to give the building a finished look and ensure the safety of your health, finishing the garage is mandatory.
First of all, to insulate the garage, you need to seal large gaps. For this, ordinary polyurethane foam will do just fine. The sleeper material is wood, and it needs air circulation. Use mineral fibers rather than foam sheets and the problem will be solved.
To finish the roof you will need either tiles or regular slate. Both materials are good enough for a garage; only the size of the budget and the owner’s desire come into play here. Exterior finishing can be done using lining or siding. These are inexpensive materials that will hide the unsightly appearance of the garage. After construction is completed, it will take some time for the structure to shrink. Don't forget and be prepared for this.
will carry out any work on lifting metal garages at a competitive price
Fill out the application form and we will calculate the cost of raising the floor in your garage absolutely free.
Types of work and their prices
We carry out work with full responsibility and provide guarantees
Lifting a garage onto sleepers and making a wooden floor
When performing the “garage lifting” service, we offer the following range of works:
• dismantling old wooden floors;
• lifting the garage using jacks from inside the garage;
• dismantling of old sleepers and garbage removal;
• filling the base with sand and crushed stone;
• installation of new sleepers;
• installation of a new floor from boards 40-50 mm thick.
Lifting the “Izhora” garage onto sleepers, replacing sleepers and adding crushed stone, removing garbage and making a new wooden floor from 40-50 mm planks
Cost: from 60,000 rub.
Raising the “Izhora” garage onto sleepers with replacement of sleepers and adding crushed stone with garbage removal, without laying a new floor
Cost: from 35,000 rub.
Lifting the "Levashovsky" garage onto sleepers with replacement of sleepers and adding crushed stone, with garbage removal, without laying a new floor
Cost: from 40,000 rub.
Lifting the "Levashovsky" garage onto sleepers, replacing sleepers and adding crushed stone, removing garbage and making a new wooden floor from 40-50 mm boards
Cost: from 65,000 rub.
Lifting metal garages
Due to climatic conditions or improper operation of the garage, it subsides below ground level. This leads to problems opening the doors, misalignment of the garage, or in some cases, even destruction of the garage. Raising the garage is also necessary if you want to increase the standard height of the existing garage, for example, when purchasing a new car.
We offer several solution options:
— Lifting the garage onto sleepers with the manufacture of a wooden floor;
— Raising the garage with the production of a concrete base;
— Increasing the gate opening and ceiling height in the garage — “Garage for a Jeep.”
We will perform high-quality lifting of metal garages at an affordable price
Raising a garage with the production of a concrete base
When building a garage, it is possible to install a “concrete base” that will simultaneously serve as both the foundation and the floor for your garage. The “concrete base” service can also be used when lifting an existing metal garage.
Raising the “Izhora” garage with the production of a concrete floor with an entrance, with garbage removal
Cost: 70,000 rub.
Raising the "Levashovsky" garage with the production of a concrete floor with an entrance, with garbage removal
Cost: from 75,000 rub.
Increasing the gate opening and ceiling height in the garage - “Garage for a Jeep”
To increase the standard height of the garage, he offers the following work:
- raising the garage by 2-3 levels of sleepers (option 1 - for a metal garage) or increasing the height of the garage using brickwork or using timber around the perimeter of the walls (option 2 - for a brick or concrete garage). In the second option, if the existing roof is wooden, then it is dismantled and a new roof structure is made at an increased height.
— installation of new, larger gates or increasing the height of existing ones.
Cost of making new metal gates
Cost: from 32,000 rub.
The cost of lifting the garage, increasing the gate opening and making the floor is
Cost: from 65,000 rub.
Cost of enlarging an old gate
Cost: from 9,000 rub.
The cost of making a new roof from wooden beams and sheathing from edged boards
Cost: from 50,000 rub.
More detailed information can be obtained by calling:
Fill out the application form and our manager will call you back within 15 minutes.
Budget option for a garage made of sleepers
Have you long dreamed of building your own car storage space, but are you afraid that it will cost a pretty penny? So an inexpensive and practical garage made from recycled materials is the option you need. There is no point in puzzling over what to use as a basis, because many have long adopted such a simple and at the same time brilliant idea as a garage made of sleepers. All that remains is to find a sufficient amount of material and you can start working.
Before you build a garage from sleepers, you need to study some of the features of this material. Its main advantage is its light weight - it is this that makes it possible to save time and money on additional strengthening of the foundation. However, even the lightest garage design requires at least a small foundation, because your car will be stored here.
There is no special wisdom in laying the foundation for a garage from sleepers and the whole process takes place in the traditional way:
- First, we dig a trench around the perimeter of the selected area. Taking into account the weight of the sleepers, it can be quite shallow - only 20-30 centimeters.
- A “cushion” consisting of crushed stone, expanded clay and sand is placed on its bottom. This is done to ensure that the sleepers do not come into contact with the soil. In addition, such layers greatly facilitate the process of leveling the beams in the future.
- Once the trench is ready, you can begin laying out the material. Under no circumstances should individual elements come into contact with each other. Moreover, a small gap needs to be made between them so that air can circulate freely.
- For greater reliability, the beams are secured with metal brackets. Experts recommend drilling holes for brackets at the installation site.
- In order to ensure high-quality waterproofing of the foundation under a garage made of sleepers, they can be lubricated with bitumen, and a layer of insulating material can be laid on top. Its role can be roofing felt or any film insulation.
- Concrete is poured on top and the monolithic base is left to dry completely.
Please note that using worn timbers is not a good idea, as there is no guarantee of the durability of such a structure. But more or less suitable sleepers will serve regularly for several decades.
As with the construction of any other garage, we will need columnar supports, which are embedded in the concrete at the stage of laying the foundation of the garage from sleepers.
Next comes the installation process:
- The very first row is secured using embedded bolts at one meter intervals. The bars must be laid flat, with wide edges adjacent to each other. This method may slightly increase the consumption of material, but the garage will be warmer thanks to a smooth frame without gaps.
- You may have sleepers of different shapes at your disposal, but for each row of wood you should try to select the same elements so that the structure is as even as possible.
- Adjacent blocks need to be connected “into a tenon” and also fastened using the same staples.
- Between rows of sleepers should also be secured with pins or staples. At the same time, do not forget to make indents of about half a meter from the ends before drilling holes.
- The corners of the structure require additional reinforcement, so a metal corner should be installed every three beams. In addition, additional rigidity can be provided by using steel strips nailed diagonally. It is desirable that these elements have a thickness of within 4 millimeters and a length of about 20-30 millimeters.
- If you are planning to install windows in a garage made of sleepers, you need to pay special attention to their design. Vertical bars are installed in the partition between the window opening, where the double-glazed windows are then attached.
There should be no problems installing a roof on such walls, since the rafters are very easy to attach to the beams and this is an additional advantage of such material.
Upon completion of all work, you need to take care of insulation and high-quality finishing of the structure.
For those who doubt the need for finishing, there are three good reasons to include the cost of finishing in the budget for building a garage made of sleepers:
- A reused wooden frame does not look the most pleasant, both outside and inside. That is why it is better to give the structure an aesthetic and finished look with the help of an additional layer of material.
- Wood itself is a good heat saver, but in case of severe cold weather, it is best to insulate the walls with at least the simplest insulation.
- To increase the service life of sleepers, they are impregnated with a special substance - creosote. It not only has a specific smell, but is also quite toxic, which makes staying in such a garage not the safest.
In order to properly insulate a house, you first need to seal the largest gaps. Here you can use ordinary construction foam. It is very important for such a natural material as wood to “breathe”, which means that for cladding it is advisable to use mineral fibers rather than foam sheets, which will ensure normal air circulation.
I recommend finishing the outside of the building with siding or clapboard - with the overall inexpensive cost of this material, you can give your garage a decent appearance for many years.
The roof structure can be sheathed with tiles or covered with the most ordinary slate - it also protects well from external factors.
Afterwards, windows and gates are installed, and the interior space is filled with shelves and racks. When the building is ready, it will need some time to shrink; this should be remembered during operation of the garage.
Thus, we can conclude that a garage made of sleepers is a practical and budget-friendly solution to the problem of storing a car. The most important thing is to stock up on quality materials and carefully follow the instructions at all stages of work.
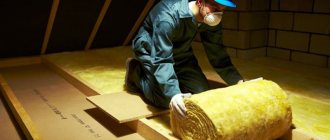
insulation of garage walls
I will now say one seditious thing. Yes, it is more common to insulate from the outside because of the notorious dew point.
But in the case of a garage, it is far from certain that it is necessary to insulate the outside, if it is a garage and not a box for daily work in it.
Let's start with the fact that the garage for equipment must be cold (according to the standards for motor transport enterprises, temperatures up to +5 degrees are allowed). In practice, it is better to have a minus in it in winter. Otherwise the car will rot. In the West, this is worse than here because of the salt, but here, too, constant changes from plus to minus have a very bad effect on the car.
So, if the garage is cold, then you don’t really care about the dew point. The wall will still be frozen through. And if you sometimes heat the garage to carry out some repair work, then the wall that is insulated from the outside will thaw from the inside, then freeze again, very wet. These regular cycles will break down the wall.
And if the wall is insulated from the inside and the room is occasionally heated, then it will be much easier to warm up the room and the wall itself will not suffer.
Even if the room will not be heated at all, insulation from the inside is still preferable. If the machine is used every day, then by running it in the evening you will heat the room with the machine. She has such a hot fool under the hood, which actually has quite a reserve of heat. In my case, a car with a 4-liter engine raises the temperature in the garage by 2 degrees per hour.
And insulation from the inside will prevent the rapid escape of this heat through frozen walls, whose thermal conductivity has increased sharply due to freezing.
In general, in your case, I would insulate from the inside with a MANDATORY and very good vapor barrier.
For example, polystyrene foam lined with moisture-resistant GVL. Then we paint the plaster in two colors (white top/dark bottom) or all white if no work is being done in it. If everything is painted white, the garage will be bright. Don’t forget to run the wiring right under the plaster.
Although yes, as YASHA noted, you end up with an explosive mixture of polystyrene foam and sleepers. You need to be careful with fire and wiring.
In principle, extruded polystyrene has a better flammability class. And maybe you can even get by with it without lathing. But it will not be covered with plaster.
You can also try using mini-slabs under plaster.
It is important to insulate not only the walls, but also the ceiling. More heat escapes through it than through the walls with equal insulation.
Now, why is it necessary to have a vapor barrier? Firstly, with a vapor barrier, your wall will simply be drier and will freeze less, which means it will lose its heat insulating properties. And secondly, you have walls made of sleepers impregnated with CURVE. You cannot breathe this muck; you need to protect yourself from the smell penetrating into the room.
Because it is very harmful to humans. In practice, many who built dachas from sleepers ended their days with cancer.
Ventilation also needs to be done in the garage. Especially considering that we made the walls vapor-tight. Ventilation is usually done naturally. On the leeward side, an inlet is made in the lower part, and on the opposite side, a ventilation pipe is installed in the wall, which must be raised above the roof of the garage. The pipe will provide the height difference necessary for traction to occur.
Don’t forget to cover the inlet with a metal grill so that it is not so easy for mice to get into the garage. But at the same time, it should be possible to plug this entrance with rags for the winter (as well as the exhaust pipe).
Added after 5 minutes 38 seconds:
Yes, I forgot. If you drill a round hole in the wall (usually 100mm), then you should insert a 100mm plastic pipe into it, they are sold in sewerage departments. This will protect the wall pie both from moisture and from the same mice, which without it can easily climb into the layer between the plaster and the wall and make excellent nests in the foam.
Safety precautions and other tips
- If there are nearby neighboring garages, make sure that yours is not connected to them. Otherwise, you risk raising your neighbor's roof.
- Work together with a partner . Firstly, extra hands won’t hurt, and secondly, insurance. It is important to ensure that no one is inside the garage during work. If, as a result of incorrect actions, a significant distortion occurs and the structure collapses, you will avoid unnecessary injuries or even casualties.
- The appearance of suspicious sounds may indicate a danger of collapse. In this case, stop work and move to a safe distance.
- Do not stick your hands into the resulting space under the walls. Give this role to boards. Once all the corners are on the bricks, level the structure using a level.
- During the lifting process, make sure that there is no strong distortion that could cause the collapse of the entire structure. Lift by no more than 10–15 cm. As soon as you notice the distortion, proceed to lifting the next wall.
- If there is a poured blind area around the structure, it will have to be removed to gain access to the perimeter of the garage.
- If the cause of the skew is uneven subsidence, it is possible to get by with lifting only the skewed part, and not the entire structure. This can happen due to partial destruction of the foundation or base of the garage.
- Before carrying out work, check the reliability of the load-bearing elements. If their strength is in doubt, it is better to refuse to carry out the work yourself. Otherwise, complete destruction of the frame and collapse of the entire structure may occur.
- If the garage is very rusty and you want to raise it, strengthen the frame with corners or channels, and weld the rusty areas. In this case, work should be carried out especially carefully, paying attention to distortions.
If you have the slightest doubt about your own abilities, it makes sense to turn to professionals. It's better to pay than to collapse the entire metal garage structure.