An artificial pond in a dacha is an exquisite decorative touch and a place of attraction. This is where the owners will most often relax, children will play, and guests will certainly envy the skill of the craftsman who created the miracle. And building a pond at your dacha with your own hands is one of the easiest things to do. The main thing is to choose the right shape, material and type of structure. Let's consider all options from a decorative pond made of tires to a massive concrete structure.
Choosing a place for a pond in the country
Before making a decorative pond at the dacha with your own hands, carefully evaluate all the nuances:
The popular bookmaker has launched a mobile application for Android, you can follow the link absolutely free and without registration.
- Land area. The shape and size of the structure depends on it.
- Relief. On complex soils with numerous differences and high groundwater levels, work will take more time.
- Length of daylight. Too intense sun will quickly evaporate the water. When introducing fish into a pond, the regime is monitored especially carefully. Place the pond in a shaded area, but not in complete shade, so that a swamp does not form.
- Free access. The decorative structure is placed taking into account visibility from all sides.
- Trees and bushes. Falling leaves can clog the pond, and the roots can suck out all the water and damage the waterproofing layer.
Advice! If you plan to install lighting in a pond, a fountain, the structure is located close to the power supply or a separate cable is pulled.
Small pond for terrace decoration
Shallow ponds around the perimeter will decorate a recreation area or paved terrace. It will be enough to build walls 25-30 cm high and lay out the film, and the floor covering will serve as the foundation. The only drawback is the rapid freezing of the pond in cold weather and, conversely, stagnation of water in hot weather.
If desired, you can easily turn a shallow pond into a flowerbed - this way the appearance of the terrace will be transformed in a matter of hours. Build the walls of the pond (or decorate them on the outside) with the same material as the surface of the site, and the raised pond will harmoniously fit into the appearance of the recreation area.
Choosing the style and size of an artificial pond
When starting the construction of a pond, its style, size and decor options are determined.
There are two types of artificial structures:
- Regular. Designs with clear outlines, regular or figured geometry. Suitable for classic areas made in a minimalist style or decor with modern elements.
- Landscape. More free-form “natural” structures. A variety of options allows you to choose any format and geometry. They take into account their own capabilities - the more bends, the more difficult it is to build the structure.
Determining the size depends on many nuances:
- According to accepted standards, the dimensions of the reservoir should be within 3-10% of the total area of the site. But here everything depends on the capabilities of the owner. A small pond is no easier to maintain than a large bowl.
- Depth. Depends on the purpose of creation. Deep plants, fish - these organisms require a depth of 1.1 m.
- Number of plants. To prevent the decor from turning into a swamp, no more than half the area is planted in it.
Important! When constructing a pond with winter storage of plants and living organisms, the depth is set below the freezing point of the soil.
Where to start constructing a pond
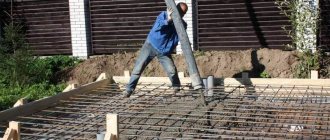
Before starting work on constructing a pond, clear the area of grass and debris, mark the contour and dig a bed 15 cm deep for the foundation.
Place reinforcement on top of a 8-10 cm layer of crushed stone and fill it with an even 5-6 cm layer of concrete.
At the joints of the foundation and the brick (concrete) wall, drive metal pins into the still damp concrete at a distance of 15-20 cm so that they protrude by 8-12 cm.
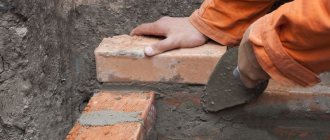
They will ensure the strength of the “half-wall” connection, becoming the wall’s reinforcement. Build walls around the perimeter of the pond, keeping track of the rows using a level.
Place the film covering in place so that it extends evenly beyond the edges. Along the top of the wall, temporarily press down the film with stones. Fill the pond with water by gradually moving the stones.
When the pond is full and the film has straightened, cut off the excess, leaving a small margin.
It will then be covered with stones or a side.
Manufacturing materials
The choice of consumables directly depends on the size, shape and purpose of the structure.
For production use:
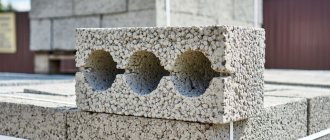
- Concrete. The most difficult to construct, but extremely durable and practical option. Concrete ponds last a very long time.
- Plastic. The breadth of choice is enormous - from ready-made multi-tiered containers to an ordinary basin or bucket. Fiberglass molds are suitable.
- Old bath. The drain and overflow holes are plugged; the finished cast iron container will last at least 50 years.
- Polymer or butyl rubber film. The first option is the most affordable, the second is extremely durable. Butyl rubber fabric can withstand numerous frosts.
- Rubber tire. A small pond of tires is all you need for a 6-acre dacha; an old wheel is just the right size and practicality.
Advice! Buckets, plastic canisters and other items are used as containers. If there is a pump, install a constant water supply/drainage system or make a mini-fountain.
Raised bodies of water
Pros:
- no need for a foundation pit
- easier to care for
- safe for children
- possible to build on a slope
When constructing such a reservoir, there is no need to remove a lot of soil. And since the walls can be of different heights, raised ponds are ideal for sloping areas. You can build a pond on a slope with only one retaining wall. Usually the height above ground level does not exceed 60 cm. Such a pond can be built from ordinary brick, concrete, or wood. The thickness of the walls depends on the material of the walls, as well as on the planned volume of water. You can even sit on well-reinforced, stable walls later.
How to make a pond at your dacha with your own hands: step-by-step instructions
Step-by-step instructions on how to make a simple artificial pond at your dacha with your own hands from film:
- Choose the shade of PVC film. Black creates a mirror effect, light highlights the color of plants and fish, and brown looks like natural soil.
- Determine the type of film and thickness. For ponds more than 1.5 m deep, buy butyl rubber rolls as they are more durable. The thickness of PVC products is from 0.5 mm. Resistance to mechanical damage, UV rays, and temperature fluctuations is taken into account.
- Determine the dimensions of the film. The dimensions are calculated as follows: the width of the reservoir + double the depth, add a margin of up to 0.6 m. The final quantity is not final, take the film taking into account possible errors and kinks. The adhesive composition is purchased specially for films, for example, Titanit or Quick Seam 3 adhesive tape.
- Draw a diagram. First, the plan is drawn on paper, then drawn on the ground. The diagram is transferred to full size with curves, “shelves” for plants, and recess areas.
Making a paper boat with your own hands: diagrams and step-by-step instructions
Advice! The diagram is assessed from different sides so that the shape of the pond and the plants proposed for planting can be seen. They make adjustments and then begin excavation work.
- Remove the top layer of turf and dig a pit, starting from the edge. Dig to the center, make indentations in accordance with the diagram. To construct a decorative border, create a protrusion to a depth of 0.7 m. Remove roots, stones, all sharp and other objects that can pierce or deform the film.
- Lay a sand base. They are compacted and covered with geotextile or PVC film (it is stronger). The sheet is laid out without tension. During the process of filling with water, the film should not stretch or deform greatly.
- Strengthen the banks. The slope depends on the type of soil - on sandy soils the slope away from the center of the pond is up to 55 degrees, and for clay soils vertical banks are made. For strengthening, use a polymer geogrid, geomats, or chain-link mesh. They fix them on pegs or wrap the ends onto the surface of the ground, then decorate them.
On a note! PVC film is being replaced with old banners. This is a dense material suitable for laying out the base of a pond. They build a pond in the heat, since cellophane straightens out better.
Concrete pond
This is one of the most expensive pond options. To make a small structure you need:
- 10 bags of cement;
- 30 bags of fine and coarse sand;
- 5 packages of hydrophobic additive to give water-repellent properties to concrete;
- reinforcing mesh;
- waterproof plaster;
- acrylic paint.
They dig a hole, make a cushion of stone and sand, formwork from timber, and pour the first layer of concrete mixture. The reinforcing mesh is pressed into the wet concrete, all surfaces are plastered, and allowed to dry. After drying, cover the pond with acrylic paint. The final finishing is carried out after testing the reservoir - if after filling with water there are no leaks, the area is improved, fish are allowed into the water, and plants are planted.
Tire Pond
A mini pond in the country from an old wheel is the fastest and easiest option. Take a large tire from BELAZ or one that you can find. Choose an installation location, do this:
- Cut off the side part along the selected border. The edges of the rubber are sanded with sandpaper.
- Dig a hole with a depth of half the height of the tire. They are buried at the request of the owner. Sometimes the wheel is completely buried in the ground.
- A tire is lowered into the hole, soil or sand is added to the sides, to the bottom and compacted.
- Cover the internal planes of the frame with a thick film, folded in half. Pour water. The film is not particularly straightened, the water itself will fill the entire space, the cellophane will lie tightly in shape.
The ends of the film are tucked around the walls. The finished tire pond is decorated.
Pond from a finished plastic container
Fiberglass or PVC molds come in any size and design features. The choice depends on the wishes and capabilities of the owner. The construction is done in 4 stages:
- digging a pit;
- set the form;
- fill all voids with sand or soil;
- plants are planted.
After this, the pond is filled with water and put into operation.
Pond from an old bathtub
An old cast iron or plastic container is ideal for constructing a pond. First, they dig a hole to fit the size of the bathtub, then make a pond from the bathtub:
- Plug both holes in the bowl. Sand is poured into the bottom of the hole and compacted. More sand is poured for acrylic bowls so as not to deform the walls of the structure.
- Lower the bathtub into the hole, paint the inside with waterproof paint, and pour in water.
On a note! The depth of the ditch is at the owner's discretion. Some leave the edges of the bathtub up to 20 cm above the ground and decorate it with stones and plants.
Pond in film soil
Work algorithm:
Step-by-step instructions for making paving slabs with your own hands
- mark the form;
- dig a hole of the required depth;
- clean the bottom from sharp stones and roots;
- level the banks;
- line the mold with film;
- press the edges of the film over the banks with stones;
- Fill in water and test the pond.
Decorate the pond in any chosen way. Knowing how to dig a hole for an artificial pond, cover it with any available material - old banners are ideal as a substrate.
Advice! On loose soils, the construction of a film pond is complicated by strengthening the banks. In this case, choose ready-made containers or line the walls with bricks and fill them with concrete.
Tips for work
It is possible to organize small ponds for different purposes, similar to the fish pool described here, 2 m long, 1-2 m wide and 600 mm deep. It requires approximately 1 cubic meter of concrete, is small enough to fit in a small garden, and shallow enough to provide natural aeration for the 1600 liters of water present in it. You can mix and lay concrete on your own in one day, but it will be very easy to work with an assistant. Prepare the concrete mixture according to the recipe for concrete for paths. If you wish to choose ready-made concrete, order an air mixture of concrete. During specific work steps, you will use some methods and tools that differ from those used in constructing concrete paths and driveways. For example, a simple rectangular or square tamper has excessively sharp corners for the rounded contours of the pool, but a car tire is perfect for tamping. Cover the edges of the pit with film so that the soil does not mix with the concrete.
Designing a decorative pond at the dacha
Knowing how to build a pond at the dacha with your own hands, they think through decoration options. The most common methods:
- Plants at the bottom of a pond. Special varieties of greenery are selected, planted in containers and placed on the steps.
- A large stone is placed in the center. There is a pot with a plant on it.
- Green spaces are located on the shore. Take potted endemic or moisture-loving flowers.
- Lay out the decor from painted stones.
- They release fish into the pond.
On a note! You need to pay attention to the terrain of the area. Irregularities and drops make it possible to build a waterfall or an artificial slide. Artificial reservoirs are raised above the ground, creating a leveling foundation. Water is released abroad by cascading overflow.
Fish in the pond
Types of fish for the pond:
- Gold fish. They are unpretentious to food, easy to care for, and do not cause any trouble. For the winter, the fish are moved to aquariums and kept in a pond from spring to autumn.
- Cold water trout. Attractive views - river and rainbow. Food: feed mixtures, small waterfowl insects. Individuals are undemanding in care, but they need a water purification system.
- Japanese koi carp. A beautiful species of fish that lives quite a long time. Aggressive individuals quickly gain weight and prefer spacious, deep reservoirs. Koi get used to humans quickly, the food is ready-made (sold in the store).
Important! The number of fish in the pond is calculated carefully. One medium-sized decorative specimen requires at least 50 liters. No more than 15 crucian carp are placed in 1 cube of water.
Pond Plants
There are several types of plants suitable for keeping in water.
Advice! In order not to install expensive filtering equipment in the reservoir, Elodea, hornwort, and swampweed are planted.
How to improve a pond at your dacha:
- In a deep place, plant water lilies, water lilies, floating pondweed, and egg pods. They are placed in special pots with a large number of holes.
- In shallow water, pots with common arrowhead, broadleaf, trefoil, and marsh calamus are placed.
Important! Shallow and deep-water plants should be no more than 30% of the area of the reservoir. Otherwise, the sheets will cover the entire surface and turn the pond into a swamp.
For coastal moist soil, take Chinese astilbe and water hyacinth. Plants are planted directly into the ground or placed in pots.
It's time to fill the pool with water
Filling the reservoir can begin 10-14 days after concreting, when the solution has completely dried. The first temporary filling is used to rinse the bowl. It should be flooded to the brim and left for 2-3 days, after which everything must be drained. Now we fill it with sand at the bottom and on the terraces. We pour soil for vegetation and plant aquatic flowers. Only after this the final filling with water occurs.
Stocking with fish can be carried out after 2-3 days. It is recommended to drain the water once a year, preferably in the fall, to catch fish, carry out repair work or clean the pool. In addition, dry concrete will withstand the winter more easily. It is better to move the fish for wintering to a special device if you do not have conditions for a free supply of oxygen into the water.
Other design options
Depending on the capabilities of the owners, various pond design options are used:
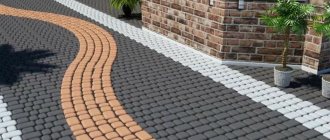
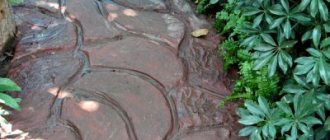
- lay out paths with stone, brick, gravel or natural stones;
- they build gazebos on the shore of a large artificial reservoir;
- building a bridge across a winding pond;
- illuminate the pond at the dacha with your own hands using multi-colored lanterns;
- form a fountain, waterfalls;
- They put up stone and wooden fences.
Concrete pond location
Channel design diagram.
Contemplation of a pond has a great effect on your mood, and since the living creatures living near reservoirs destroy pests, it is best to dig a pond closer to the garden, if there is one. It will be easier to construct a pond if it is dug on a flat area. The general slope of the land around the reservoir is also of great importance, because during rainstorms water can overflow over the edges and will need to be drained. Oddly enough, a pond should not be built in low-lying areas where water collects. Surface flows will flow into the artificial reservoir and clog it. In addition, natural groundwater pressure can knock out the bottom lining.
Tips for caring for a decorative pond
To maintain the cleanliness and beauty of the reservoir, certain work is performed:
- Clean the walls from algae. During leaf fall, stretch the net or use a net.
- Add water with a hose or bucket.
- Planted plants are brought into the house during the cold season or protected with covering material.
- Monitor aeration. Cattails are planted as natural fillers.
- Covers plants and the surface of water in extreme heat.
- Check the fish regularly. The sick are treated and disposed of.
- In winter, the water is poured out, the walls are cleaned and the pond is covered from snow.
Advice! The most convenient time to clean a concrete pond is in winter. They break up the ice along with the silt and take it away.
Excavation
The excavation was carried out using an excavator, since the volume of excavated land was about 450 cubic meters of earth.
As a result of the excavation, a foundation pit has a given shape with the required heights, and work can begin.
Landscape ideas for a pond at the dacha with your own hands
For decoration, choose various landscape ideas for a pond at the dacha with your own hands. Landscape designs look especially beautiful with cascading waterfalls or fountains. To make an overflow waterfall, the main bowl is installed at the top point of the alpine slide, and a constant supply of water (circulation) is organized using pumping equipment.
Fountains are constructed in various ways, for example, with a low-power pump or using natural water circulation. To build a device of the second type, you need a bottle, a reservoir of water, and two tubes of different diameters. The “Gerona” type design works without electricity and does not require adding water.
Studying the land on the site
Before starting work, decide on the specific purpose for which the pool will be built.
- whether it will be a piece of decoration or you will begin to use its functionality to its full potential;
- how deep will the reservoir be;
- arrangement of the aggregate.
In addition, before construction, you need to study the land to see if it is suitable for the implementation of your plans, and also if, after completing the examination, you become confident that it is possible to build a structure on it, you still need to strengthen the soil. Thus, you will protect the area from erosion due to atmospheric factors. For this, geogrids and geotextiles are used, thanks to them there is a clear filtration of groundwater from sediment.
9.4. How to build the foundation of a house on a slope
Build a pool in 3 minutes
Interesting notes:
- Growing bush pumpkin
- Improving the quality of the soil through vermicompost
- Planting calendula and taking care of it
- Decorating a summer cottage with a rose garden
Relevant articles selected according to important queries:
- Construction of a swimming pool on a summer cottage
Everyone wants to have their own personal pool at their dacha, but not everyone knows what it should be like and how best to build it. Basically the pools...
- Inflatable pools for summer cottages
Once upon a time, having a swimming pool in a country house was available only to a select few. Currently, the development of pools has come a long way. Now actually...
- We build a fence at the dacha with our own hands
A fence on a site is a necessary element of its arrangement. With its help, it is possible to reduce the territory, hide it from the eyes of passers-by and protect it from...
- Arrangement of a summer house - swimming pools and swings
For a couple of decades, the dacha was perceived as not the most pleasant place. It was associated with constant care and hard work for plantings with...
- Swimming pool for a summer residence
In spring and summer, most of the municipal residents go to their own summer cottages in order to make good use of their time or. For some, a favorite...
- What type of pool will you have: self-leveling, inflatable or frame?
Water is the main source of delight and joy for kids on hot days. And until the little one gets stronger and grows up, the best place for water treatments is an inflatable...
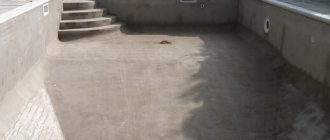
Pit preparation
First, geotextiles were laid on the surface of the pit; its function was to make it easier to spread the next layers and reduce sand shedding.
The next layer was a PVC membrane. Its task is waterproofing, to prevent any possibility of water leaking out of the pond. The PVC membrane for the pond was a single sheet, without joints or breaks, this was necessary for tightness.
Next, geotextiles were laid on the PVC membrane; it was needed to preserve the integrity of the PVC membrane, so that it would not be damaged or accidentally pierced by reinforcement or during the pouring process.
The reinforcing frame is designed with a classic step and section. Reinforcement of 12 diameters was used and the cage had a size of 20x20 cm. The reinforcement was laid on special plastic stands.
Since the pond was located on a slope, the water mirror in the future would unevenly approach its shores. In order to level out this difference, it was decided to fill up one of the edges of the pond, removing a little soil from the other edge.
Pump installation
A submersible pump is installed at the bottom of the pond, from which pipes are pulled to the source and connected to a filter for water purification. The pump is needed to create circulation of water, which is pumped into the filter and returned back after purification.
Installing a pump in a pond means that in general it is ready for use and all that remains is to decorate it and design it to your liking.
Pumps are divided into two types: submersible and centrifugal. The submersible is located at the bottom of the reservoir, and the centrifugal is located outside, below the water level.
Overfill protection system
As mentioned earlier, the pond is equipped with an overflow protection system; a pipe leading to a dissipation well is installed at a high point of the water surface. The dissipation well consists of several concrete rings.
The top of the well cover was also decorated with cobblestones.
Arrangement of the area around the pond
After the bowl was formed, concrete and stones were laid in the same way on the paths around the pond. We made a retaining wall, steps to the pond and a platform near the pond. All these elements were finished with the same stones as the pond itself.