Making a foundation for a garage without the help of specialists is within the capabilities of every owner of a personal vehicle. The main thing is to carefully calculate all the parameters of the future foundation and carry out the necessary preliminary preparations during construction work. In particular, creating a foundation for a garage requires the preparation of design documentation that allows for the calculation of expected loads and takes into account the characteristics of the soil on the site.
Depending on whether we are talking about a mobile metal version of the structure or its brick, block and monolithic analogues, the parameters according to which the base will be made will also change. Foundations for garages are mostly made using strip construction technology - using expanded clay concrete blocks, or in the form of a monolithic concrete structure poured in removable or permanent formwork.
Types of foundation for a metal garage
The abundance of building materials allows you to build various types of foundations. When choosing what to install a garage structure on, it is recommended to pay attention to the following types:
- Tape. The most affordable option with enough reliability to withstand heavy structures, cars and garage interiors.
- Columnar. This type is suitable for installation in places where groundwater is located close to the ground. The pile structure provides reliable protection against corrosion.
- Monolithic. The base in the form of a solid slab is used for unweighted structures. The disadvantage of a monolithic foundation is the inability to equip a cellar or inspection hole.
Laying depth
The following main factors influencing depth :
- material for garage construction;
- soil type;
- type of foundation.
In most cases, a strip foundation for a one-story garage needs to be buried 20-40 cm . However, if it is brick and/or has a second floor, as well as when building on soils with a high clay content, then it should be buried below the freezing point of the soil.
In most regions, this point is located at a depth of 60-80 cm. The trench under the tape should also be of the appropriate depth.
Pile or columnar foundations are deepened until incompressible soil layers are reached.
The determining factor here is the composition of the soil.
40-60 cm may be sufficient , on weak-bearing soils - from 1 m or more.
Pile-screw supports are screwed in as long as this is possible or as long as the length of the pile is sufficient.
There is a possibility that it will not be possible to screw all the piles to the same depth.
In this case, the height of the ends of the piles is leveled by cutting with a grinder.
Slab foundations can either not be buried , or be built flush level . In the first case, it will be enough just to prepare a pit to fill the cushion; in the second, it is necessary to add the calculated thickness of the slab.
Required Tools
Armed with a set of tools, you can lay the foundation for your garage yourself. Regardless of the type of base chosen, you will need the following tools:
- concrete mixer;
- jigsaw or hand saw;
- different types of shovels;
- drill and screwdriver with sets of attachments;
- instruments for taking measurements (building level with laser, tape measure, square);
- pliers;
- nails and screws.
Construction materials
The exact list of materials required for building a foundation depends on the type of foundation chosen . Basic materials include:
- sand and gravel;
- concrete mixture;
- lumber for creating formwork;
- polyethylene film;
- waterproofing coating (roofing felt).
Preparing to create a foundation
Before you begin laying the foundation, a number of preparatory works are required. First you need to choose the optimal location for the location of the future structure. Shaded areas where direct ultraviolet rays do not reach are suitable. It is convenient to place the base next to another building so that its shadow keeps the building cool during hot periods. The shelter also protects the room from the effects of precipitation and gusts of wind.
After selecting a location for the foundation, a drawing is developed indicating the building materials used, the dimensions of the foundation and the selected type of structure.
If you plan to build an inspection hole, additional information about the level of groundwater location is included in the design documentation. At the design stage, the location of the system for draining precipitation and melt water from the roof is determined, which provides protection against flooding of the room and the formation of rust on the walls.
When the calculations have been made and the appropriate variety has been selected, the site is prepared. The area where the foundation for the garage will be laid is cleared of debris and trees. It is important to remove all plant roots from the ground, as they can later grow and destroy the concrete slabs, making the structure unstable.
Based on the technical specifications and drawings, the boundaries of the foundation are marked on the ground. If a high groundwater level is recorded in the area, a drainage structure is installed.
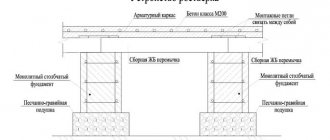
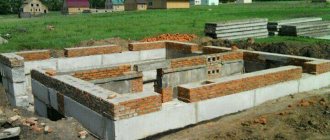
Strip foundation made of blocks
The strip structure is erected after geodetic research. This foundation is intended for the installation of log or brick one-story houses. When building the foundation, the maximum depth should be taken into account, which should not exceed twice the height of the blocks. To reduce the cost of the structure, a scheme with the installation of reinforced concrete FBS elements around the perimeter is used. To install internal partitions, columnar supports are used in increments of 1-1.5 m.
An example of using large FBS and FL blocks
A brief algorithm for making a base from large blocks:
- Dig a pit, at the bottom of which a sand cushion is placed.
- Compact the soil and install concrete slabs of the FL type (with a trapezoidal profile). To reduce the cost of the structure, it is possible to install FL base plates with a gap of up to 700 mm.
- Place blocks on the surface of the slabs and fix them with cement mortar. Between the layers in the thickness of the solution, reinforcement is laid, increasing the strength of the base. The blocks are installed in a checkerboard pattern, the vertical joints are spilled with mortar.
Strip foundation made of small concrete blocks
Since a structure made of large-sized elements has a high cost, such a base is used in the construction of multi-apartment buildings or industrial facilities. Small-sized blocks are used for private houses. The number and dimensions of elements are determined on the basis of the project; the design of the parts provides windows for entering communications. If gaps form when laying standard parts, they are filled with block cuttings or sand-lime bricks.
To calculate the number of elements, use a calculator for wall parts. You need to enter the dimensions of the strip base and the width of the support contour. Additional applications allow you to determine the amount of concrete mortar and reinforcement that are used in the manufacture of cast structural elements. To the results obtained it is necessary to add 7-10% of the material supply.
Required Tools
To arrange the structure you will need the following materials and tools:
- containers for mixing cement with water and other components (it is recommended to use an electric mixer);
- bayonet and shovel shovels;
- container for carrying the solution;
- vibration plate;
- welding machine or knitting wire for connecting reinforcement;
- metalworking tools;
- an electric machine with a grinding wheel for cutting rods;
- carpentry tools for arranging formwork;
- roulette;
- hydraulic or laser level.
Step by step implementation
Algorithm of actions when arranging a strip foundation for a country house:
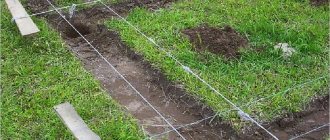
- Level the area while simultaneously removing a layer of fertile soil.
- Mark the area for constructing trenches for the strip base. Driven pegs and cables mark the contours of the structure; the height of the rods is equal to the height of the future concrete structure.
- Dig trenches and add sand to the bottom. After compacting the sandy base, gravel is poured in and exposed to a vibrating tool. The layer of compacted cushion is 300-350 mm; during the compaction process, the materials are moistened.
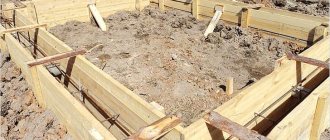
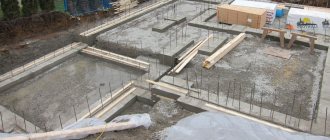
- Install wooden formwork in the trenches for the reinforcing belt. The structure is leveled horizontally.
- Lay a layer of reinforcement, fill the channels with a mixture of Portland cement, sand and fine gravel.
- Fill the reinforcing layer with concrete, the minimum thickness of the support is 300 mm. To remove air bubbles, stir the solution with a metal rod or hand mixer.
- Extend the layer to the top edge of the formwork.
- After the solution has hardened (12-14 days), corner blocks are installed, from which the side walls are mounted. The design provides ventilation windows and openings for the input of communications. Rows of blocks are laid in a checkerboard pattern, overlapping 50% of the length, and reinforcement is introduced into the cement mortar between the layers.
- After the masonry has hardened, waterproofing is installed using mastic or roofing felt.
Description of the stages of constructing different types of foundations with your own hands
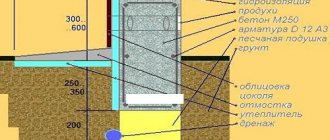
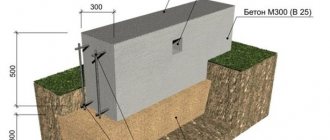
The stages of laying the foundation depend on the type of foundation chosen. The general condition is that its depth must be at least 20 cm below the freezing level of the soil. This criterion does not allow the soil to destroy structures during severe cold weather.
Tape
Installing a strip foundation requires sequential completion of construction stages. In particular, it is necessary:
- Based on the markings of the territory, dig a hole 40 cm deep and wide.
- Place a sand cushion at the bottom of the hole and compact it until a layer of 20 cm is formed. To make it easier to compress the sand, it is recommended to moisten it first.
- Place 10 cm of gravel on top of the sand layer.
- Make a strong frame from reinforcement, using a cross-section from 8 to 15 mm. Metal rods are connected with wire to give reliability to the foundation. A distance of 20 cm is left between the rods.
- Construct formwork from plywood or wooden boards. The height of the formwork from the ground surface must be at least 30 cm. For additional reinforcement, stops or wooden clamps are used.
- Pour the concrete mixture evenly over the entire surface in a layer of 30-40 cm from the ground surface. For a small metal garage, concrete grade M200 is suitable. The solution is prepared in a concrete mixer.
- Cover the concrete with a layer of roofing felt or thick plastic film to protect it from the negative effects of sunlight. Otherwise, the base may crack due to partial hardening. It takes 3 to 6 weeks for the concrete to fully harden. The period of strengthening the base directly depends on the concrete used and the ambient temperature.
The tape design is universal and can be used for any type of soil. The construction of this type does not require large financial costs, and the design is reliable and can withstand high loads.
Pile or columnar
The technology for constructing a pile structure differs from the construction of a strip foundation. Mortgage requires the following steps:
- Dig holes 60 cm deep, 50 cm wide and 50 cm long at a distance of 1 m from each other.
- Pour moistened sand into the bottom of the holes and compact it to create a layer of 20 cm.
- Build the formwork and metal frame by analogy with the construction of an element for a strip base. The difference is that the frame is placed in the holes.
- Pour concrete mixture into the formwork.
- Fill the space between the formwork and the dug holes with earth and compact it tightly.
- Wait for the concrete to harden.
Monolithic slab
The construction of a monolithic foundation is a similar process to laying other types of foundation. To create the base you need:
- Dig a pit with a recess of 40 cm and fill the bottom with a sand-gravel mixture. The layer thickness should be 30 cm.
- Build formwork using dense plywood sheets and a three-dimensional metal mesh frame. Secure the joining points of the reinforcing bars with wire.
- Place the frame inside the formwork and fill it completely with concrete. Metal elements should not protrude above the solution layer. As a rule, the thickness of the concrete layer varies between 30-35 cm.
Finally, it is necessary to cover the surface of the concrete to protect it from rain and negative external influences.
Soil analysis for construction
In order for the foundation to last for a long time, the first step is to examine the soil in the given area where the garage is to be built.
The nature of the soil is of great importance, as well as indicators such as freezing depth and groundwater level.
Foundation diagram for a garage on clay soils.
You can carry out the analysis either with the help of specialists or with your own hands. To do this, you will need to dig a small hole (hole) and assess the nature of the soil. The most common soils in our country are clay, sandy loam, loam, peat and sand. Clay, sandy loam and loam impose some restrictions on the construction of the foundation. The thing is that clay soil has the ability to swell during the cold season. According to the laws of physics, the water there freezes, but the density of ice is less than the density of water, so the volume of water can increase. All this creates high pressure on the foundation.
Over time, this can lead to its gradual destruction, distortion of the entire structure, cracks, and so on. Therefore, the depth of the foundation is made below the freezing depth. As for peat, it is not suitable for such buildings, because when washed away it can form so-called quicksand. In the event that construction is still planned on such a site, the peat layer is replaced with sand or any other dry and dense soil. Loams are a mixture of sand and clay, so it is advisable to lay the foundation to a depth of at least 2 m. The best option is sand or rock. The latter is very difficult to work with, since it is a very durable stone. If there is sandy soil, the foundation can be laid at a depth of 40-70 cm. It is important that there is no perched water on the site (an aquifer layer located almost on the surface).