Type of foundations for a shed - there are plenty to choose from
Private backyards often have many outbuildings intended for various purposes. The most common of them is the barn. Usually it is a multifunctional structure that can be used for storing a variety of working tools and household equipment, and breeding domestic animals. Some owners set up a workshop in the barn.
Regardless of the specific purposes for which the described economic structure is used, it needs a quality foundation.
High-quality foundation of economic structure
Of course, you can build a shed without a foundation. But such a structure will not last long. A guarantee of long-term operation of any outbuilding will be a strong and reliable foundation for it. It could be:
- tape;
- screw;
- columnar.
Any of the above foundations for a commercial building is made as simple and economical as possible. As a rule, the foundations for a shed or outbuilding go deep into the ground no more than 0.6 m. They are built using simplified construction methods. Therefore, such structures cannot take truly serious loads. But in any case, buildings even on a very light foundation are much stronger and more durable than sheds built without a foundation. Always remember this.
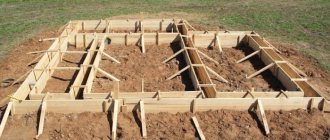
DIY foundation for a barn
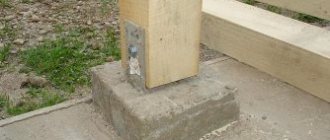
The dimensions of our utility block are 2.5 x 6.0 m. It was decided to install blocks along the long wall every 1.5 m (along the axes); on the narrow side we settled on two corner blocks.
A pit with dimensions of 80 x 80 cm was dug for each pillow. When determining the depth of the pits, we proceeded from the thickness of the soil layer on our site - it is approximately 40 cm. The excavated soil, I must say, was very useful. Our site is uneven, has many depressions, and the soil was used to level it.
After preparing the next pit, they filled it with sand, which was compacted. The usual method - pouring water on the sand - is not suitable in this case, since water can soften the surrounding soil, which will lead to subsidence of the foundation. We wetted the sand before backfilling, laid it in the pit in layers and compacted it with a wooden tamper.
After filling the sand, it was necessary to level the surfaces of all the pillows, which was done using a long, even block and a building level. When the pillows were leveled, slabs were placed on them, on which blocks were installed. We bought standard solid blocks measuring 20 x 20 x £0 cm, but we made the tiles ourselves. It took some time, but they cost more than half the price of store-bought ones. Each block was installed on the solution, checking the correct position with a level and adjusting all blocks to the general level.
After making the foundation and before further work, we decided, if possible, to select the fertile layer from under the utility block: why should goodness go to waste? Moreover, we had a heap of clay piled up on our site after the construction of a well - and the question of where to put it was very acute. And here there is a double benefit: they chose fertile soil, which was used to level the site, and partially used unnecessary clay - it was also not of the best quality, and the prospect of using it in the future for construction, for example, a furnace, was unlikely.
How to make a strip foundation for household construction - a reliable solution
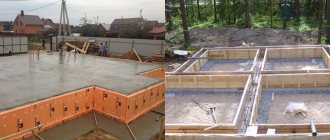
Strip-type bases are most popular among summer residents and owners of private homes. Such foundations can be built on any soil; they can withstand quite heavy loads. True, the cost of their construction is higher compared to other foundations for a utility block or frame shed.
Tape type shed base
If you plan to spend a minimum of finance on construction activities, it is better to build a different type of foundation rather than a strip one. Fortunately, there is a large selection of them. For the rest, we will briefly describe how to properly build such a structure. You can make a strip foundation yourself, based on the following algorithm for performing the work:
- Dig a ditch approximately 0.7 m wide. Determine its depth based on how much the ground freezes in winter. The bottom of the foundation for an outbuilding should be slightly below the freezing level of the soil.
- Next, you need to make a cushion in the ditch from two layers - a 10-centimeter layer of crushed stone plus a 5-8-centimeter layer of construction sand. Then you should compact this cake well.
- You make formwork from boards. It is advisable to provide additional reinforcement for this structure. You need to make a simple mesh with cells measuring about 0.3x0.3 m, from small cross-section reinforcing bars (up to 1 cm). The formwork should protrude 0.25–0.3 m above the ground.
- Prepare a concrete solution and pour it into the prepared structure. The mixture for filling the formwork, without which the strip foundation cannot be built, can be made according to the classic recipe. Mix crushed stone with sand in a ratio of 5 to 3, add cement (1 part). Then fill this composition with water and stir it until the composition becomes homogeneous and thick enough.
All you have to do is wait for the concrete mixture to harden properly, dismantle the formwork structure and fill the gaps left after removing the wood frame with earth. The strip foundation is ready. This base is recommended for loaded buildings, for example, for a utility room or a full-fledged home workshop.
Features of the base for a shed
Of course, a barn is a lightweight building compared to a house. But it also does not have the weight of a toy; it is susceptible to soil movements, rising groundwater, freezing, and rotting. Therefore, a foundation is necessary, at least the simplest one. It is a fundamental part of any building. And any foundation is bad and does not fulfill its functions if it is built inconsistently with the purpose and incorrectly.
A barn with the right strip foundation will last a long time
Foundation (from Latin fundamentum - base) is an underground or underwater part of a building (structure), which receives loads and transfers them to the base. There are strip foundations (including those made from cross strips), columnar, solid, and pile foundations. There are monolithic and prefabricated ones. Material: concrete, reinforced concrete, stone (rubble), wood.
Big Encyclopedic Dictionary (BED)
https://slovari.299.ru/enc.php
There are not many types of foundations, and they all have common features. This includes penetration into the soil, a cushion of drainage material (crushed stone, sand, pebbles), the foundation itself and waterproofing. Only pile foundations do not have a cushion - and only if they do not have a buried grillage. And for lightweight structures, completely shallow foundations are used. There is a strict connection between them and the type of soil and the weight of the structure.
Classification of soil on the site
Before designing a house, it is better to order a professional survey of the site (and it is advisable not to use the results of your neighbor: sometimes even nearby sites have very different soil conditions). But by the time you get to the point of building a house, a lot of time will pass; building a shed does not require such precision, so before building a shed, you can do a soil study yourself: use a garden drill to drill a two-meter hole, removing and studying the soil from different depths.
There are several simple tests. Water is mixed into the soil, you try to roll it out like dough and roll it into a ring. If this is successful, then two-thirds of it consists of clay or loam. If soil is poured into water and it begins to dissolve before our eyes and the water becomes cloudy, then this indicates loam; sand and clay precipitate.
Scheme of sedimentation in a solution of soil in water
According to the reference book “Soils. Foundations. Choosing the optimal foundation” There are three types of soils:
The contact area of the foundation with the soil must correspond to the load, taking into account the expected resistance of the soil. The maximum resistance (reactive pressure) of the soil is determined experimentally based on the principles of soil mechanics, and state building codes provide tables of permissible soil resistance for certain geographic zones.
Collier's Encyclopedia
Groundwater
The groundwater level is also the most important indicator, on which not only the foundation “model” depends, but also the depth of its foundation.
The structure of groundwater in your area is very important information
Soil freezing
In addition to the composition of the soil, you need to know to what depth it freezes in winter. In our “latitudes” the freezing depth is usually from eighty to one hundred centimeters, but with certain rare types of soil it can be more or less.
The base of the foundation should be below the maximum freezing depth of the soil to prevent swelling of the soil when freezing. The safe depth depends on annual temperature variations, the type and range of local soil variations, and the normal groundwater level. In addition, seasonal changes in the volume of clay soils are sometimes observed, which should not be allowed under a foundation laid on a natural foundation.
Collier's Encyclopedia
https://dic.academic.ru/dic.nsf/enc_colier/6886/%D0%A4%D0%A3%D0%9D%D0%94%D0%90%D0%9C%D0%95%D0%9D %D0%A2
Since the barn is light, very simple and extremely economical types of foundations are often used. But sometimes in difficult soils you need to strengthen them.
Types of foundations suitable for a barn
- Based on depth, foundations are divided into buried, shallowly buried and non-buried. It is clear that the barn will be satisfied with a small and shallow foundation.
- By design, they come in four main types. Let's consider all possible cases of their use depending on the type of soil, the height of groundwater, the depth of freezing and the weight of the structure. To do this, you need to know all these indicators and be aware of their importance.
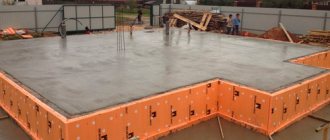
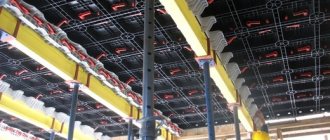
Slab
Excellent for unstable or subsiding soil; in addition, it is often used if the barn is heavy. Pros: solidity, reliability. Disadvantages: labor intensive, lack of underground, high cost.
An example of a monolithic foundation - such a foundation for a barn is, of course, too solid
Tape
The best option is a shallowly buried strip foundation. It can be made from ready-mixed concrete, cement mortar, or concrete blocks with mortar. Pros: comparative simplicity and financial accessibility of its construction. Disadvantages: it cannot be placed on unreliable soils with close soil water, on clay and sand. But almost one hundred percent of the experts will recommend it to you, even if your site consists of unfavorable soils - but with amendments to the design: it will be necessary to make the “ribbon” of the foundation wider and deeper.
A strip concrete foundation in this design is also redundant for a light barn
Columnar
One of the easiest types to perform independently. Suitable for light wooden or frame structures. Such a foundation can also be shallow, but this is more suitable for gazebos and barbecues - for a house it is too ephemeral. It is placed in pits (on a bed of drainage material) made of factory-made concrete blocks. Pros: ease of implementation, low price, suitable for any soil. Cons: not suitable for heavy structures; It practically eliminates the presence of an underground floor, and the space under the shed will be poorly insulated.
Columnar foundation is very suitable for lightweight structures
Pile
It dampens movements well and is made from asbestos-cement pipes, which are concreted into pits with drainage filler, and sometimes from ordinary metal and screw piles. Pros: suitable for unstable soils and slopes, resistant to subsidence and landslides; asbestos cement is also cheap. Cons: pile-grillage with a metal grillage is very expensive due to the cost of metal for a heavy grillage and requires welding.
A pile-and-grillage foundation with screw piles is wonderful, but too expensive for a cheap shed
But there are also a lot of foundations that are combined in design and depth.
Photo gallery: examples of foundations suitable for a barn
Screw piles are camouflaged here A shed made of logs on a columnar foundation A shed on screw piles is an expensive solution A strip foundation for a shed is sometimes very heavy and too redundant A barrel shed on a slab foundation made of wood A shed with a woodshed on a slab foundation made of rubble stone A shed with a roof made from an old boat on a strip foundation in Wales Plank shed on a post foundation Designer shed can be installed on any foundation; made in Russia
Video: types of foundations for construction
A columnar foundation is the simplest foundation for an outbuilding
Arranging a columnar structure requires much less labor and financial costs. Let us immediately note that it is impossible to erect such a structure on moving soils. It is very easy to make a columnar foundation for a light outbuilding or similar building:
- Clearing the area for the shed. On clay soils, it is necessary to additionally arrange a gravel cushion on the ground (thickness - about 10 cm).
- Mark the area, identifying the mounting points for the columnar supports.
- Dig holes in the designated places. The depth of the wells is taken in the range of 50–100 cm. The softer the soil on the land plot, the deeper the supports should be buried.
- Pour a mixture of gravel and sand into the bottom of the holes (the total layer thickness should be about 15 cm), and compact the pie.
- Install the posts in the wells prepared for them. You can make supports from bricks, asbestos-cement pipes or concrete blocks. The choice is yours. Experts advise placing additional reinforcing bars inside the pillars. Then their load-bearing potential increases significantly. Of course, if you are building a foundation for a very light shed, an additional rod is not needed.
- Make a simple formwork and fill it with concrete solution.
Arrangement of a columnar structure
After 5–7 days, the concrete will harden and you will be able to build a shed on the prepared foundation.
Please note: if it was decided to make the pillars from bricks, the finished support must be treated with mastic with waterproofing properties.
Which foundation is better for a barn?
Criterias of choice:
- Weight of the structure. As a rule, you can build outbuildings with your own hands using brick, foam blocks, wood or steel. Concrete blocks are not used due to their large mass and difficulty in installation. Therefore, the largest mass will be a brick structure, and a wooden one will be the lightest.
- Soil type. Sheds are often built on soils that are not suitable for residential buildings. Therefore, in most cases these are heaving soils with a high level of groundwater. The optimal foundation design is selected for this type of soil.
- Terrain. No one spends extra money on leveling a construction site or digging deep pits.
Therefore, taking into account the relief and construction features, you can make a barn with your own hands with the following types of foundations:
- Monolithic concrete or reinforced concrete slab of shallow type.
- Pile-grillage foundations with a shallow laying depth. The grillage is made shallow or hanging.
- Shallow strip bases made of concrete blocks, bricks or foam blocks.
- Columnar (foundation made of tires, etc.)
Other technologies for constructing foundations for a barn - new trends
Relatively recently, outbuildings began to be installed on screw foundations. Special supports that are used for these purposes have a special design with blades at the ends. Due to these elements, screw rods can be screwed into the ground without any problems by two adult men. There are no real difficulties when performing such work.
The piles are screwed in not by hand, but by means of a piece of ordinary pipe or an iron crowbar, which is attached to the support through a special hole made in its upper part. Installation of screw products must be carried out strictly vertically. It is advisable that two people screw in the supports, and a third person from the side monitors the correct installation.
Installation of screw products
When a structure made of foam blocks, a popular modern construction material, is being erected on a site, the foundation for such a building is made according to the algorithm described for a strip foundation:
- Dig a 0.6-meter deep trench. Fill its bottom with gravel and sand (it is optimal to use fine materials) in a layer of 15–20 cm.
- Make a reinforcement skeleton from rods with a cross-section of 0.9–1 cm and a simple formwork from boards.
- Pour concrete, wait for it to harden, and install light and durable foam blocks on the resulting base.
Choose the technology that suits you for constructing the foundation for the utility block and do all the work yourself, saving the family budget!
Source https://remoskop.ru/fundament-saray-svoimi-rukami.html
(Visited 566 times, 1 visits today)
Screw foundation
For screw foundations, screw piles are used, which already follows from the name. This is a fairly cheap method of constructing a foundation for a shed and can easily be installed in one day.
The preparation process here is the same as with a strip foundation; you will also have to clear the area and mark it. Naturally, there is no need to carry out any excavation work.
Please note that screw piles should be located at a distance of up to three meters from each other. This is the maximum distance.
By the way, it’s quite suitable for a foundation for a barn, but for reliability, let it be 2 meters.
We do the calculation again, and it turns out that we will need 8 screw piles. We will install 4 in the corners, and, given that the dimensions of our barn are 4x3, then 4 more piles will stand in the middle of each side. It is not fundamentally important to maintain ideal proportions; we will simply place the piles at the same distance from the corners.
At the top of each pile there is a special device into which a lever is inserted; you can use a simple crowbar, and this lever helps screw the pile into the ground.
Naturally, you will need an assistant, or even better, two; screwing occurs as follows: while two people are twisting the pile, the third makes sure that it enters the ground evenly and strictly perpendicularly; a building level is used for this.
After yours are installed, they are cut to the same level using a grinder. Next you will have to use a welding machine, with which the base will be welded, almost a grillage, which will connect the piles to each other. however, there are also disadvantages of a pile-screw foundation, which you also need to be aware of.
The second option involves the use of paws, on which the timber will be installed, if the barn is supposed to be light.
Is it possible to build a shed without a foundation?
Becoming the owner of coveted acres of country land, many are faced with the question of how to build a shed without building a foundation with your own hands, with the least cost and effort.
Often a shed without a foundation is used to store tools, building materials, gardening equipment and sometimes serves as a makeshift shelter for the summer residents themselves.
First, it is better to draw up a visual diagram in which to mark all the zones and buildings.
Often, a shed does not serve an aesthetic function and is therefore perceived as something that needs to be disguised or hidden from prying eyes by placing it away from the house.
Since its installation will be done with your own hands, it is associated with an unprofessional, unpresentable and temporary structure.
Yes, and competently building a good foundation that would allow the barn to maintain its original appearance and functionality is not an easy task.
However, it is possible to turn a banal place for storing country rubbish into something quite solid and attractive.
Setting up a shed does not always require a foundation.
If this is a small one-story building made of wooden boards or beams, OSB boards or a metal cargo container, then other technologies can be used.
This will help anyone, even those far from construction, to build a high-quality shed with their own hands.
What is needed to successfully build a practical shed without building a foundation and large time and financial costs?
First, choose a location for its location. This will be the least suitable land for cultivating garden crops.
Having marked the zones, you will decide where it is most appropriate to build the building. It is also worth deciding on the material, size and style of construction.
You can turn an unsightly element of a dacha into a highlight and decoration.
- Plank (built from unedged boards);
- Brick (expensive and durable);
- Foam block (more expensive than brick ones and you can’t build them with your own hands);
- Wooden (frame, finished with different materials);
- Buildings made of oriented strand board (OSB), insulated with expanded clay (this option is also suitable for a country house).
Do-it-yourself plank buildings are considered the most budget-friendly, simplest and fastest to install. These are temporary structures that are not designed to last for many years of use.
You can place it directly on wooden pallets or beams to protect it from water.
Characteristic features of such sheds:
- Small dimensions (2x3x2.5 m - optimal);
- Shed roof (choices of roofing felt, roofing felt residues, tar, bitumen, slate, etc. are used as a covering);
- Material of the structure (frame made of beams with unedged boards);
- Possible decor in the form of ivy or grapes climbing along the wall, pots with indoor plants, etc.
Brick sheds require pouring a strip foundation; they are durable and beautiful, they can be successfully integrated into the overall composition of all buildings on the territory.
They are also suitable for equipping workshops, garages, supply closets, wood sheds and guest houses.
They are more expensive, building them yourself can take weeks, but the result is worth it.
OSB-expanded clay buildings are erected quite quickly and simply; in terms of costs they are in the middle between planks, wood and brick.
But they are already more durable and you can sleep in them in winter if you install a heater or stove. The latter will turn the barn into a full-fledged house suitable for living.
The most popular are foam block and wooden sheds.
Installing the first ones is the most expensive and you can’t do it yourself, but they are built to last a lifetime with the possibility of arranging inside full-fledged barns for livestock and storing harvested hay.
To build them, you need specialists, a foundation, significant funds and a large amount of finishing materials.
The roof of such buildings is gable and covered with corrugated sheets, aluminum, metal tiles, etc.
Foam block sheds are most popular among farmers.
The most economical one is a wooden shed, an imperishable classic of the genre. There are plenty of options for installing it yourself.
We'll look at a few of the most common ones.
First you need to prepare the site and foundation for construction.
You will need to clear the surface of the ground and fill it with gravel.
Next, everything must be done in the following order:
- Four three-meter wooden posts are dug into the corners of the future barn to a depth of 50-60 cm. It is imperative to insulate the part of the post that will go into the ground by wrapping it with roofing felt;
- The rear pillars are placed 10-20 cm lower in order to provide a slope to the roof;
- They tie the upper and lower parts of the shed frame with 50 by 50 mm bars and a building level. 10-15 cm from the top and bottom edges. They also do it in the center;
- The frame of the shed is sheathed with boards vertically or horizontally. Cut openings for windows and doors.
- For the roof, three bars are used as rafters, which are attached to the top frame. They are sewn up with boards, covered with roofing felt or other material with overlaps in the seams of at least 5 cm;
- Sheets are secured along the roof using nailed bars;
- Rainwater drains are installed;
- Next comes the doors, windows and interior decoration, as well as the functional content of the barn;
- Treating the building with antiseptic agents that protect the wood from insects and rot;
- Final finishing and decoration of a self-built barn.
Such a building can turn out to be quite practical and pleasing to the eye, a neat, inexpensive structure and will last at least 5-7 years, and its construction takes no more than one day.
Let's consider another option for installing a wooden shed, designed for a more serious service life:
- The first stage is similar to the previous construction option. Only poles are used in the form of metal pipes. This will avoid displacement of the axis of the structure over time, and will relieve part of the roof load on the supporting pillars;
- Also, the floor frame can be welded around the perimeter from metal pipes or beams. Then the floor will be securely fastened from all corners and the entire structure will be stronger;
- It is possible to erect a building on metal piles, which will serve as a reliable foundation, instead of a concrete foundation;
- Subsequent steps are similar to the first option with the difference in the use of some materials. For example, the roof can be made of corrugated sheets or metal tiles, and sanded boards can be used for cladding;
- Build water drains with your own hands from metal-plastic or galvanized steel.
Such a shed will last much longer and retain its original appearance. Its cost is slightly higher, but its functionality and appearance will delight you for many years.
You can build a shed from a metal container by first cutting out openings for windows and doors in it.
Such a block for household purposes provides great opportunities for DIY decoration, and it can also be simply dismantled and transported to another place.
It is placed on small piles or blocks, the space between which is filled with crushed stone. It doesn't need a foundation.
The container is easy to insulate and sheath, install double-glazed windows, etc.
It also makes an excellent recreation area with a terrace, greenhouse, gazebo or dining room, veranda and other buildings.
You can combine two purposes in one and make a storage room for garden tools and a greenhouse by cutting wide openings for special windows in one or two walls of the container.
By the way, this option can also become a country house - comfortable, inexpensive and similar to a trailer, since it can be transported and reinstalled many times.
It just so happens that the barn is associated exclusively with the habitat of livestock - from cows and horses to chickens and turkeys. In such a room there must be a place for animals to rest, a feeding and activity area. The building must be warm, environmentally friendly and safe, so that the living creatures inside are comfortable and calm. To create a shed, a wooden plank is best suited. The building is placed on the ground without a foundation. In this case it is not necessary.
Experienced farmers advise creating sheds from wooden planks and installing them directly on the ground, without building a foundation. The advantages of such structures are as follows:
- saving time - they can be erected quickly (in just a few days);
- saving money - without a foundation, the structure will cost 2 times less;
- saving effort - it is obvious that erecting a structure without a foundation requires less effort on the part of the builder.
In addition, the barn itself turns out to be quite light and stable.
To build a shed without a foundation, choose wooden boards - they are quite light, but durable
However, such buildings also have disadvantages:
- the need for mandatory additional insulation of the floor so that the animals inside do not freeze;
- the need for external and internal waterproofing of walls and floors so that water from the soil does not destroy wooden boards;
- fragility of the structure (a barn will last about 20 years, whereas with a foundation it will last about 50);
- the need for careful preparation of the area where the shed will be installed.
If such problems do not scare you, then you can safely start building a shed from wooden planks without a foundation.
Wooden boards are a durable and reliable material and are relatively inexpensive. That is why they do not lose their popularity and relevance, despite the abundance of modern innovative materials.
A wooden shed without a foundation will last a maximum of 20 years, then it will begin to quickly collapse
When a barn is built to last, it must be installed on a foundation. If there is no need for long-term operation of the building or the structure is to be moved from one place to another, then the foundation is not poured.
There is no need for a foundation if you live in warm regions where there are no harsh winters and little rainfall throughout the year.
Residents of warm regions with low average annual precipitation can afford to build a shed without a foundation.
Cheapness is another important feature of a shed without a foundation. If funds are limited, you can build a structure without a foundation and install it directly on the ground.
Before you begin the process of constructing a shed from wooden planks, you need to decide on the design of the room, prepare all the necessary tools and materials, choose insulation and waterproofing.
A barn made of wooden planks without a foundation can only be one-story. Otherwise, the earth will not stand it and will begin to sag, the structure will gradually sink into the soil, the walls and floor will begin to collapse. This is dangerous for animals and humans.
A barn without a foundation can only be one-story: the more floors, the heavier the structure; it will quickly sink into the ground
The height of the building walls should not exceed three meters, and the total area should not be more than 20 m2. Otherwise, the structure will turn out to be very large, the earth simply will not support such weight.
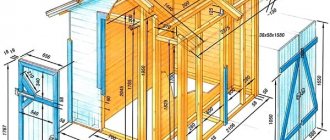
In any case, the barn made of wooden boards will be frame. This means that initially they build a “skeleton” - a base, then it is lined with boards, insulation, waterproofing and finishing.
To build a shed, you need a drawing. It is better to choose the simplest design. It will be easier to build such a structure alone.
By strictly following the drawing, a barn can be built in a couple of days alone
The barn can be made square or rectangular depending on the personal preferences of the owner. But an elongated structure that is too narrow is inconvenient to use; the animals inside will be too cramped.
Using a simple drawing you can create a comfortable and cozy barn for livestock
The main material for building a shed without a foundation is wooden planks. Oak, spruce and pine trees are suitable for agricultural purposes. It is worth choosing such tree species because they:
- smell nice;
- do not absorb unpleasant odors;
- are durable;
- resistant to mold formation.
To build a frame base, choose oak wooden blocks with a square or rectangular cross-section (100×100 or 60×100 millimeters).
For construction, choose only bars with a cross-section of 100X100 mm or 60X100 mm, others will not work
To calculate how many boards and bars will be needed, you will have to take into account the following nuances:
- To create a frame, place 4 identical bars at the corners of the future structure. The length of each “stick” is 3 meters 20 centimeters (provided that the height of the barn is 3 meters, 20 centimeters will be buried in the ground to ensure the stability of the entire structure).
- Vertical bars are connected to each other by horizontal ones. And not only on the walls, but also on the floor and ceiling. The distance between parallel bars is 50 centimeters.
- The frame is sheathed with wooden boards on the outside and inside (entirely, including the floor and ceiling). The planks should fit snugly against each other without forming gaps.
Based on such features, calculations are made. To erect a building with an area of 20 square meters with three-meter walls, you will need the following number of boards and bars:
- 210 meters of timber (70 timber, 3 meters each);
- 188 square meters of wooden plank.
To calculate how much material will be required for the construction of a building, you need to know the exact dimensions of the future room. If the structure is three meters high, 5 meters long, and 4 meters wide, then counting the number of boards is easy. You need to find out the total area of all surfaces of the building (including the floor and ceiling). To do this, first multiply the length of the building by the height (5 * 3). We get the area of one wall, the same area of the parallel wall. The area of the other two walls is equal to the product of the height and the width of the barn, multiplied by two (4 * 3 * 2). The floor and ceiling have equal area. We calculate them by multiplying the length by the width (5 * 4). Now we sum up all the received numbers (5*3*2+4*3*2+5*4*2). We carry out the cladding outside and inside. This means that we multiply the resulting value (94) by 2.
Using the same formula, you can calculate the required amount of insulation and waterproofing for a shed.
The shed definitely needs to be insulated. Otherwise, the animals will not be able to stay inside in the winter. It will be damp and cold for them to sleep on the floor. In such conditions, livestock will quickly become ill and begin to die.
Suitable materials for insulation include:
- wool (mineral, stone, glass);
- ecowool;
- polyurethane foam.
Cotton wool is the cheapest insulation material, but it quickly absorbs moisture and sags. It is recommended to use it in conditions of austerity. Glass wool can be hazardous to livestock. If it gets on the skin or mucous membranes of an animal or bird, it can be fatal. It is better to choose mineral or stone.
Ecowool is more expensive than ordinary mineral or stone wool, but is considered an environmentally friendly and moisture-resistant material. Reliably retains heat indoors.
Polyurethane foam is a rather expensive insulation material. But they haven’t come up with anything better yet. It is resistant to moisture and does not sag even after long-term use. Reliably retains heat in the building.
To insulate a shed, it is better to choose polyurethane foam. It does not absorb moisture and does not deform during use
Polyurethane foam for insulation is placed in one layer, while cotton wool is placed in two or more. The choice in this case is obvious.
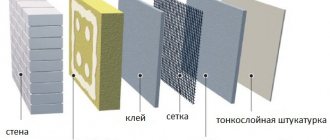
When building a shed from wooden planks without a foundation, special attention is paid to waterproofing. It must be carried out on all surfaces of the structure - from floor to ceiling, so that moisture does not enter inside and interfere with the comfortable stay of livestock in the barn.
Betonite mats, membranes and injections are also used as water insulation.
Coating waterproofing is bitumen - a substance with a pungent odor. It is not effective, but it is cheap. Shed wrap insulation works best. It is a rolled material that itself is attached to the surface. Paint insulation is similar to paint; sprayed insulation (in powder form) requires special equipment. The injection layer requires a lot of money. Mats or membranes are expensive and increase the thickness of the walls. But they reliably protect the structure from moisture. If there are no financial limitations, it is better to choose mats or membranes. Their service life reaches 70 years.
It is necessary to waterproof the barn, otherwise the room will be damp and the animals will get sick often
The required drawing has already been selected, the materials have been calculated. The preparation of instruments begins. To build a wooden shed without a foundation you will need:
- saw;
- drill;
- plane;
- screwdriver;
- self-tapping screws;
- nails;
- hammer;
- construction corner;
- building level;
- pencils;
- wires for carrying lighting into the room;
- marker for marking;
- construction stapler.
Additional materials and items needed to create a full-fledged shed:
- wooden door and hinges for its installation;
- a small window (in a plastic or wooden frame) so that sunlight penetrates into the room during the day, and the owner saves on electricity;
- OSB panels for creating partitions;
- lampshade and light bulb;
- switch;
- socket;
- cement mortar to fill vertical bars buried in the ground;
- sand, crushed stone;
- corrugated roofing;
- polyurethane foam.
You can build a shed not only from wooden planks. Wooden pallets and scraps are also suitable for this purpose. The main thing is to prepare them for construction work: remove all nails, level them, and process them with a plane.
Instructions for building a shed without a foundation:
- They are clearing the area for the future barn. All debris and dirt are removed from the site, holes are dug, hills and mounds are leveled.
Preparation for construction begins with cleaning and marking the area
The bars at the corners are buried in the ground and filled with cement for strength.
The ground under the shed is compacted with crushed stone and sand so that the shed stands firmly in its place
Don't forget to leave room for the door and window
When covering, it is necessary to avoid gaps between the boards
A planer will help make the wood cladding smooth and even and remove all snags.
To insulate with mineral wool, you will have to make plank sheathing with the distance between the boards 1–2 mm less than the width of the slabs, so that the slabs fit as tightly as possible
First they put waterproofing on the floor, then insulation, then again waterproofing and only in the end - wooden boards
Windows and doors can be of any shape and from any material
Waterproofing must be installed under the outer skin
Corrugated sheeting is the best material for protecting a barn roof from bad weather - it lasts a long time and is inexpensive
Building a shed from wooden planks without a foundation is quite simple. The main thing is to strictly follow the instructions and take a responsible approach to each stage of the work. Proper insulation is the key to ensuring that the animals inside will be cozy and comfortable, and the owner will not have to worry about them.
Barn finishing
Now you can start exterior finishing. Here the flight of imagination can be wide. You can do any cladding with your own hands - boards, clapboards, plastic, siding (if there is any left over from the main construction on the site). The last two materials do not require additional finishing, but wooden elements must be treated with an antiseptic and coated with paint, enamel or varnish.
Next you need to install the window (if provided) and the door. When installing the frame and external wall cladding, openings must be provided in advance for this. Both the window and the door can be used ready-made, or you can make it yourself. There is no particular difficulty in this, all you need is the desire, materials and tools.
The last stage of the construction of the utility block is the interior finishing of the building. It is necessary when the premises must retain heat well. To do this, additional vertical and horizontal beams are installed between the main frame posts. Between them, as well as between the rafters, insulation is laid, which is used as mineral or stone wool, polystyrene foam. And the interior decoration of walls and ceilings can be done with boards, clapboards, wood chips or plasterboard sheets.
We recommend watching a video with a selection of ideas for decorating courtyard spaces.
Then you can paint it, or not, but it is advisable to cover it with drying oil or oil. And, in order for the barn to be completely warm and comfortable, it would be a good idea to cover the insulation with a layer of vapor barrier before the final cladding of the walls.