Purpose and functions
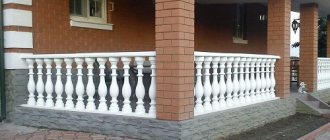
Decorative balusters are produced in the form of small columns, and are mainly intended to support railings and fences, together with which they form beautiful balustrades.
Such structures are installed on stairs, balconies, open verandas and roofs. In addition to their load-bearing function, vertical supports serve as an excellent decorative solution that will add elements of luxury to the exterior design.
Why are balusters needed?
Types of balusters.
So why do you need a baluster? Today, a similar element is used for many architectural forms; it is used to decorate balustrades, house facades, and stairs. It has become not only functional, but also decorative, allowing it to emphasize the overall style and design.
Despite its apparent simplicity, a baluster is a rather complex element, since it is not easy to correctly determine its future design. It all depends not only on the desired shape, but also on what loads are planned. Balusters for stairs should not be too thin, as they will simply break (this applies to wooden elements); their appearance should correspond to the entire structure. We must remember that a beautiful silhouette should go well with the voids and design.
Do not forget that the main purpose is to support the railing when leaning on it, that is, the material must withstand the load from the weight of a person who climbs or descends the stairs, leaning on the railing.
It is these supports that give the structure additional rigidity, strength, reliability and durability.
Advantages and disadvantages
The decorative architectural element has many advantages that make the use of concrete balusters more common among modern developers. First, let's look at the positive aspects of the support posts.
Advantages
First of all, I would like to note the excellent durability of the structures and their resistance to mechanical loads. Their cost is much lower than that of similar products made of granite or marble, so concrete balusters are available to many buyers.
The low price is achieved thanks to waste-free production, which makes it possible to reduce the cost of the process of producing finished products.
The pouring figures for stairs and fences meet all the requirements of environmental friendliness, which is important in the current safety situation for the environment, people and animals.
Many consumers are also attracted by the fact that finished products do not require additional processing and are completely ready for installation. Their glossy surface visually imitates polished natural stone.
However, if desired, a special composition can be applied to the surface of concrete balusters, which will significantly extend the service life of the product. Using gold or silver alkyd paint, structures can be given a rich, aristocratic look with antique elements.
Another undeniable advantage of concrete products is their resistance to weather conditions and temperature changes. They are also highly waterproof, so they last for many years. Manufacturers pay attention to the fact that balusters of any shape and size can be poured from the mortar mass, which means that it is possible to satisfy any customer requirements, taking into account his personal preferences.
Flaws
Concrete balusters have virtually no significant disadvantages. Of course, they cannot replace natural stone in their beauty and are slightly inferior to granite in strength. Due to its impressive weight, it is unlikely that you can install the structure yourself, but its excellent appearance and affordable cost allow decorative supports to remain highly popular.
Installation of balusters
Installation of balusters
The two most common methods are: with the help of embedded parts, and without them. They can sometimes be combined. For example, a baluster is attached to a staircase or landing using mortgages, and the handrails are attached to it without them, or vice versa. Now let's learn more about how to install concrete balusters.
Without embedded parts
The most common method is suitable if there are no mortgages on the stairs or balusters. The downside is the reduced strength of the joint due to the fact that the baluster reinforcement is not connected to the frame of the flight of stairs. The advantage is that the installation of concrete balusters does not require a welding machine.
Consists of the following steps:
- We drill holes in the stairs where the balusters are installed. If there are no protruding reinforcing bars in the balusters, then we drill into them too.
- We install the reinforcement into the holes using glue.
- Align the columns vertically using a level horizontally along the cord.
- The gaps that appear during leveling are filled with solution.
- The installation of handrails is carried out in the same way.
Using embedded parts
In this case, both on the flight of stairs and on the balusters there must be steel plates connected to the reinforcement frame - embedded parts. If on the stairs they are not concreted in all places where balusters are planned to be installed, then you can install them additionally by gluing in rods or using self-expanding bolts. The advantage of the method is the high strength of the joint, the disadvantage is that a welding machine is required and the labor intensity of the process is increased.
To install, we carry out the following operations:
- We install the balusters in place. Alignment with a plumb line and along the cord. If necessary, place metal spacers between the embedded parts.
- We weld the embedded parts together. Moreover, we do not apply the seam in a circle, but only on three sides, so that metal deformations at the welding sites do not change the position of the balusters.
- Weld seams and protruding parts of embedded parts are primed and painted.
- We also attach handrails.
- We mask the joints with a concrete screed.
That's all we could tell you about how a concrete baluster is made in a home workshop. I hope our article helped you with recommendations, tips and instructions. Let your stairs be safe, beautiful and original.
Manufacturing
There are several ways to make concrete balusters, but we propose to consider the simplest of them. All work on the production of decorative elements consists of several stages and is carried out in strict sequence.
Filling form
To cast a support column of a certain configuration, you will need a special blank. The mold for casting concrete balusters can be made from any suitable material, such as:
- clay;
- Styrofoam;
- tree;
- gypsum.
In our case, we will talk about a gypsum blank, which can be made at home. To work, you will need dry gypsum, 1/5 of lime and a small amount of citric acid.
First, a disk with a diameter slightly larger than the diameter of the baluster is created from the gypsum mixture. Next, the places for the lobar parts are marked on the disk. On the reverse side of the marks, it is necessary to make holes that serve as locks, with the help of which it is possible to assemble without displacement. Then the mold must be divided into two equal parts and the first row carefully assembled, always using a special release agent.
At the next stage, gypsum mortar is poured into the resulting void, and the segments are connected to each other. For maximum strength, the outer casing is cast using the same principle. To make it convenient to work with the workpiece and easily remove it from the mold, handles should be provided.
If you want to make concrete balusters with your own hands in a short time, you can purchase ready-made molds and speed up the production process.
Solution recipe
To create high-quality decorative elements from concrete, you will need a special solution. In appearance, the plastic mass after hardening will be similar to marble, which will have the best effect on the finished products. So, in the process we will need the following components:
- high grade cement;
- plasticizer to give concrete elasticity;
- sand of river origin without clay impurities;
- pure water;
- polyethylene;
- polyurethane matrix;
- mixer;
- coloring pigment;
- filler (crushed stone).
Mixing and casting process
When starting the main stage, you need to familiarize yourself with the proportions by which the solution for decorative columns is mixed. In a specially designated container, you need to mix 2 parts of river sand, 1 part of cement and filler (optional). Then a dye is added to this composition, the amount of which should not exceed 1% of the total mass of the solution.
In no case should you overdo it with pigment, otherwise the balusters will be painted unevenly and will look sloppy. Sometimes they resort to using several colors at the same time, but such an extravagant solution is not for everyone, so it is better to conduct experiments on a trial batch of products.
If you stick to the recipe, at this stage the mass will look like marble with small inclusions. Next, water is gradually introduced into the mixture (4/5 of the total amount of liquid) and a plasticizer is added (1% of the total volume of the mixture).
After thorough stirring, add the remaining water, mix again and pour the resulting solution into a prepared form. After a few days, after complete drying (depending on the weather and brand of cement), the products can be removed from the molds.
The main stages of making balusters
Having your own small workshop, as well as following the established rules for making support posts, you can decorate the staircase structure with your own hands. To do this, the master will need a lathe or drill, a metal rod for fastening a wooden workpiece, sharpening, flat or semicircular chisels, and paint and varnish materials.
Important! When carrying out carpentry work, safety regulations must be observed. When working with machines, it is recommended to use gloves and special devices to protect the torso, eyes and neck.
First of all, you need to decide on the material for making balusters. In this case, you need to take into account what material the staircase structure itself is made of, the fastening features, and also observe the general architectural style of the room.
The shape of the baluster is pre-developed. In accordance with the dimensions of the fence, the parameters of the columns are calculated. Next, blanks with a square cross-section of a given size are made from the edged boards using a machine with circular saws. If you have a cross-cut saw, it can be used to quickly saw blanks to length, removing wood defects and chips.
A lathe is used to form the support, body and main part of the baluster. If necessary, it can be replaced with a mechanism built with your own hands from an electric drill.
Drill lathe
A machine with a copier greatly simplifies the process of making balusters. First, prepare a template and fix it on the machine next to the workpiece. A special roller moves along the template, giving the same shape to the wooden blank. After giving the column the intended shape according to the approved sketch, they begin to perform decorative work. The carving or ornament is applied manually, treated with impregnations, painted or varnished.
Installation work
Experts recommend installing all the posts at the same time, since the solution under them must harden, and this will take some time. The installation process itself is quite simple and not only professionals can do it, but it will require physical strength to complete it. Before installing the columns, a cement mortar is prepared, onto which the finished concrete decorative balusters will be installed.
A solution is poured onto the selected location, in which the column is fixed. After drying, markings are made for the installation location. Next, using a diamond drill, holes are drilled in the concrete for pins of a slightly larger diameter than the pins themselves. All that remains is to pour the solution into the hole and secure the post in its permanent place. Installation and final fastening of decorative concrete balusters consists of leveling them and final hardening.
Making a mold for pouring
Scheme of the form for filling balusters.
A concrete baluster is made by pouring concrete mortar into a mold that completely replicates the appearance of the future baluster. This form can be made of wood, clay, gypsum, foam plastic and other material in which the desired cavity can be easily formed. The most widely used form is a plaster mold, which is made by hand in the following order.
First of all, you need one exact copy of the posts that are scheduled for installation. You can purchase it in a store in one copy or make it yourself from wood, polystyrene foam, plastic, carving it in full accordance with the baluster drawing. A body is then formed around this sample in the form of two identical plaster halves. For casting, prepare the following solution: gypsum (4 parts), slaked lime (1 part), a little citric acid. To strengthen, the gypsum blanks are covered on top with a reinforcing mesh, which is also filled with gypsum.
Metal balusters
The second most popular option is metal supports. How to make metal balusters with your own hands? First of all, of course, work out the drawing. Usually it comes down to the simplest determination of basic parameters, such as height and thickness. Usually, stainless steel pipes are taken for them and cut into the required fragments.
To make shaped fences you will need a homemade forging machine. You can make a machine for bending balusters with your own hands from a circle and a metal matrix blank. You just need to secure the rod and turn it, and the machine will do the rest.
Metal balusters for stairs - popular in private construction
Manufacturing materials
Scheme for attaching balusters to railings and steps.
Modern balusters can be made from various materials, but the most popular are wood, metal, concrete, stone, glass, and plaster.
Wood is considered the best material for the manufacture of such a staircase element. It is easy to process and can be given any desired shape. The shape of a wooden baluster can be made of the following type:
- flat (smooth and carved);
- square volumetric;
- in the form of a twisting spiral (hollow and not);
- voluminous with thickening at the base;
- in country style, that is, made in the form of tree branches.
Often such an element is carved in the form of heroes of fairy tales and legends or complex patterns and ornaments, representing a type of flat shape. Such stairs can become a real work of art.
The wooden baluster is quite complex in shape; it is a structure consisting of the following components:
- support base;
- the central (main) part, which is usually the most decorated;
- directly support for the handrail.
The base is attached to the step using a special rail called a baluster. The upper part of the support is fixed to the handrail (railing) of the stairs.
Installation of balusters
Once the supports are ready, you can begin installing them. It is best to observe a step of 150 mm during installation, which is optimal for maintaining the safety and rigidity of the structure. The installation process is as follows:
- Markings are applied to the surface of the stairs for the installation locations of future supports;
- then the balusters are attached, which serve as a place for fastening;
- on the steps, the supports are secured using round rods with a diameter of one-fourth of the baluster itself. Their length should be two diameters;
- For such fasteners, you need to drill holes in the lower part and also cut them into the surface of the step itself. After this, the dowels sit on the glue. A similar operation is carried out with fastening the railings. The handrails are installed last, when all the supports are already installed.
One of the elements that gives the staircase strength and decorativeness are balusters. Today they are made from a wide variety of materials, although wood remains affordable and easy for home production. It is easy to process; the production of balusters requires simple tools and skills in working with wood.
